
About PyHIST | Setup | Quickstart | Documentation | References | Citation
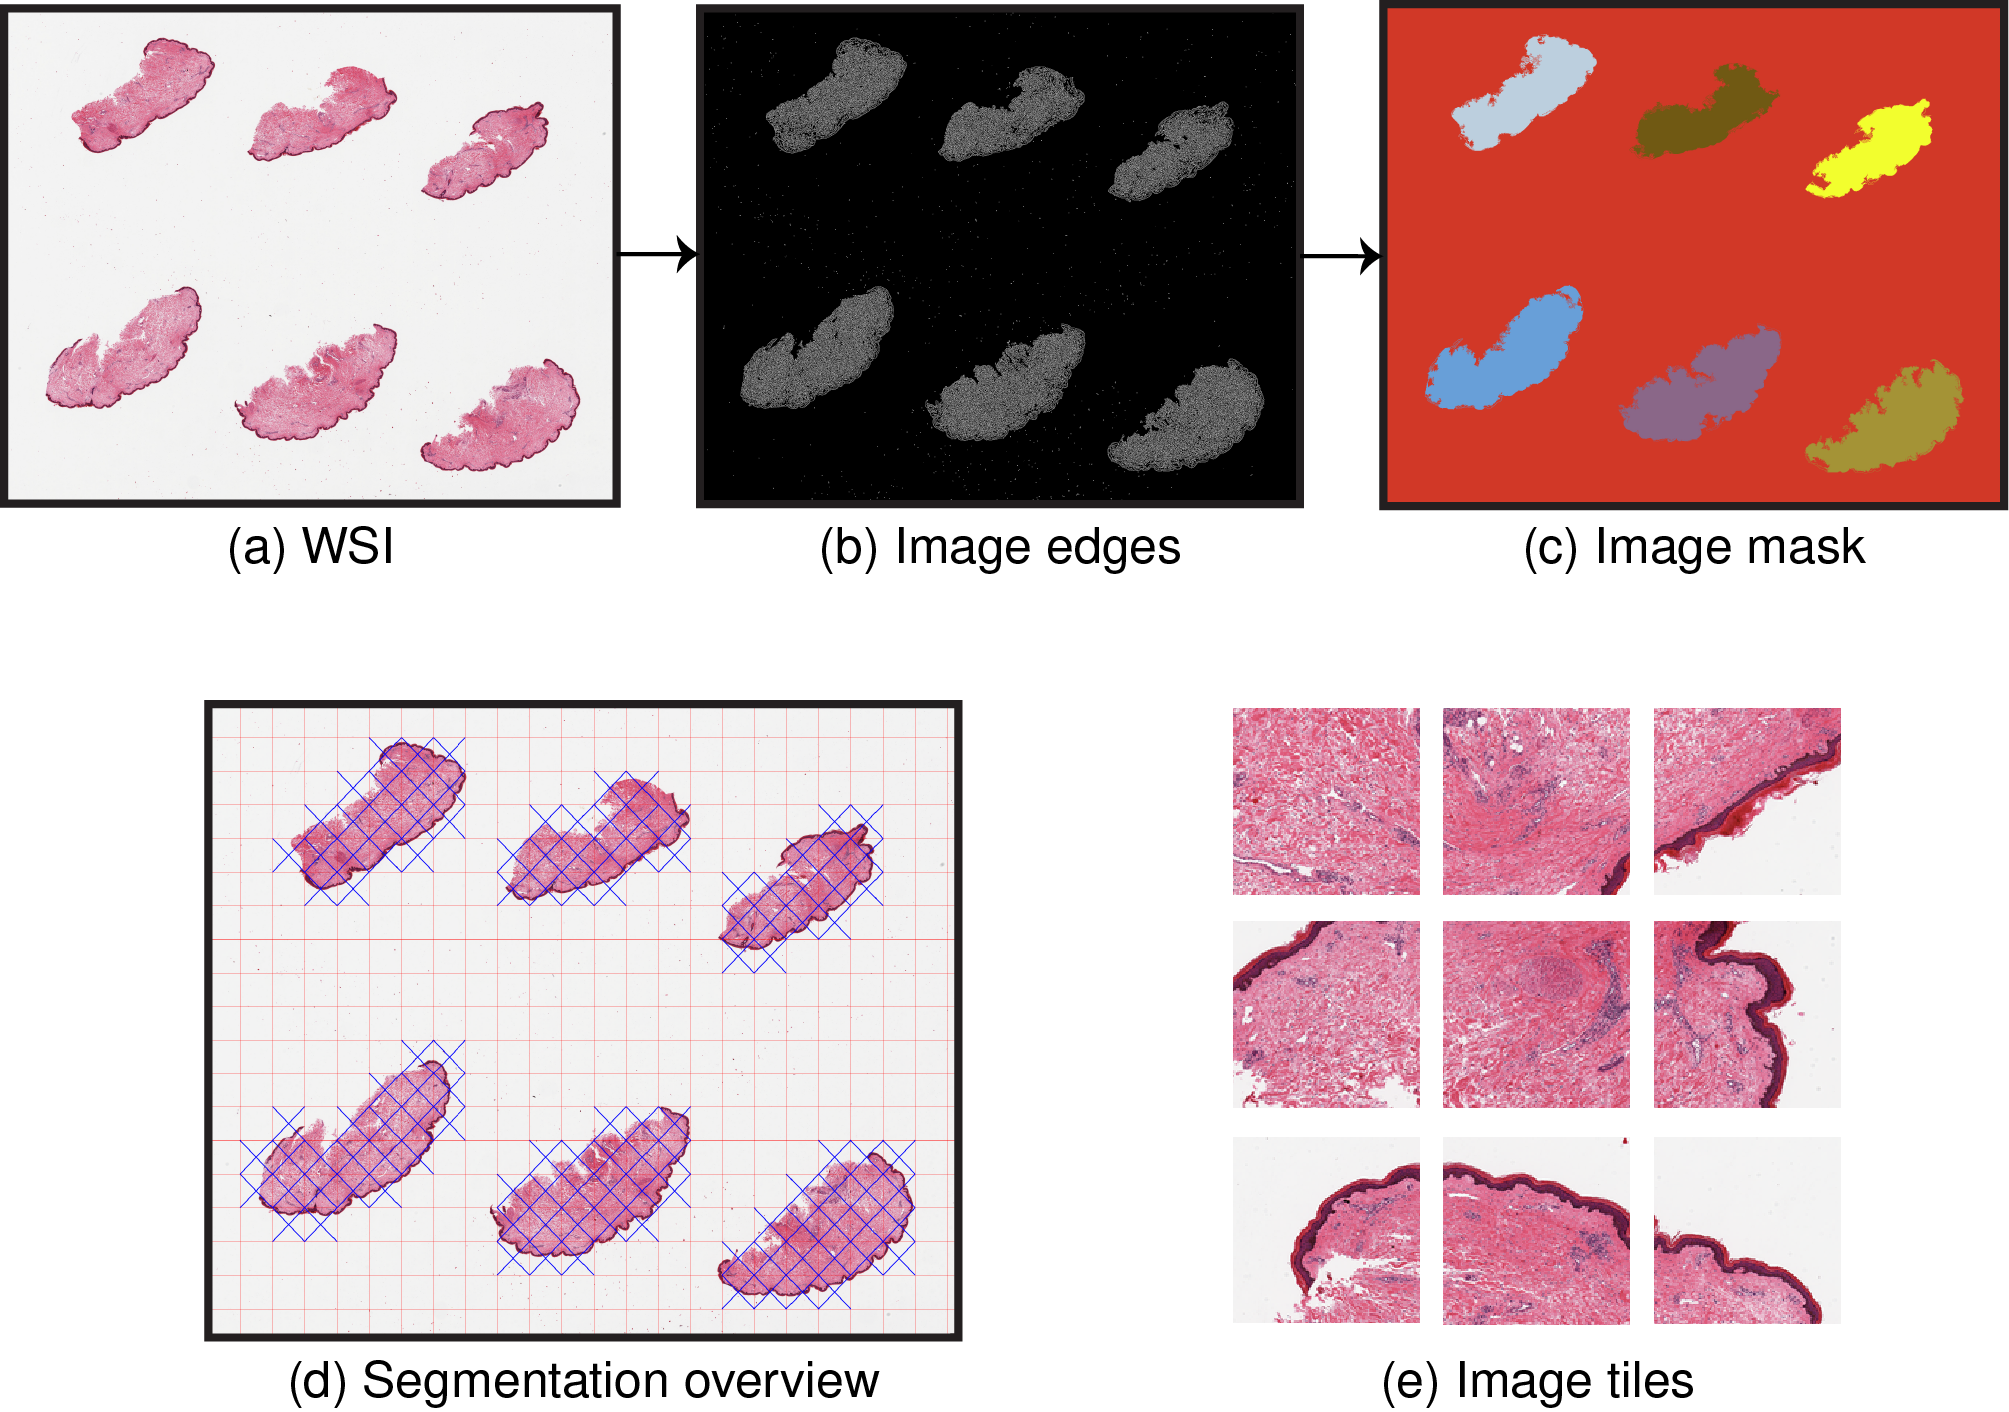
PyHIST is a Histological Image Segmentation Tool: a lightweight semi-automatic pipeline to extract tiles with foreground content from SVS histopathology whole image slides (with experimental support for other formats). It is intended to be an easy-to-use tool to preprocess histological image data for usage in machine learning tasks. The PyHIST pipeline involves three main steps: 1) produce a mask for the input WSI that differentiates the tissue from the background, 2) create a grid of tiles on top of the mask, evaluate each tile to see if it meets the minimum content threshold to be considered as foreground and 3) extract the selected tiles from the input WSI at the requested resolution.
Installation of PyHIST can be performed in three different ways:
- Through a Docker image (Linux/macOS/Windows)
- Conda environment (Linux/macOS)
- Standalone (Linux/macOS)
The Docker image described in this section contains all the necessary dependencies to run PyHIST. The public Docker image for PyHIST can be downloaded from the Docker Hub:
docker pull mmunozag/pyhistAfter downloading it, you can skip directly to Quickstart: Using the Docker image. Alternatively, you can build the Docker image on your own by using the Dockerfile in this repository. Clone the respository and move into the folder:
git clone https://github.com/manuel-munoz-aguirre/PyHIST.git
cd PyHIST
Build the docker image with the following command:
docker build -f docker/Dockerfile -t mmunozag/pyhist .Clone the respository and move into the folder:
git clone https://github.com/manuel-munoz-aguirre/PyHIST.git
cd PyHIST
A conda environment with all the necessary Python dependencies can be created with:
conda env create -f conda/environment.yml
Then, PyHIST can be simply used as a python script (see quickstart).
Although we recommend isolating all the dependencies in a conda environment as above, PyHIST can be simply used as a python script (see quickstart) as long as the following dependencies are met:
- Python (>3.6):
- openslide-python, opencv-python, pandas, numpy, Pillow
- Other:
- openslide-tools, pixman==0.36.0
PyHIST can be directly executed using Docker.
docker run mmunozag/pyhist --helpTo mount a local folder /path_with/images/ mapping to the folder /pyhist/images/ inside the container, use the -v flag specifying the absolute path of the local folder.
docker run -v /path_with/images/:/pyhist/images/ mmunozag/pyhist [args]Optionally, if you want to ensure that all the generated output files are written with permissions belonging to the current host user (instead of root, which is Docker's default), specify the username and group with the -u flag (retrieval of both can be automated with id ), as well mapping the passwd file with a second -v flag:
docker run -v /path_with/images/:/pyhist/images/ \
	-u $(id -u):$(id -g) \
	-v /etc/passwd:/etc/passwd \
	mmunozag/pyhist [args]
A working example to process an image called test.svs located inside /path_with/images/:
docker run -v /path_with/images/:/pyhist/images/ \
	-u $(id -u):$(id -g) \
	-v /etc/passwd:/etc/passwd \
mmunozag/pyhist --save-tilecrossed-image --output images/ images/test.svsPyHIST can be directly executed as a script. To see all available options:
python pyhist.py --help
A working example to process an image called test.svs located inside /path_with/images/:
python pyhist.py \
	--content-threshold 0.05 \
	--patch-size 64 \
	--output-downsample 16 \
	--info "verbose" \
	--save-tilecrossed-image\
	/path_with/images/test.svs
PyHIST's documentation explains in detail the installation steps and all available arguments and processing modes, as well as tutorial with examples to perform histological image segmentation, random tile sampling, and explanations of the steps of the segmentation pipeline. An example use case with a sample of The Cancer Genome Atlas WSIs is also available to demonstrate how to use PyHIST to prepare data for a machine learning application.
PyHIST is published in a PLOS Computational Biology software article (doi: 10.1371/journal.pcbi.1008349). If you find PyHIST useful, consider citing as:
Muñoz-Aguirre, M., Ntasis, V. F., Rojas, S. & Guigó, R. PyHIST: A Histological Image Segmentation Tool. PLoS Computational Biology 16, e1008349 (2020).

@article{MunozAguirre2020,
  doi = {10.1371/journal.pcbi.1008349},
  url = {https://doi.org/10.1371/journal.pcbi.1008349},
  year = {2020},
  month = oct,
  publisher = {Public Library of Science ({PLoS})},
  volume = {16},
  number = {10},
  pages = {e1008349},
  author = {Manuel Mu{\~{n}}oz-Aguirre and Vasilis F. Ntasis and Santiago Rojas and Roderic Guig{\'{o}}},
  title = {{PyHIST}: A Histological Image Segmentation Tool},
  journal = {{PLOS} Computational Biology}
}