


Some time ago, I heard about GitHub using a traffic light to display their continuous integration system (read more here) and I thought it would be a great idea for uptime monitoring or service status. My company uses PagerDuty as an aggregate for all our monitoring services (like NewRelic, Wembon, etc). Thankfully, PagerDuty has a super simple API that made the software part of this project trivial. I wanted to try to make sure my efforts could benefit someone else, so I posted my work on here under the MIT License.
This repository is where the code lives along with this small guide. For a detailed writeup of the journey I took, check out my blog.
- Raspberry Pi Model B
- 5V Micro USB Power Supply
- USB WiFi Adapter (Optional)
- Traffic Light
- 4GB+ SD Card
- Relay Board (The one I used)
- For setup you'll need an HDMI Cable (or RCA Cable) and a USB Keyboard
- For PagerDuty support, you'll need an account and a read-only API key
Download the Arch Linux disk image for the Raspberry Pi and extract the contents.
$ wget http://downloads.raspberrypi.org/arch_latest --output-document alarmpi.zip
$ unzip alarmpi.zip
Using dd, copy the image onto your SD card. Replace /dev/sdX with your SD card's device. Warning: Be careful that of= points to your SD card device. If you chose the wrong option, it may overwrite your hard disk, causing severe data loss.
$ dd bs=1M if=archlinux-hf-2013-07-22.img of=/dev/sdXNow you should be able to insert the SD card and connect your Raspberry Pi to power. By default, the root password is root. If you ran into problems, refer to one of the many guides online and be sure to check out the official guide.
If you want to set up WiFi, grab yourself a USB Wifi dongle and enter the WiFi menu.
$ wifi-menu -oIn order to get the Wifi connection to activate automatically on boot, you'll need to use something like the following:
$ pacman -Syu wpa_actiond
$ ls /etc/netctl/
$ netctl enable PROFILE_IN_ETC_NETCTL
Since the image file may be out of date, you may as well run some updates.
$ pacman -SyyuYou may want to change the root password. I chose not to add another user since you need root access to change the GPIO state.
$ passwd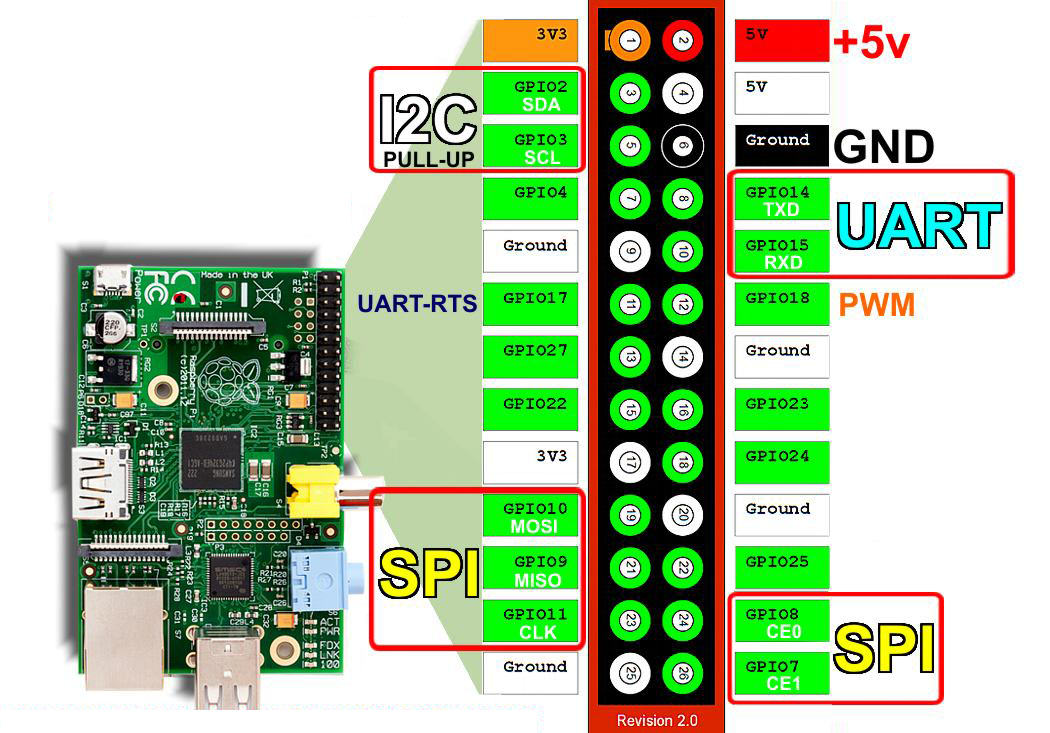
- +5V (pin 2) from the Raspberry Pi goes to the VCC of the relay board.
- Ground (pin 6) from the Raspberry Pi goes to the Ground of the relay board.
- GPIO 14 (pin 8) from the Raspberry Pi goes to the IN1 of the relay board.
- GPIO 15 (pin 10) from the Raspberry Pi goes to the IN2 of the relay board.
- GPIO 18 (pin 12) from the Raspberry Pi goes to the IN3 of the relay board.
The scripts I wrote use a Python library called RPi.GPIO. You can use pip or the Arch AUR. Below are the instructions to install it using the AUR.
$ pacman -Syu file base-devel abs git
$ wget https://aur.archlinux.org/packages/py/python-raspberry-gpio/python-raspberry-gpio.tar.gz
$ tar xzvf python-raspberry-gpio.tar.gz
$ cd python-raspberry-gpio/
$ makepkg -scif --asroot
$ pacman -U python-raspberry-gpio*.tar.xz
Next, you'll need to clone this repository onto your Raspberry Pi and copy the control script into /usr/bin.
$ git clone https://github.com/mide/traffic-light-controller.git
$ chmod +x traffic-light-controller/light-control.py
$ cp traffic-light-controller/light-control.py /usr/bin/light-control
You can now test the light controller by running the following commands.
$ light-control red on
$ light-control green on -v
$ light-control red off -v
$ light-control yellow on
$ # You can keep going, but that verifies the light-control script works.Now it's time to set up the status watcher module. This logic is application specific, so this is the part you'll need to change to match your setup. I've documented what I did to get you on the right direction.
The default file that comes with this project can link to a PagerDuty account. If you don't use PagerDuty, you'll need to rewrite this file. Also, I chose to write the PagerDuty logic in Ruby, but you can do whatever you want; just be sure to make the appropriate adjustments in the following steps.
$ pacman -Syu ruby
$ # If you already ran "git clone", you can skip the next line
$ git clone https://github.com/mide/traffic-light-controller.git
$ chmod +x traffic-light-controller/status-watcher.rb
$ cp traffic-light-controller/status-watcher.rb /usr/bin/status-watcherIf you have a PagerDuty account and you're going to run the provided code, you'll need to do a little bit of configuration. If you're not on PagerDuty (or are opting not to use the provided code), you can skip this section.
If you haven't done so already, generate a new read-only API Key for your traffic light (you can see your API Keys by clicking "API Access" in the PagerDuty menu).
Edit the following lines to reflect your account.
@pagerduty_url       = 'https://yourname.pagerduty.com'
@pagerduty_api_token = '123ABC'In order to make the state change automatically, you'll want to edit your crontab. You can do so by running crontab -e. The following will run status-watcher once a minute.
* * * * * status-watcher
You may need to install and enable cron, depending on your setup.
$ pacman -Syu cronie
$ systemctl enable cronie
$ systemctl start cronieThis project is licensed under the MIT License, so feel free to use it for your company or home network. The only thing that will need to be changed is the status-watcher.rb, since that has the display calculation logic.
Made with ❤️ by Mark Ide. Made public with the the MIT License.