
"We conclude that, in the program we studied, prospective teachers have fewer opportunities to engage in approximations that focus on contingent, interactive practice than do novices in the other two professions we studied." Grossman et al. (2009)
For more information come chat with @mit_tsl or visit the MIT Teaching Systems Lab.
Draft quality design notes.
This is a React webapp, and a small Express server. Code in both environments is written in ES6.
To develop locally:
$ yarn install
$ yarn start
This will both run the server and a process that will continually build the UI, writing the output of both to stdout in parallel.
The server app was developed for the engine specified in the root package.json.
If you already have node installed, you can check the version with node -v. If you need to install node from scratch, follow the instructions for the current version on the node.js website.
Seed the database to store text responses:
$ yarn db-create-dev
- For storing audio files, you'll need keys authorized for a development S3 bucket.
- For transcribing audio files, you'll need keys authorized for accessing the Watson Speech to Text API. Details on how to use the API can be found on their website.
Ask someone for these keys.
To view data, go to localhost:3000/login in your web browser. You can use the default test@mit.edu email to login. A link should appear in your terminal for verification.
Note: This only gives you access to the Researcher Portal. The test@mit.edu default user does not have access to any data. You can fix this by adding entries to the whitelist and access databases and using the corresponding urls when generating local development data.
Now you can play around with the app locally!
The project is built with Browserify and uses Babel via bablify to transpile ES6 and JSX. It also uses livereactload for hot reloading of React components in local development.
For static analysis, we're experimenting with eslint and Flow. The configuration for eslint uses eslint-plugin-react and babel-eslint. None of these tools trigger build failures right now, but can be run locally.
You may also want to check out react-devtools, which is a Chrome plugin that is especially helpful for navigating apps and discovering which parts of the product correspond to which React components.
This starts a Flow server in the background, and then runs a typecheck once. There's no watch command right now.
client $ yarn run flow-quiet
client $ yarn run lint
client $ yarn run jest
This is used in CI, and runs any and all tests in the project including linting, typechecks and actual tests.
client $ yarn run test
If you're developing in Sublime, here's a recommended setup for niceties like code highlighting and inline lint errors:
- Package Control for installing Sublime packages
- babel-sublime for syntax highlighting
- SublimeLinter-eslint for inline linting (not jshint)
Make sure you have Node.js and the Heroku Toolbelt installed. To run remote Postgres commands you'll also need to install Postgres locally.
Create the database:
$ heroku addons:create heroku-postgresql:hobby-dev
Backups can be scheduled like so:
$ heroku pg:backups schedule DATABASE_URL --at '01:00 America/New_York'
Scheduled automatic daily backups at 01:00 America/New_York for DATABASE

$ heroku pg:backups schedules
=== Backup Schedules
DATABASE_URL: daily at 1:00 (America/New_York)
$ heroku create
$ git push heroku master
$ heroku open
or

Other Heroku docs:
- Getting Started with Node.js on Heroku
- Heroku Node.js Support
- Node.js on Heroku
- Best Practices for Node.js Development
Researchers and teacher educators (TEs) looking to use data collected in Teacher Moments must be registered with the Teaching Systems Lab. To give researchers and TEs access to the researcher portal, their email addresses must be manually added to the whitelist database.
Once a researcher or TE has been given access to the portal, they need to be given access to a specific instance of Teacher Moments.
For example, if they are using the Jessica Turner scenario for their thesis project, they might collect data using the following url: https://teachermoments.teachingsystemslab.org/teachermoments/turner?KevinThesis20180319. Teacher candidates would engage with the Teacher Moments simulation at that url and we would use that link to extract the data collected. To view the data, we would need to add an entry into the access database linking the TE's email to the url.
All data collected by Teacher Moments is protected to ensure the privacy of participants. In order for a researcher or TE to view the data collected on a specific participant, the participant must fill out a TSL consent form.
To update Teacher Moments on who has consented to share their data, you need to:
-
Download a CSV version of the consent spreadsheet. Search for
User Testing Consent Form (Responses)in the TSL team Google Drive. Rename the file toconsented-latest-raw.csvand save this file in thethreeflows/tmpfolder. -
Run the prep-consent script to process the CSV file using
$ yarn run prep-consent
This should generate 1 file in the threeflows/tmp folder: consented-latest.json.
- Run the update-consent script in heroku to update the live
consented_emaildatabase and clean sensitive information from your codebase using
$ cat ./tmp/consented-latest.json | heroku run --no-tty yarn run update-consent | rm ./tmp/consented-latest.json ./tmp/consented-latest-raw.csv
Travis is setup for CI. It will run on pull requests and on commits to master.
On merging to master, Travis will trigger a build. If that build passes, Heroku will deploy the app on its own.
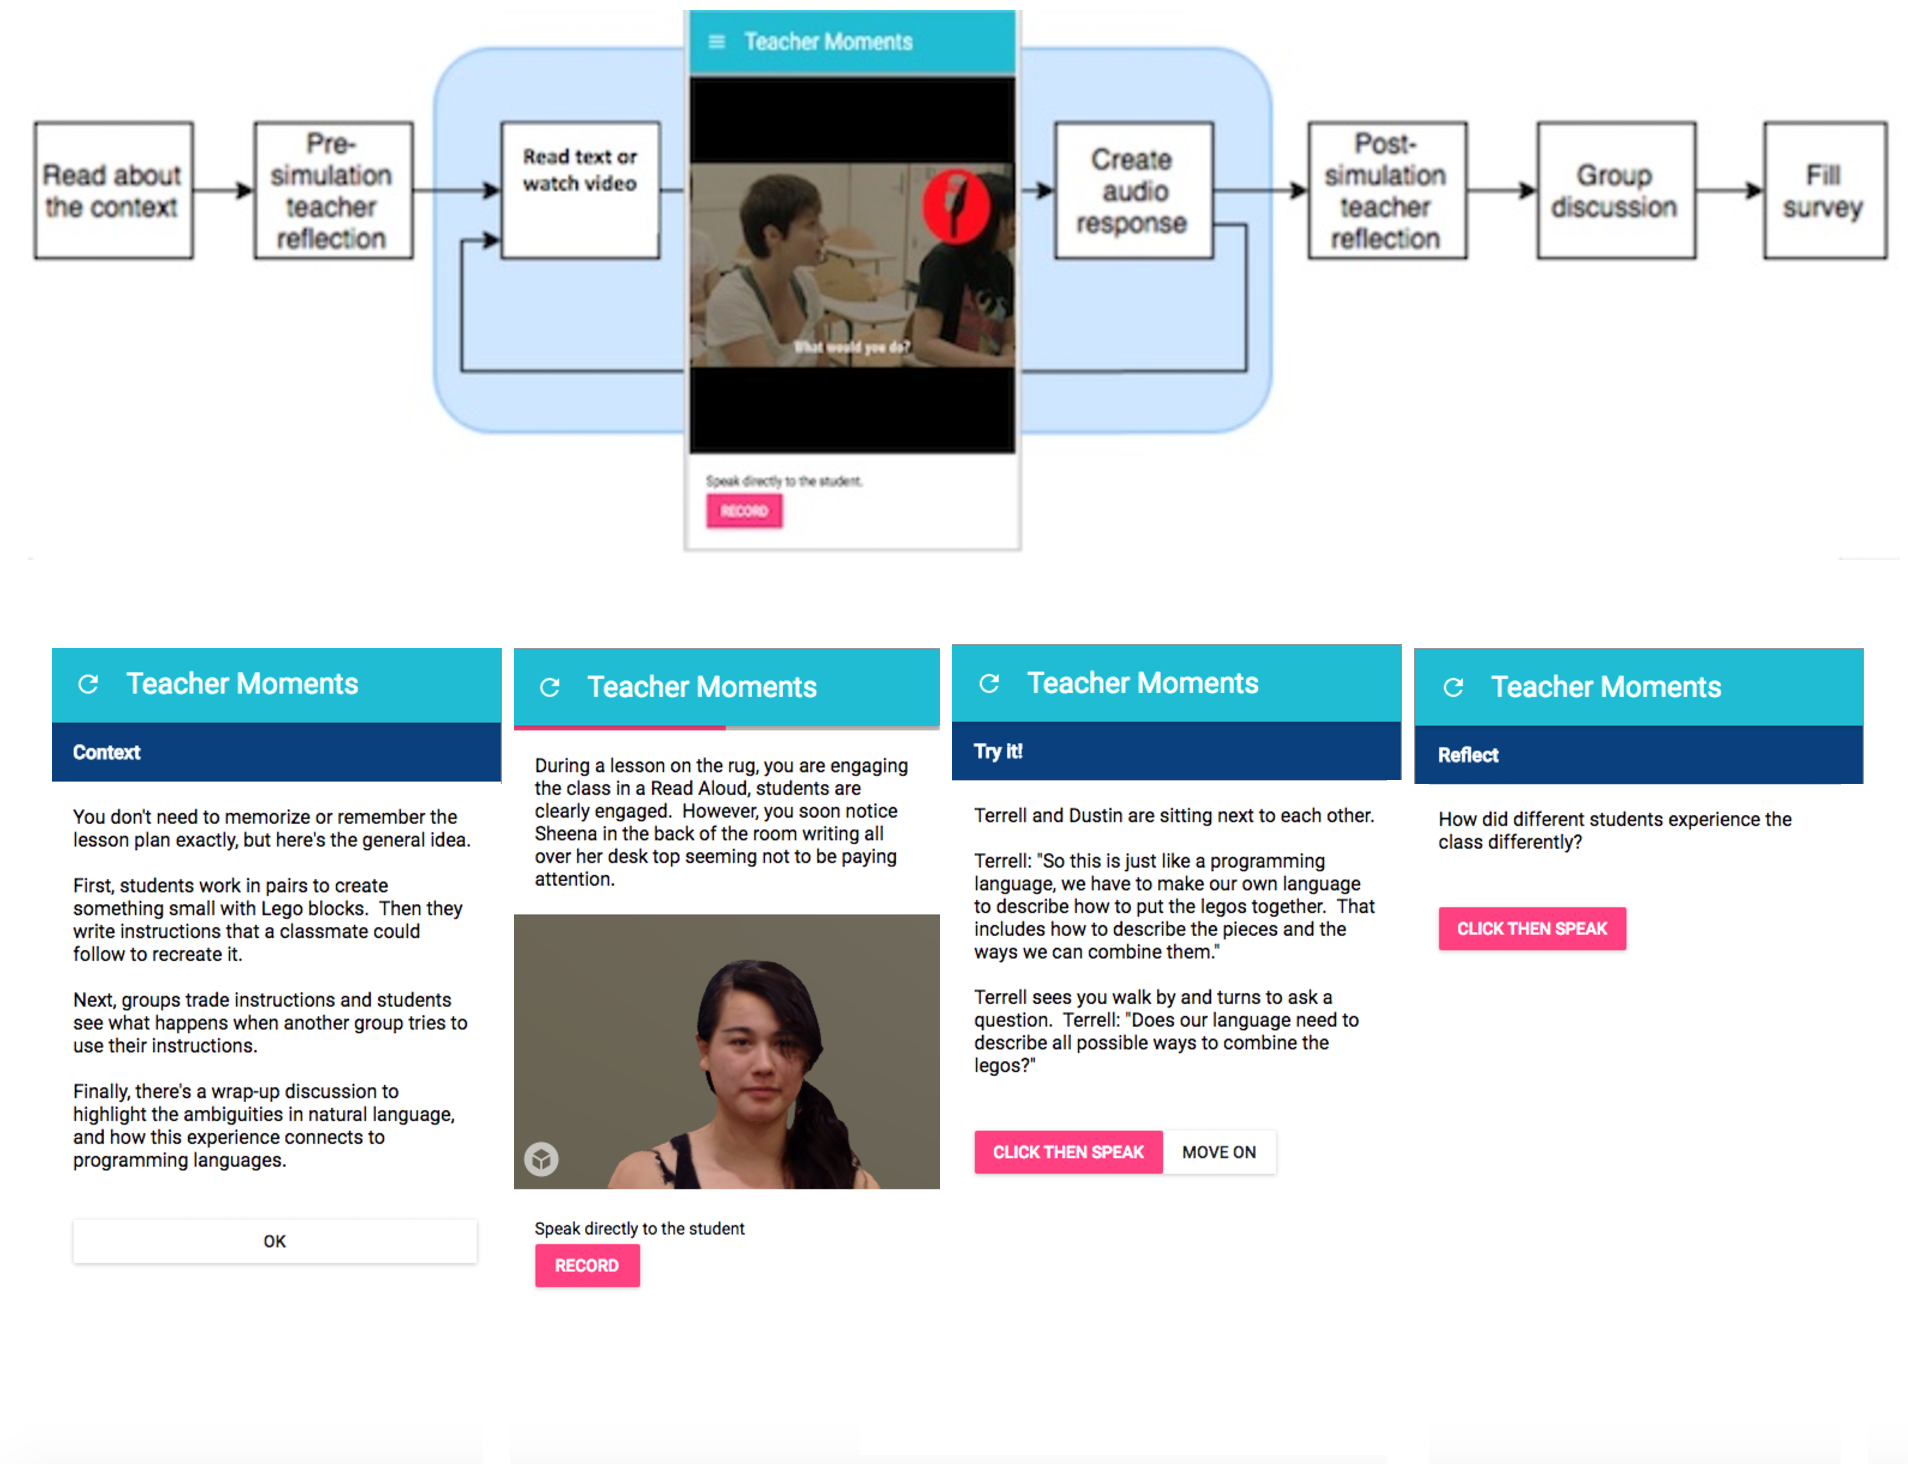
In order to create a new simulation or scenarios, you need to follow these steps:
-
Create Experience Page: Create an experience page (in
ui/src/message_popup/playtestfolder) to implement and connect the key components of your simulation such as the welcome page, the scenarios, and the summary page. In this experience page, you can use linear_session.jsx to step through all the questions, responses, and reviews that make up your scenarios. You can look at some of the other experience pages to get a better understanding of how this works. For example, danson_experience_page.jsx is for the Lori Danson simulation which consists of a background context, reflection questions, text scenarios and audio responses. turner_experience_page.jsx is for the Jennifer Turner simulation, which has a similar structure as the Lori Danson simulation except that it consists of video scenarios and the audio recording begins immediately the scenario ends instead of requiring the user to click a button. There are other simulations that include a review after each response, multiple choice responses, and likert-scale responses. -
Create Scenarios: For many of the current simulations, the actual scenarios are contained in a separate file in the same folder as the experience page. The name of these files typically end in
_scenarios.js. For example, the scenarios forturner_experience_page.jsxare contained inturner_scenarios.js. The scenarios get imported in the experience page. -
Configure URL: The URL for the simulations are configured in
ui/src/message_popup/index.js. This is where you configure a URL that points to your experience page. Note that it requires you to configure a URL at the top of the file and then export your experience page at the bottom of the file. -
Implement Logger and Data store: If you follow a similar format to what we currently have in other experience pages and reuse existing components, your data will be stored in our current data stores i.e., postgres database for text and log messages, and Amazon S3 for audio recordings.