PyTorch implementation of PROGRESSIVE GROWING OF GANS FOR IMPROVED QUALITY, STABILITY, AND VARIATION
YOUR CONTRIBUTION IS INVALUABLE FOR THIS PROJECT :)

- original: trans(G)-->trans(D)-->stab / my code: trans(G)-->stab-->transition(D)-->stab
- no use of NIN layer. The unnecessary layers (like low-resolution blocks) are automatically flushed out and grow.
- used torch.utils.weight_norm for to_rgb_layer of generator.
- No need to implement the the Celeb A data, Just come with your own dataset :)
[step 1.] Prepare dataset
The author of progressive GAN released CelebA-HQ dataset, and which Nash is working on over on the branch that i forked this from. For my version just make sure that all images are the children of that folder that you declare in Config.py. Also i warn you that if you use multiple classes, they should be similar as to not end up with attrocities.
---------------------------------------------
The training data folder should look like :
<train_data_root>
                |--Your Folder
                        |--image 1
                        |--image 2
                        |--image 3 ...
---------------------------------------------
[step 2.] Prepare environment using virtualenv
- you can easily set PyTorch (v0.3) and TensorFlow environment using virtualenv.
- CAUTION: if you have trouble installing PyTorch, install it mansually using pip. [PyTorch Install]
- For install please take your time and install all dependencies of PyTorch and also install tensorflow
$ virtualenv --python=python2.7 venv
$ . venv/bin/activate
$ pip install -r requirements.txt
$ conda install pytorch torchvision -c pytorch
[step 3.] Run training
- edit
config.pyto change parameters. (don't forget to change path to training images) - specify which gpu devices to be used, and change "n_gpu" option in
config.pyto support Multi-GPU training. - run and enjoy!
  (example)
  If using Single-GPU (device_id = 0):
  $ vim config.py   -->   change "n_gpu=1"
  $ CUDA_VISIBLE_DEVICES=0 python trainer.py

  If using Multi-GPUs (device id = 1,3,7):
  $ vim config.py   -->   change "n_gpu=3"
  $ CUDA_VISIBLE_DEVICES=1,3,7 python trainer.py
[step 4.] Display on tensorboard (At the moment skip this part)
- you can check the results on tensorboard.


$ tensorboard --logdir repo/tensorboard --port 8888
$ <host_ip>:8888 at your browser.
[step 5.] Generate fake images using linear interpolation
CUDA_VISIBLE_DEVICES=0 python generate_interpolated.py
The result of higher resolution(larger than 256x256) will be updated soon.
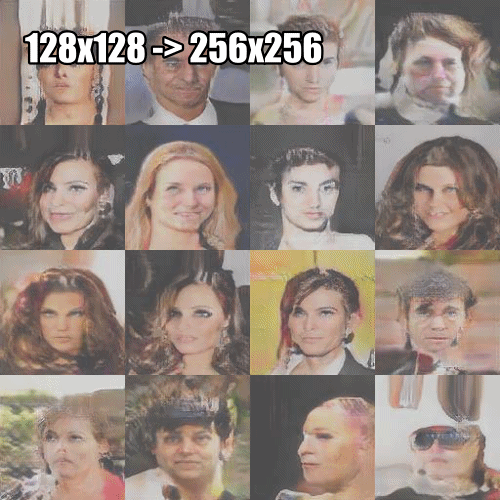
Generated Images


Loss Curve

- Support WGAN-GP loss
- training resuming functionality.
- loading CelebA-HQ dataset (for 512x512 and 1024x0124 training)
- cuda v8.0 (if you dont have it dont worry)
- Tesla P40 (you may need more than 12GB Memory. If not, please adjust the batch_table in
dataloader.py)
MinchulShin, @nashory
DeMarcus Edwards, @Djmcflush
MakeDirtyCode, @MakeDirtyCode
Yuan Zhao, @yuanzhaoYZ
zhanpengpan, @szupzp