M5Stack Nightscout monitor
Copyright (C) 2018-2020 Martin Lukasek martin@lukasek.cz
This program is free software: you can redistribute it and/or modify it under the terms of the GNU General Public License as published by the Free Software Foundation, either version 3 of the License, or (at your option) any later version.
This program is distributed in the hope that it will be useful, but WITHOUT ANY WARRANTY; without even the implied warranty of MERCHANTABILITY or FITNESS FOR A PARTICULAR PURPOSE. See the GNU General Public License for more details.
You should have received a copy of the GNU General Public License along with this program. If not, see https://www.gnu.org/licenses/.
This software uses some 3rd party libraries:
IniFile by Steve Marple (GNU LGPL v2.1)
ArduinoJson by Benoit BLANCHON (MIT License)
IoT Icon Set by Artur Funk (GPL v3)
DHT12 by Bobadas (Public domain)
Additions to the code:
Peter Leimbach (Nightscout token)
Patrick Sonnerat (Dexcom Sugarmate connection)
Sulka Haro (Nightscout API queries help)
Dominik Dzienia (Refactoring, migration to Platform.IO)
What is this good for?
Latest software revisions (CHANGELOG) WHAT IS NEW
Syntax of M5NS.INI configuration file
Display
Buttons
Battery
Installation and support
Donations - support the project 👍
M5Stack is small development kit based on ESP32. It is in a nice plastic box, equipped with color display, micro SD card slot, 3 buttons, speaker and internal battery. It is great to monitor and display something, so I used it to monitor my daughter's glycemia. It is nice, comfortable and cheap solution.
We use Abbott Freestyle Libre, together with MiaoMiao transmitter. It transmits the glycemia values to her mobile phone (we used to use Spike on iPhone, but you can also use Tomato on iPhone or xDrip, Glimp and more on Android). The daughter’s mobile phone then sends data to the Nightscout, where we (parents) watch it using the web application or a mobile phone (Spike, Nightscout, …). We use the small M5Stack monitor with my software to monitor the glycemia during nights in our sleeping room, my wife has one in the kitchen and we take one always on our trips. It has different backlight intensity for night usage and alarms for hypo/hyper glycemia situations.
In short it displays information from Nightscout site and provides visual and sound alarms if needed.
Some people were asking for the software. I am not a professional programmer, I am a hardware engineer, but I work more with tables, numbers and e-mails recent years, so I was a little bit shy about the code. As there is quite a lot of people interested in something that shows current values and makes alarms during nights, I decided to release the code as an Open Source.
If you know what to do with it, just download the code, modify it any way it suits you and use it in M5Stack. If you do not know how to handle the source code, just find someone who can. It is easy, just open it in Arduino IDE, download M5Stack libraries, Arduino JSON library and build it to your M5Stack. M5Stack is in more versions, the Core is just enough. The code does not use any features of the higher models. The official M5Stack store is here https://m5stack.com/products/basic-core-iot-development-kit. The current price is about 27.95 USD (9 February 2020). You can also buy it on Aliexpress https://www.aliexpress.com/item/M5Stack-Official-Stock-Offer-ESP32-Basic-Core-Development-Kit-Extensible-Micro-Control-Wifi-BLE-IoT-Prototype/32837164440.html or elsewhere.
You will need a microSD card. It has to be formatted to FAT32 format and you have to put at least M5NS.INI file with configuration to the root of the microSD card. It is a good idea to put M5_NightscoutMon.jpg files to the SD card root too. You can replace M5_NightscoutMon.jpg with any 320x240 pixels picture if you want to customize your experience.
You have to update M5NS.INI file to your requirements. As a minimum requirement you will need to update your Nightscout URL and your WiFi SSID and password.
[config]

nightscout = yoursite.herokuapp.com ; use your Nightscout site URL
token = security token              ; token for access secured Nightscout site,
                                    ; if public Nightscout site is used, delete token line and do not use it
bootpic = /M5_NightscoutMon.jpg     ; boot picture
name = YourName                     ; display name
device_name = M5NS                  ; device name for mDNS, that can be used to  access the device from local
                                    ; intranet, use .local domain, eg. m5ns.local
disable_web_server = 0              ; To disable internal Web server enter 'disable_web_server = 1'
time_zone = 3600                    ; the time zone where you live in seconds (3600 is GMT+1, Prague)
dst = 3600                          ; your daylight saving time offset (3600s is +1 hour)
show_mgdl = 0                       ; use 0 to display values in mmol/L or 1 for mg/dl
sgv_only = 0                        ; set to 1 if you use xDrip, Spike or similar to filter out calibrations
                                    ; etc., do not use with Tomato (set 0)
default_page = 0                    ; page number displayed after startup
show_current_time = 1               ; show current time instead of last valid data time
restart_at_time = HH:MM             ; time in HH:MM format when the device will restart
restart_at_logged_errors = 0        ; restart device after particular number of errors in the log
                                    ; (0 = do not restart)
show_COB_IOB = 1                    ; show COB and IOB, values are grayed out if COB/IOB value is 0
snooze_timeout = 30                 ; sound snooze time in minutes after press of the middle button
alarm_repeat = 5                    ; sound repeat interval in minutes (alarm repeats only if alarm/warning
                                    ; conditions are met)
info_line = 1                       ; 0 = sensor info, 1 = button function icons,
                                    ; 2 = loop info (Loop) + basal, 3 = OpenAPS loop info + basal
temperature_unit = 1                ; 1 = CELSIUS, 2 = KELVIN, 3 = FAHRENHEIT. Can be omitted (default Celsius).
display_rotation = 1                ; 1 = buttons down (default, can be omitted), 3 = buttons up,
                                    ; 5 = mirror buttons up, 7 = mirror buttons down
date_format = 0                     ; 0 = dd.mm. (default, can be omitted), 1 = MM/DD
time_format = 0                     ; 0 = 24 Hours (default, can be omitted), 1 = 12-hour AM/PM
brightness1 = 50                    ; the first (default) brightness value
brightness2 = 100                   ; the second brightness value
brightness3 = 10                    ; the third brightness value

;;;;;;;;;; following values are in mmol/L or mg/dL depending on the previous setting of "show_mgdl" key value_

yellow_low = 4.5           ; glycemia values under this value will be displayed in yellow color
yellow_high = 9            ; glycemia values over this value will be displayed in yellow color
red_low = 3.9              ; glycemia values under this value will be displayed in red color
red_high = 11              ; glycemia values over this value will be displayed in red color
snd_warning = 3.7          ; softer high beep sound will beep every 5 mins when under this value
snd_alarm = 3.0            ; strong alarm will sound every 5 min when under this value
snd_warning_high = 14.0    ; softer high beep sound will beep every 5 mins when over this value
snd_alarm_high = 20.0      ; strong alarm will sound every 5 min when over this value
snd_no_readings = 20       ; softer high beep sound will beep every 5 mins when time in minutes when last data was read
                           ; is over this value
snd_loop_error = 1         ; 0 = no loop error alarm, 1 = stronger sound alarm to loop error
snd_warning_at_startup = 1 ; play test warning sound with its volume during startup (1 = play, 0 =  do not play)
snd_alarm_at_startup = 0   ; play test alarm sound with its volume during startup (1 = play, 0 =  do not play)
warning_volume = 20        ; volume of warning sound in range 0-100 (0=no sound, 1=silent, 100=max volume)
alarm_volume = 100         ; volume of alarm sound in range 0-100 (0=no sound, 1=silent, 100=max volume)

;;;;;;;;;; there are supported some external devices, take care and know what you are doing when you connect it

LED_strip_mode = 0         ; external RGB LED strip or internal M5Stack Fire RGB LED support
                           ; 0 = off, 1 = visualize sound, 2 = show warnings and alarms, 3 = light always
LED_strip_pin = 15         ; pin that controls LEDs, 15 = M5Stack Fire internal pin
                           ; 21 = red PORT A connector (not recommended, collides with I2C, first LEDs will blink occassionaly
                           ; 26 = black PORT B connector, 17 = blue PORT C connector
LED_strip_count = 10       ; 10 = number of M5Stack Fire internal LEDs,
                           ; 15 = 10 cm strip, 29 = 20 cm strip, 72 = 50 cm strip, 144 = 100 cm strip, 288 = 200 cm strip
LED_strip_brightness = 10  ; 1-100% brightness intesity (100 = max.)
                           ; for more than 10 LEDs use 10%, 5% or even less otherwise loaded current will reset the M5Stack

vibration_mode = 0         ; VIBRATION MOTOR UNIT ; 0 = off, 1 = ON (vibrate during sound)
vibration_pin = 26         ; pin that controls VIBRATION UNIT motor, 26 = M5Stack Fire PORT B connector, 17 = blue PORT C connector
                           ; do not connect vibration motor to red PORT A, it will rotate always as it will be in collision with I2C
vibration_strength = 512   ; 10 bit PWM value for VIBRATION UNIT motor control, 512 = 1/2 of max. power, do not use more, full power
                           ; will reset the M5Stack, recommended range is 256-512

micro_dot_pHAT = 0         ; 0 = off, 1 = ON (display SGV and DELTA on I2C Pimoroni Micro Dot pHAT connected to I2C pins 21+22)

;;;;;;;;;;  you can connect up to 9 WiFi access points, no need to setup all, one is enough

[wlan1]
ssid = ssid1
pass = pass1

[wlan2]
ssid = ssid2
pass = pass2

[wlan3]
...
...There are currently 3 display pages, that can be changed by a short press of the right button. The button does not work when the device communicated with Nightscout (small blue WiFi icon is displayed).
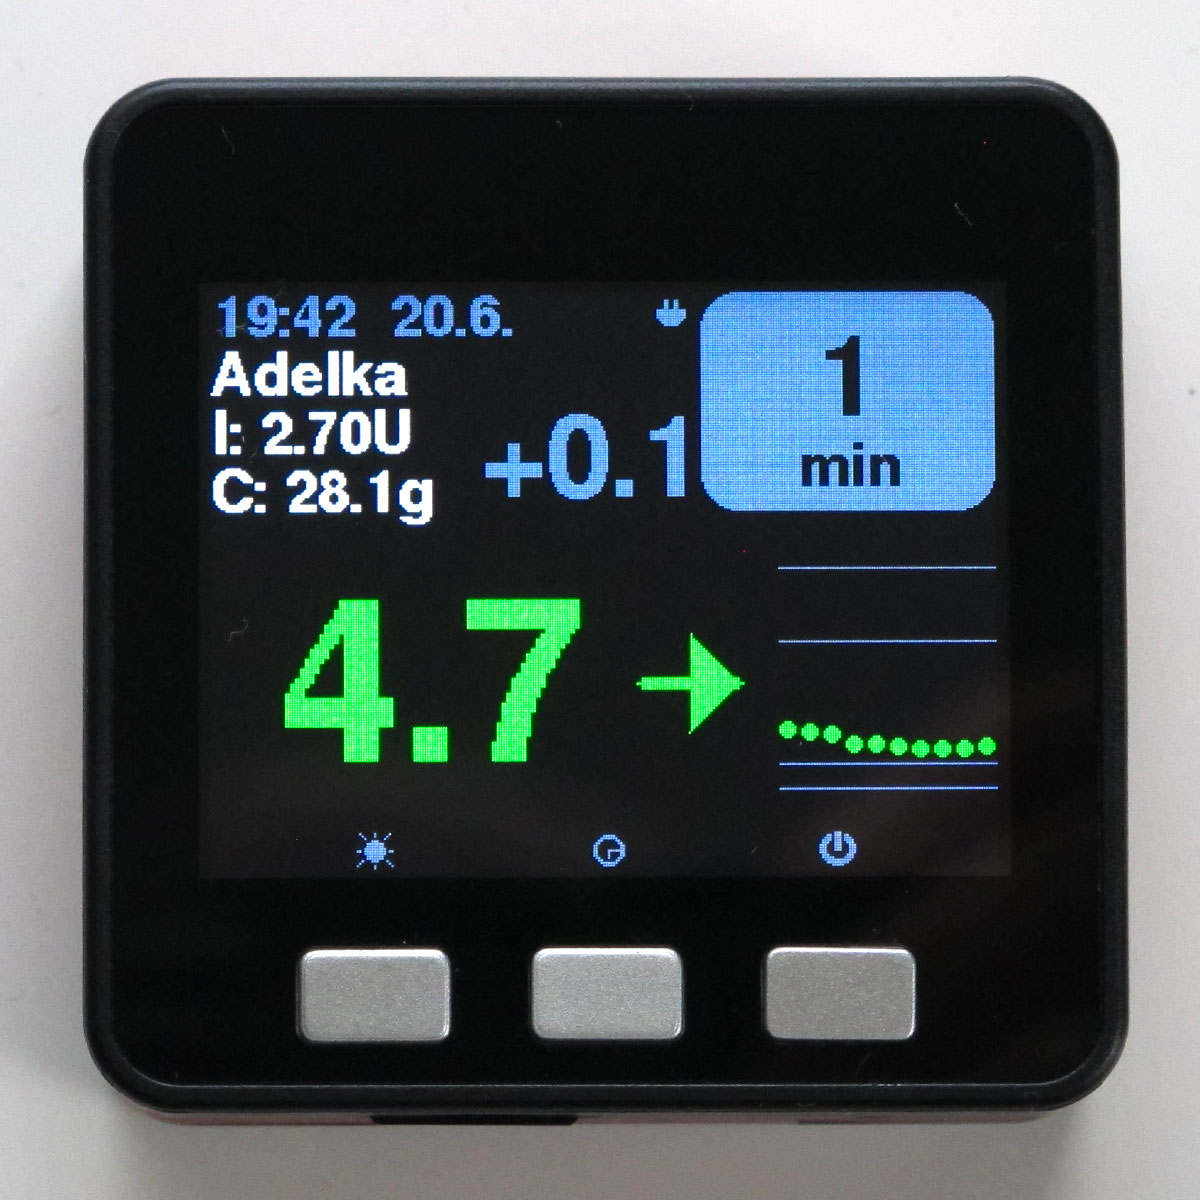
Page 0 - default page
What you see on the display is a matter of your M5NS.INI and Nightscout configuration. By default you will see current time, date and user name from config file in upper left corner. You will see IOB (Insulin On Board) an COB (Carbs On Board) values below the name. Right from the IOB/COB value is current BG delta (difference from the last reading, trend where the BG is going). Box with time difference from last valid data from Nighscout is displayed in upper right corner. Delay of 5 mins is OK and the box has grey color, 5-15 mins is warning and the box will have white background, more than 15 mins without a valid data is error and the box background will be red. There is also possibility to set sound warning on data delay in M5NS.INI.
Glycemia (BG) value and its direction are below the basic information. There is a mini graph created from 10 last BG values right of the glycemia value. The mini graph shows only values in range 3-12 mmol/L (48-216 mg/dL) and values below/above this will be displayed on mini graph as the min/max values.
There are also icons in upper side of display. Plug or battery icon displays battery status (on newer devices only). Red clock indicated silent "snooze" mode activated. Grey or yellow (more than 5 errors) shows that there are errors in error log (last page). Blue WiFi icon in 2 sizes (2 different queries) indicated that MStack is downloading data from Nightscout.
Last line contains icons for buttons or data source or Loop information (depending on M5NS.INI key "info_line").
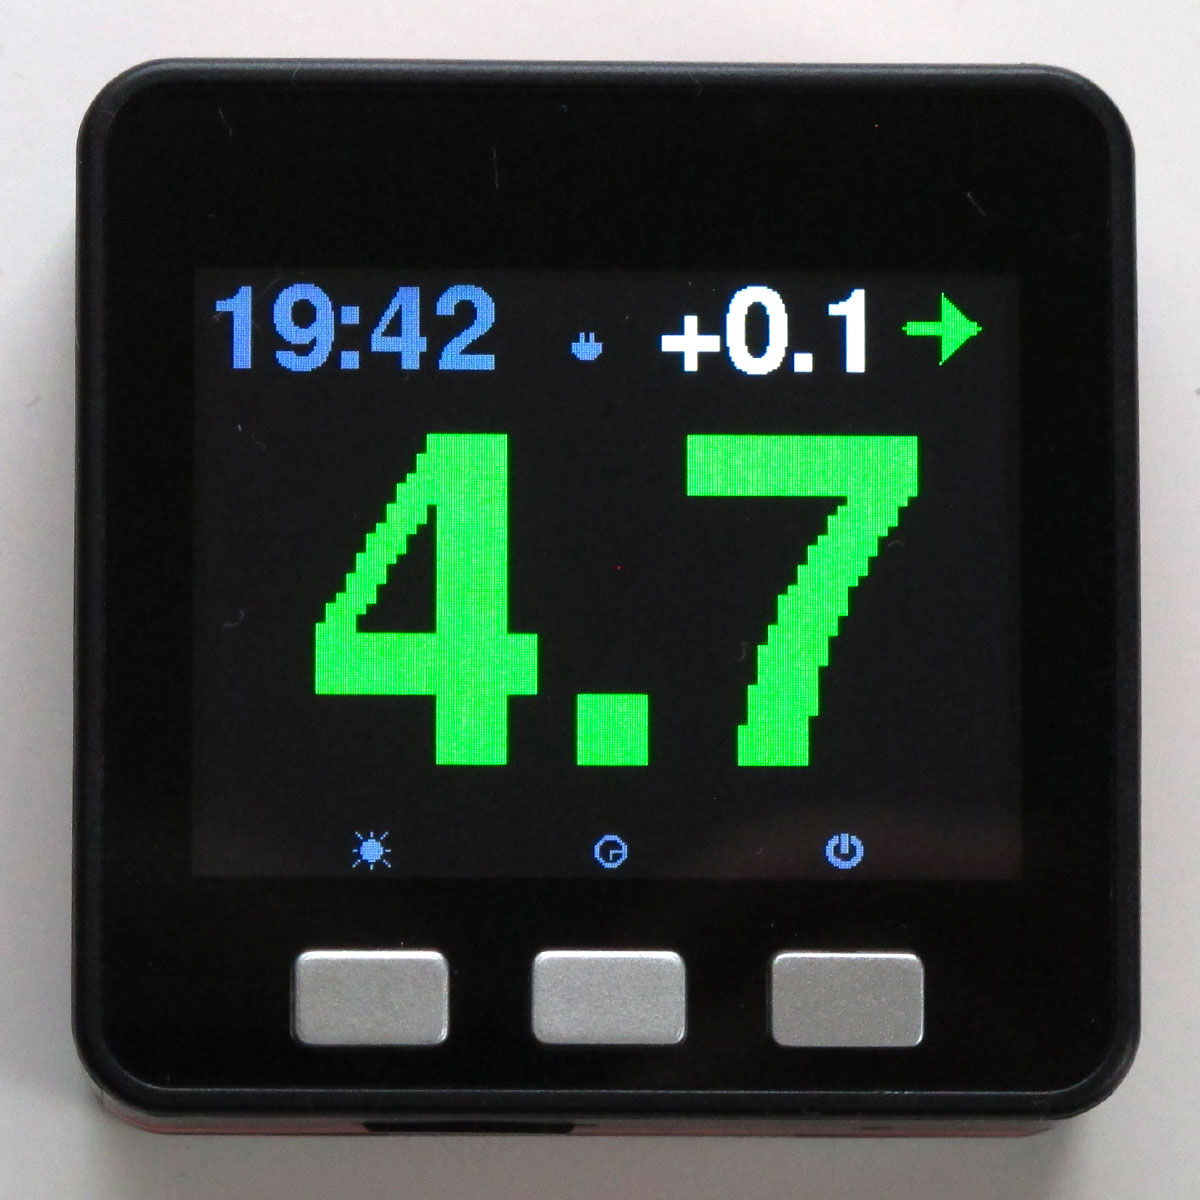
Page 1 - simple page with large BG value
Long distance visible page with large BG value and larger clock. Top line contains current time, icons, delta value a BG direction arrow.
Bottom info line is the same as on page 0.
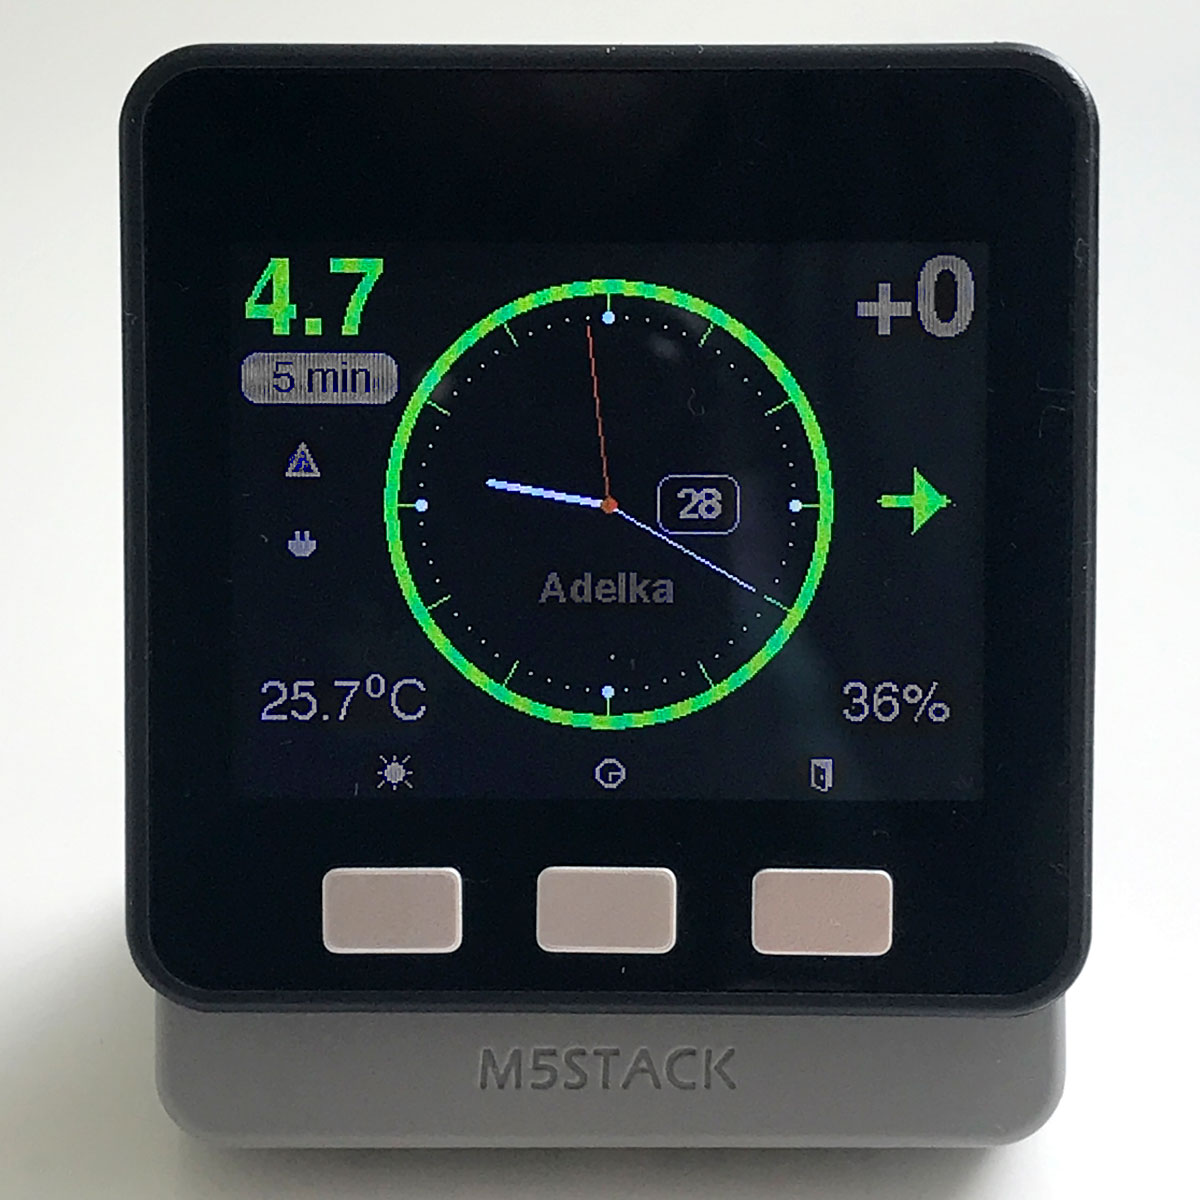
Page 2 - analog clock with temperature and humidity
Large analog clock with date. BG value in top left corner with time difference from the last reading. BG delta value in top right corner and arrow pointing chinge direction below it.
This screen contatins environmental values form DHT12 sensor. Requires ENV Unit or BTC Standing Base connected to MStack. The temperature is in lower left corner and humidity in lower right corner. Temperature unit can be set in M5NS.INI.
Bottom info line is the same as on page 0.
Error Log page
Displays last 10 record errors and total number of errors record since last restart. Occasional communication errors, such as "timeout" or "connection refused" are normal and happen sometimes due to WiFi and internet connection and Nightscout site status. If you have a lot of errors every few minutes, consider to move your M5Stack to a different place or extend WiFi signal.
The left button changes the backlight in the 3 steps defined in M5NS.INI file.
The middle button snoozes M5Stack for defined time to prevent alarm or warning sound. You can "snooze" it even before the alarm is activated. Snooze active is indicated by red clock icon in status icon area. You can press "snooze" more times to make snooze time longer. It cycles 1x - 2x - 3x - 4x - OFF and again. You have 2s to press button again, otherwise it starts from 1x. The "snooze" function is distributed to all devices in your local network with the same Nightscout user (Nightscout URL).
Short press of the right button switches display pages. Long press (4 seconds) puts M5Stack to the sleep as it is a little bit tricky to double click standard red power button.
Battery icon feature works only on newer M5Stack units. Here are my battery measurements and battery icon statuses:
| internal battery total | 43 min |
|---|---|
| plug icon (full charge or plugged in) | 1 min |
| gray full battery icon | 13 min |
| white 2/3 battery icon | 20 min |
| yellow 1/3 battery icon | 8 min |
| red empty battery icon | 1 min |
| extended battery total | 7h 49 min |
|---|---|
| plug icon (full charge or plugged in) | 53m |
| gray full battery icon | 2 h 59 min |
| white 2/3 battery icon | 1 h 55 min |
| yellow 1/3 battery icon | 1 h 48 min |
| red empty battery icon | 14 min |
Installation can be done by download or git clone the code to the Arduino IDE environment. You have to download ESP32 board and M5Stack libraries, Arduino JSON library and build it to you M5Stack.
Another easier possibility is to download latest M5Burner release. It is Windows executable with binary M5Stack firmware included. Just unzip it, start the M5Burner.exe, choose COM port where your M5Stack is connected and burn the firmware. Simple. Remember to add you microSD card with M5NS.INI configuration file.
There is a Facebook group M5STACK NIGHTSCOUT where you can get support and installation guides in several languages prepared by members of the M5Stack Nightscout community. Please check the Files section first and search the group before asking questions. A lot of questions have been answered already. Big thanks to Patrick Sonnerat, Didier Frétigné, Peter Leimbach and more...
- You can use VSCode & Platform.IO besides Arduino IDE for development.
- For development use free Visual Studio Code
- Install Platform.IO addon in VSCode:
- open
Extensionsfrom left sidebar - search for
Platform.IOin extension search bar - click green
Installbutton and wait till it is installed
- open
- Unpack the M5_NightscoutMon_PlatformIO.zip to PlatformIO projects folder.
- Copy the latest sources from GitHub root to PlatformIO project src folder (overwrite) and rename M5_NightscoutMon.ino to M5_NightscoutMon.cpp (the .zip dows not have to be updated to the latest version).
- You can open project directly from VSCode
File -> Open folder...menu, or fromPIO HomewithOpen projectbutton. - Project is already configured for Platform.IO & VSCode. During build it will download and configure all dependencies.
- To build project press
PlatformIO: Buildbutton (it is white check mark iconâś“on the blue bottom toolbar) - To upload your project to the m5stack board:
- Connect your board via USB-C cable to your Laptop/PC
- press
PlatformIO: Uploadbutton (it is white right arrow icon→on the blue bottom toolbar)
If you find my project useful, I will appreciate if you donate me few bucks for further development or buy me a glass of beer or wine 🍷.
I also collect and repair vintage 8-bit computers, so if you have some really old computer, I could give it a new home and care 😄. Thank you!