This it the source code of a demo usage of the Yocto-Serial. You can read the full post on our web site : https://www.yoctopuce.com/EN/article/driving-a-roomba-with-a-yoctopuce-module
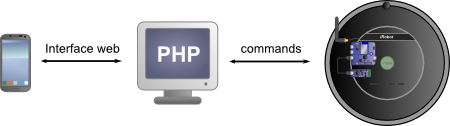
We coded a small web application in PHP, enabling us to control the Roomba. This web application uses the Roomba class described above and another PHP script to take care of the interface. The user connects himself or herself to the local server with a web browser transmitting the commands to the Roomba depending on the HTTP requests it receives.
The OI (Open Interface) port uses a 7 pin Mini-Din socket. Through this socket you have:
- ground
- 14V power supply
- the Roomba serial input (RXD) working from 0 to 5V
- the Roomba serial output (TXD) working from 0 to 5V
- a (BRC) signal used to maintain the Roomba awake and to change transmission speed
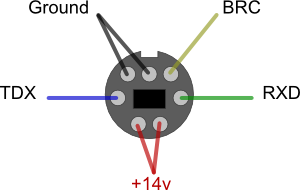
To connect the Yocto-Serial to the Roomba, we use the following mapping:
- the Roomba ground on the Yocto-Serial ground
- the Roomba RXD signal on the Yocto-Serial TD signal
- the Roomba TXD signal on the Yocto-Serial RD signal
- (optional) the Roomba BRC signal on the Yocto-Serial RTS signal
The first three connections are enough to establish communications between the Yocto-Serial and the Roomba. The BRC signal enables you both to commute the speed of the serial port and to prevent the vacuum cleaner to go to sleep. We cabled the Roomba BRC signal to the Yocto-Serial RTS signal in order to be able to modify the state of the BRC signal. But it's not necessary, because the Yocto-Serial can communicate at 115200 bauds (which is the default setting of the Roomba).
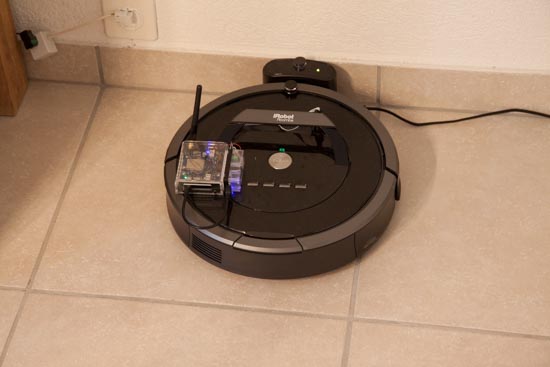
We still have to connect the Yocto-Serial to the YoctoHub-Wireless-G and to power the hub. You must ABSOLUTELY NOT directly connect the 14V output from the Roomba to the YoctoHub: All our modules work in 5V. We must therefore reduce the voltage with a regulator. We used a D24V5F5 regulator from Pololu which can use any voltage between 5 and 36 volts to provide a maximum of 500 milliamps at 5V. This regulator is very easy to connect as it works in common ground. You simply connect the 14V on VIN and the YoctoHub on VOUT. The SHDN signal is left floating as it is not used in our case.
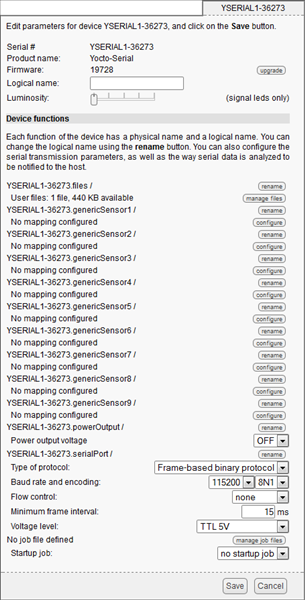
For the Yocto-Serial to communicate with the Roomba, you must configure the Yocto-Serial so that it works from 0 to 5V and at the correct speed. If you connect yourself to the YoctoHub-Wireless-G web interface, you can access the configuration panel of the Yocto-Serial and change its parameters. By default, the Roomba communicates at 115200 bauds with a stop bit and no parity bit (beware, some sites talk about 57600 bauds, but it's for older models). You can configure the Yocto-Serial in "Frame-based binary" mode with a 15ms time interval. This mode automatically separates binary frames depending on their direction and a time interval. It's not absolutely necessary, but it allows you to correctly display the traffic in the Yocto-Serial interface.
The communication protocol is explained in the "iRobot Create 2 Open Interface (OI)" document, available on the iRobot web site. It's an exchange of byte frames. A frame corresponds either to a command that the Roomba must run, or to the answer of the Roomba to the latest command sent. All the commands have the same format:
- 1 byte containing the number of the command to be run (for example, clean, drive, read the battery state, and so on)
- 0 to 15 bytes of function parameters (for example, the speed, the led number, and so on)
It is very important to send the correct number of bytes for each command otherwise the Roomba becomes unsynchronized and all the following commands are misinterpreted. In the same way, the correct number of bytes returned by the function must be read, otherwise there is a risk of mixing up the returned values.
Note: When the Roomba is sleeping, the OI interface is disabled and commands are ignored. To wake it, you must send the Start (code=128) command to wake the Roomba. It is therefore important to always send the Start command at the beginning of the application. Beware, the Roomba automatically goes to sleep 5 minutes after it is idle. In this case, you must send the Start command again.
We wrote a "Roomba" PHP class formatting the commands to be sent and decoding the bytes of the received answers. This call implements a method for each command that you can send to the Roomba (Clean, Drive, Dock, ...) and a method to read each sensor of the Roomba (charge status, bumper, ...)
The class constructor takes as parameter the IP address of the YoctoHub. It makes a connection with the YoctoHub thanks to the YAPI::RegisterHub method and stores a pointer on the YSerialPort object corresponding to our Yocto-Serial. Thanks to this object, it configures the Yocto-Serial parameters (communication speed, number of parity bits, ...).
class Roomba
{

private $serial_port;

function __construct($addresse)
{

    // Uses explicit error handling rather than exceptions
    YAPI::DisableExceptions();

    // Sets up the API to use the VirtualHub on local machine,
    if(YAPI::RegisterHub($addresse, $errmsg) != YAPI_SUCCESS) {
        die("Cannot contact $addresse");
    }

    /** @var YSerialPort $serialPort */
    $this->serial_port = YSerialPort::FirstSerialPort();
    if($this->serial_port == null)
        die("No module found on $addresse (check USB cable)");

    // sets up the serial parameter with the Roomba
    // serie 600 and following communicate at 115200 bauds
    $this->serial_port->set_serialMode("115200,8N1");
    // lets the serial port wait 20ms between each writes
    $this->serial_port->set_protocol("Frame:20ms");
    // clears all buffers of the serial port
    $this->serial_port->reset();
    ...

}
All the methods of this object encode the method parameters into a frame to be sent to the Roomba. This byte array is sent to the Roomba with the writeArray method of the YSerialPort object. Methods waiting for an answer from the Roomba wait 50 milliseconds to leave the Roomba enough time to treat the command, and then read the planned number of bytes.
private function sendCmd($cmd, $nbytes = 0)
{
    $this->serial_port->writeArray($cmd);
    if ($nbytes > 0) {
        YAPI::Sleep(50);
        return $this->serial_port->readArray($nbytes);
    } else {
        return array();
    }
}

public function Motors($main_brush, $vacum, $side_brush)
{
    $flags = 0;
    if ($main_brush)
        $flags |= 4;
    if ($vacum)
        $flags |= 2;
    if ($side_brush)
        $flags |= 1;
    $this->sendCmd(array(138, $flags));
}

public function getVoltage()
{
    $ret_bytes = $this->sendCmd(array(142,22), 2);
    return $ret_bytes[0] * 256 + $ret_bytes[1];
}
Here is an example of use of the Roomba class:
require_once('Roomba.php');
$roomba = new Roomba('192.168.1.88');
$roomba->Start();
...
$roomba->Clean();
...
$charge = $roomba->getBatteryCharge();
$capacity = $roomba->getBatteryCapacity();
print("Battery:" . ($charge*100  / $capacity ). "% \n");
...
$roomba->Dock()
...
$roomba->StopOI();
Instantiating the $roomba object establishes the HTTP communication with the YoctoHub and configures the Yocto-Serial, but no command is yet sent to the Roomba. The first command must be Start to take the Roomba out of its sleeping mode and to enable the OI command interpreter. Then, you can send any command which is run by the Roomba. To end, you can make the Roomba sleep immediately with the Stop command.