當我們要管理的資源越來越多後,會產生很多的 tf 檔案,假設我們現在有三個 gce 服務,會在以下三個不同環境上面運作,每個環境都會有我們之前學會的基本 tf 檔案(包含 provider.tf 、main.tf、backend.tf),且其中的 main.tf 檔案內有些設定會不太一樣,如下:
- 架構圖
.
├── dev
│   ├── backend.tf
│   ├── main.tf
│   └── provider.tf
├── prod
│   ├── backend.tf
│   ├── main.tf
│   └── provider.tf
└── qa
    ├── backend.tf
    ├── main.tf
    └── provider.tf

3 directories, 9 files
- dev/main.tf
resource "google_compute_instance" "instance" {
  project      = "馬賽克"
  name         = "test-dev"
  machine_type = "e2-small"
  zone         = "asia-east1-b"

  boot_disk {
        initialize_params {
          image = "debian-cloud/debian-10"
          size = 50
    }
  }

.... 其他省略不寫 ....
}
- qa/main.tf (多了 tags)
resource "google_compute_instance" "instance" {
  project      = "馬賽克"
  name         = "test-qa"
  machine_type = "e2-small"
  zone         = "asia-east1-b"

  tags = ["for-qa"]

  boot_disk {
      initialize_params {
        image = "debian-cloud/debian-10"
        size = 50
    }
  }

.... 其他省略不寫 ....
}
- prod/main.tf (多了 labels)
resource "google_compute_instance" "instance" {
  project      = "馬賽克"
  name         = "test-prod"
  machine_type = "e2-small"
  zone         = "asia-east1-b"

  labels = {
    aaa = "test1"
    bbb = "test2"
    ccc = "test3"
  }

  boot_disk {
    initialize_params {
      image = "debian-cloud/debian-10"
      size = 50
    }
  }

.... 其他省略不寫 ....
}
可以看到三個 main.tf 檔案除了 name 以外,在 qa 還多了 tags、prod 多了 labels 等設定,等於我們會依照每個不同環境不同服務去客製化他的 tf 資源設定,雖然非常直覺,但往後的維護以及調整卻非常不方便 ( 假設我們現在要全部都加上 labels,就必須一個一個檢查並調整 )。
為了方便我們維護以及重複使用,因此有了 module,可以先將全部會使用到的設定寫成模板,透過參數的方式帶入即可,module 有以下幾個優點:
-
重複使用性: module 讓程式碼更易於重複使用。當我們需要在多個項目中使用相同的基礎架構或配置時,可以先將其封裝為一個 module。這樣,我們只需要在不同的項目中引用並調整模組的參數,而不需要重新寫整個 tf 檔。
-
抽象化:將 Terraform 代碼轉換為 module 可以將詳細的實現細節抽象化,僅寫必要的參數。這樣做可以提高程式碼的可讀性和可維護性,並降低使用者學習和使用的門檻。
-
參數化配置:module 可以使用輸入參數來接收不同的配置值。這意味著您可以根據需要動態更改模組的行為,而不需要直接修改模組的內部程式。這使得配置更靈活並支持不同環境的部署。
-
module 版本控制:將 Terraform 程式封裝為 module 後,可以使用 git 對其進行版本控制。可以更輕鬆地協作和共享 module (可以將 module 與 Terraform 分別存放,並使用對應 tag or 分支來做開發 )。
首先我們要先定義我們的 module,我們先建立以下資料夾結構以及對應檔案:
(再次提醒,會區分檔案名稱是因為方便調整跟維護,也可以把它全部寫在同一個 tf 檔案內歐)
- 架構圖
.
├── module
│   └── google_compute_instance
│       ├── main.tf
│       ├── outputs.tf
│       └── variables.tf
└── projects
    ├── dev
    │   ├── backend.tf
    │   ├── main.tf
    │   └── provider.tf
    ├── prod
    │   ├── backend.tf
    │   ├── main.tf
    │   └── provider.tf
    └── qa
        ├── backend.tf
        ├── main.tf
        └── provider.tf

6 directories, 12 files
module 資料夾:放我們 module 設定 (這邊範例是放 gce)
projects 資料夾:放我們不同服務、不同環境設定 (這邊為了簡化,範例只以不同環境為例)
- module/google_compute_instance/main.tf
provider "google" {
  project      = var.project_id
  zone         = var.instance_zone
}

resource "google_compute_instance" "instance" {
    name         = var.instance_name
    machine_type = var.machine_type
    zone         = var.instance_zone
    tags = var.instance_tags
    labels = var.instance_labels

    boot_disk {
      auto_delete = var.boot_disk_auto_delete
      initialize_params {
        image = var.boot_disk_image_name
        size = var.boot_disk_size
      }
    }

    dynamic "attached_disk" {
      for_each = var.attached_disk_enabled ? [1] : []
      content {
        device_name = var.attached_disk_name
        mode = var.attached_disk_mode
        source = var.attached_disk_source
      }
    }

    network_interface {
      network = var.network_name
      subnetwork = var.subnetwork_name

      dynamic "access_config" {
        for_each = var.nat_ip_enabled ? [1] : []
        content {
        }
      }
    }

    metadata = var.metadata
    enable_display = var.enable_display
    resource_policies = var.resource_policies

    service_account {
      email  = var.service_account_email
      scopes = var.service_account_scopes
    }

    timeouts {}
    deletion_protection = var.deletion_protection
    allow_stopping_for_update = var.allow_stopping_for_update
}
我們需要把所有設定的值都挖洞,使用 var 的方式來帶入參數,這邊要注意的是等號前面的值或是 block 名稱都是不能修改的,他是 google 定義的 api 變數,但 var 後的參數名稱我們可以自訂 (後面 variable.tf 會在詳細說明),那這邊比較特別的用法是 dynamic,以下說明:
dynamic "attached_disk" {
      for_each = var.attached_disk_enabled ? [1] : []
      content {
        device_name = var.attached_disk_name
        mode = var.attached_disk_mode
        source = var.attached_disk_source
      }
   }
我們有些 block 只有在特定服務時才需使用,例如上面的 attached_disk 他是 gce 另外掛載其他磁碟的設定,如果有需要我們才會多設定這個 block,沒有則不需要加,因此須使用 dynamic 來動態產生 block,這邊的設定是我們要在參數要帶入 attached_disk_enabled 用 for_each 來判斷是否需要這個 block,如果是 true,就會產生 attached_disk block,且需要輸入 attached_disk_name、attached_disk_mode、attached_disk_source。
- module/google_compute_instance/variables.tf
variable "project_id" {
  type        = string
  description = "GCP 專案 ID"
}

variable "instance_name" {
  type        = string
  description = "GCE 名稱"
}

variable "machine_type" {
  type        = string
  description = "GCE 類型"
}

variable "instance_zone" {
  type        = string
  description = "GCE 所在區域"
}

variable "instance_tags" {
  type        = list(string)
  description = "GCE 網路標記"
}

variable "instance_labels" {
  type = map(string)
  description = "GCE 標籤"
}

variable "boot_disk_auto_delete" {
  type    = bool
  description = "是否刪除 instance 時,自動刪除開機磁碟"
  default = true
}

variable "boot_disk_image_name" {
  type        = string
  description = "GCE 映像檔名稱"
}

variable "boot_disk_size" {
  type        = number
  description = "GCE 開機磁碟大小 (單位: GB)"
}

variable "attached_disk_enabled" {
  type    = bool
  description = "是否啟用附加磁碟"
  default = false
}

variable "attached_disk_name" {
  type        = string
  description = "GCE 附加磁碟名稱"
  default = ""
}

variable "attached_disk_mode" {
  type        = string
  description = "GCE 附加磁碟模式"
  default = "READ_ONLY"
  validation {
    condition     = contains(["READ_WRITE", "READ_ONLY"], var.attached_disk_mode)
    error_message = "不符合附加磁碟模式的值,請輸入 READ_WRITE 或 READ_ONLY"
  }
}

variable "attached_disk_source" {
  type        = string
  description = "GCE 附加磁碟來源"
  default = ""
}

variable "network_name" {
  type        = string
  description = "GCE 網路名稱"
}

variable "subnetwork_name" {
  type        = string
  description = "GCE 子網路名稱"
}

variable "nat_ip_enabled" {
  type    = bool
  description = "是否啟用 NAT IP"
  default = false
}

variable "metadata" {
  type = map(string)
  description = "GCE 中繼資料"
}

variable "enable_display" {
  type    = bool
  description = "是否啟用虛擬顯示"
  default = false
}

variable "resource_policies" {
  type        = list(string)
  description = "GCE 資源原則"
}

variable "service_account_email" {
  type        = string
  description = "GCE 服務帳戶電子郵件"
}

variable "service_account_scopes" {
  type        = list(string)
  description = "GCE 服務帳戶範圍"
}

variable "deletion_protection" {
  type    = bool
  description = "是否啟用刪除保護"
  default = false
}

variable "allow_stopping_for_update" {
  type    = bool
  description = "是否允許自動停止後更新"
  default = false
}
這個檔案會定義每個變數的名稱以及資料型態,也可以寫說明以及預設的值,這邊比較特別的是 validation ,他可以驗證帶入的參數是否符合 condition 內容,也可以自定義錯誤的訊息,如下:
variable "attached_disk_mode" {
  type        = string
  description = "GCE 附加磁碟模式"
  default = "READ_ONLY"
  validation {
    condition     = contains(["READ_WRITE", "READ_ONLY"], var.attached_disk_mode)
    error_message = "不符合附加磁碟模式的值,請輸入 READ_WRITE 或 READ_ONLY"
  }
}
這邊限制 attached_disk_mode 輸入必須符合 READ_WRITE or READ_ONLY 的值,如果輸入其他不符合的會顯示 error_message 內容。
另外 variable 這邊有幾個資料型態可以選擇,如下:
-
string:字串,不知道要選什麼就選他沒錯 xD
-
bool:布林值,只有 true、false 兩種選項,適用於判斷的內容,例如剛剛上面說的
attached_disk_enabled就是使用 bool -
number:數字,只能輸入數字
-
list (tuple):清單,內容可以放置類似
["us-west-1a", "us-west-1c"]的資料 -
map (object): key value 存放模式,例如:
{
    "aaa" : "test1",
    "bbb" : "test2",
    "ccc" : "test3"
}
- module/google_compute_instance/outputs.tf
output "instance_id" {
  value       = google_compute_instance.instance.instance_id
}
這邊主要放置要輸出的內容,像我們這邊就會把 instance_id 給顯示出來。
projects 我這邊只示範 prod 的部分
- projects/prod/main.tf
module "ian-test" {
  source = "../../module/google_compute_instance"

  project_id = "馬賽克"
  instance_name = "test-prod"
  machine_type  = "e2-small"
  instance_zone = "asia-east1-b"
  instance_tags = []
  instance_labels = {
    "aaa" = "test1"
    "bbb" = "test2"
    "ccc" = "test3"
  }
  boot_disk_image_name    = "debian-cloud/debian-10"
  boot_disk_size = "50"
  attached_disk_enabled = false
  network_name  = "馬賽克"
  subnetwork_name = "馬賽克"
  nat_ip_enabled = false
  metadata = {}
  resource_policies = []
  service_account_email = "馬賽克"
  service_account_scopes = ["storage-ro", "logging-write", "monitoring-write", "service-control", "service-management", "trace"]
}
這邊我們可以定義要使用 module 的叫什麼,這邊我就取名 google_compute_instance,然後他會去 source "../../module/ian-test",也就是我們剛剛在上面先挖洞的模板,底下就開始帶入我們在 variables.tf 有設定的參數。這邊比較要注意的是,在 main.tf、variables.tf 有使用的變數設定,都必須要寫在個別資源 tf 的檔案裡面,沒有的就帶入對應資料型態的空值,例如 instance_tags、metadata、resource_policies 等等。
當我們完成上面的架構後,我們進入 projects/prod/main.tf 路徑下,開始用 module 的方式建立資源,建立資源的流程與原本的相同,一樣是 init > plan > apply 這三個步驟,那我們一個一個來看,與原本的建立方式有哪些不同之處吧~
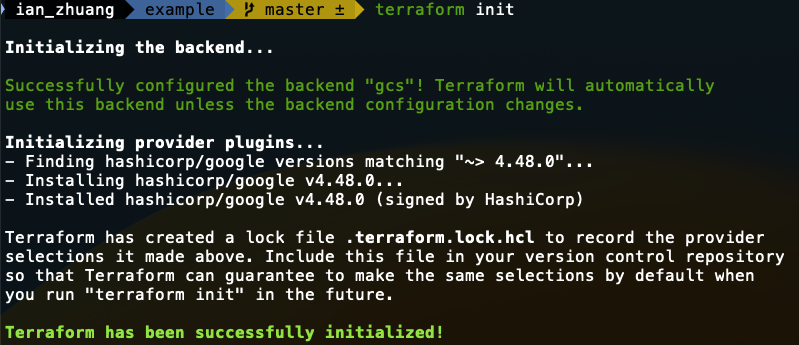
我們使用 terraform init 來看看原本 init 與使用模組 init 後差在哪裡:
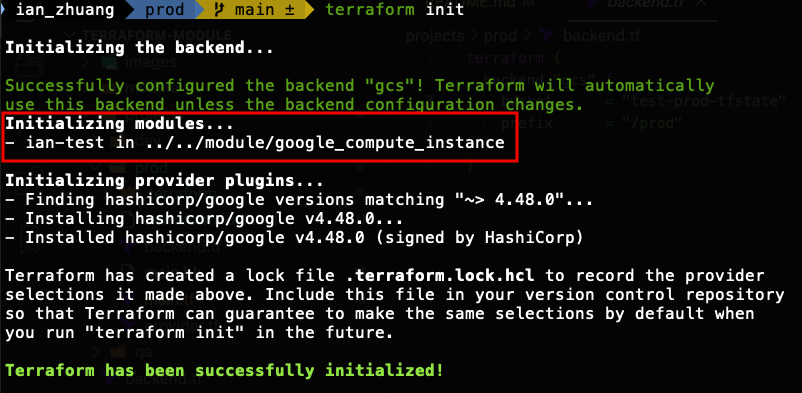
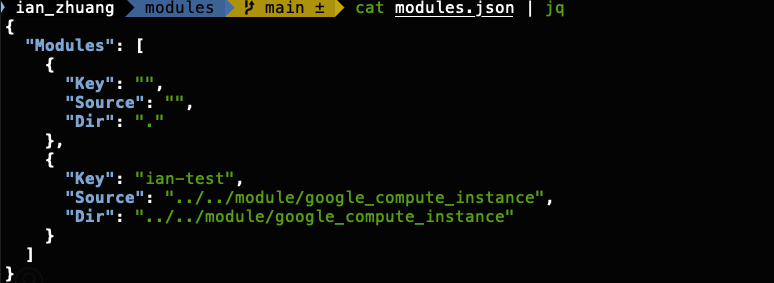
可以看到有使用 module 在初始化的時候,會連同 module 也一併初始化,接著我們進到 .terraform 資料夾內,可以看到有 moduels 資料夾。
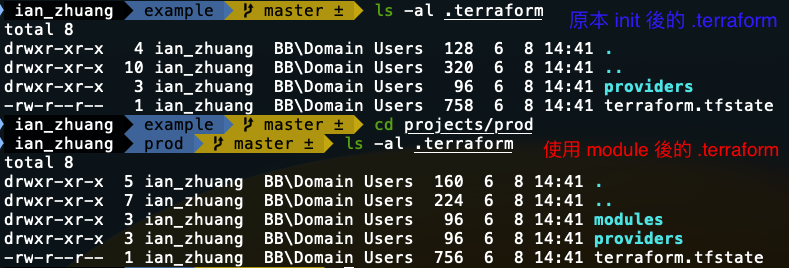
在進去看會看有一個 modules.json 檔案,會紀錄 module 使用的路徑,因此當我們使用的 module 有改變時,要記得重新 init 才可以確保使用的 module 是正確的。
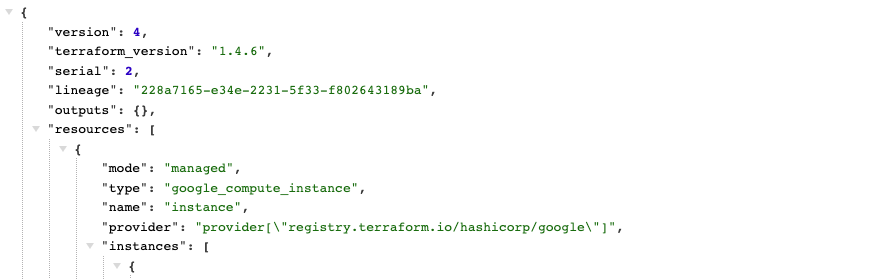
我們一樣下 terraform plan 指令,來看看兩者顯示的差異:
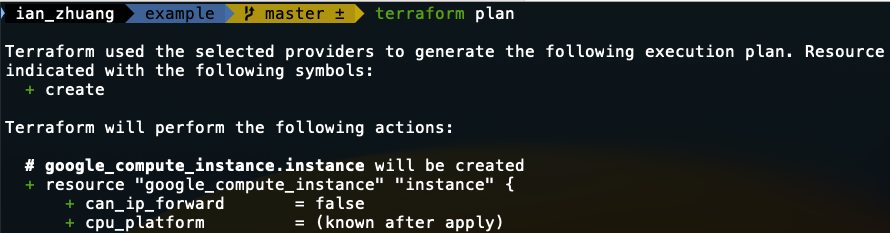
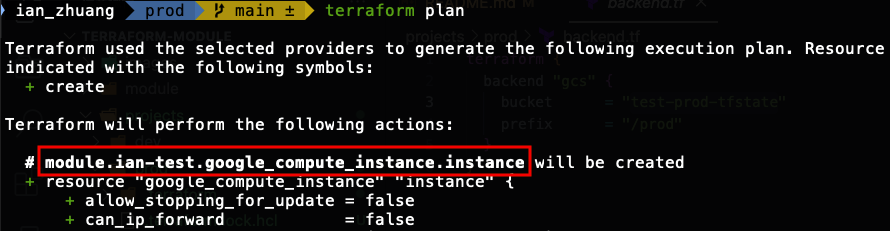
可以看到使用 module 在 plan 時,預覽創建的資源格式不同,也就代表他存在 tfstate 檔案的格式也會不同 (這個後面會在提到,與 import 也有關係)
使用 terraform apply 來看建立資源後的結果有什麼不同:
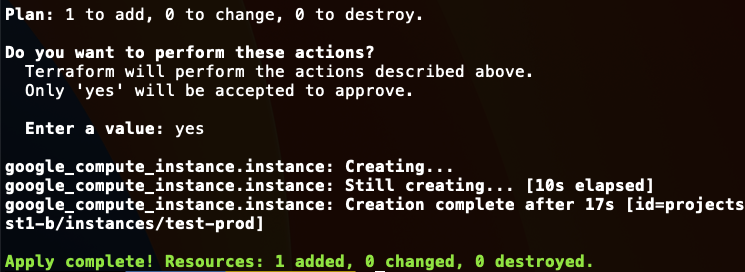
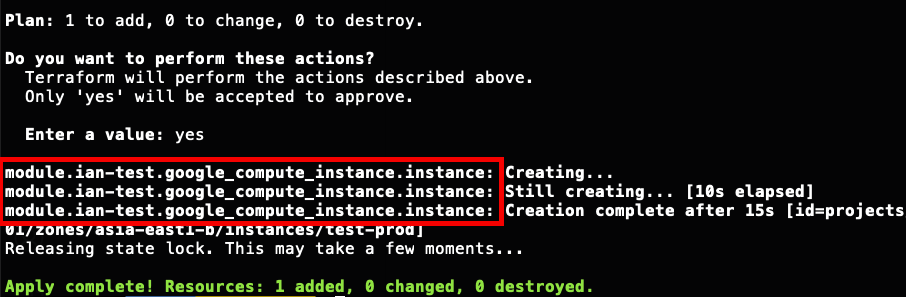
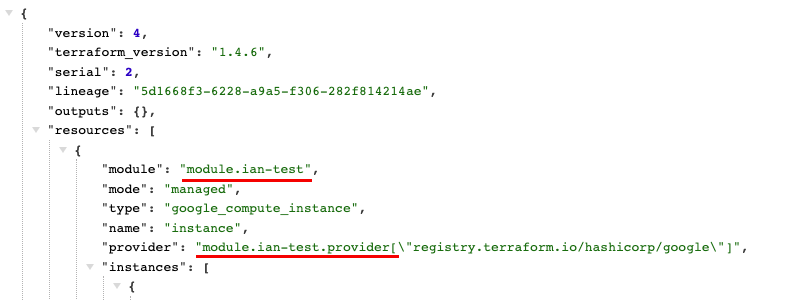
apply 看到的與 plan 顯示的一樣,使用 module 建立的資料格式會不太一樣,所以我們來看看兩者 tfstate 檔案的差異:
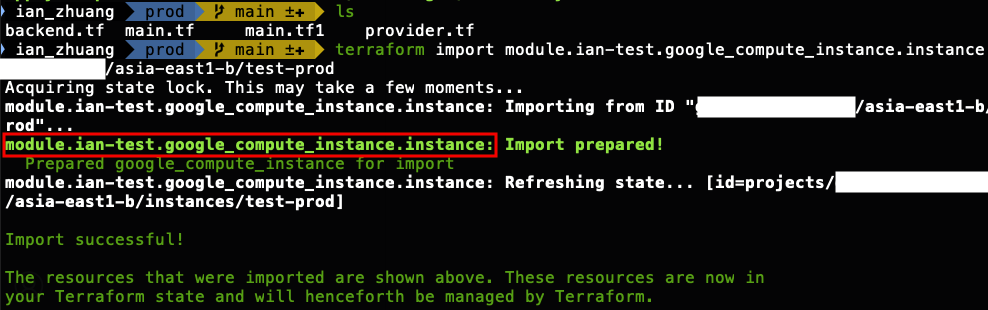
import 的功用是可以從雲上服務轉成 tf,在之前原本的 terraform 是要先建立一個空的 resource:
resource "google_compute_instance" "instance" {

}
再使用 terraform import google_compute_instance.instance [專案 ID]/[機器地區]/[機器名稱] 來匯入雲上服務的狀態到後端存到 tfstate 的位子。
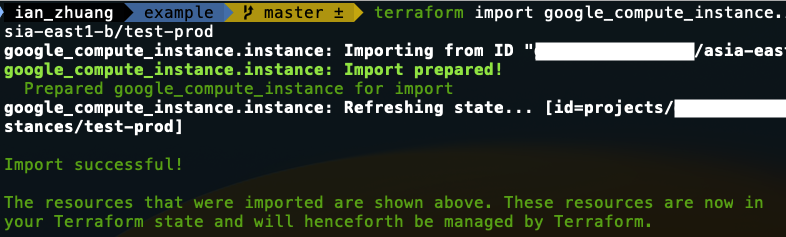
那我們現在改成 module,會比較麻煩一點,因為我們有在 variables.tf 設定我們的變數,若是沒有設定預設值,就必須一定要輸入,所以我們在建立時,要先把變數的空值也補上,如下:
module "ian-test" {
  source = "../../module/google_compute_instance"

  project_id = ""
  instance_name = ""
  machine_type  = ""
  instance_zone = ""
  instance_tags = []
  instance_labels = {}
  boot_disk_image_name    = ""
  boot_disk_size = 50
  attached_disk_enabled = false
  network_name  = ""
  subnetwork_name = ""
  nat_ip_enabled = false
  metadata = {}
  resource_policies = []
  service_account_email = ""
  service_account_scopes = []
}
" " 是 string 格式的空值,[ ] 是 list 格式的空值,{ } 是 map 格式的空值,其他的 bool 我預設會給他 false,number 我會隨便給他一個數字 xD。這邊帶入的內容不是很重要,主要是讓他可以去抓到他的架構,我們也可以在 variables.tf 設定時都補上預設值。
再使用 terraform import module.ian-test.google_compute_instance.instance [專案 ID]/[機器地區]/[機器名稱] 來匯入狀態檔案。(這邊要記得依照你 module 設定的名稱帶入)