Home
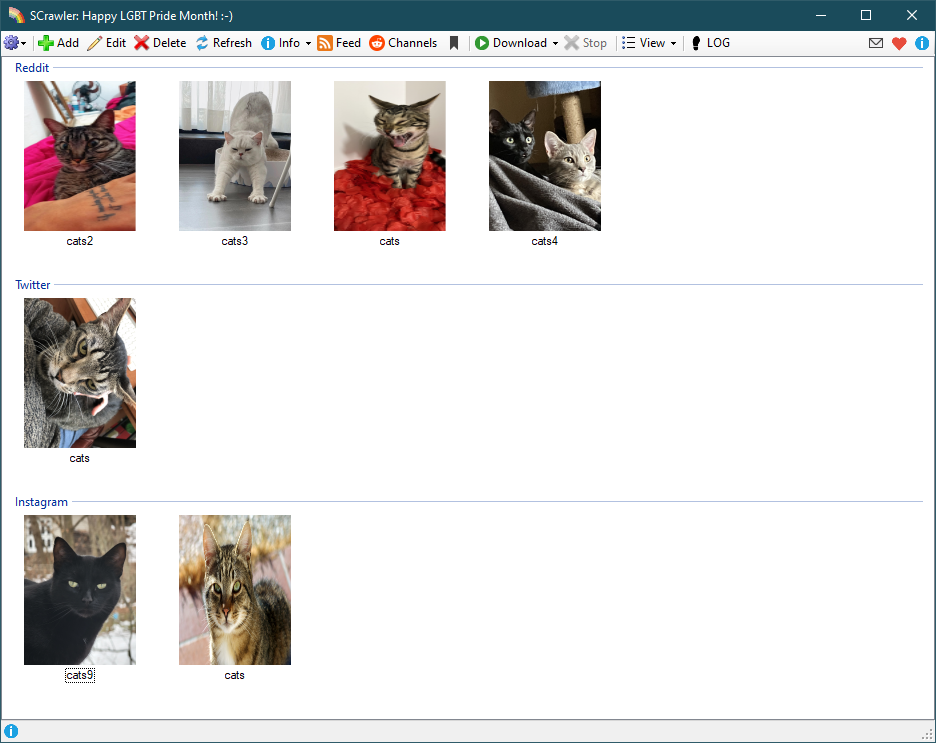
This window contains all data management tools.
-
Add/Edit/Delete- actions with users. -
Refresh- refresh the user list. You do not need to press this button. Added just in case... -
Info- show downloaded users and what exactly and how many were downloaded. -
Feed- show recently downloaded data -
Channels- open Channels form -
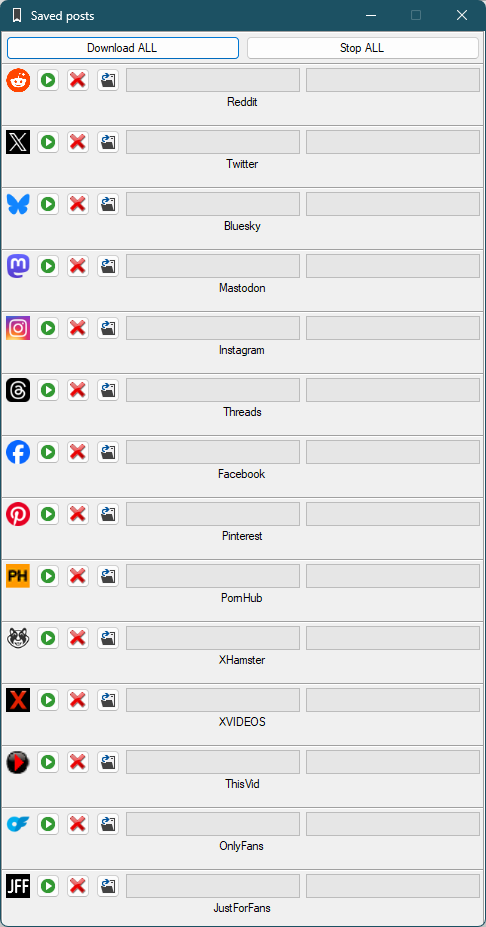
Saved posts- download saved posts -
Download- download operations -
Stop- stop downloading -
View- change view mode -
LOG- program error log and information
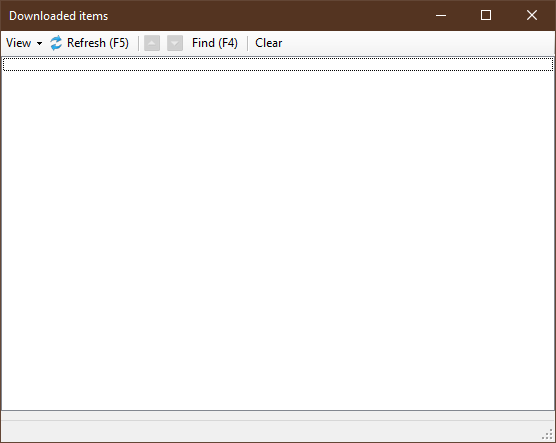
This form will show downloaded items (sorted by latest download date). Each line of data contains information about how many images and videos have been downloaded for the user. If no media is downloaded, the user will not appear in this form.
Double-clicking on the data line will open the content folder.
-
View- view modes:-
Session- show downloaded results for this session only; -
All- show downloaded results for all users, sorted by last downloaded date.
-
-
Up / Down- list navigation buttons -
Find- find the selected user in the main window -
Refresh- update information list. You don't need to press this button. Added just in case... -
Clear- clear the information list of the current download session.
In the Session view, the list is updated automatically.
Hot keys:
-
F2- Down -
F3- Up -
F4- Find -
F5- Refresh
This is a visualization of users' download queue.
Hot keys:
Del - cancel the download of the selected user
Ctrl+F - find the selected user in the main window
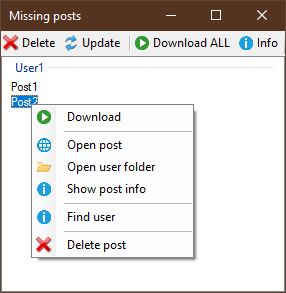
This form shows posts that have not been downloaded. This form is opened by clicking on the 'Missing posts' button in the 'Info' menu in the main window.
Buttons:
-
Delete- delete selected posts -
Update- check the missing posts again and refill the list -
Download ALL- download all missing posts (not working, in development) -
Info- show post information
Context menu:
-
Download- download selected post -
Open post- open post in browser -
Open user folder- open user folder -
Show post information- show post information -
Find user- find user in the main window -
Delete post- delete selected post
Hot keys:
-
F1-Info
You can open this form by clicking on the 'User metrics' button in the 'Info' menu in the main window.
Here you can get summary information for each user you have, such as: total size, number of files and their total size (by file type), last download date, etc.
-
Calculate- start calculation -
Cancel- cancel calculation -
View- view modes and options

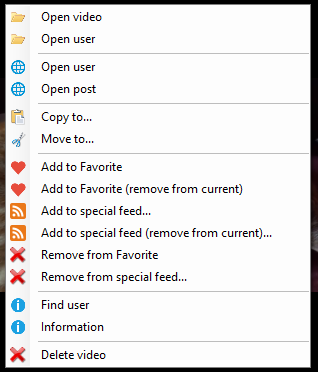
This form will show the recently downloaded data (images and videos). Each image/video contains download information, file address, user information, etc.
Double-clicking on an image will open the original image in an external viewer.
You can also add posts to your Favorite feed and/or special feed(s) that you can create.

Buttons:
-
Refresh- the feed will be updated to receive new downloaded items and/or remove missing items -
Delete selected- delete marked items from the disk
Context menu:
-
Open picture/video- open picture/video in external viewer -
Open user(with folder image) - open user folder -
Open user(with globe) - open user site -
Open post- open post in browser -
Copy to...- copy item to another location -
Move to...- move item to another location -
Add to Favorite- this post will be added to your favorite feed -
Add to Favorite (remove from current)- this post will be added to your favorite feed and removed from the current feed/session -
Add to special feed...- this post will be added to the feed(s) you select (a selection form will open) -
Add to special feed (remove from current)...- this post will be added to the feed(s) you select (a selection form will open) and removed from the current feed/session -
Remove from Favorite- this post will be removed from your favorite feed -
Remove from special feed...- this post will be removed from the feed(s) you select (a selection form will open) -
Find user- find user in the main window -
Information- show post information -
Delete picture/video- delete picture/video
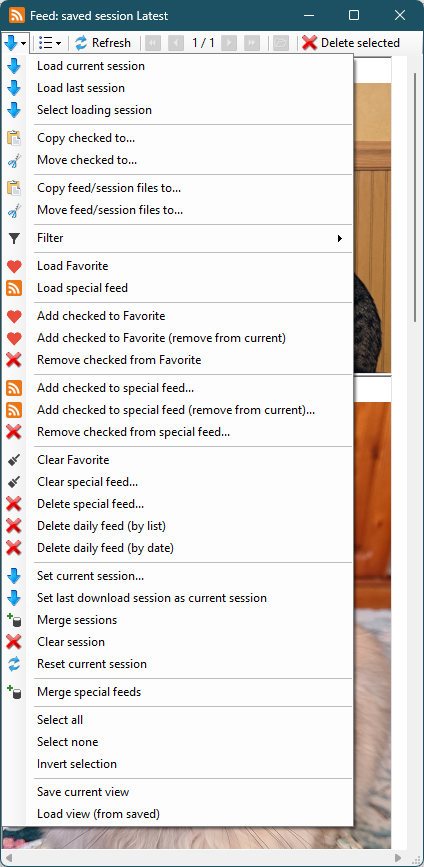
Load sessions:
Load current session-
Load last session- load last saved session data -
Select loading session- load the data of the session you have chosen (the session selection form will open) -
Copy checked to...- copy checked items to another location -
Move checked to...- move checked items to another location -
Load Favorite- load your Favorite feed -
Load special feed- load one or more of your special feeds -
Add checked to Favorite- add checked posts to your Favorite feed -
Add checked to Favorite (remove from current)- add checked posts to your Favorite feed and remove them from the current feed/session -
Remove checked from Favorite- remove checked posts from your Favorite feed -
Add checked to special feed...- add checked posts to one or more of your feeds -
Add checked to special feed (remove from current)...- add checked posts to one or more of your feeds and remove them from the current feed/session -
Remove checked from special feed...- remove checked posts from one or more of your feeds -
Clear Favorite- remove all posts from your Favorite feed (just clearing the feed; files will not be deleted) -
Clear special feed...- remove all posts from one or more of your feeds (just clearing the feeds; files will not be deleted) -
Delete special feed...- delete one or more of your feeds (files will not be deleted) -
Delete daily feed (by list)- delete one or more session feeds (a selection form will open; files will not be deleted) -
Delete daily feed (by date)- delete session feeds by the date (the date selection form will open; files will not be deleted) -
Merge sessions- merge multiple session feeds into one -
Clear session- clear list of recent downloads -
Merge special feeds- merge multiple special feeds into one Select all/noneSave current view-
Load view (from saved)- load one of your previously saved views
Change view:
-
Downloads- show downloaded regular users -
Subscriptions- show downloaded subscriptions
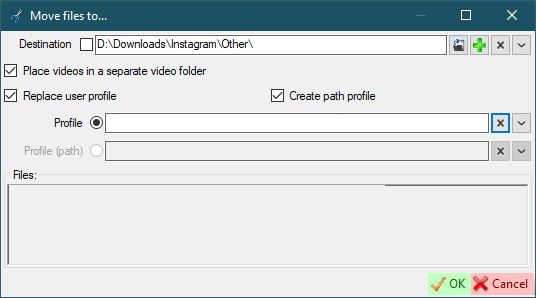
Move/Copy media:
-
Destination- The destination folder for the media you want to move/copy. If checked, the profile path will be ignored when changing profiles. -
Place videos in a separate video folder- The videos will be placed in a separate folder (Video) at the destination. -
Replace user profile- The user profile will be replaced with the selected one. This may be suitable for cases where you're deleting a user profile. Feeds' media are associated with the user's profile. If you delete a profile, all of that profile's media will disappear from all of your feeds. If you change the user profile, this won't happen! Only works when moving media! -
Create path profile- Create a path profile if it doesn't exist. This means that if you checkedReplace user profileand didn't select a replacement profile, a newPathprofile (path plugin) will be created and added to SCrawler. Only works when moving media! -
Profile- List of user profiles (without path plugin). Only works when moving media! -
Profile (path)- List of user profiles (path plugin only). Only works when moving media!
Hot-keys:
-
F5- refresh -
Ctrl+G- go to a specific page -
Home- go to first page -
End- go to last page -
F3,Up,Page Up- go to previous page -
F4,Down,Page Down- go to next page
You can read about the settings here.
The channels form will open.
More about channels here.
You can add profiles in subscription mode (if available). This mode means that files will not be downloaded. Instead, a video preview (screenshot) will be loaded. You can choose what to download, open a post, etc. The download goes through a standalone downloader. You can see downloaded subscriptions in the feed.
Go to Settings - Settings - Reddit/Instagram/Twitter/... Enter your username in the Saved posts user textbox. Click OK. Go to the main window. If this option is not displayed in the site settings, it doesn't need to be configured.
This button looks like a bookmark. When you click on this button, a form for downloading saved posts will open. Saved posts are stored in the Reddit/Instagram/Twitter data path in the !Saved posts folder.
You may see a message like Host [Site] is not ready or Host [Site] is unavailable. This means that your credentials have expired, or some of your credentials are missing, or a saved posts for a particular site cannot be downloaded at this time.
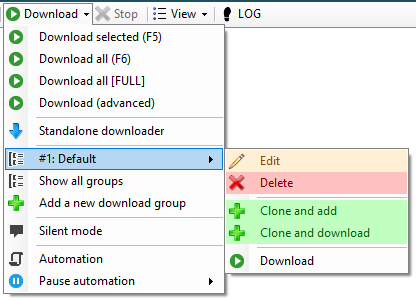
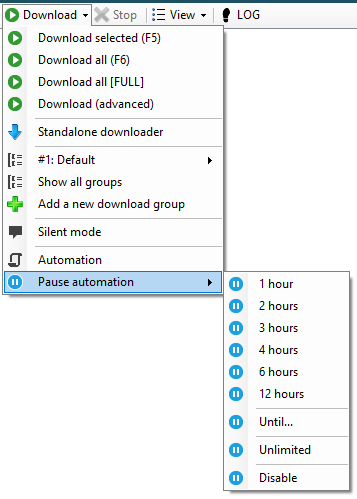
-
Download selected (F5)- start downloading one or more selected users. -
Download all (F6)- download all users markedReady for downloadfrom all sites. -
Download all [FULL]- download all users from all sites. TheReady for downloadoption will be ignored. -
Download (advanced)- Filter the users you want to download and download them. -
Standalone downloader- Just a downloader for single videos. -
Add a new download group- Create a new download group (read more here). -
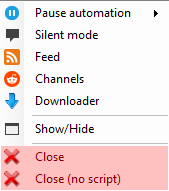
Silent mode- Temporarily disabling notifications. -
Automation- Automatic download settings (read more here). -
Pause automation- Pause the automation process. -
Stop- stop all download operations.
This allows you to pause the automation for a while. The pause will remain in effect until you press this button again or restart SCrawler.
-
1 hour- pause automation for 1 hour -
2 hour- pause automation for 2 hours -
3 hour- pause automation for 3 hours -
4 hour- pause automation for 4 hours -
6 hour- pause automation for 6 hours -
12 hour- pause automation for 12 hours -
Until- you will be prompted to enter the time you want to pause the task(s) -
Unlimited- pause the task until you turn it off or close the program -
Disable- disable pause
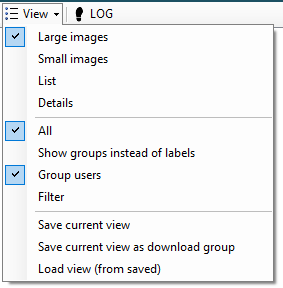
Users view modes.
- The first block specifies how users will be displayed in the form.
-
Large/Small images- with icons. -
List/Details- simple, without icons.
-
- The second block specifies which users will be displayed in the form.
-
All- sgow all users -
Show groups instead of labels- show sites groups instead of labels (when filtering users by labels) -
Group users- group users by site or labels -
Filter- filter the users you want to display
-
- View third (read here about filter settings)
Save current viewSave current view as download group-
Load view (from saved)- load one of your previously saved views (filters, download groups, scheduler plans)
You can also change the view by (un)grouping by site using the Show groups and Use user grouping options in the settings.
The error log will be opened by clicking on this button. The log contains program and download errors. The log is saved automatically when you close the program, but you still can save, copy, or clear it (using the special buttons on the log form) if you want.
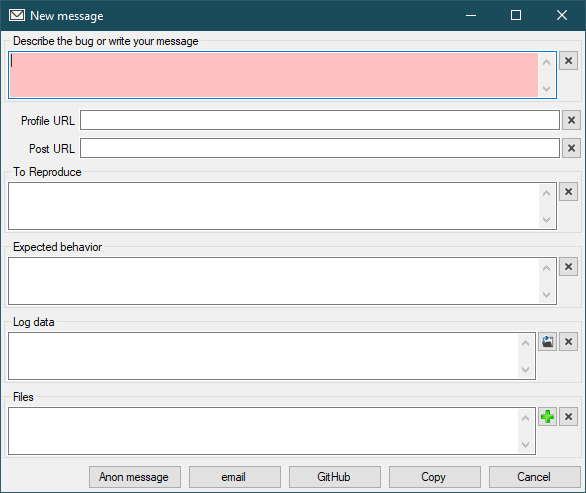
You can submit a bug report anonymously, or prepare it for GitHub or email. You can find it in the top right corner of the main window (message icon).
Fields:
-
Describe the bug or write your message- a clear and concise description of what the bug is. Profile URLPost URL-
To Reproduce- steps to reproduce the behavior: do something, see error. -
Expected behavior- a clear and concise description of what you expected to happen. Log data-
Files- attach files to your message (only works with anonymous message).
Buttons:
-
Anon message- send an anonymous message. The developer will not be able you contact you back. You can attach files (images, photos) to your message. If you would like a response from the developer, response, please add your contact details (email, Discord, etc.). You can also use this button to say something nice to the developer. 😊 -
email- create a message to send via email. -
GitHub- create a MarkDown message to post to GitHub. -
Copy- create a message and copy to your clipboard.
-
F1- program information and checking for a new version -
Insert- add user -
Del- delete one or more selected users -
Enter- open user folder -
F3- edit user -
F5,Ctrl+F5- start downloading one or more selected users (pressing withCtrlexcludes this data from the feed) -
F6,Ctrl+F6- start downloading all your users marked asReady for download(pressing withCtrlexcludes this data from the feed) -
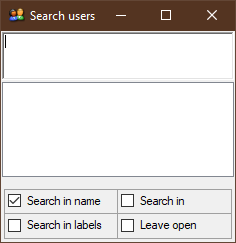
Ctrl+F- open search form -
Ctrl+NumericKey- download group with this number -
Alt+A- open scheduler -
Alt+P- open progress form
Double-click the user to open the content folder.
Download - Standalone downloader
Read here
-
Silent mode- Temporarily disabling notifications. -
Pause automation- Pause the automation process. ChannelsFeedDownloader-
Scheduler- show scheduler -
Show/Hide- show/hide SCrawler -
Close- close the program -
Close (no script)- close the program ignore the script (if you configured the script in the settings)
Ctrl+F to start searching
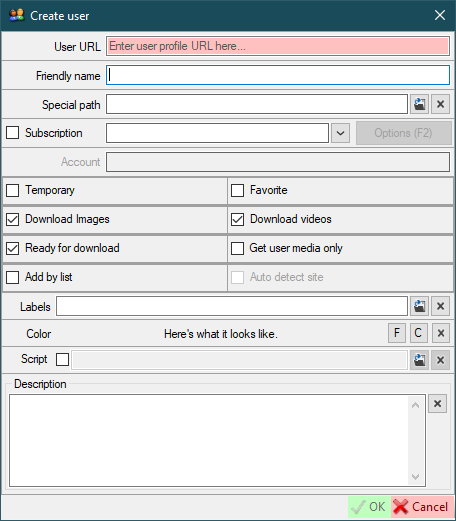
In the main window, click the Add button to open the user creation form.
Paste the copied URL into the User name field. Ignore if the username is set to something other than the actual User name. For some sites, this is necessary for internal purposes. If the site is identified, don't change the User name manually.
If you want to add a folder as a user, you need to use the following pattern: D:\Data\.
ATTENTION!
ALWAYS PASTE THE USER PROFILE URL
-
User name- Paste the user profile URL here. -
Friendly name- if configured, this name will be displayed in the user list instead of the username (if this field is green, it means that the user site name is shown).Fbutton to set the friendly name you configured;Sbutton to set site name. -
Special path- specify a path other than the default path for user data. If you set an absolute path (for example,D:\Data\), that path will be used as the user's path. If you set a relative path (for example,SomeFolder,SomeFolder\SomeFolder2), then this path will be created relative to the root folder for this site (configured in the site settings). -
Subscription- read about subscriptions here -
Sites combo box- site pointers. -
Options- additional user options. -
Account- if you've configured more than one account for the selected site, this field will be active. You can select the account through which the user will be downloaded. -
Temporary- mark user asTemporary. -
Favorite- mark user asFavorite. -
Download images/videos- for the created user, only the selected media types will be downloaded. -
Ready for download- download this user in the operationDownload all. -
Get user media only- download all posts posted by this author. -
Add by list- add users' profiles by list (new line as separator (Shift+Enterto insert new line)).- If you add users by the URL, you must check the
Auto detect sitecheckbox; - If you are adding users by username, you must select the site in the combo box.
- If you add users by the URL, you must check the
-
Auto detect site- add users by the URLs. -
Description- some information you want to keep. If theAdd by listcheckbox is checked, you must enter a list of users in this textbox (Shift+Enterto insert new line); -
Labels- labels associated with this user (used to filter users in the main window). -
Color- you can select custom user highlighting in the main window and feed. -
Script- If the checkbox is checked, script to be executed after the user download is complete. If the text is empty, the script from the global settings will be executed. How to use the script. If neitherTemporarynorFavoriteis checked, the user will be displayed in the regular site group.
In collection editing mode checkboxes have three states. When loaded, an indeterminate state means that profiles have different values for this option. When you save, checkboxes that are in indeterminate state will not be applied.
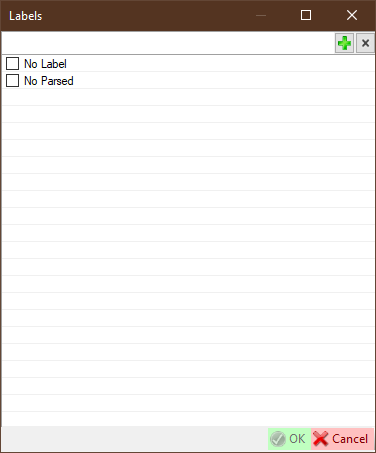
In this form, you can create labels and select them for users.
Click the + button to add a new one.
You can pick up one or more labels in this form.
-
F2- open advanced options -
F4- open labels form for pick up a label
- Users whose profile has been deleted are marked in red.
- Users whose profile has been suspended are marked in yellow.
- Collections in which all profiles have been deleted are marked in red.
- Collections that contain active profiles and deleted profiles are marked in blue.
-
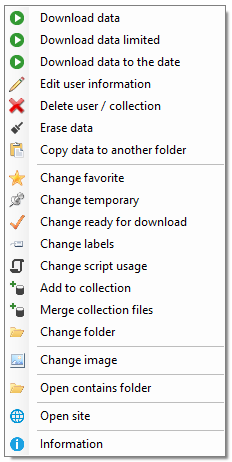
Download data- download this user/collection data. -
Download data limited- download this user/collection data only the specified number of posts. -
Download data to the date- download this user/collection data up to selected date. -
Edit user information- open a form to change user parameters. -
Delete user/collection- delete one or more selected users/collections. -
Erase data- delete all user data and/or download history -
Copy data to another folder- allows you to copy user data to another folder. -
Change favorite- if the user was marked as favorite, he becomes a regular; otherwise, he becomes the favorite. -
Change temporary- if the user was marked as temporary, he becomes a regular; otherwise, he becomes the temporary. -
Change ready for download- download this user in the operationDownload all. -
Change labels- change user labels. -
Change script usage- change script usage for selected users. -
Add to collection- add user to collection. -
Merge collection files- move files to collection root folder. -
Change folder- change user data folder -
Change image- change user icon. -
Open contains folder- open selected user/collection folder. -
Open site- open user profile. -
Information- some user information.
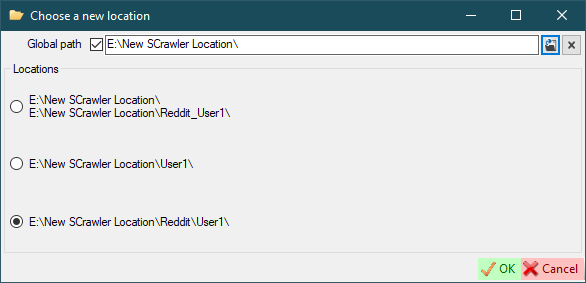
This window gives you the option to select the user's exact location.
When you change the locations of a collection, the Collection name textbox also appears. You must select the location of the collection and set the collection name!
If the Global path checkbox is checked, the selected location will be added to the global locations for quick selection in the future.
Right-click on the user, then click Erase data. Then download this user again.
Delete the user and add it again.
- Open the user settings folder.
- Find the
....._Data.xmland....._Posts.txtfiles. - Delete these files.
- Restart SCrawler.
- Download these users again.
SCrawler has advanced deletion options. It can delete a user/collection with or without a ban, delete a user with his files, delete a user from SCrawler without deleting his files. The following diagram shows all available options.
graph TB
style C fill:#f00,color:white,font-weight:bold
subgraph Delete user
A[Delete]
A -->|With ban|A1[Enter ban reason]
A -->|Without ban|B[Process]
A -->|User only|Q[Delete user/collection from SCrawler]
A1 --> B
B -->|Is user| C(Delete files)
C--> Q
Q --> Z[Exit]
end
subgraph Delete collection
B-->|Is collection| CC[Collection deletion confirmation message]
CC-->|Delete| C
CC-->|Split| E[Split collection]
CC-->|Cancel| Z
E-->EE[Extract users and add them to SCrawler as regular users]
EE-->Q
end
I've developed collections for users with multiple profiles, but you can use them however you like.
To add a user to the collection, click Add to collection in the context menu. Add a new one by clicking the + button, or select an existing one.
When you add a user to a collection, the user's data will be moved to the collection folder with the name you specified.
You can select multiple users and a collection to add users to this collection.
When you add a user to the collection, a new folder will be created in the collection folder named by pattern Site_UserName. That is, each profile in the collection is stored separately. When you merge, all files in the profiles' folders are moved to the root of the collection.
- Select the collection you want to delete.
- Click the
Deletebutton or right-click on the collection and selectDelete user / collection.-
Delete- The collection and all its files will be permanently deleted. -
Split- The collection will be split: each user profile in the collection will be displayed as a separated profile (as is), and the collection will be deleted. -
Cancel- Cancel operation.
-
Go to a diagram that illustrates all the available options.
You have two users: SomeUserName1 (from Reddit) and SomeUserName1 (from Twitter).
- Creation of the
First collectioncollection. - The folder
First collectionwill be created in the collections folder (you specify it in the program settings). - The
SomeUserName1(Reddit) folder will be moved to theFirst collectionfolder and renamed toReddit_SomeUserName1. - The
SomeUserName1(Twitter) folder will be moved to theFirst collectionfolder and renamed toTwitter_SomeUserName1.
If you want to merge the collection.
Files from the Reddit_SomeUserName1 and Twitter_SomeUserName1 folders will be moved to the First collection folder.
You can create a virtual collection. This means that this collection will only exist in SCrawler. The collection folder will not be created. The user files of users included in this type of collection, will not be moved.
You can also virtually add a user to a real collection. In this case, the user's files will not be moved to the collection folder.
Adding a user to a virtual collection is possible only in virtual mode.
Settings-Import users
You can import users that are not in SCrawler from the specific folder. You can also scan existing SCrawler directories to find missing users.
This feature is not for importing users from the site. It's more like searching for missing users.
The program has the Black list, which included users you have added to. It is only a blacklist of the program and no impact on the site!
Users in this list will be skipped when downloading channels. If you add a new user to the program and this user is already blacklisted, you will receive a notification about. The notification includes the username and the reason (if specified) for deletion.
The program implements two ways to add users to this list:
- with a reason (you can specify the reason for the ban for cases if you try to add this user again);
- with no reason.
- Close SCrawler.
- Move the data to a new location.
- In the SCrawler settings folder, find the
Settings.xmlfile.- Change the value of the
GlobalPathnode. - For each site in this file (under the
Sitesnode) where it exists, change the value of thePathnode to the new location. Example:Sites-Instagram-Path. - Save this file and close.
- Change the value of the
- Open the
Users.xmlfile (in the SCrawler settings folder).- Check the
SpecialPathvalues to make sure they still point to the correct locations. If not, replace these values with the correct ones. To find all non-emptySpecialPathvalues, you can use a simple regular expression:SpecialPath="[^"]+". - Save this file and close.
- Check the
- Open SCrawler.