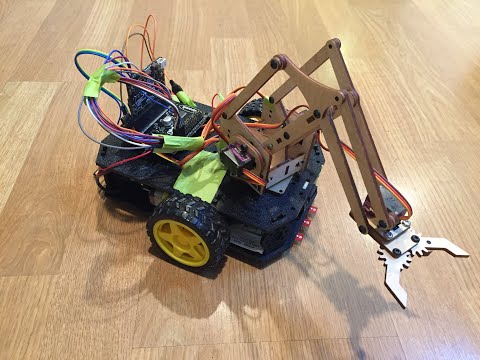
You make the Buggy Chassis and Robot Arm from scratch using a laser cutter (cardboard, plywood or plastic) or a 3D printer. The following is a list of materials needed for this project, purchase URLs included:
- BBC Microbit board
- Motor Driver Board for the Microbit: Adafruit Crikit Board or Kitronik All-In-One Robotics Board
- Buggy Chassis, Motors, Wheels
- meArm Robot Arm (Laser Cutter file included in this repository)
Go to the following links to get build instructions for the Chassis and Robot Arm.
If you're using the Kitronik All-In-One Robotics board, the datasheet shows that PINs 0, 8, 12, and 16 are used to control the wheels. You can flip the RED/BLACK motor wires to reverse motor direction to match software commands.
The Robot Arm uses four 9g Servo motors connected directly to the Microbit GPIO PINs and driven by PWM signals. You may need to solder on some female header pins to access the full GPIO of the Microbit board.
| Robot Arm Servo | PIN |
|---|---|
| Base Servo | PIN 1 |
| Shoulder Servo | PIN 13 |
| Elbow Servo | PIN 14 |
| Gripper Servo | PIN 15 |
The BBc Microbit has built in Bluetooth which makes wireless communication possible. This means you can control the robot with other Microbit board, as well as a smartphone!
- Install the Microbit App for iPhone or Android.
- Download Robot C++ code from this repository or the compiled .hex file.
- Upload C++ code to Microbit using the YOTTA offline compiler. More info at BBC Microbit C++ Documentation.
- Bluetooth pair the Microbit with your phone.
- Drive it around using the D-PAD Joystick built into the app.
Refer to the video at the top of this page for a guide to the Drive Gestures. One Microbit Controls the Robot electronics (Receiver), another sends Arm commands (Transmitter), and the third one sends Drive commands (Drive Remote).
- Download Buggy.hex onto the Robot.
- Download Arm Remote.hex onto the Arm Remote Microbit.
- Download Drive Remote.hex onto the Drive Remote Microbit.