The Training Planner
Utilize the #ASKnet training planner to curate and organize personalized training sessions. The training planner presents a variety of modules, each containing distinct resources. Select modules effortlessly to construct your personalized training. The resources within these modules include links to external sources. The planner automatically generates a timetable with suggested breaks, allowing for personalized adjustments. Additionally, you have the option to print your training plan or save it as a PDF. The planner also provides a summary of utilized resources along with their references.
Following comprehensive set of terms ensures a clear understanding of the diverse elements within the #ASKnet training platform.
-
Resource: A resource encompasses various educational elements such as documents, videos, or images. It can also include tools essential for training or a list of materials needed for a specific purpose. Each resource is accompanied by an open license, allowing unrestricted use. The training planner conveniently provides direct links to access these resources.
-
Module: Represents a unit with a specific topic, consisting of various resources. Modules have a learning objective and a time specification.
-
Training: An accumulation of different modules, with durations ranging from a few hours to days or weeks. You plan your training by selecting modules relevant to the substance of the training you are organizing.
-
License: Every resource on this platform comes with an open license, granting permission for use, sharing, and remixing of content. The standard license on this platform is CC-BY-SA 4.0 International.
A brief introduction to the two main areas and their distinct functionalities and elements. Starting with the main area and the center of the platform.
This is where you plan your training – the centerpiece of the platform. Modules can be inserted by dragging and dropping them from the Modules Selection on the left side. As each module and resource has a specific duration, a schedule will be automatically applied, starting from 9 am. You have the options to adjust times, modify descriptions, and specify orders. The following section describes and explains these functions.
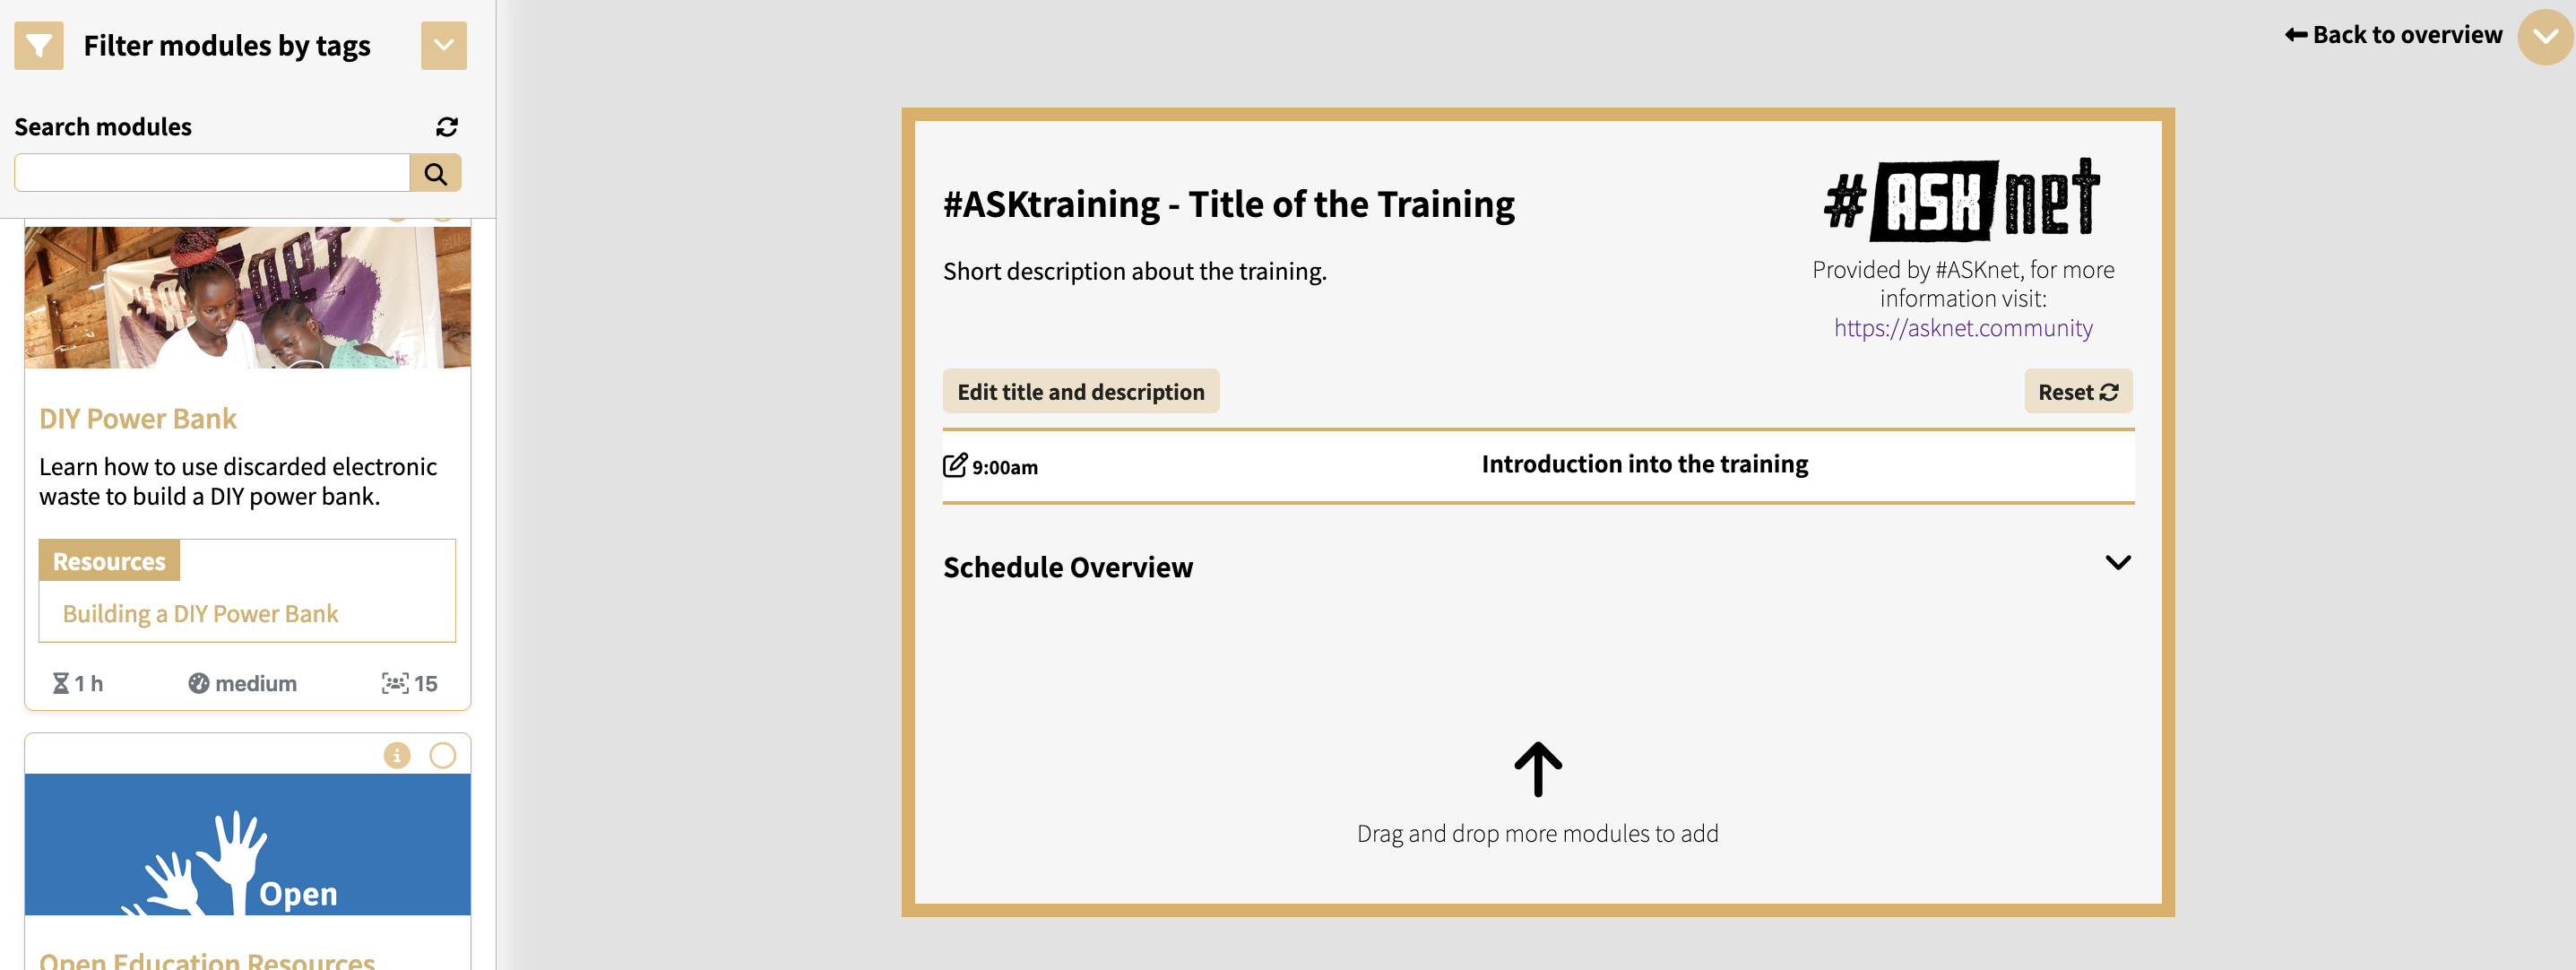
Overview Training Planner
Each training includes a title and a description, both of which can be edited by clicking the 'Edit Title and Description' button. A pop-up window will appear for editing, and you can save your changes by clicking the 'Save changes' button or cancel by clicking the 'x' button in the upper right corner.
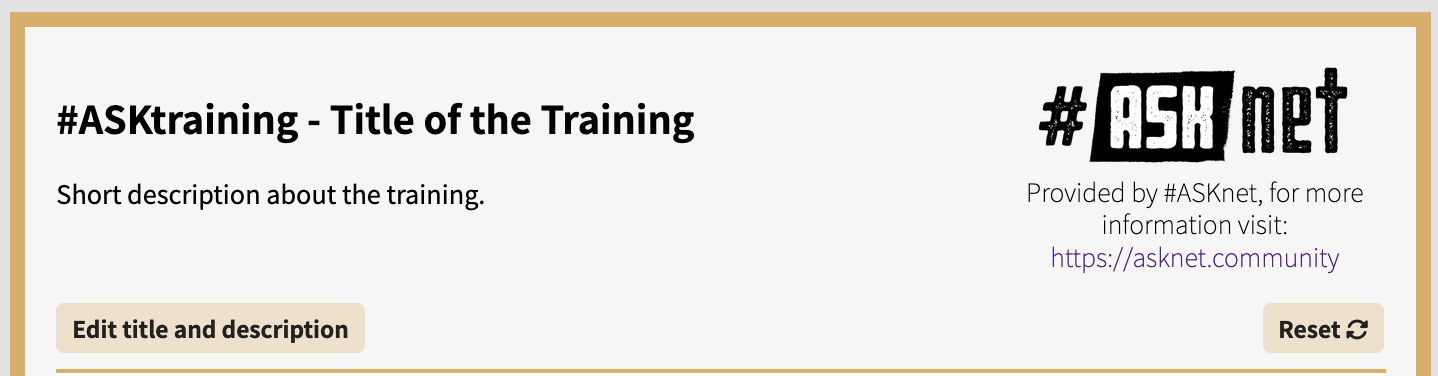
Title of the Training
Opposite the 'Edit Title and Description' button is the 'Reset' button (refer to figure: Title of the Training). This function restores the training planner to its original state, deleting all added modules, notes, descriptions, etc., leaving the Training Planner empty.
Every training begins with an introduction, set by default to 15 minutes. You can change the title of the introduction it´s duration and starting time by clicking the pen icon ('edit duration'). Apply the changes by clicking the 'Save' button; to abort, use the "x" in the upper right corner.
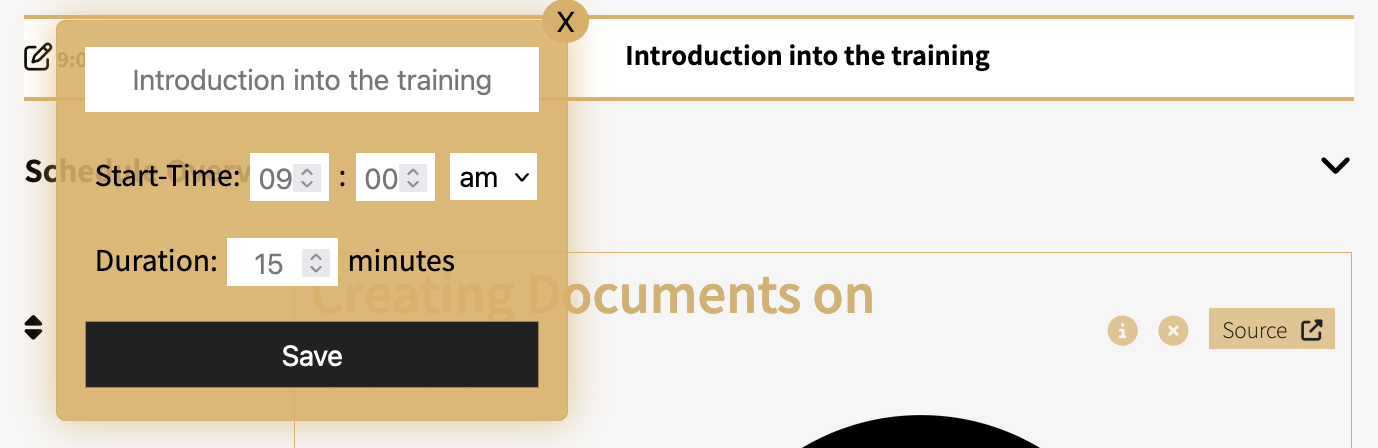
Introduction into the Training
The Training Planner provides an automatically generated schedule overview, accessible by clicking on the arrow icon (refer to figure: Schedule Overview). It lists all training modules, organized by time and day.

Schedule Overview
Once the modules are placed inside the Training Planner, their order can be effortlessly changed by dragging them using the 'move module' icon (refer to figure - left side: Move modules).
![]()
Move modules
The following section provides an overview of the modules and their elements once they are dropped into the Training Planner.

Module inside the Training Planner
-
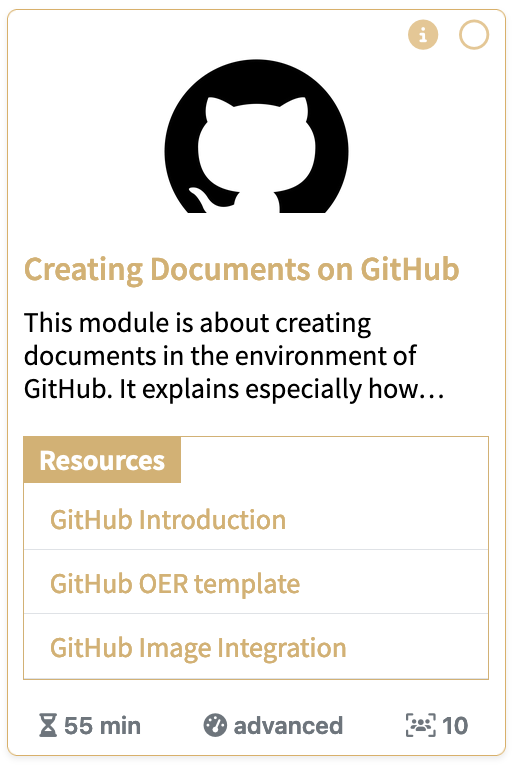
i Button: Clicking the info button (located in every module on the right upper side) opens a pop-up window providing more details about the specific module and its resources. Navigate through all modules using the '<' and '>' icons on the left and right sides. Close the window by clicking the 'x' icon located in the upper right corner.
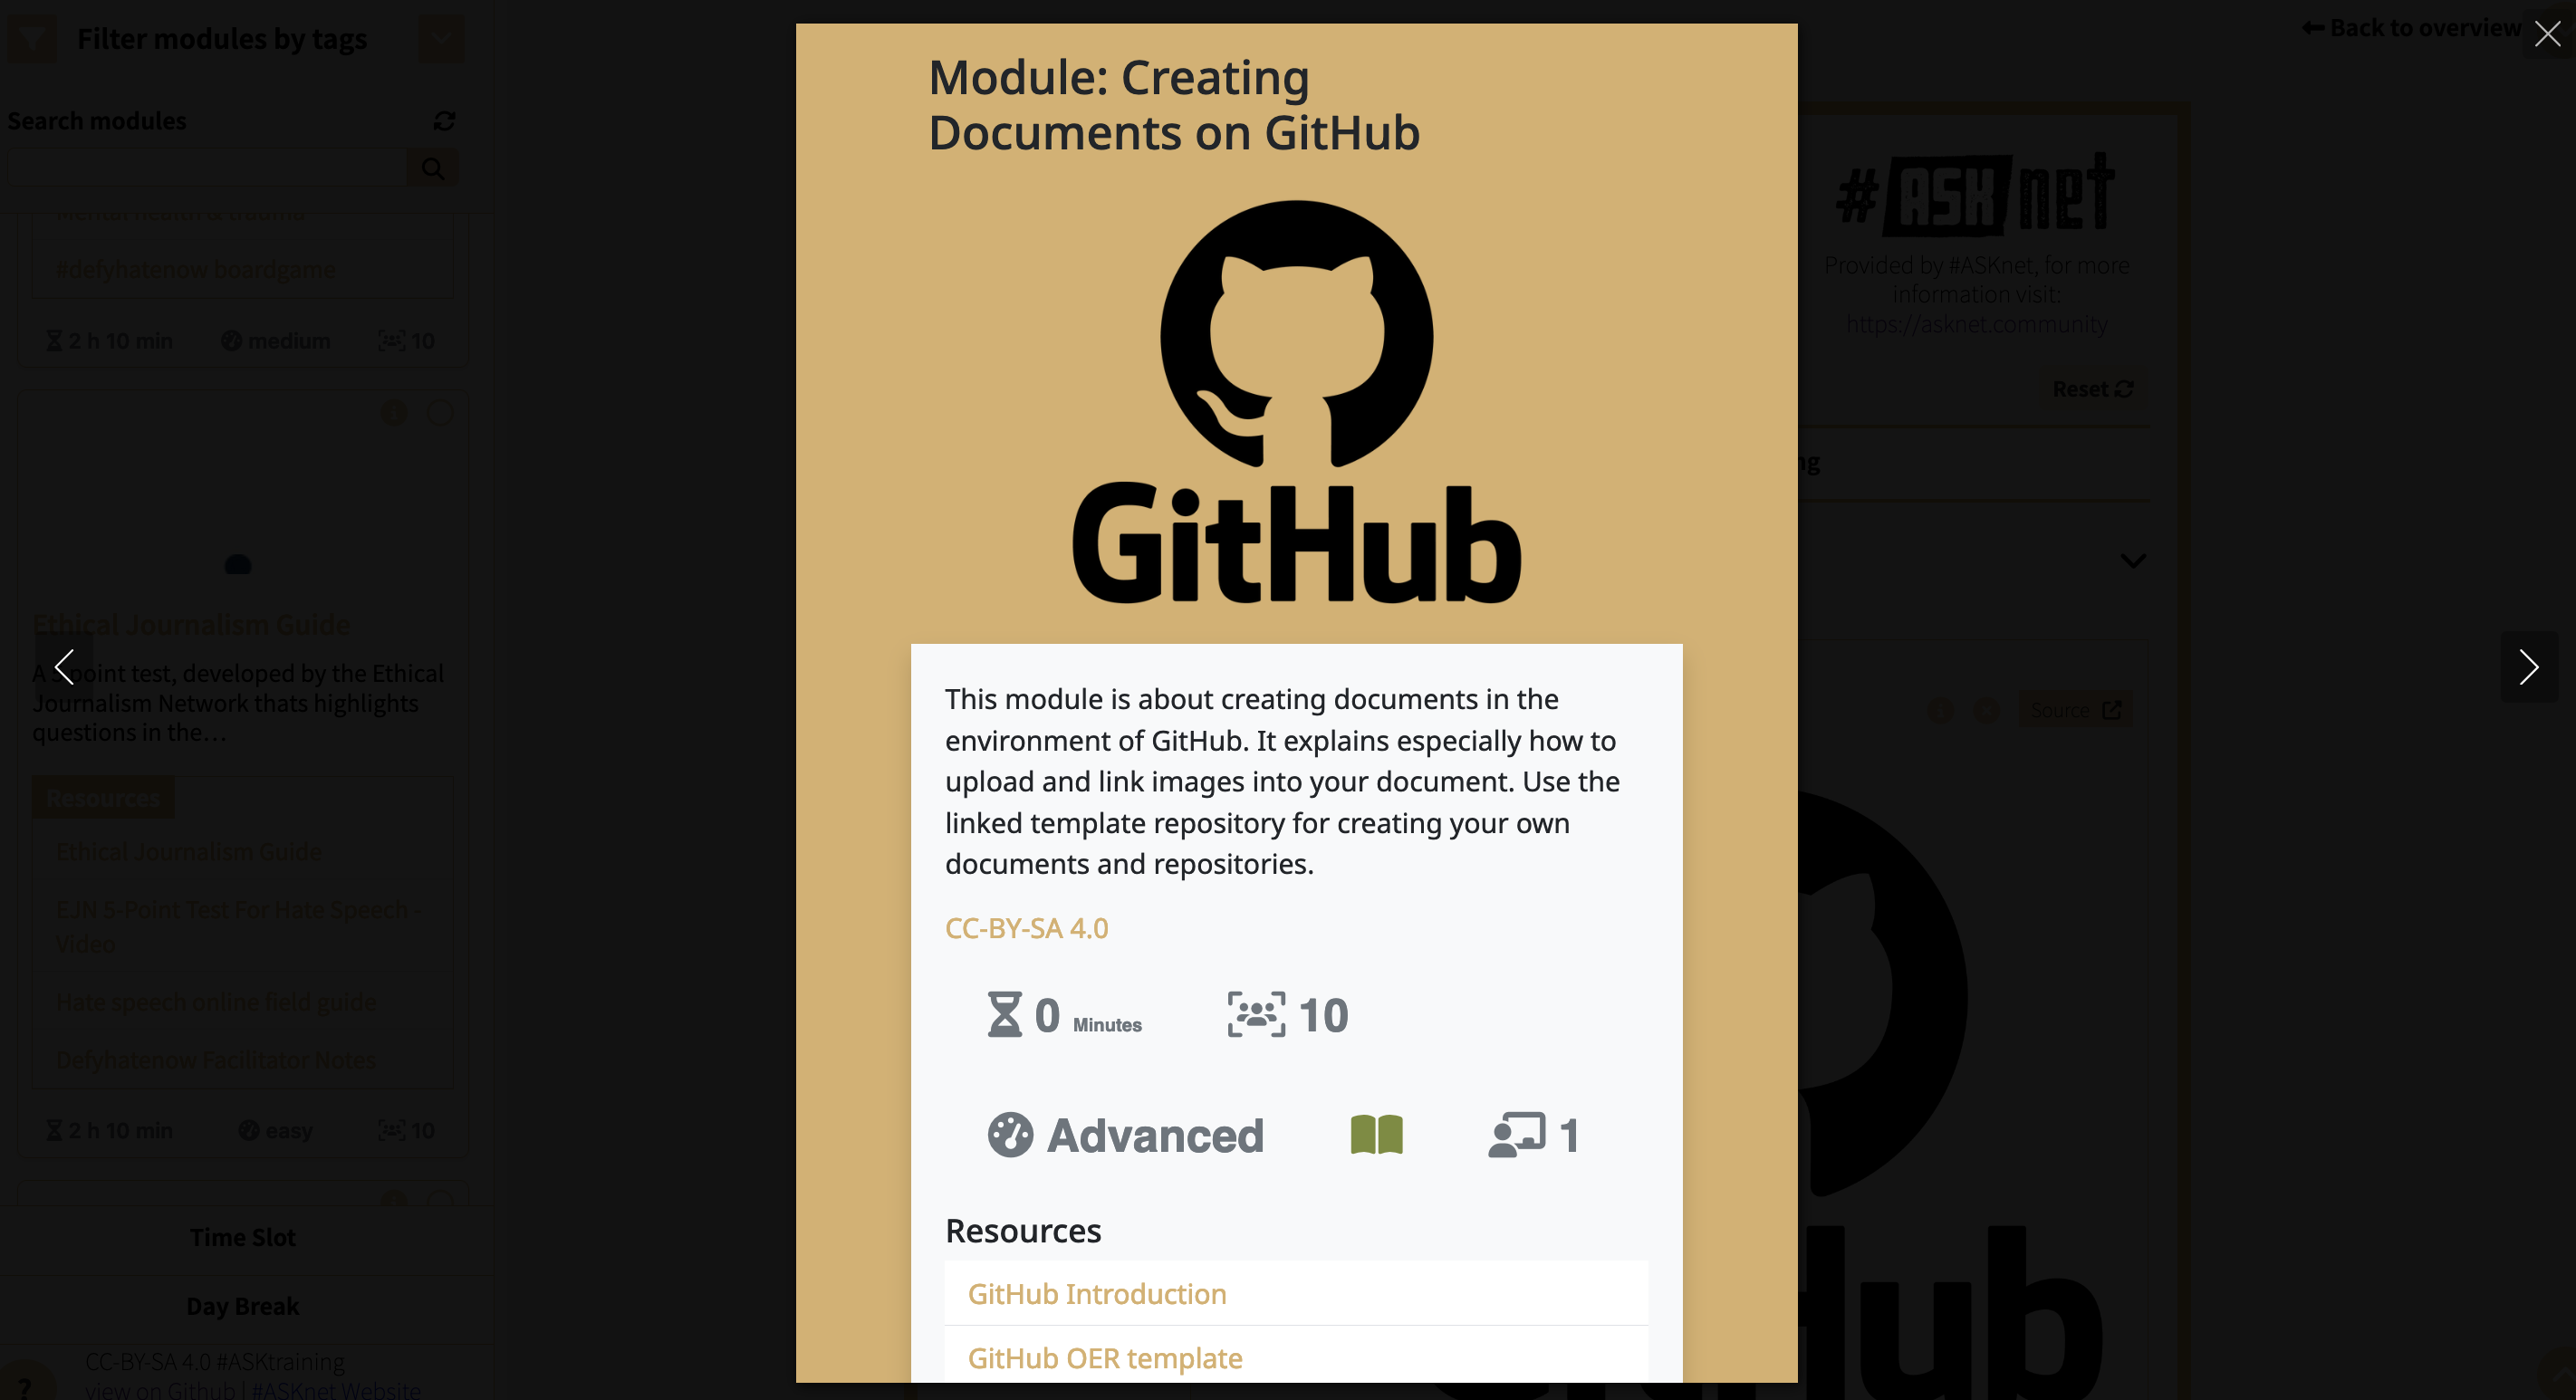
Module view -
x Button: This button removes the module from the training. The module can be found again at the end of the Module selection.
-
Source Button: This button provides a link to the source of the module. It will open in a new browser tab.
-
Learning Objective : Gives a brief, clear statement defining what participants should be able to achieve or understand after completing the module.
-
Add trainer notes: This feature allows you to add personal notes to the module. By clicking on the button, a window will pop up, providing space to enter your notes, similar to the 'Edit Title and Description' function. Once the notes have been added, the icon transforms into a pen, allowing you to click on it and edit the notes (refer to figure: Different Icons within Modules).
-
Icons: Five icons are displayed here, with the first three being familiar from the Module Selection—indicating the duration of the module, the difficulty level for the trainer, and the maximum number of participants. Additionally, there are two new icons denoting the minimum number of trainers and the estimated costs for the module (e.g., materials expenses). These icons are followed by the module's license.
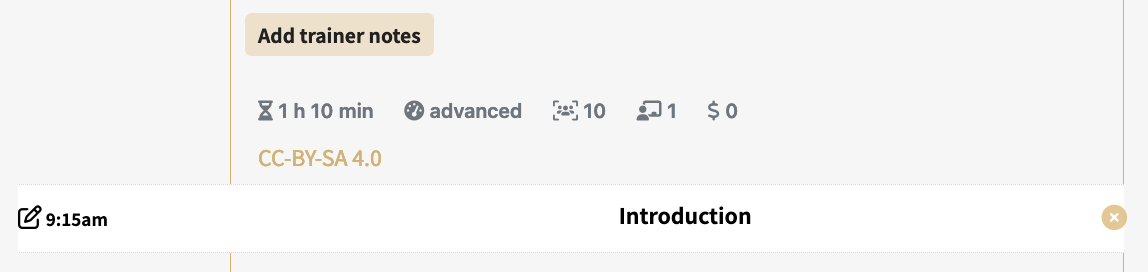
Different Icons within Modules -
Introduction: This serves as an introduction to the module, with a default setting of 15 minutes (refer to figure: Different Icons within Modules). You have the option to edit or delete it. The editing process is similar to that of 'Introduction into the training'.
-
Resources: Modules consist of various resources. Inside the module block, resources follow the same structure as modules:
- Link to the source
- Option to add notes to resources
- Additional information about duration, level of difficulty for the participants (contrary to the same icon in the module it is not the level of difficulty for trainers), cost, followed by the resource's author and license.
-
Order of Resources: Change the order of resources within the module by simply dragging and dropping them to the desired position.
On the left side, you'll find a comprehensive list of modules. Easily filter or search for specific ones. To add a module to your training, simply drag it from the sidebar and drop it into the training planner.
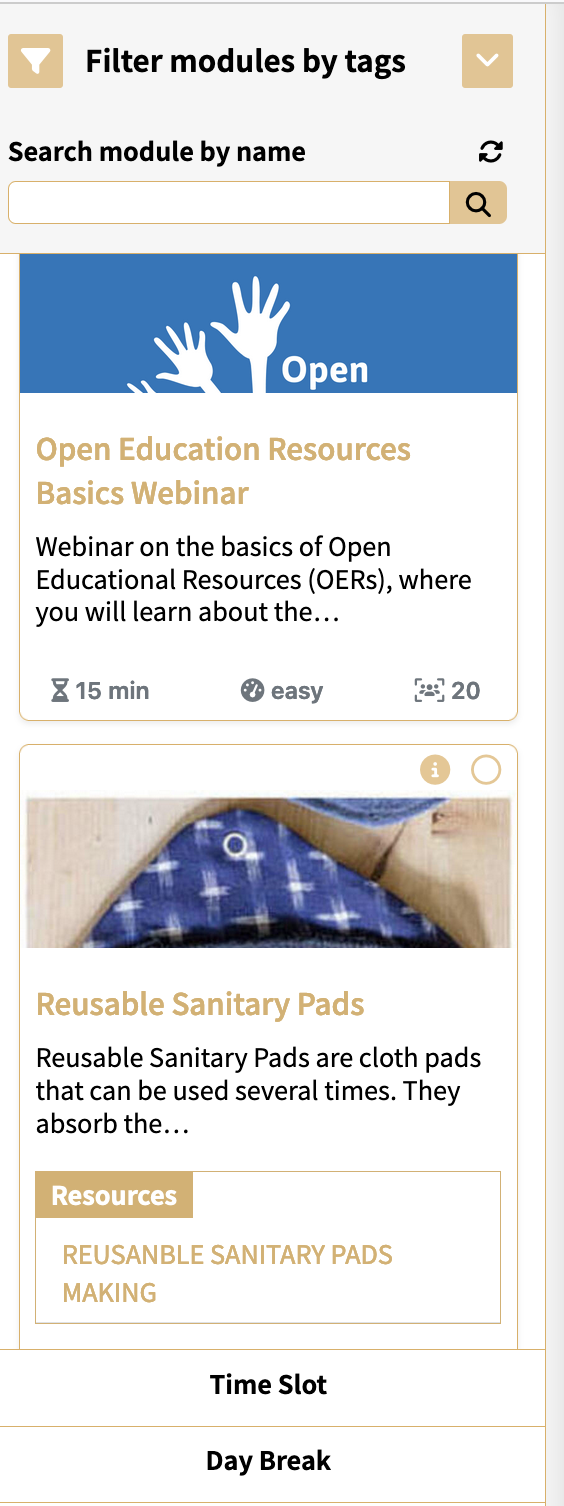
Left sidebar with modules and filter options
This function is initially collapsed; expand it by clicking the arrow icon on the right. A list of tags will appear; clicking on a specific tag will dynamically update the list of modules below to display those associated with the chosen tag. Multiple tags can be combined, providing modules that use one, the other, or both tags. Therefore, multiple selections do not narrow the list. Selected tags appear in a darker color than non-selected ones, and you can deselect a tag by a second click or simply selecting the tag 'all'.
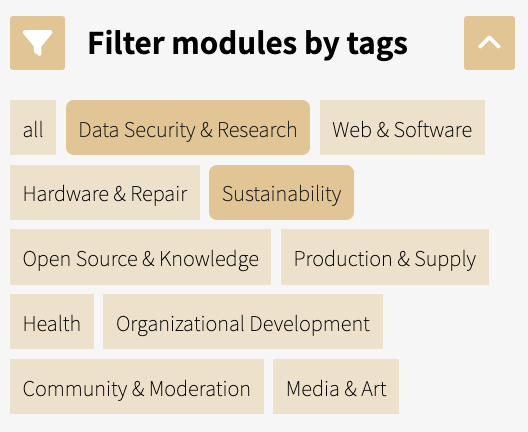
Filter modules by tags - expanded
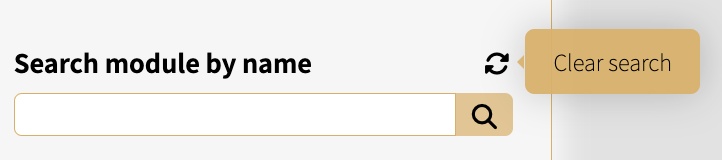
The search bar is located in the upper left corner; as you type, the list of modules will dynamically update. It filters not only by the titles but also by the content of the modules. Clear your search by using the 'Clear Search' button.
Searchbar
The modules are organized in a dynamic list. Utilize the filter options to locate specific modules. Easily select and add modules to your training plan by dragging and dropping them into the center of the Training Planner tool.
Module in the sidebar
- i Button: Clicking on the info button opens a pop-up window that provides more details about the specific module.
- Select module: Adjacent to the info button is the option to select multiple modules simultaneously. Choose the modules you need and drop them all at once into the Training Planner.
- Icons at the bottom: At the bottom of each module, three distinct icons are featured. The left icon denotes the estimated duration of the module, the center one rates the difficulty level for the trainer, and the right one indicates the maximum number of participants.
This element can be dragged and dropped, functioning as an interruption between modules and resources, such as lunch and coffee breaks. Once placed in the main area, you can adjust its duration and rename the time slot by clicking the pen icon ('edit duration'). Apply the changes by clicking the 'Save' button; to abort, use the "x" in the upper right corner.
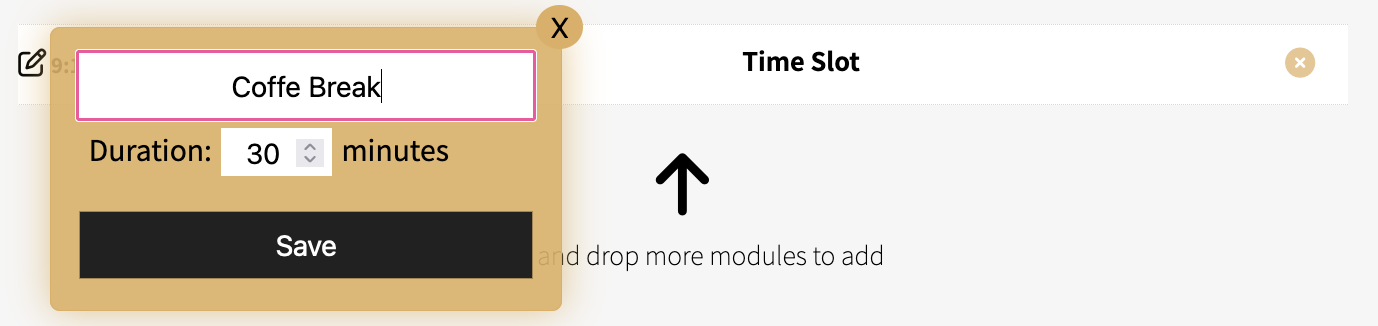
Editing the time slot
This element serves the same purpose as the Time Slot, allowing for the continuation of training on the next day. After dropping a Day Break, the time for the following module/resource automatically starts at 9:00 am and includes an option to plan some introduction time. Editing the Day Break is done in the same way as editing the Time Slot.
Offers a comprehensive snapshot, encompassing the training's overall duration and module count. It analyzes participant numbers, seeking the minimum for both resources and modules to ensure the training's viability. Additionally, it calculates the minimum required trainers, considering all resources and modules, and identifies the highest difficulty level required for the trainer(s).
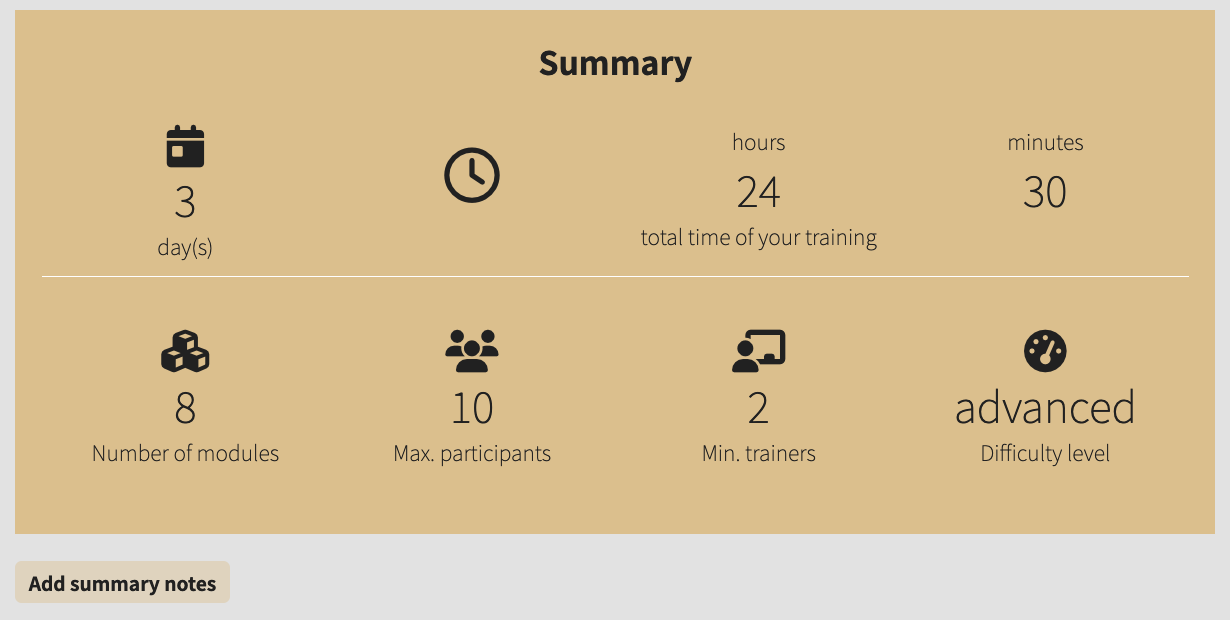
Summary
Enhance the summary with personalized information about the planned training by clicking the 'Add Summary Notes' button (refer to figure: Summary). A familiar window appears, featuring a text area for entering supplementary notes.
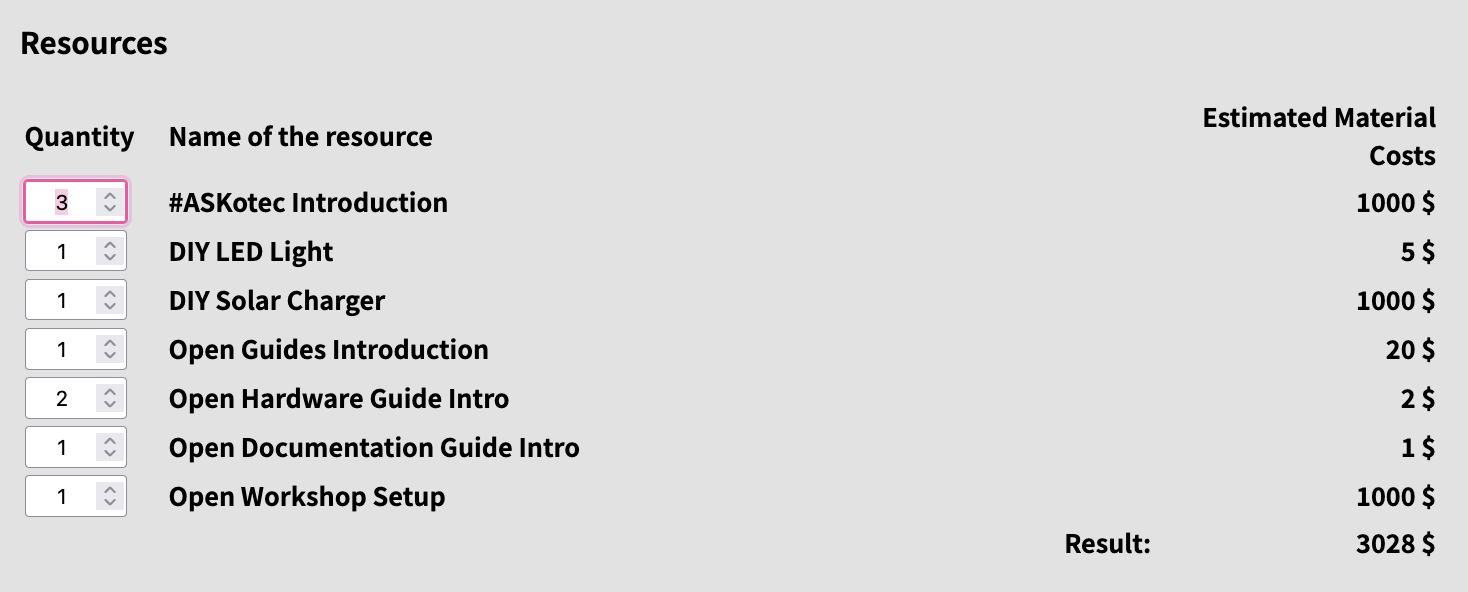
The planner provides a comprehensive list of all resources, summarizing their costs. Easily adjust the quantity by either typing the number or using the arrow buttons.
List of Resources and estimated costs
Explore the list of authors who contributed their resources and modules selected for the training. Each entry in the list serves as a clickable link, providing direct access to the respective authors. Feel free to expand the list of references for a comprehensive view.
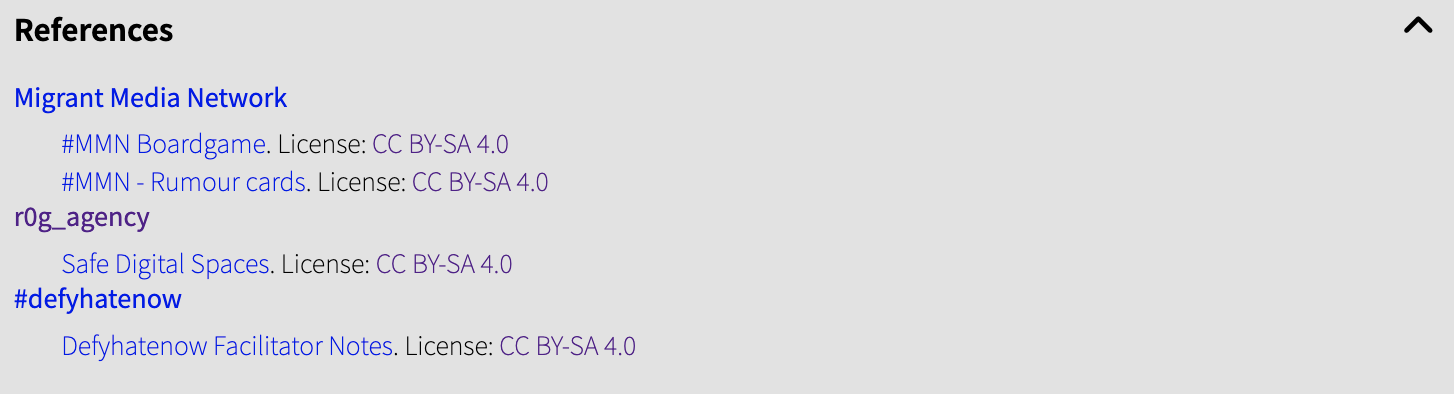
List of References
Utilize the 'Print' button located at the bottom to generate a hard copy of your meticulously planned training or save it as a PDF document. For optimal results, use Chromium-based browsers such as Brave or Chromium.