Psych Engine originally was used on Mind Games Mod, intended to be a fix for the vanilla version's many issues while keeping the casual play aspect of it. Also aiming to be an easier alternative to newbie coders.
Bloxxin'XFunkin' has moved to Psych Engine to follow up on the simplistic modding style (maybe).
-
You must have the most up-to-date version of Haxe, seriously, stop using 4.1.5, it misses some stuff.
-
After installing Haxe, Install HaxeFlixel.
-
Install
git.- Windows: install from the git-scm website.
- Linux: install the
gitpackage:sudo apt install git(ubuntu),sudo pacman -S git(arch), etc... (you probably already have it)
-
Install and set up the necessary libraries:
haxelib install lime 7.9.0haxelib install openflhaxelib install flixelhaxelib install flixel-toolshaxelib install flixel-uihaxelib install hscripthaxelib install flixel-addonshaxelib install actuatehaxelib run lime setuphaxelib run lime setup flixelhaxelib run flixel-tools setuphaxelib git linc_luajit https://github.com/nebulazorua/linc_luajit.githaxelib git hxvm-luajit https://github.com/nebulazorua/hxvm-luajithaxelib git faxe https://github.com/uhrobots/faxehaxelib git polymod https://github.com/MasterEric/polymod.githaxelib git discord_rpc https://github.com/Aidan63/linc_discord-rpchaxelib git extension-webm https://github.com/KadeDev/extension-webmlime rebuild extension-webm <ie. windows, macos, linux>- Note: for Linux, you need to install the
g++-multilibandgcc-multilibpackages respectively. (use apt to install them.)
- Note: for Linux, you need to install the
If you don't want your mod to be able to run .lua scripts, delete the "LUA_ALLOWED" line on Project.xml
Windows-only dependencies (only for building to Windows. Building html5 on Windows does not require this)
If you are planning to build for Windows, you also need to install Visual Studio 2019. While installing it, don't click on any of the options to install workloads. Instead, go to the individual components tab and choose the following:
- MSVC v142 - VS 2019 C++ x64/x86 build tools
- Windows SDK (10.0.17763.0)
This will install about 4 GB of files, but is necessary to build for Windows.
If you are running macOS, you'll need to install Xcode. You can download it from the macOS App Store or from the Xcode website.
If you get an error telling you that you need a newer macOS version, you need to download an older version of Xcode from the More Software Downloads section of the Apple Developer website. (You can check which version of Xcode you need for your macOS version on Wikipedia's comparison table (in the min macOS to run column).)
Since you already installed git in a previous step, we'll use it to clone the repository.
cdto where you want to store the source code (i.e.C:\Users\username\Desktopor~/Desktop)git clone https://github.com/KadeDev/Kade-Engine.gitcdinto the source code:cd Kade-Engine- (optional) If you want to build a specific version of Kade Engine, you can use
git checkoutto switch to it (i.e.git checkout 1.4-KE) (remember that versions 1.4 and older cannot build to Linux or HTML5)
- You should not do this if you are planning to contribute, as you should always be developing on the latest version.
Finally, we are ready to build.
- Run
lime build <target>, replacing<target>with the platform you want to build to (windows,mac,linux,html5) (i.e.lime build windows) - The build will be in
Kade-Engine/export/release/<target>/bin, with<target>being the target you built to in the previous step. (i.e.Kade-Engine/export/release/windows/bin) - Incase you added the -debug flag the files will be inside
Kade-Engine/export/debug/<target>/bin - Only the
binfolder is necessary to run the game. The other ones inexport/release/<target>are not.
Check the Troubleshooting documentation if you have problems with these instructions.
- AbraX - Coding, Arts, Animations, Music, Charting, etc.
- Shadow Mario - Coding
- RiverOaken - Arts and Animations
- bbpanzu - Assistant Coding
- shubs - New Input System
- SqirraRNG - Chart Editor's Sound Waveform base code
- iFlicky - Delay/Combo Menu Song Composer + Dialogue Sounds
- PolybiusProxy - .MP4 Loader Extension
- Keoiki - Note Splash Animations
- David Baszucki - CEO
- Erik Cassel - CEO
- Probably one of the main points of this engine, you can code in .lua files outside of the source code, making your own weeks without even messing with the source!
- Comes with a Mod Organizing/Disabling Menu.
- Remastered Noob sprite!
- New Funky Friday Background!
- Remastered Guest 666 sprite!
- New Bloxburg Background!
- Remastered Bacon sprite!
- New Livetopia Background!
- NEW Character: Shedletsky!
- NEW Work at a Pizza Place Background!
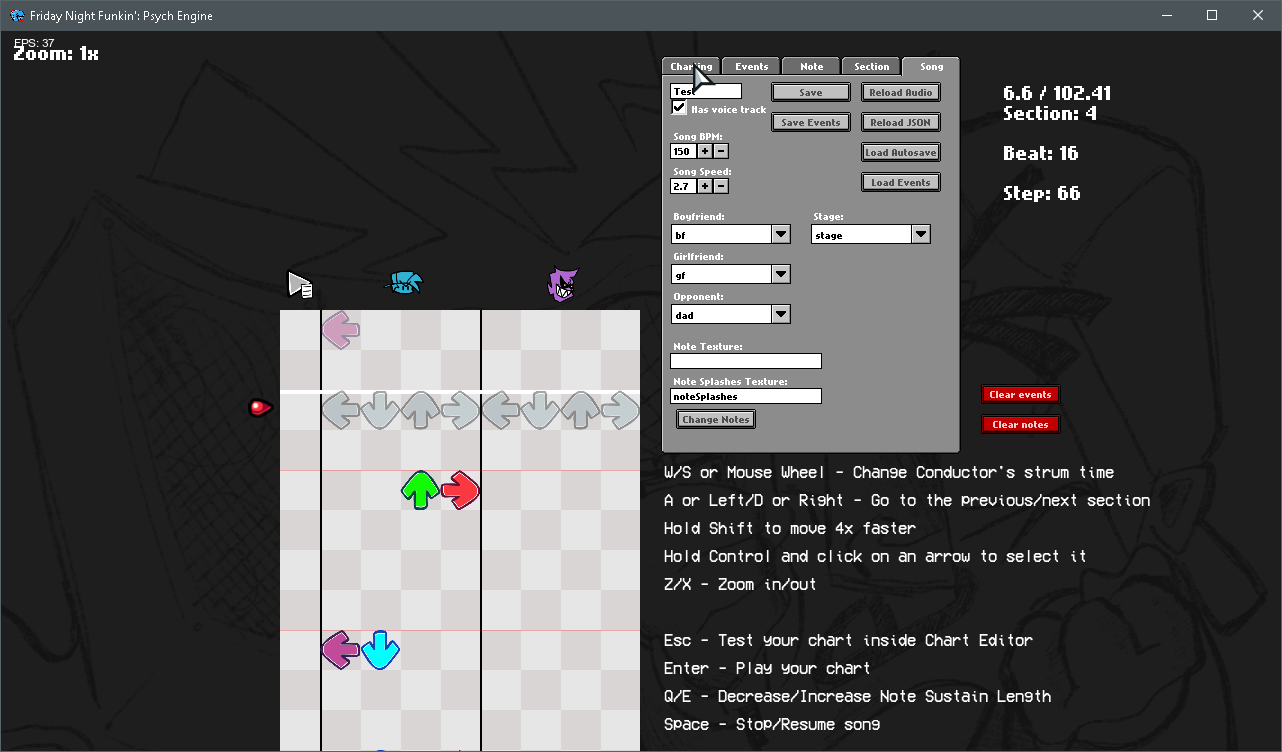
- You can now chart "Event" notes, which are bookmarks that trigger specific actions that usually were hardcoded on the vanilla version of the game.
- Your song's BPM can now have decimal values
- You can manually adjust a Note's strum time if you're really going for milisecond precision
- You can change a note's type on the Editor, it comes with two example types:
- Alt Animation: Forces an alt animation to play, useful for songs like Ugh/Stress
- Hey: Forces a "Hey" animation instead of the base Sing animation, if Boyfriend hits this note, Girlfriend will do a "Hey!" too.

- Working both for Source code modding and Downloaded builds!

- There are a good amount of buttons here, but some do not have any functions yet.

- Songs are now formatted to look like games, or in ROBLOX's case, Experiences.

- People involved in the creation of said mod or engine now appear in a somewhat grid-like arrangement, hover over an icon to see their contributions!

- 3 old badges and 4 new ones for a total of 7 badges to obtain! (Check Achievements.hx and search for "checkForAchievement" on PlayState.hx)
- You can change Note colors, Delay and Combo Offset, Controls and Preferences there.
- On Preferences you can toggle Downscroll, Middlescroll, Anti-Aliasing, Framerate, Low Quality, Note Splashes, Flashing Lights, etc.
- When the enemy hits a note, their strum note also glows.
- Lag doesn't impact the camera movement and player icon scaling anymore.
- Depending on the camera's character focus, Girlfriend will also look at the character!
- Your controls are listed below your set of arrows now!
- New Note Assets!
- Loading Screen simulates how ROBLOX games would load!

- Pause Menu simulates the ROBLOX menu in a game!
