ESP8266 based bridge that allows you bridge any 433Mhz ASK/OOK and IR devices to a network via MQTT over WiFi!
This project uses an ESP8266 to bridge 433/315Mhz OOK/ASK RF modules as well as 38khz based IR devices to a LAN network. The primary intended form of communication is over MQTT to allow for easy integration into home automation systems such as OpenHAB or HomeAssistant
Written in the Ardiuno IDE with the ESP8266 board manager plugins

This device allows you to send and receive messages from ANY 433Mhz/315Mhz OOK sensor, switch etc. It also supports any 38 khz IR device. At the moment packets are raw format and encoded as pulse lengths, there is no packet decoding implemented yet.
There is also provision for a RGB led that can be used as an indicator. The board is compatible with most cheap 433/315Mhz OOK/ASK modules that are available cheaply from various online sources.
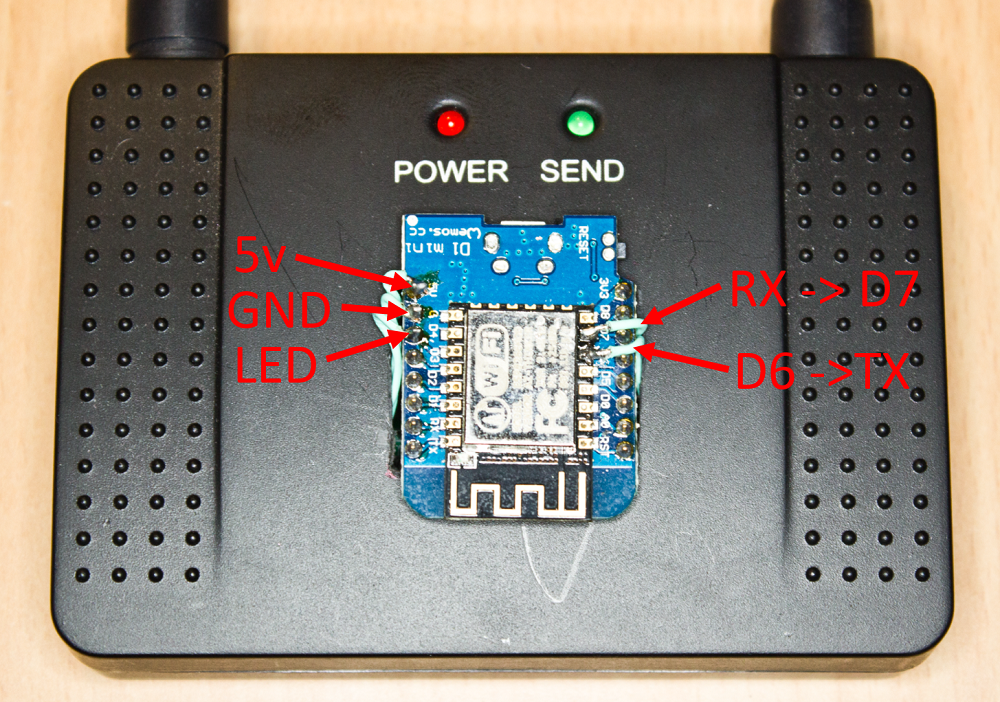
The bridge hardware can be as 'polished' or rudimentary as you like, the bridge can be built on a breadboard or integrated into a custom housing. STLs will be provided for a 3D printed enclosure that fits a WeMo 8266 along with a daughter board to mount the RF modules.
If you don't care about IR the easiest solution is to purchase an RF repeater such as this: https://www.aliexpress.com/item/RF-wireless-repeater-wireless-calling-system-repeater-Signal-amplifier-transmitter-repeater/32379532511.html
Then modify it as follows, for the extra resistor on the RX line anything between 2k and 10k will work fine.

Otherwise, free to use discrete transmitter and reciever modules.
You will need a properly setup and working MQTT server on your local network (WAN servers have not been tested)
After flashing firmware, you should see the device appear in your wireless network list. Connect to the device and browse to 192.168.4.1 Enter the Wifi Credentials for your network. The WifiManager Library is used for the moment. After connection there will not be an active webserver all comms will occur over MQTT.
Assuming everything is working correctly the bridge will now use pub/sub messages for communication.
The following topics are used for communication:
ESP/RFtoSend ---MQTT Sub Topic, Will relay any messages here over RF
ESP/IRtoSend ---MQTT Sub Topic, Will relay any messages here over IR
ESP/RFrecv ---MQTT Pub Topic, Will publish any RF packets recieved here
ESP/IRrecv ---MQTT Pub Topic, Will publish any IR packets recieved here
ESP/RLED ---MQTT Sub Topic, Set RED Led Brightness (0-255) (Optional led Topic)
ESP/GLED ---MQTT Sub Topic, Set BLUE Led Brightness (0-255) (Optional led Topic)
ESP/BLED ---MQTT Sub Topic, Set GREEN Led Brightness (0-255) (Optional led Topic)
ESP/Status ---MQTT Pub Topic, Publishes Debug Messages to here
Lets say you want to control a 433mhz switch from your home automation system.
I assume you are running the MQTT server on a linux based device.
SSH into the device, make sure you set the correct device IP address in the code. My MQTT server exists on 192.168.1.103, this is currently hardcoded into the source but of course you can edit the variable and recompile
Subscribe to the topic "ESP/RFrecv" (make sure you have mosquitto and mosquitto-clients installed and configured!)
mosquitto_sub -t "ESP/RFrecv"
If there is some RF noise in your location you may already see some messages come through. Press button on your RF device. You should see packets stream through.
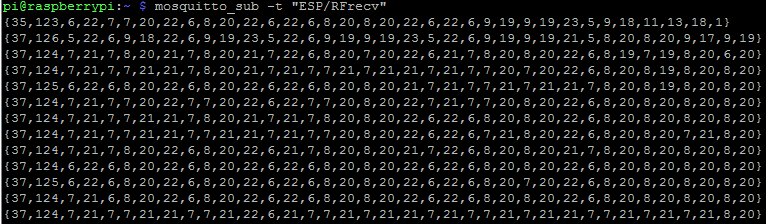
The is the RAW packet stucture, the first value the length of the the packet, each value after is the number of 'ticks' (interrupt routines) before the signal toggle states.
For the example in the above image: (not to scale)

A small variance is expected from packet to packet and will not effect operation. The values should only be -/+2 difference form eachother for stable operation. The first few packets may also be incorrect until the reciever AGC kicks in.
Now to send that signal you simply publish the same message to "ESP/RFtoSend"
mosquitto_pub -t "ESP/RFtoSend" -m "{37,126,5,22,6,9,18,22,6,9,19,23,5,22,6,9,19,9,19,23,5,22,6,9,19,9,19,21,5,8,20,8,20,9,17,9,19}"
The packet will be relayed over 433Mhz and should emulate the effect of the hardware remote.
OpenHAB integration:
To bind this to a virtual switch in OpenHAB is simple.
The best way is to have a .map file.
Make a .map file and place it under 'transform' in your OpenHAB directory, basically we 'map' switch state like ON/OFF to the RF packet
It will look like this:

save it to: (for example)
transform/RF/AlessFanLight.map
Will you need to have the transform addon enabled in OpenHAB as well as the MQTT service configured
Now your switch binding would be something like this:
Switch AlessFanLight "Fan Light" {mqtt=">[MQTTPI:ESP/RFtoSend:command:*:MAP(RF/AlessFanLight.map)]"}
Now when the switch recieves an ON or OFF command it will be 'mapped' to the RF packet, and sent out to the ESP8266 bridge to be relayed over the air. If you have an RTL-SDR module you can use to make sure the data is being sent.
For IR packets it is the exact same proceedure, just use the IR MQTT topics.
Decoding received data is more complex, currently I handle this with a custom python script, I would like to impliment something more elegant on the bridge itself.
Like my work and want to buy me a beer?: Donate Bitcoin!
BTC: 1NZ1k6XDN7KLy2XSQfdu96SEhrRuJMYbpd
License: CC BY-NC-SA 3.0