This is a master student project realized at the robotics laboratory of the Westphalian University of Applied Science. With the programs in this repository you can calibrate single cameras, a stereo system, calculate disparity maps and evaluate your data. It's a all in one package for stereo vision! The software runs under windows and linux and is written in C++.
Checkout the project in action or see other nice projects: My YouTube Channel, Robalab W-HS YouTube Channel
Based on the following libraries:
- OpenCV
- BOOST
- libConfig
- PCL
- OpenMP
- Qt 4.8.X
Projects in this package:
- IntrinsicExtrinsicCalib
- ImageRectify
- ADCensusBM
- PictureOverlay
- OpenCVBM
- evalDisp
With this program you can calculate the intrinsic and extrinsinc parameters of your cameras. The calibration requires several images with chessboard pattern in any size, e.g. a 8x6 (width x height) pattern. We used this 18x12 (only the inner edges count) pattern on a A0 sheet in the project. Every calibration is based on about 20 images from different views, distances and angles. It is important that the pattern is visible on every section of the camera sensor! For every single camera and calibration step (intrinsic and extrinsic) you must take these images.
Build the program:
- Navigate into the "IntrinsicExtrinsicCalib" folder.
mkdir buildcd buildcmake ..make- If you build the program successfully you should be able to see the "intrisic" and "extrinsic" executables.
Execute the intrinsic:
- Create a "intrinsicConfig.cfg" as you can see in the sample folder. (e.g.: configIntrinsicLeft.cfg, configIntrinsicRight.cfg)
- Create a "intrinsicImages.xml" as you can see in the sample folder. (e.g.: imagesLeftIntrinsic.xml, imagesRightIntrinsic.xml)
- Execute the intrisic calibration:
./intrinsic PATH_TO_YOUR_CONFIG/intrinsicConfig.cfg - This can take several minutes. Check your calibration result in your destination folder!
Execute the extrinsic:
- Create a "extrinsicConfig.cfg" as you can see in the sample folder. (e.g.: configExtrinsic.cfg)
- Create a "extrinsicImages.xml" as you can see in the sample folder. (e.g.: imagesExtrinsic.xml)
- Execute the extrinsic calibration:
./extrinsic PATH_TO_YOUR_CONFIG/extrinsicConfig.cfg - This can take several minutes. Check your calibration result in your destination folder!
- Check the translation vector in the resulting 4x4 matrix. This should match the distance between the cameras in the selected measuring unit.
With this program you can easy rectify new images which are taken with a calibrated stereo camera system. You need the intrinsic calibration from each camera and the extrinsic calibration for the stereo system. All the calibrations can be estimated with "IntrinsicExtrinsicCalib".
Build the program:
- Navigate into the "ImageRectify" folder.
mkdir buildcd buildcmake ..make- If you build the program successfully you should be able to see the "ImageRectify" executable.
Execute the image rectification:
- Create a "config.cfg" as you can see in the sample folder.
- Create a "images.xml" as you can see in the sample folder.
- Execute the image rectification:
./ImageRectify PATH_TO_YOUR_CONFIG/config.cfg
This program creates the disparity map for a given rectified image set with the use of the ADCensus algorithm. You can find the paper in the "Documents" section or here. The current implementation doesn't use your graphics card for parallelization, for what the algorithm is designed for, but rather it makes use of OpenMP. By using the OpenCV it should be easy to make a port to the graphics card.
If you have an extrinsic calibration file for your images the program creates a point cloud. Otherwise create an empty extrinsic file and change the specific parameter in the config as you can see in the sample folder. Only the depth maps will be created if no extrinsic exists. In any case, the input images must be rectified!
You can see the results and evalution of the algorithm here: http://vision.middlebury.edu/stereo/eval/
Build the program:
- Navigate into the "ADCensusBM" folder.
mkdir buildcd buildcmake ..make- If you build the program successfully you should be able to see the "ADCensusBM" executable.
Execute the image rectification:
- Copy and edit the "config.cfg" from the sample folder. The values in the "config.cfg" are for the middleburry image set. The values also work with other images but specific values for your own dataset can improve the quallity.
- Create a "images.xml" as you can see in the sample folder.
- Execute the image rectification:
./ADCensusBM PATH_TO_YOUR_CONFIG/config.cfg
It's a small tool to check the accuracy of your calibrations and the disparities in the scene. The program simply overlays 2 corresponding images from the left and right camera and display them. Afterwards you can move one image (the first one) and check if objects layes on the same epipolar lines. Further you can check the disparity between the objects.
Build the program:
- Navigate into the "PictureOverlay" folder
mkdir buildcd buildcmake ..make- If you build the program successfully you should be able to see the "PictureOverlay" executable
Execute PictureOverlay:
./PictureOverlay PATH_TO_YOUR_IMAGE/image1.jpg PATH_TO_YOUR_IMAGE/image2.jpg alpha1 alpha2 scale
- alpha1: The alpha value for the first image. The value must be between 0 - 1. (e.g.: 0.5)
- alpha2: The alpha value for the second image. The value must be between 0 - 1. (e.g.: 0.5)
- scale: You can reduce the size with this parameter, if you have images bigger than your screen resolution. The value must be between 0 and 1. If you don't want to reduce the size, set the value to 1.
- With the "A" and "D" keys you can move the first image left and right.
- With the "W" and "S" keys you can move the first image up and down.
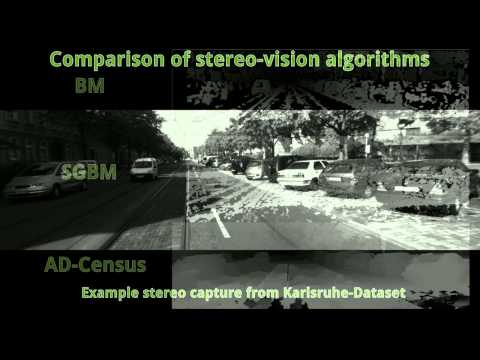
It's a small programm to compare the results from the ADCensus with the builtin block matching methods by the OpenCV, Block-Matching (BM) and Semi-Global Bock-Matching (SGBM). As the input, the programm needs 2 rectified images from a stereo camera system. You're be able to adjust all free parameters for each algorithm and see immediately the results. You have the option to switch the whole time between the 2 algorithms , to compare them.
Build the program:
- Navigate into the "OpenCVBM" folder
mkdir buildcd buildcmake ..make- If you build the program successfully you should be able to see the "OpenCVBM" executable
Execute OpenCVBM:
./OpenCVBM PATH_TO_YOUR_IMAGE/image1.jpg PATH_TO_YOUR_IMAGE/image2.jpg scale
- scale: You can reduce the size with this parameter, if you have images bigger than your screen resolution. The value must be between 0 and 1. If you don't want to reduce the size, set the value to 1.
With this programm you can evaluate each pixel and see the disparity and the calculated distance for this. All you need are the rectified images, the calculated disparity images and the camera extrinsic.
Writing a config file:
Before you can use the programm you need a config. A sample config is under the "evalDisp/sample"!
Parameter:
- cameraName: Name for the camera
- extrinsicFile: Is a file that would be created with "IntrinsicExtrinsicCalib"
- imagesXML: Is a OpenCV XML-File that contains the pathes to the images
- You need only 1 image from your camera (left or right camera)!
- dispsXML: Is a OpenCV XML-File that contains the pathes to the disparity maps
- Attention: You need the .yml disparity maps, which are created by the ADCensus! The disparity map must be the corresspondig file to the image at the imagesXML! See the samples in the project!
- scaleFactor: You can reduce the size with this parameter, if you have images bigger than your screen resolution. The value must be between 0 and 1. If you don't want to reduce the size, set the value to 1.
Sample config 1 camera:
cameras =(
            {
                cameraName="Sample_Camera";
                extrinsicFile="PATH_TO_THE_CALCULATED_CAMERA_EXTRINSIC_FILE/CAMERA_EXTRINSIC_FILE.yml";
				imagesXML="PATH_TO_THE_IMAGE_CONFIG/IMAGE.xml";
                dispsXML="PATH_TO_THE_DISPARITY_MAPS/DISPARITY_MAPS.xml";
                scaleFactor=0.5;
            }
    };
Sample config for a couple of cameras:
cameras =(
            {
                cameraName="Sample_Camera_1";
                extrinsicFile="PATH_TO_THE_CALCULATED_CAMERA_EXTRINSIC_FILE/CAMERA1_EXTRINSIC_FILE.yml";
				imagesXML="PATH_TO_THE_IMAGE_CONFIG/IMAGE1.xml";
                dispsXML="PATH_TO_THE_DISPARITY_MAPS/DISPARITY1_MAPS.xml";
                scaleFactor=0.5;
            },
            {
                cameraName="Sample_Camera_2";
                extrinsicFile="PATH_TO_THE_CALCULATED_CAMERA_EXTRINSIC_FILE/CAMERA2_EXTRINSIC_FILE.yml";
				imagesXML="PATH_TO_THE_IMAGE_CONFIG/IMAGE2.xml";
                dispsXML="PATH_TO_THE_DISPARITY_MAPS/DISPARITY2_MAPS.xml";
                scaleFactor=0.5;
            }
    };
Build the program:
- Navigate into the "evalDisp" folder
mkdir buildcd buildcmake ..make- If you build the program successfully you should be able to see the "evalDisp" executable
Execute evalDisp:
./evalDisp PATH_TO_YOUR_CONFIG/YOUR_CONFIG.jpg
- With the "A" and "D" keys you can move the cross left and right.
- With the "W" and "S" keys you can move the cross up and down.
- With "C" you can toggle between the disparity and the color image.
- With "B" and "N" you can go to the previous / next image on your list.
- With "H" and "J" you can go to the previous / next camera if exists.
- With "Q" or "ESC" you can quit the program.