非越狱插件Pod
本节主要介绍如何将自己的非越狱插件传到CocoaPods,然后通过Pod一键安装!
注意: 自己开发Pod的时候,文件命名都带上前缀,防止多个pod出现同一个头文件的情况!
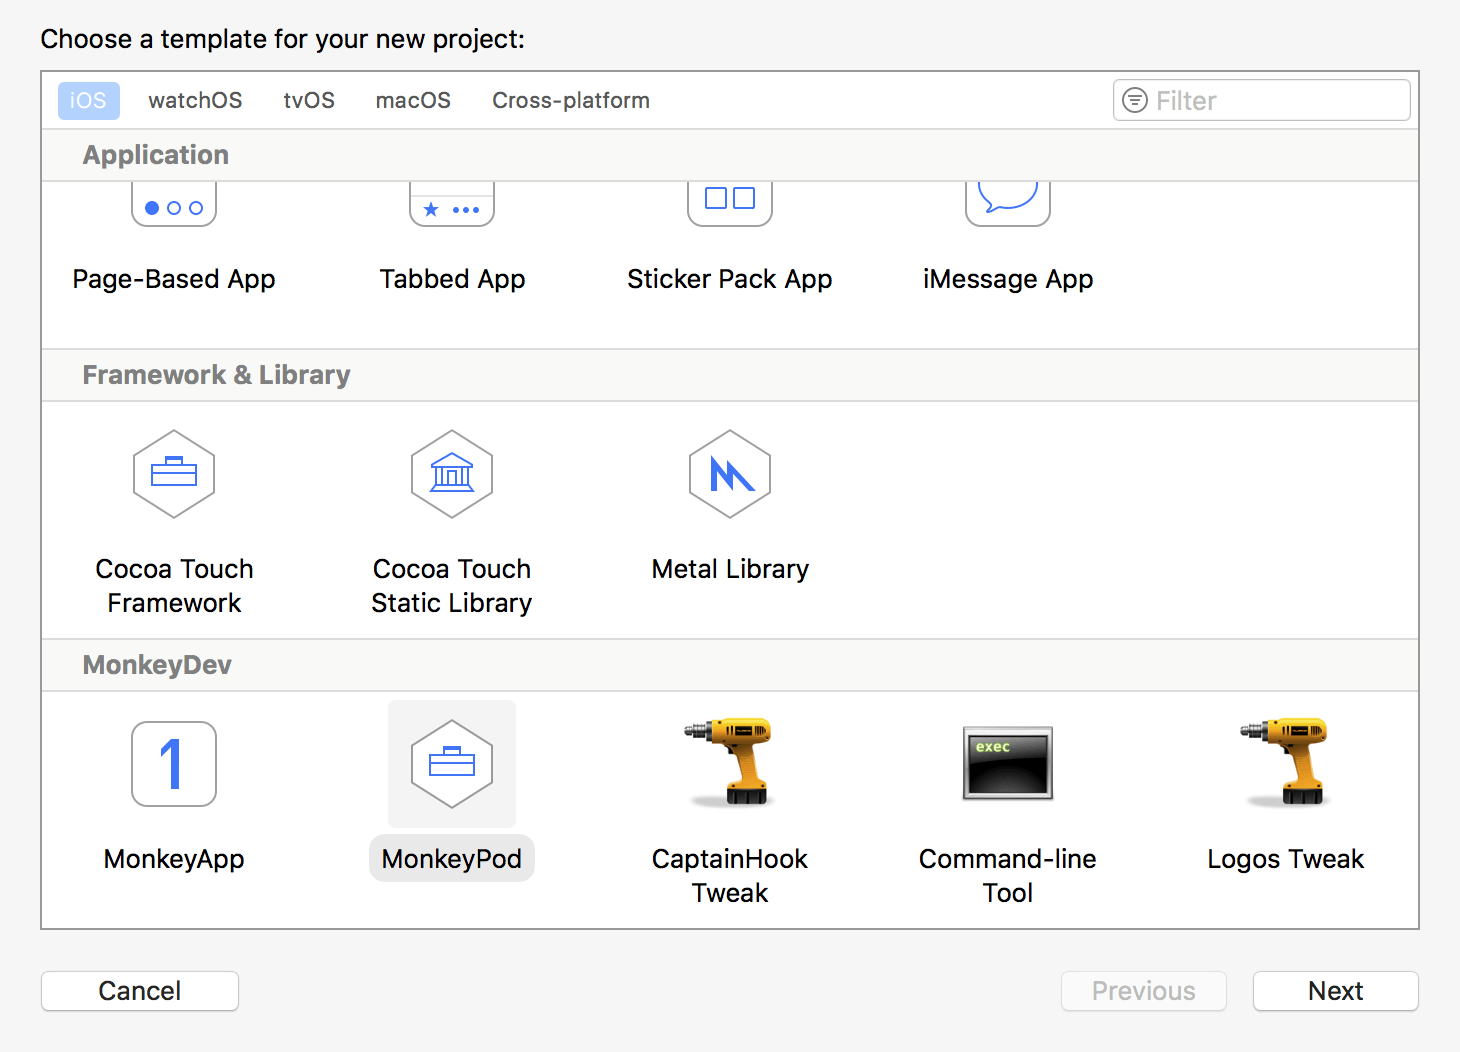
MonkeyDev本身提供了创建Pod的项目,点击"File -> New -> Project",在iOS的最下面选择MonkeyPod创建新的项目如下:
创建出来的项目目录结构如下所示:
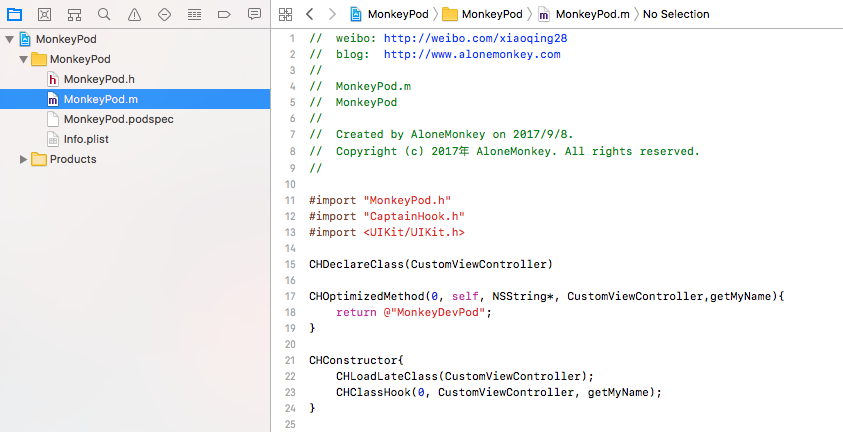
可以将你通过CaptainHook编写代码直接拷贝过来即可,其中有一个"xxxx.podspec"的文件就是用来上传CocoaPods的,右键点击显示在Finder,然后使用终端定位到"xxxx.podspec"文件的目录,将其拖到项目的根目录下并从项目中移除并输入pod lib lint进行本地验证。
➜  MonkeyPod pod lib lint --allow-warnings

 -> MonkeyPod (1.0.0)
    - WARN  | xcodebuild:  /Users/alonemonkey/Desktop/MonkeyPod/MonkeyPod/MonkeyPod.m:17:1: warning: undeclared selector 'getMyName' [-Wundeclared-selector]
    - NOTE  | xcodebuild:  <scratch space>:3:1: note: expanded from here
    - NOTE  | xcodebuild:  <scratch space>:5:1: note: expanded from here

MonkeyPod passed validation.

[!] Unable to read the license file `/private/var/folders/7q/dxk4jpyn59x40lt6p998dkg40000gn/T/CocoaPods-Lint-20170908-29497-1ys2vxr-MonkeyPod/Pods/CaptainHook/LICENSE` for the spec `CaptainHook (2.0.0)`

[!] Unable to read the license file `/Users/alonemonkey/Desktop/MonkeyPod/MonkeyPod/LICENSE` for the spec `MonkeyPod (1.0.0)`
验证成功。
在github创建一个repo,然后将本地代码上传到repo,将代码打一个tag。
 MonkeyPod git init
Initialized empty Git repository in /Users/monkey/Documents/MacReverse/MonkeyDev/MonkeyPod/.git/
➜  MonkeyPod git:(master) ✗ git add .
➜  MonkeyPod git:(master) ✗ git commit -m "first commit"
[master (root-commit) ca15785] first commit
 9 files changed, 1193 insertions(+)
 create mode 100644 MonkeyPod.xcodeproj/project.pbxproj
 create mode 100644 MonkeyPod.xcodeproj/project.xcworkspace/contents.xcworkspacedata
 create mode 100644 MonkeyPod.xcodeproj/project.xcworkspace/xcuserdata/monkey.xcuserdatad/UserInterfaceState.xcuserstate
 create mode 100644 MonkeyPod.xcodeproj/xcuserdata/monkey.xcuserdatad/xcschemes/xcschememanagement.plist
 create mode 100755 MonkeyPod/CaptainHook/CaptainHook.h
 create mode 100644 MonkeyPod/Info.plist
 create mode 100644 MonkeyPod/MonkeyPod.h
 create mode 100644 MonkeyPod/MonkeyPod.m
 create mode 100644 MonkeyPod.podspec
➜  MonkeyPod git:(master) git remote add origin https://github.com/AloneMonkey/MonkeyPod.git
➜  MonkeyPod git:(master) git pull origin master --allow-unrelated-histories
From https://github.com/AloneMonkey/MonkeyPod
 * branch            master     -> FETCH_HEAD
Merge made by the 'recursive' strategy.
 LICENSE   | 201 ++++++++++++++++++++++++++++++++++++++++++++++++++++++++++++++
 README.md |   2 +
 2 files changed, 203 insertions(+)
 create mode 100644 LICENSE
 create mode 100644 README.md
➜  MonkeyPod git:(master) git push -u origin master
Counting objects: 22, done.
Delta compression using up to 8 threads.
Compressing objects: 100% (18/18), done.
Writing objects: 100% (22/22), 18.58 KiB | 0 bytes/s, done.
Total 22 (delta 0), reused 0 (delta 0)
To https://github.com/AloneMonkey/MonkeyPod.git
   bb37187..51afe82  master -> master
Branch master set up to track remote branch master from origin.
➜  MonkeyPod git:(master) git tag -a 1.0.0 -m "release 1.0.0"
➜  MonkeyPod git:(master) git push origin --tags
Counting objects: 1, done.
Writing objects: 100% (1/1), 169 bytes | 0 bytes/s, done.
Total 1 (delta 0), reused 0 (delta 0)
To https://github.com/AloneMonkey/MonkeyPod.git
 * [new tag]         1.0.0 -> 1.0.0
代码上传到git后需要重新修改"xxxx.podspec"文件里面的路径为git对应的路径如下,tag和刚刚打的tag一致!
Pod::Spec.new do |spec|
  spec.name             = "MonkeyPod"                         #Pod的名字
  spec.version          = "1.0.0"                                     #版本号
  spec.summary          = "A example pod for MonkeyDev"
  spec.description      = <<-DESC                                     #Pod的描述
                          - A example pod for MonkeyDev
                        DESC

  spec.homepage         = "https://github.com/AloneMonkey/MonkeyDevPod"   #Pod的地址

  spec.license          = { :type => "BSD", :file => "LICENSE" }          #License
  spec.author           = { "AloneMonkey" => "liupeiqing1993@163.com" }   #作者
  spec.social_media_url = "http://weibo.com/xiaoqing28"                   #weibo
  spec.platform         = :ios, "8.0"                                     #平台、版本
  spec.source           = { :git => "https://github.com/AloneMonkey/MonkeyPod.git", :tag => spec.version.to_s }  #代码的git地址以及tag
  spec.source_files     = "MonkeyPod/**/*.{h,m}"        #本地验证这里填  "**/*"  表示当前目录以及子目录的所有文件   如果发布到MonkeyPodSpec需要填写git clone下来的对应的路径
  spec.public_header_files = "MonkeyPod/MonkeyPod.h"        #需要对外导出的头文件  此处为本地验证
  spec.requires_arc     = true                                       #ARC
  spec.dependency 'CaptainHook'                                      #由于多个pod导致CaptainHook.h找不到,单独依赖CaptainHook
  spec.pod_target_xcconfig = { "ONLY_ACTIVE_ARCH" => "No" }          #这个必须有,不要修改
end
然后需要增加的私有Pod:
先fork我的私有CocoaPods,然后下面的https://github.com/AloneMonkey/MonkeyDevSpecs.git 换成你fork的链接,最后提交成功后再向我的私有CocoaPods提pull request!!!
➜  MonkeyPod git:(master) ✗ pod repo add MonkeyDevSpecs https://github.com/AloneMonkey/MonkeyDevSpecs.git
Cloning spec repo `MonkeyDevSpecs` from `https://github.com/AloneMonkey/MonkeyDevSpecs.git`
最后提交pod:
➜  MonkeyPod git:(master) ✗ pod repo push MonkeyDevSpecs MonkeyPod.podspec --allow-warnings

Validating spec
 -> MonkeyPod (1.0.0)
    - WARN  | xcodebuild:  MonkeyPod/MonkeyPod/MonkeyPod.m:17:1: warning: undeclared selector 'getMyName' [-Wundeclared-selector]
    - NOTE  | xcodebuild:  <scratch space>:4:1: note: expanded from here
    - NOTE  | xcodebuild:  <scratch space>:6:1: note: expanded from here

Updating the `MonkeyDevSpecs' repo

Already up-to-date.

Adding the spec to the `MonkeyDevSpecs' repo

 - [Add] MonkeyPod (1.0.0)

Pushing the `MonkeyDevSpecs' repo

To https://github.com/AloneMonkey/MonkeyDevSpecs.git
   d2cc68b..1f8d101  master -> master
提交成功后,往MonkeyDevSpecs提交pull request,pull request通过后然后继续下一步。
pod推送成功后就能够通过pod集成非越狱插件了,新建一个MonkeyApp工程,然后新建一个Podfile文件,内容如下:
source 'https://github.com/AloneMonkey/MonkeyDevSpecs.git'

use_frameworks!

target 'MonkeyAppDylib' do
     pod 'MonkeyPod'
end
一定要加use_frameworks!以动态库的方式导入!!!
pod install安装,并打开MonkeyApp.xcworkspace文件。
➜  MonkeyApp pod install
Analyzing dependencies
Downloading dependencies
Installing MonkeyPod (1.0.0)
Generating Pods project
Integrating client project

[!] Please close any current Xcode sessions and use `MonkeyApp.xcworkspace` for this project from now on.
Sending stats
Pod installation complete! There is 1 dependency from the Podfile and 1 total pod installed.

[!] Automatically assigning platform ios with version 8.0 on target MonkeyAppDylib because no platform was specified. Please specify a platform for this target in your Podfile. See `https://guides.cocoapods.org/syntax/podfile.html#platform`.
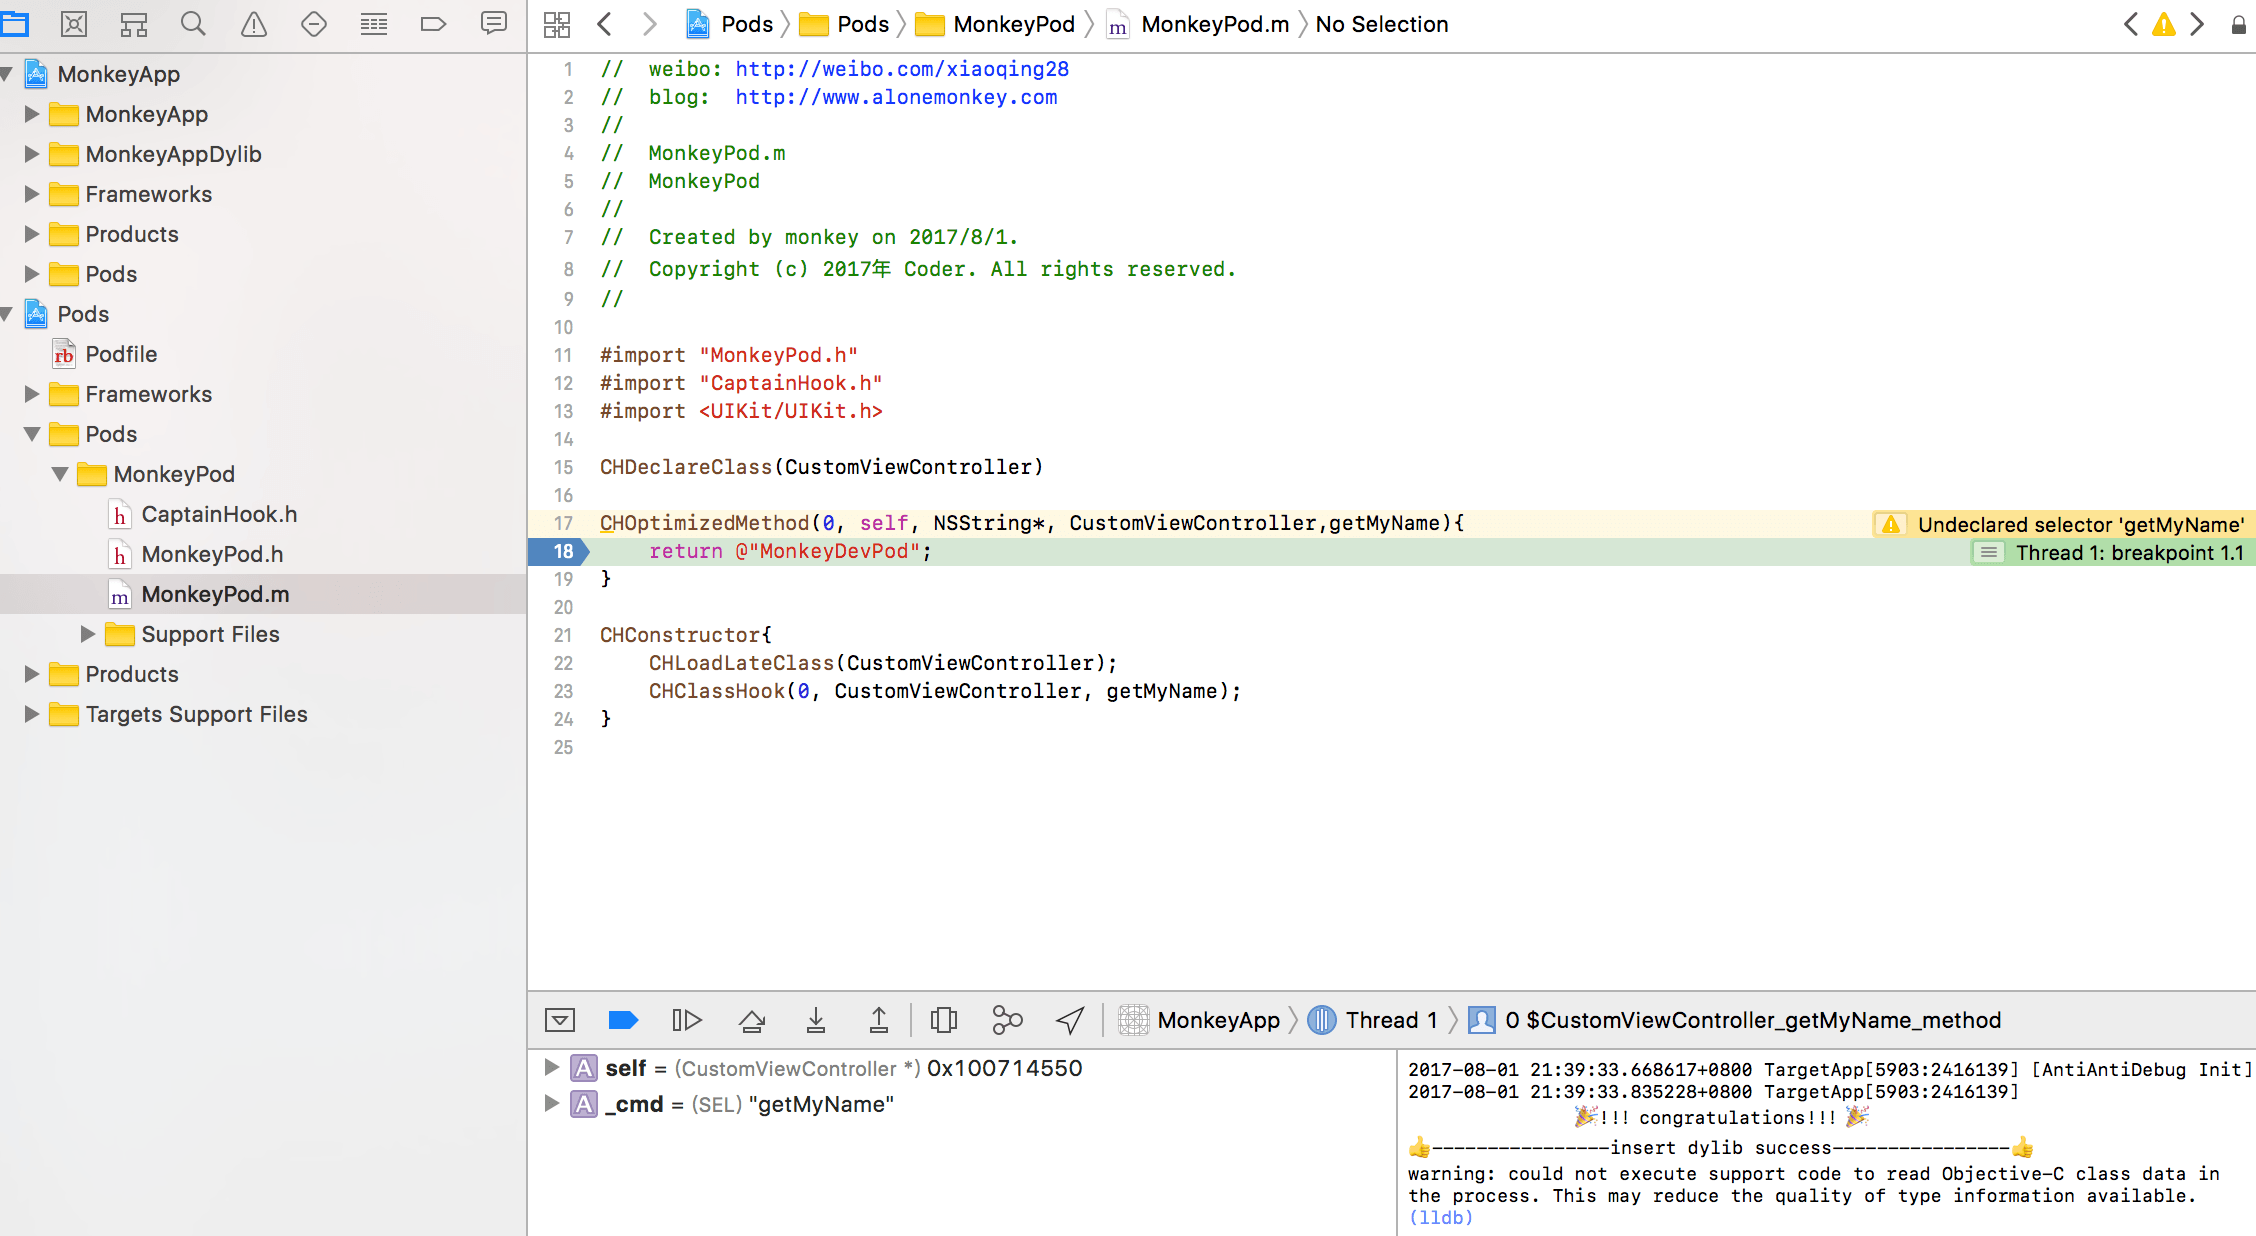
打开工程后发现pod已经成功集成!运行项目也会断在集成的pod代码上面!
如果我想要边写pod边开发插件可不可以呢? 答案是当然可以! MonkeyApp和MonkeyPod完美结合!
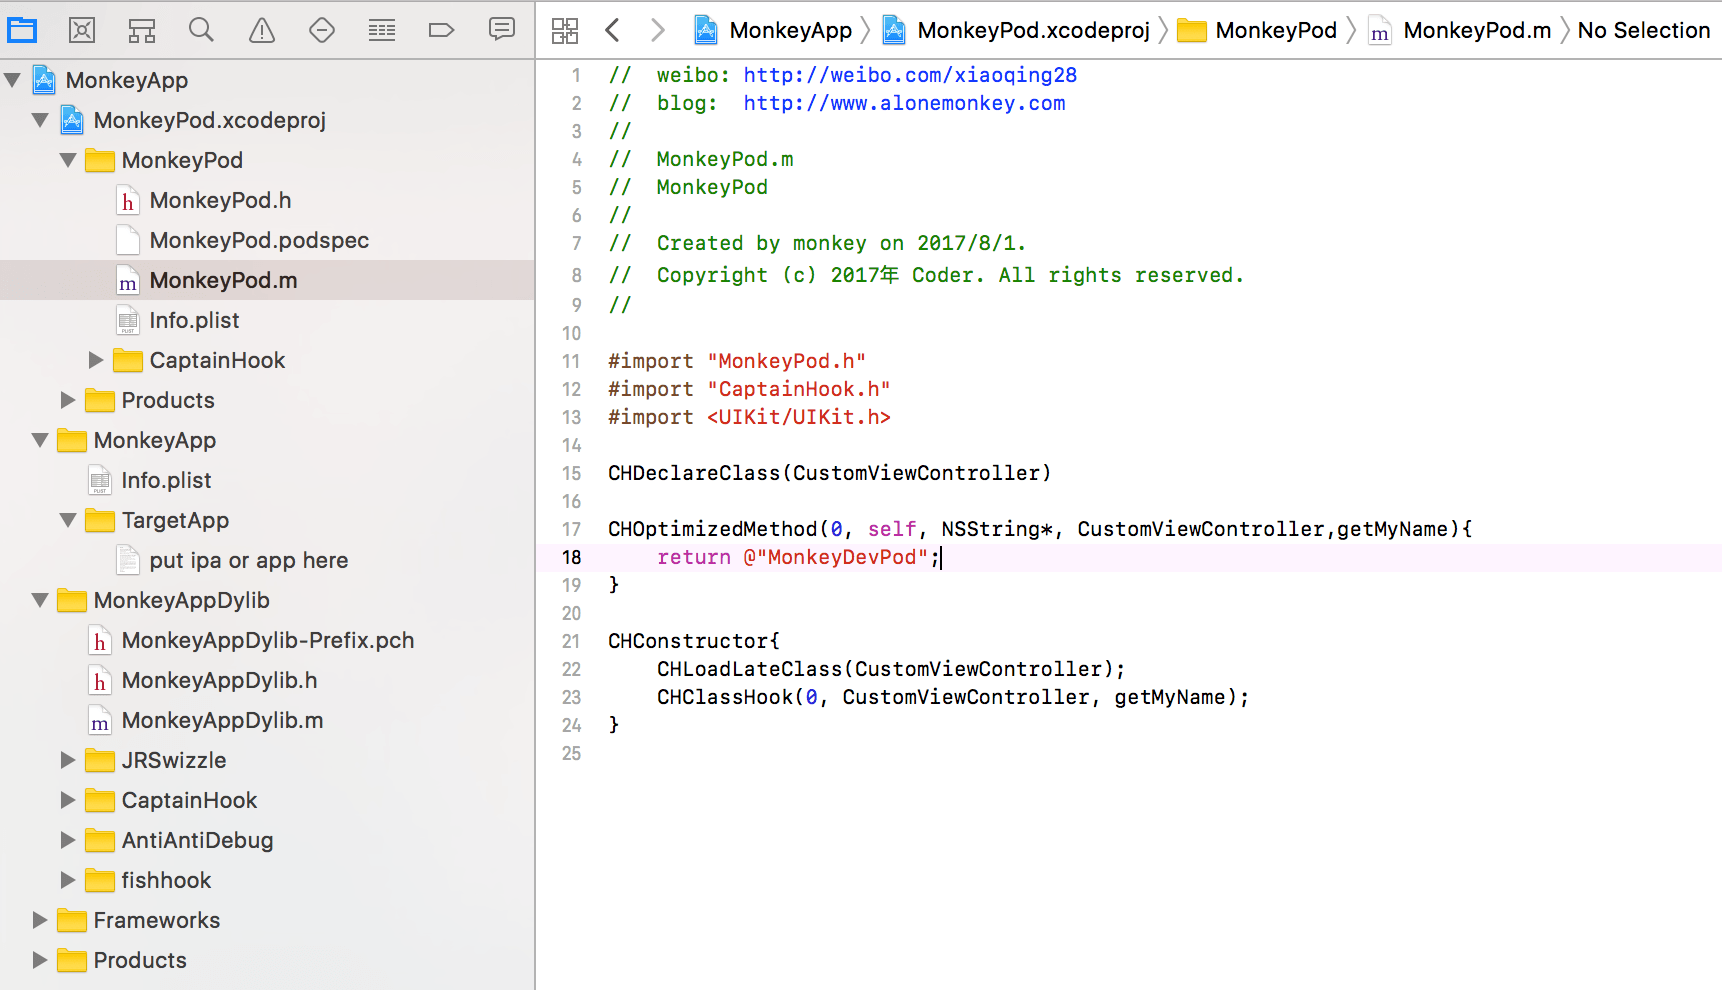
首先新建一个MonkeyApp工程,然后新建一个MonkeyPod工程,然后把MonkeyPod工程拖到MonkeyApp工程,如图:
然后找到MonkeyApp的Target增加依赖,并Embed Librarys里面增加MonkeyPod:
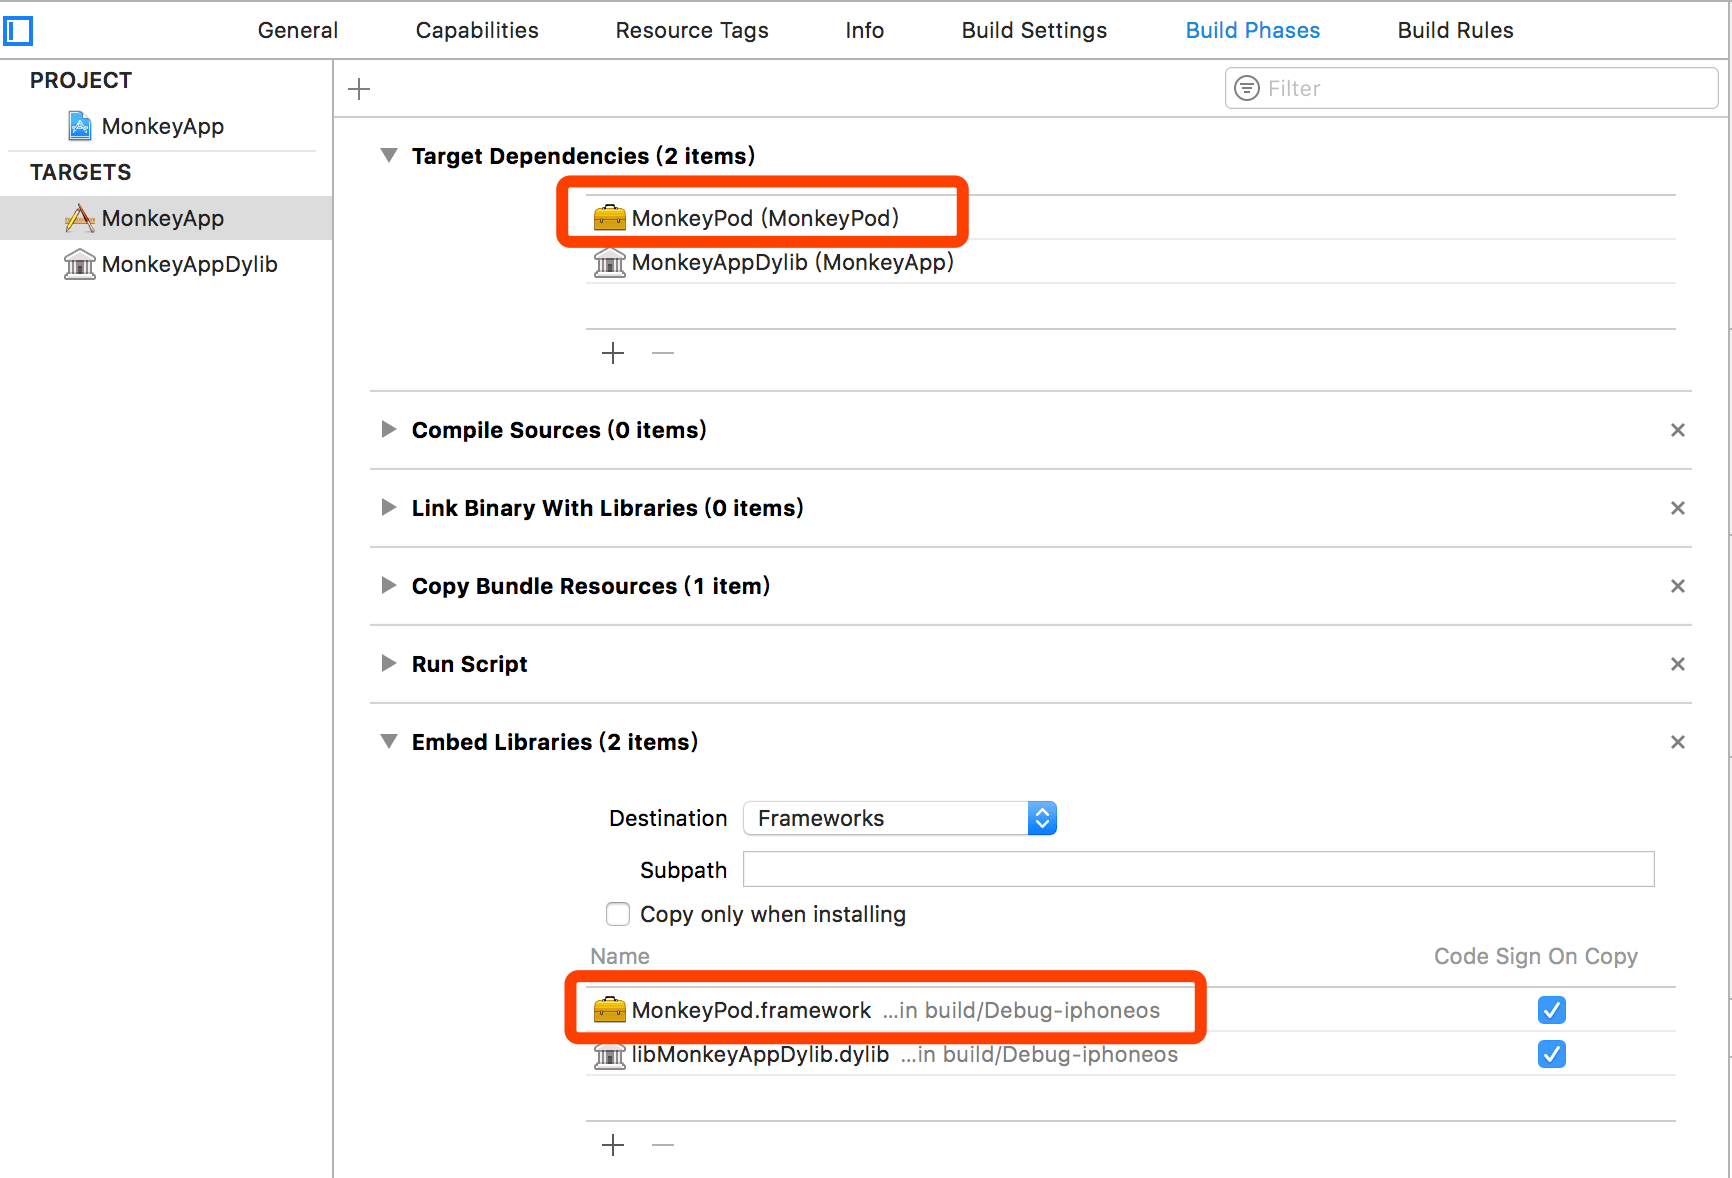
最后在MonkeyApp的动态库里面链接MonkeyPod:
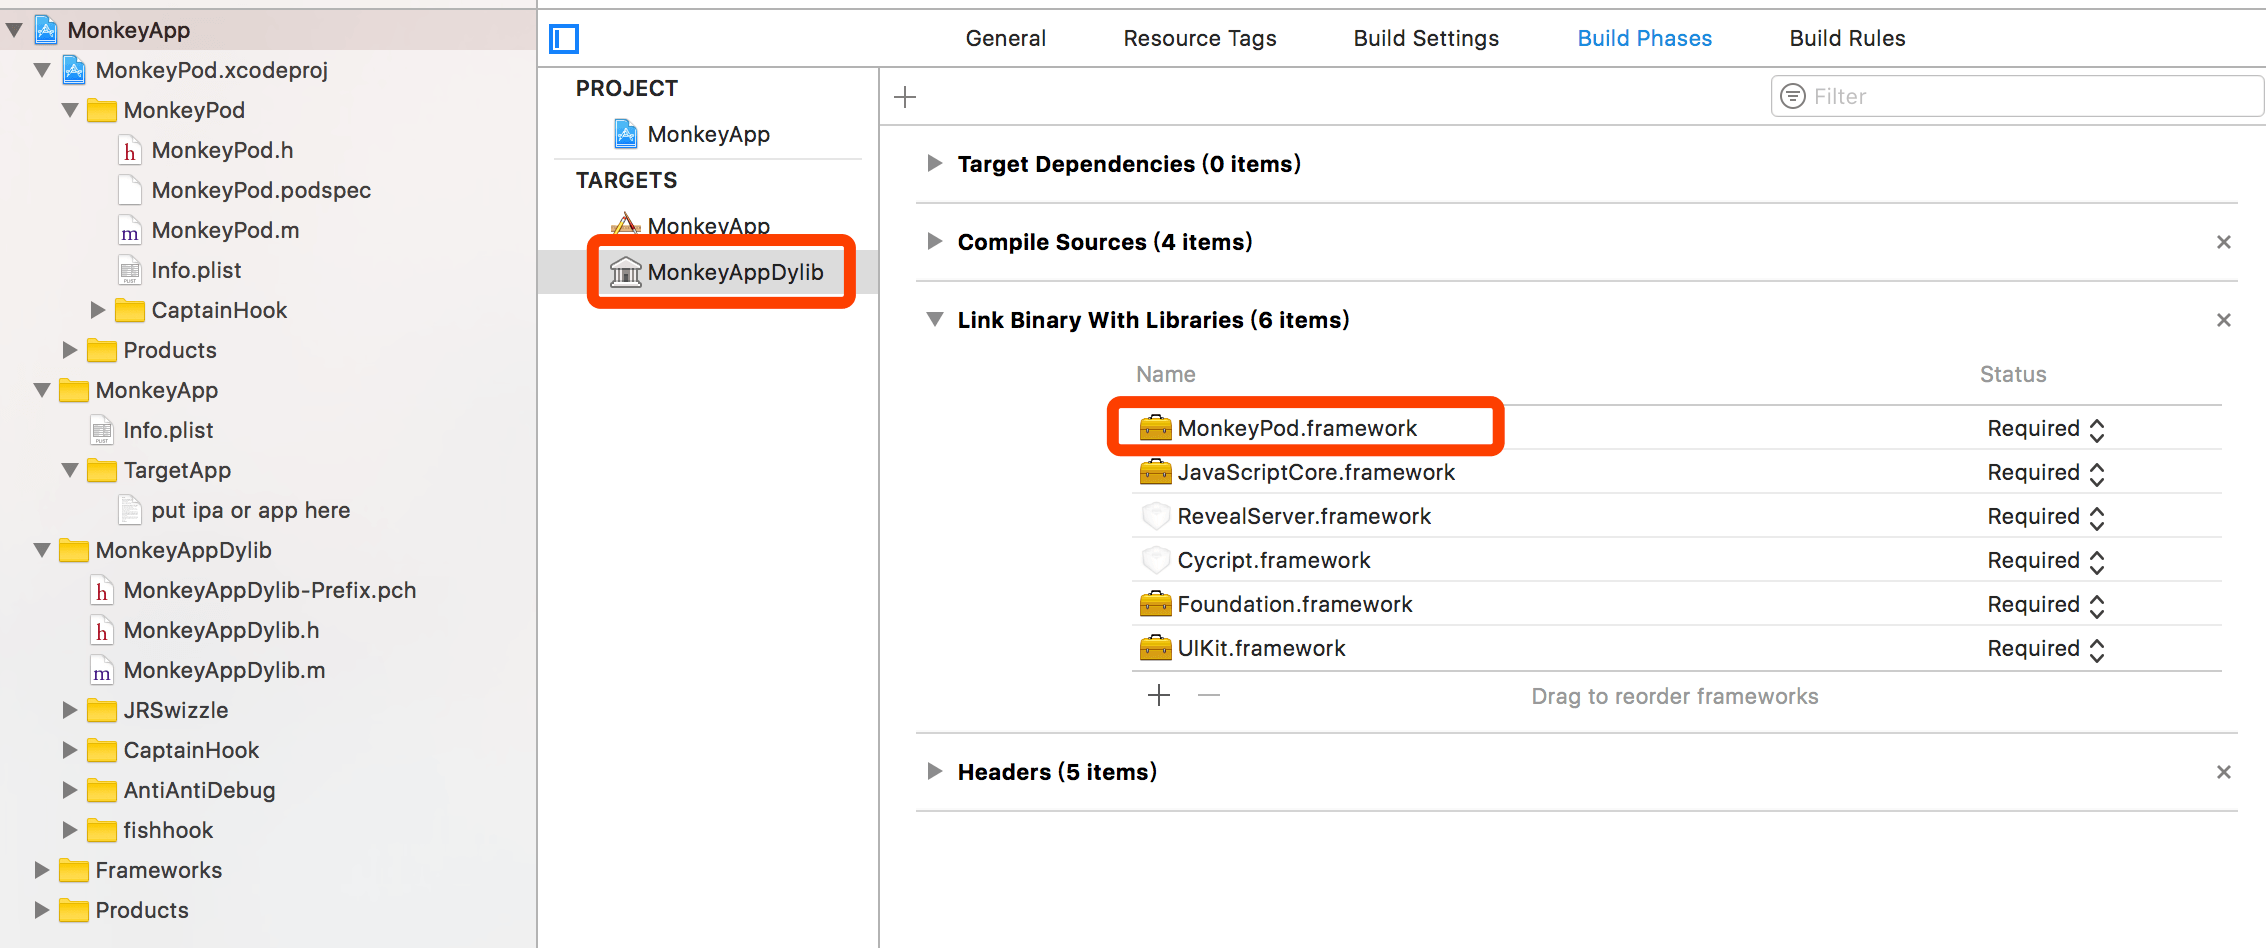
运行就可以将MonkeyPod注入到MonkeyApp边写Pod边写插件!!!
玩的开心~