This is a template github project for building your binder app based on Lesson 3 of the fastai course v4 (2020) and also discussed in Chapter 2 of the book "Deep Learning for Coders with fastai and Pytorch" . This template is based on the instructions posted on the fastai forums here.
(Note that for Colab, see the special instructions below as it does not provide a terminal environment, nor does it run voila, and also does not persist your data across sessions)
Do the next steps only after making sure you already created and exported the learner (export.pkl) and your stripped down voila app notebook is ready (preferably tested in a jupyter notebook environment with voila).
-
Create a github account if you don't have one yet.
-
Fork this repo as a template for your own binder app repository. You can click on this link to generate your own copy.
- Make sure to rename your repo to something other than
fastai-binder-app-template. Due to a github policy,git-lfsdoes not support uploads to public forks, which is what your repo will be if you name it the same as what you are copying from. For more info, please see this issue.
- Make sure to rename your repo to something other than
-
Clone your newly created repository into the machine running your jupyter notebook (which can be either your local machine, Colab, Paperspace Gradient notebooks or your GCP, Sagemaker and other VM instances)
-
If you are running the notebooks on a standard jupyter notebook environment (e.g. Paperspace Gradient), you can create a terminal to run your git and shell commands. (For Colab, no terminal environment is provided, so see the special instructions)

-
If
gitis not installed on your jupyter environment, install it by following these instructions -
You might have to run the following commands to setup your email and username for
git:git config --global user.name "<Your name>"git config --global user.email "<email@address>"
-
[Optional] In order to push code to a github repo, it is usually convenient to create an ssh key to authenticate yourself. See instructions here on creating an ssh key and registering it on github.
sshis normally installed on Ubuntu and other Linux systems by default, but if it is not installed (e.g. Paperspace Gradient), you can install it by following the instructions here.
-
To clone your repo,run either of the following commands:
- (Run this if you have already setup your ssh key)
git clone git@github.com:/<your-github-id>/<your-copy-of-fastai-binder-app-template>.git- (Run this if you haven't setup your ssh key, but this will require you to input your github id and password each time you push your code)
git clone https://github.com/<your-github-id>/<your-copy-of-fastai-binder-app-template>.git
-
-
Copy over the following from your jupyter environment:
- the
export.pklcreated in Chapter 2 as the exported learner for classifying bear images - the stripped down notebook from Chapter 2 containing only the voila app.
A sample notebook is provided but stripping down the Chapter 2 notebook is a good exercise for building more voila apps in the future.
- the
-
[Optional] Test your stripped down voila app notebook using voila in your jupyter environment.
-
Install
git lfson your local environment. If you are running on Jupyter notebook, create a terminal and run your installation commands there. See instructions here -
Push your code changes into your github repository. Run the following git commands:
git add .git commit -m 'Add my app notebook and exported learner'git push
Note: the
git pushcommand might take a while as it is uploading yourexport.pklfile -
Head over the binder site and continue following the instructions to run the app on binder. Note that the
.gitattributesandrequirements.txtfiles have already been provided as part of this template repo.
Note: just a slight modification to the instructions provided: In the field Path to a notebook file (optional), change the path type from File to URL.
Because Colab uses a non-standard Jupyter environment, it is not as easy to run and test your voila app in Colab. You can however still build and export your learner to export.pkl and strip down your Chapter 2 notebook so that it will run on binder as a voila app.
The easiest way to setup your github repo is to clone it on Colab and add your exported learner (export.pkl) to your repo via git (with git lfs installed).
You can add your stripped down notebook manually as detailed in the instructions below.
In order to run shell and git commands on Colab, you can create a new cell and
add a %%bash on the first line. You can then add any git or shell commands after the first line and execute it as a pseudo terminal.
- First,
cdinto your/contentdirectory
%cd /content
- Install
git-lfsby following the instructions here - Clone your repo into your Colab VM
%%bash
git config --global user.name "<Your name>"
git config --global user.email "<email@address>"
git clone https://github.com/<your-github-id>/<your-copy-of-fastai-binder-app-template>.git
- cd into your local git repo
%cd <your-copy-of-fastai-binder-app-template>
- Add and commit your exported learner into your local repo
%%bash
cp ../export.pkl .
git add export.pkl
git commit -m "Add exported learner"
Due to some weird limitations, Colab does not allow ssh access from your Colab VM to your github repo, thus requiring the use of 'https://github.com:...' format for pulling and pushing your git repo.
The problem is that when trying to push your changes back, executing git push in a jupyter notebook cell triggers an error as well.
The solution is to use the git credentials command to store your credentials so that git will use the credentials without asking for a prompt (a prompt asking for your userid/password triggers an error on Colab since we are not running these commands on a terminal)
- To configure
gitto use our stored credentials, we need to configure our local repo settings by running the following command
%%bash
git config credential.helper store
- Then we create a
.git-credentialsfile in the home directory/rootcontaining our github user id and password in the formathttps://<github-userid>:<password>@github.com
%%bash
echo "https:<github-userid>:<password>@github.com" > /root/.git-credentials
Note that this is a MASSIVE SECURITY HOLE since your github password is stored in plain text. Please delete both the cell containing this in the jupyter notebook as well as the .git-credentials file itself after you've pushed your changes..
- Run the
git pushcommand
%%bash
git push
Your github repo should now contain the exported learner (export.pkl).
To add your voila notebook (which I assume will be in your Google Drive under the Colab Notebooks folder), you can save this stripped down voila notebook directly into your Github repository by clicking on the Save a copy in Github option under the File menu option.
(You might have to authorize Colab to access your github repositories the first time you do this).
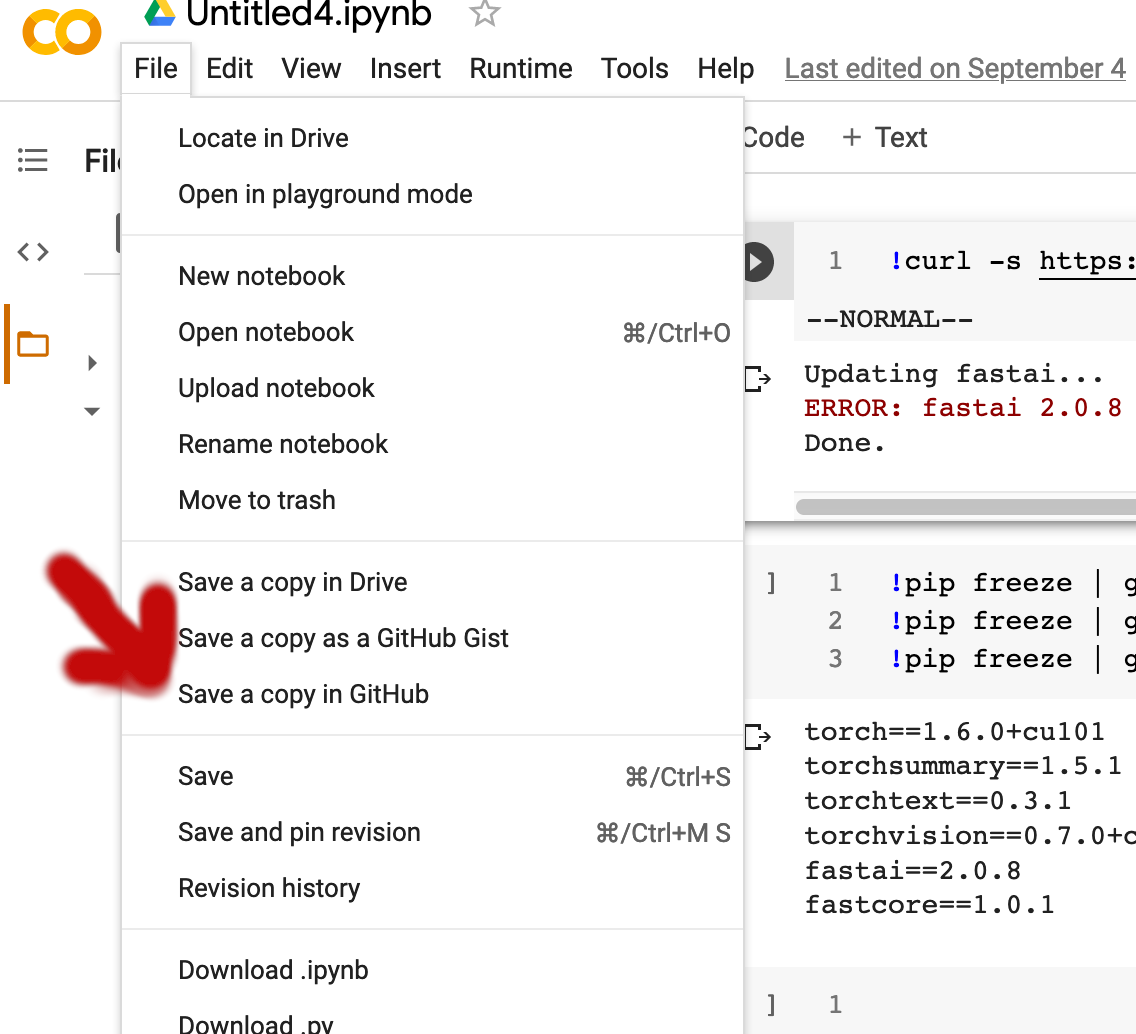
Please make sure to pick the right repository to save your stripped down voila notebook.
Unfortunately, Colab is not your standard Jupyter environment and does not support voila natively so there is no easy way to test your stripped down voila notebook prior to deploying it on github repo and running on binder.
Note: As of 9/17/2020, the ipywidgets (including the image cleaner) are now runnable on Colab, just not the voila app.
Also, because Colab does not persist your VM instance storage across sessions, please connect your Google Drive and copy your downloaded data, your cloned repository and your exported learner (export.pkl). By default, your exported learner and your cloned repository will be created in the /content directory.
Big thanks to @vikbehal for providing the instructions!