部署方式 Deployment
GPTeams 官方支持使用 docker 和 Railway 来部署。这里的“官方”意味着每次发布新版本时都会测试基于 docker 和 Railway 的部署方式。同时也意味着如果你使用其他方式进行部署时遇到问题,将无法得到官方支持。
在正式部署前你需要提前配置好 firebase, 并获取下文中会用到的 firebase 环境变量。
进入 firebase 控制台。点击添加项目,跟随 firebase 的指引创建项目,期间会提示是否启用 Google Analytics, 此时点击禁用 Google Analytics 即可, 然后直接点击创建项目,等待片刻后出现提示:

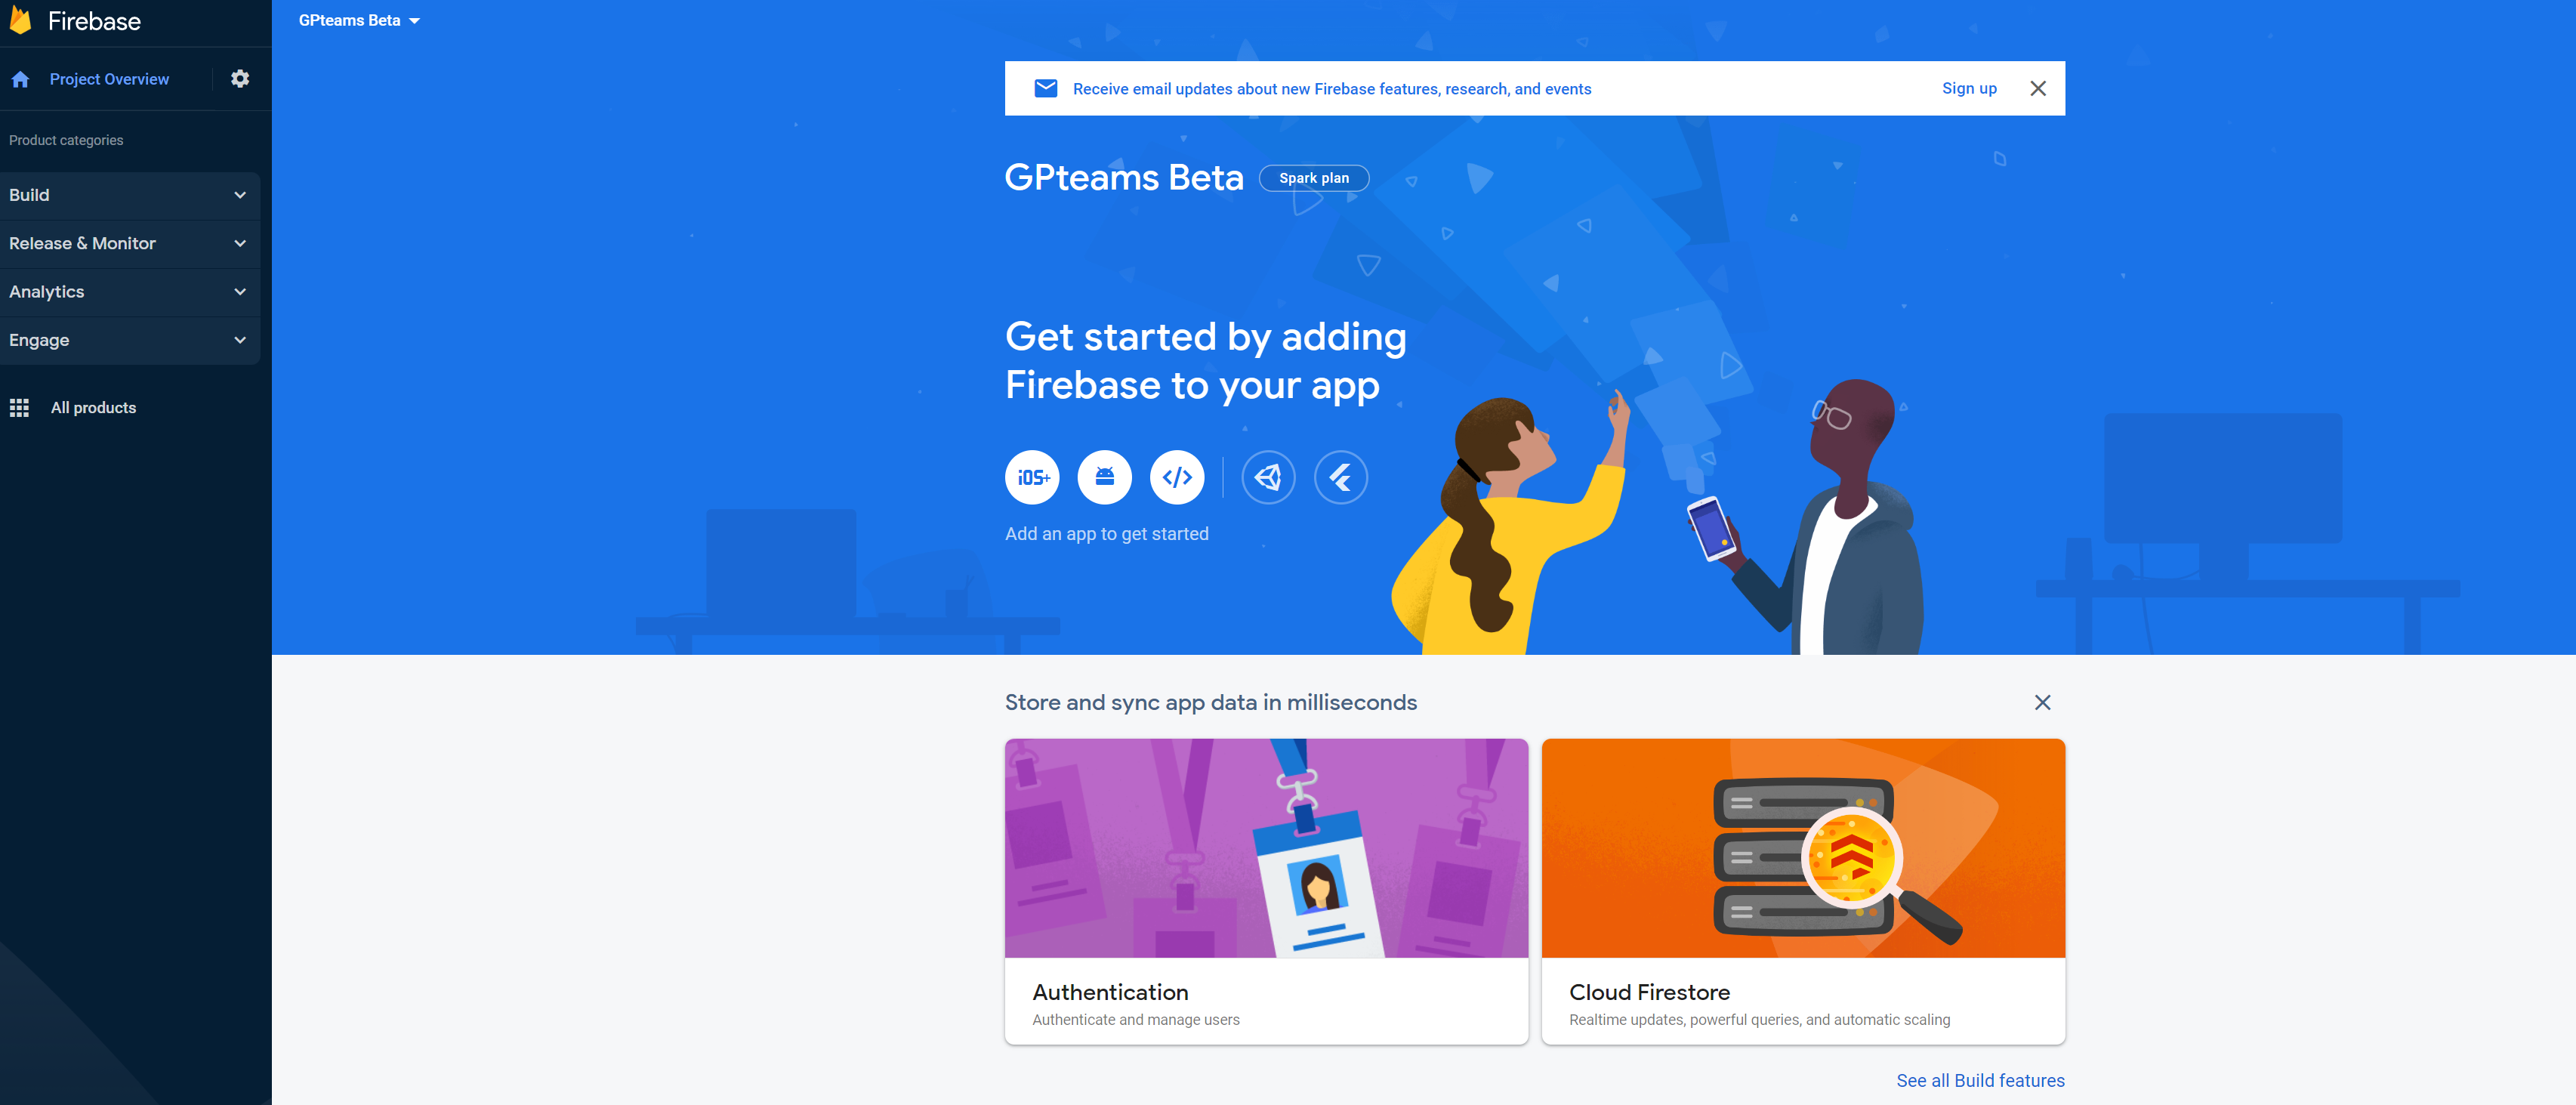
点击 "继续"按钮,之后会跳转到我们刚刚创建的项目的控制台:
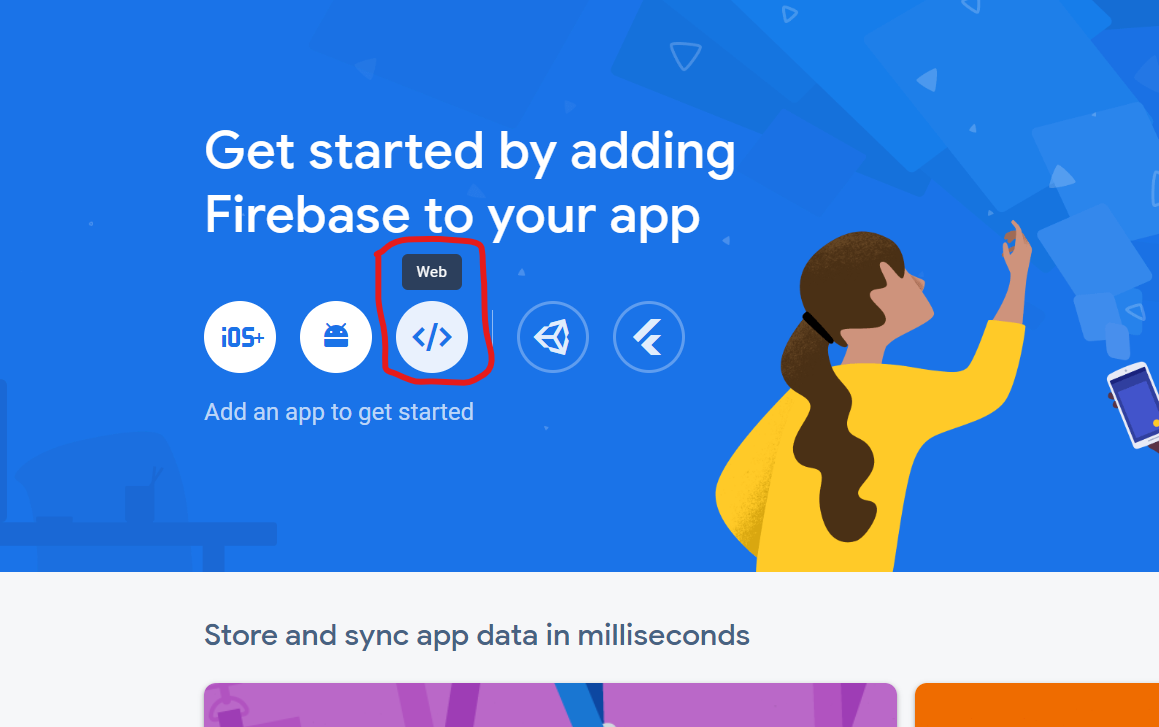
此时点击下图中用红框框住的按钮:
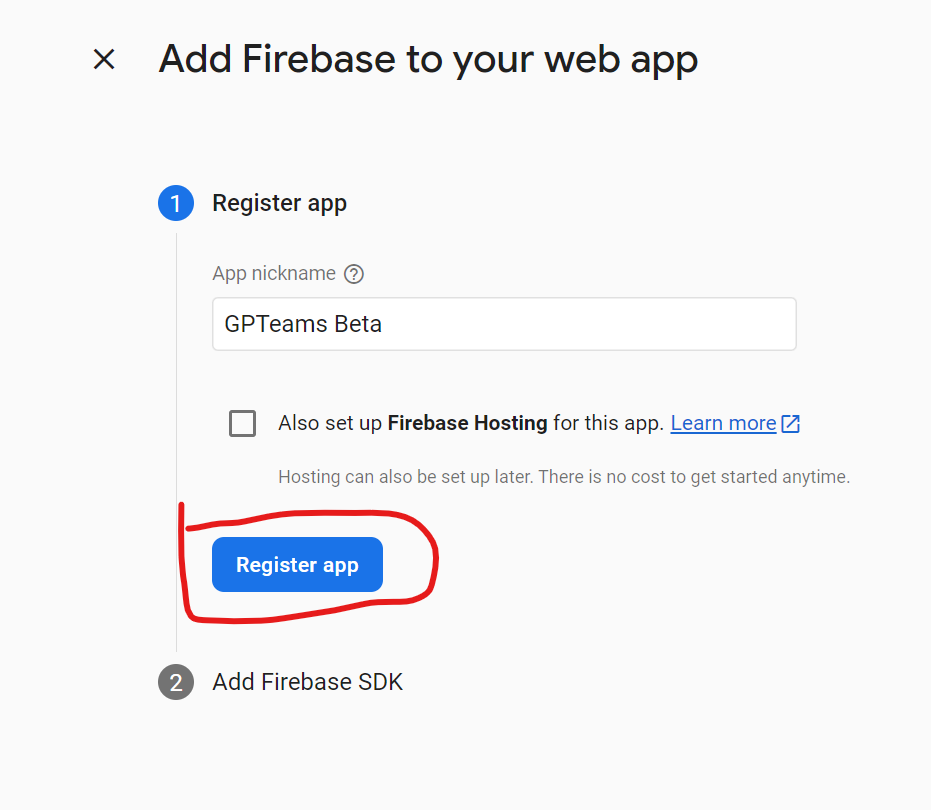
输入项目名称后点击注册按钮:
用红框框住的部分就是我们获取到的项目的 firebase 配置:

上图的 firebase 配置即为我们之后会用到的 firebase 环境变量:
FIREBASE_API_KEY=<apiKey> # 将 <apiKey> 替换为上文中的 apiKey
FIREBASE_AUTH_DOMAIN=<authDomain> # 将 <authDomain> 替换为上文中的 authDomain
FIREBASE_PROJECT_ID=<projectId> # 将 <projectId> 替换为上文中的 projectId
FIREBASE_STORAGE_BUCKET=<storageBucket> # 将 <storageBucket> 替换为上文中的 storageBucket
FIREBASE_MESSAGING_SENDER_ID=<messagingSenderId> # 将 <messagingSenderId> 替换为上文中的 messagingSenderId
FIREBASE_APP_ID=<appId> # 将 <appId> 替换为上文中的 appId
之后返回项目控制台,点击下文中用红框框住的 Authentication 部分:
点击 'Get Started' 按钮:

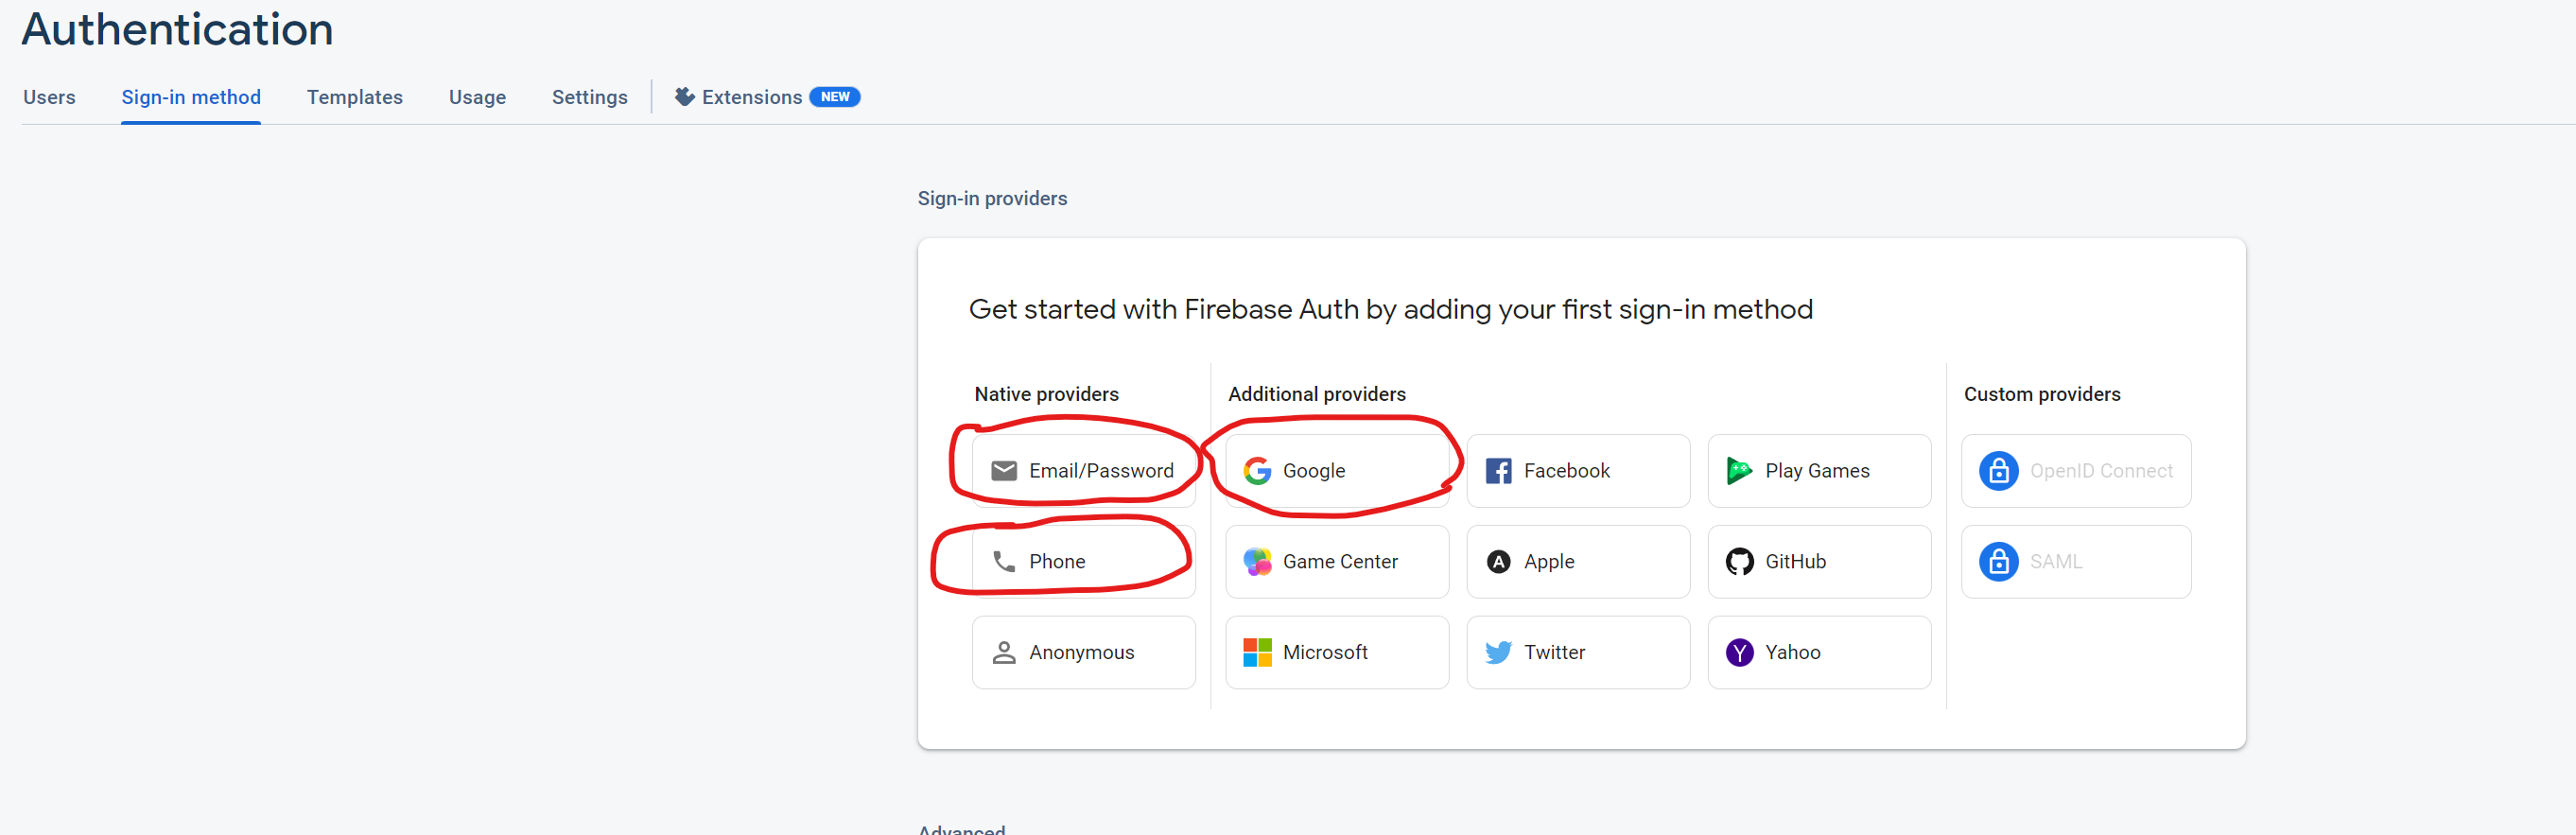
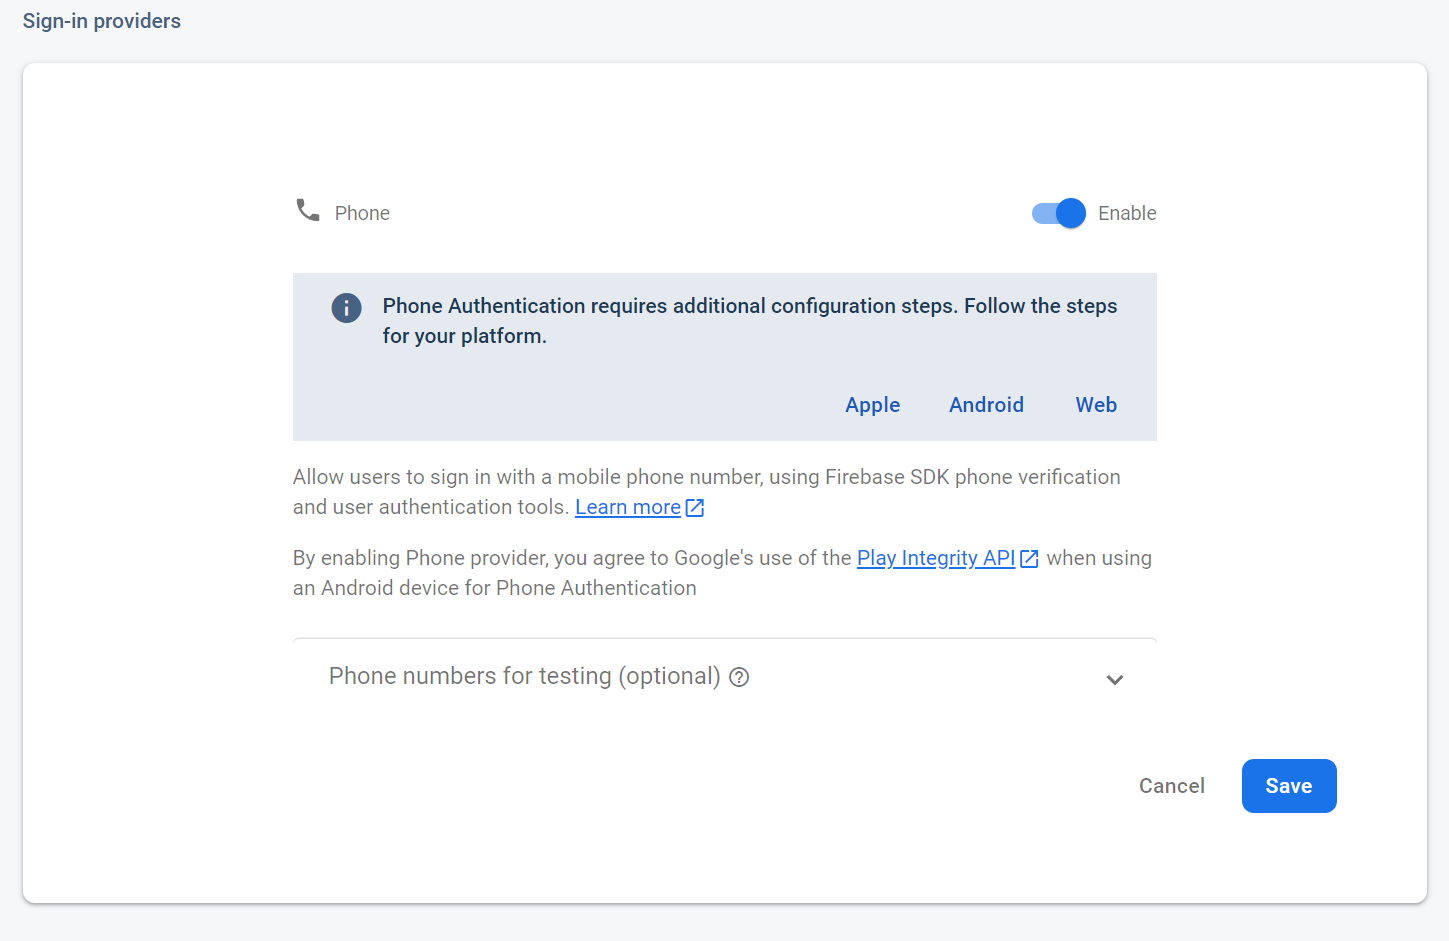
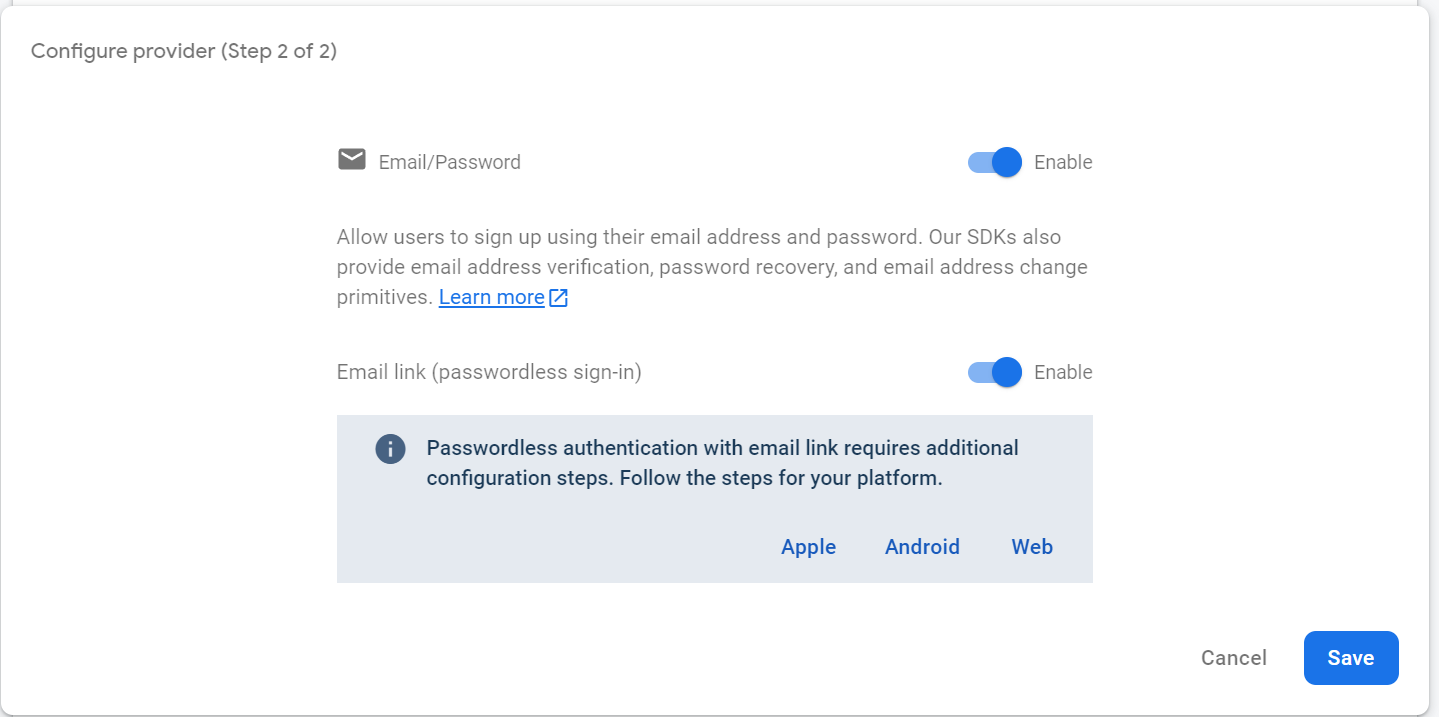
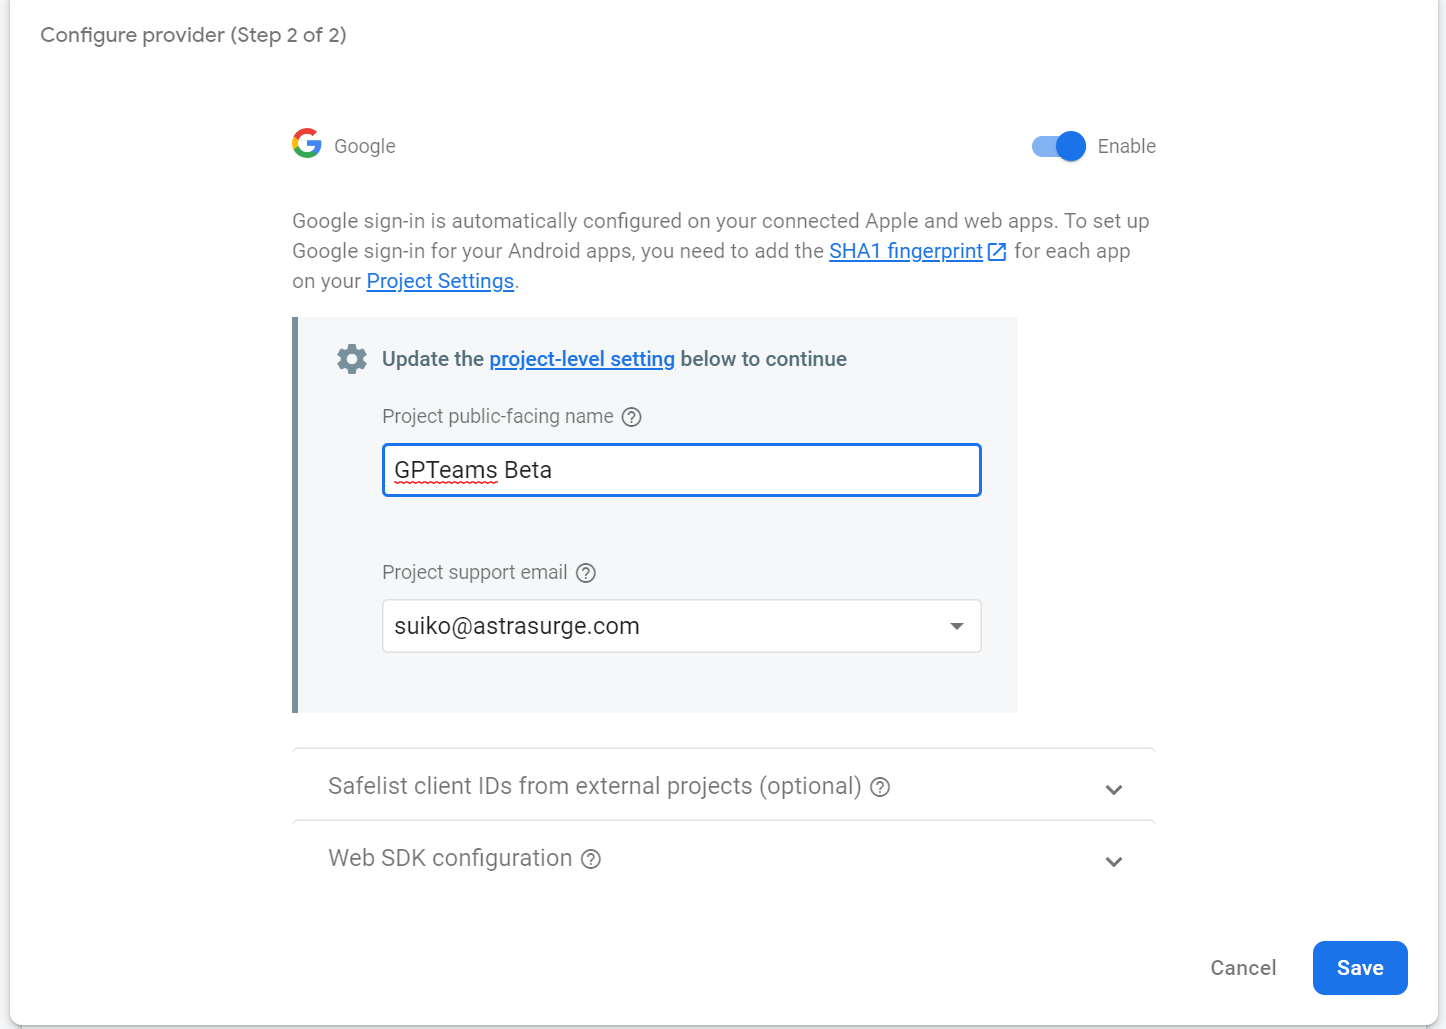
在 'Sign In method' 中启用如下三种登录方式:
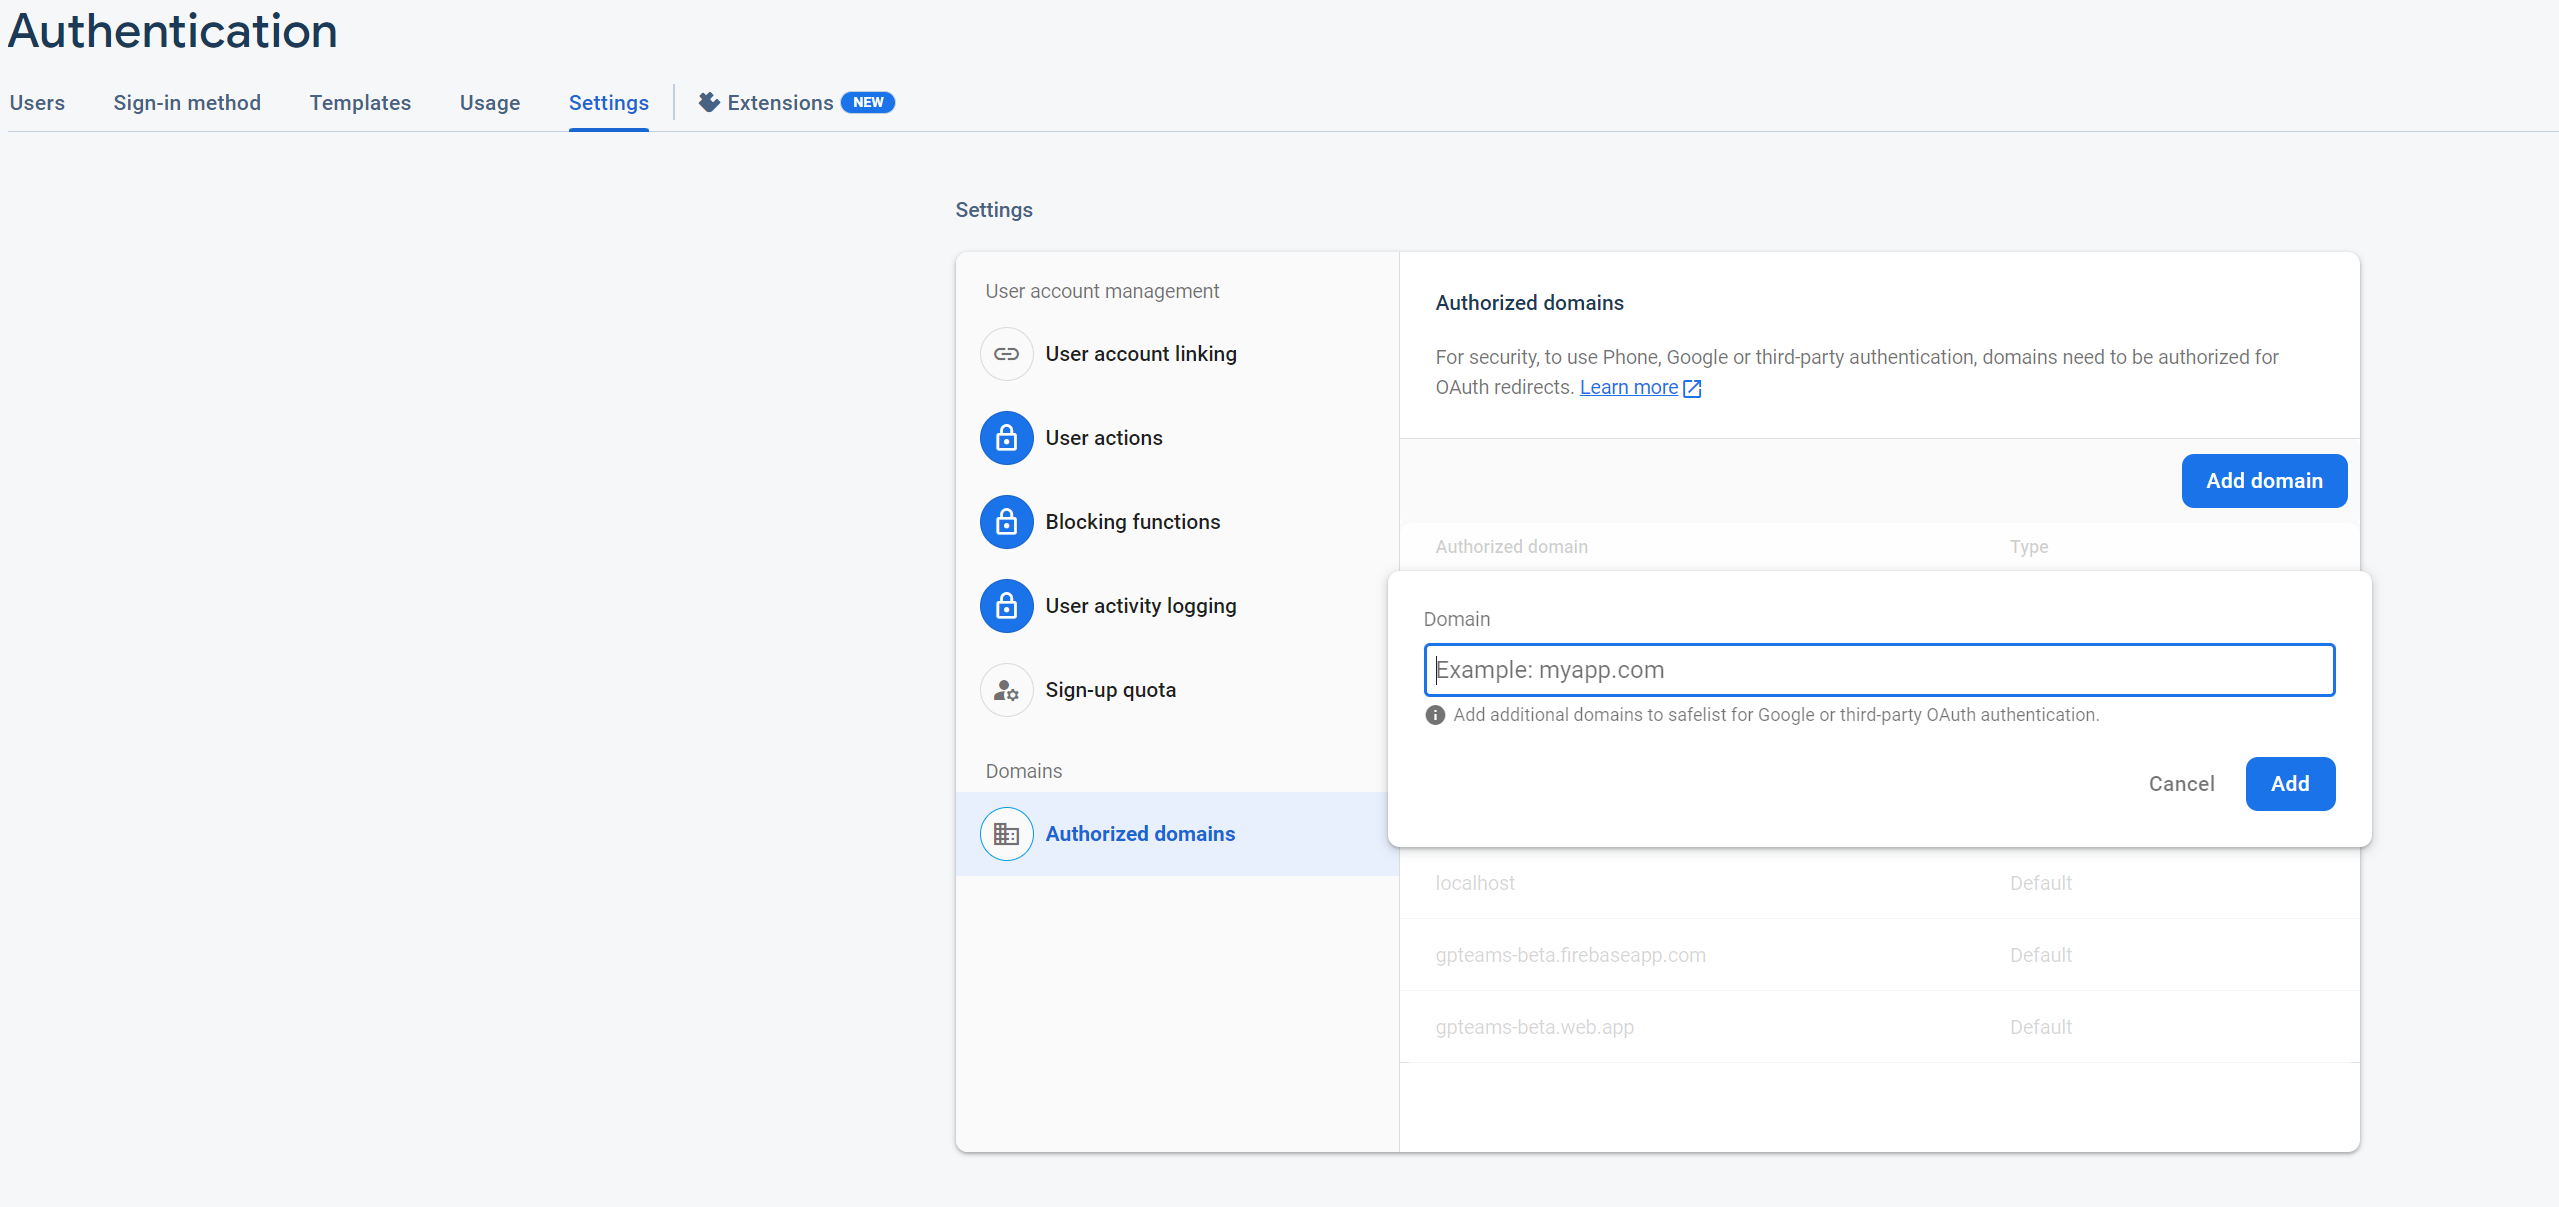
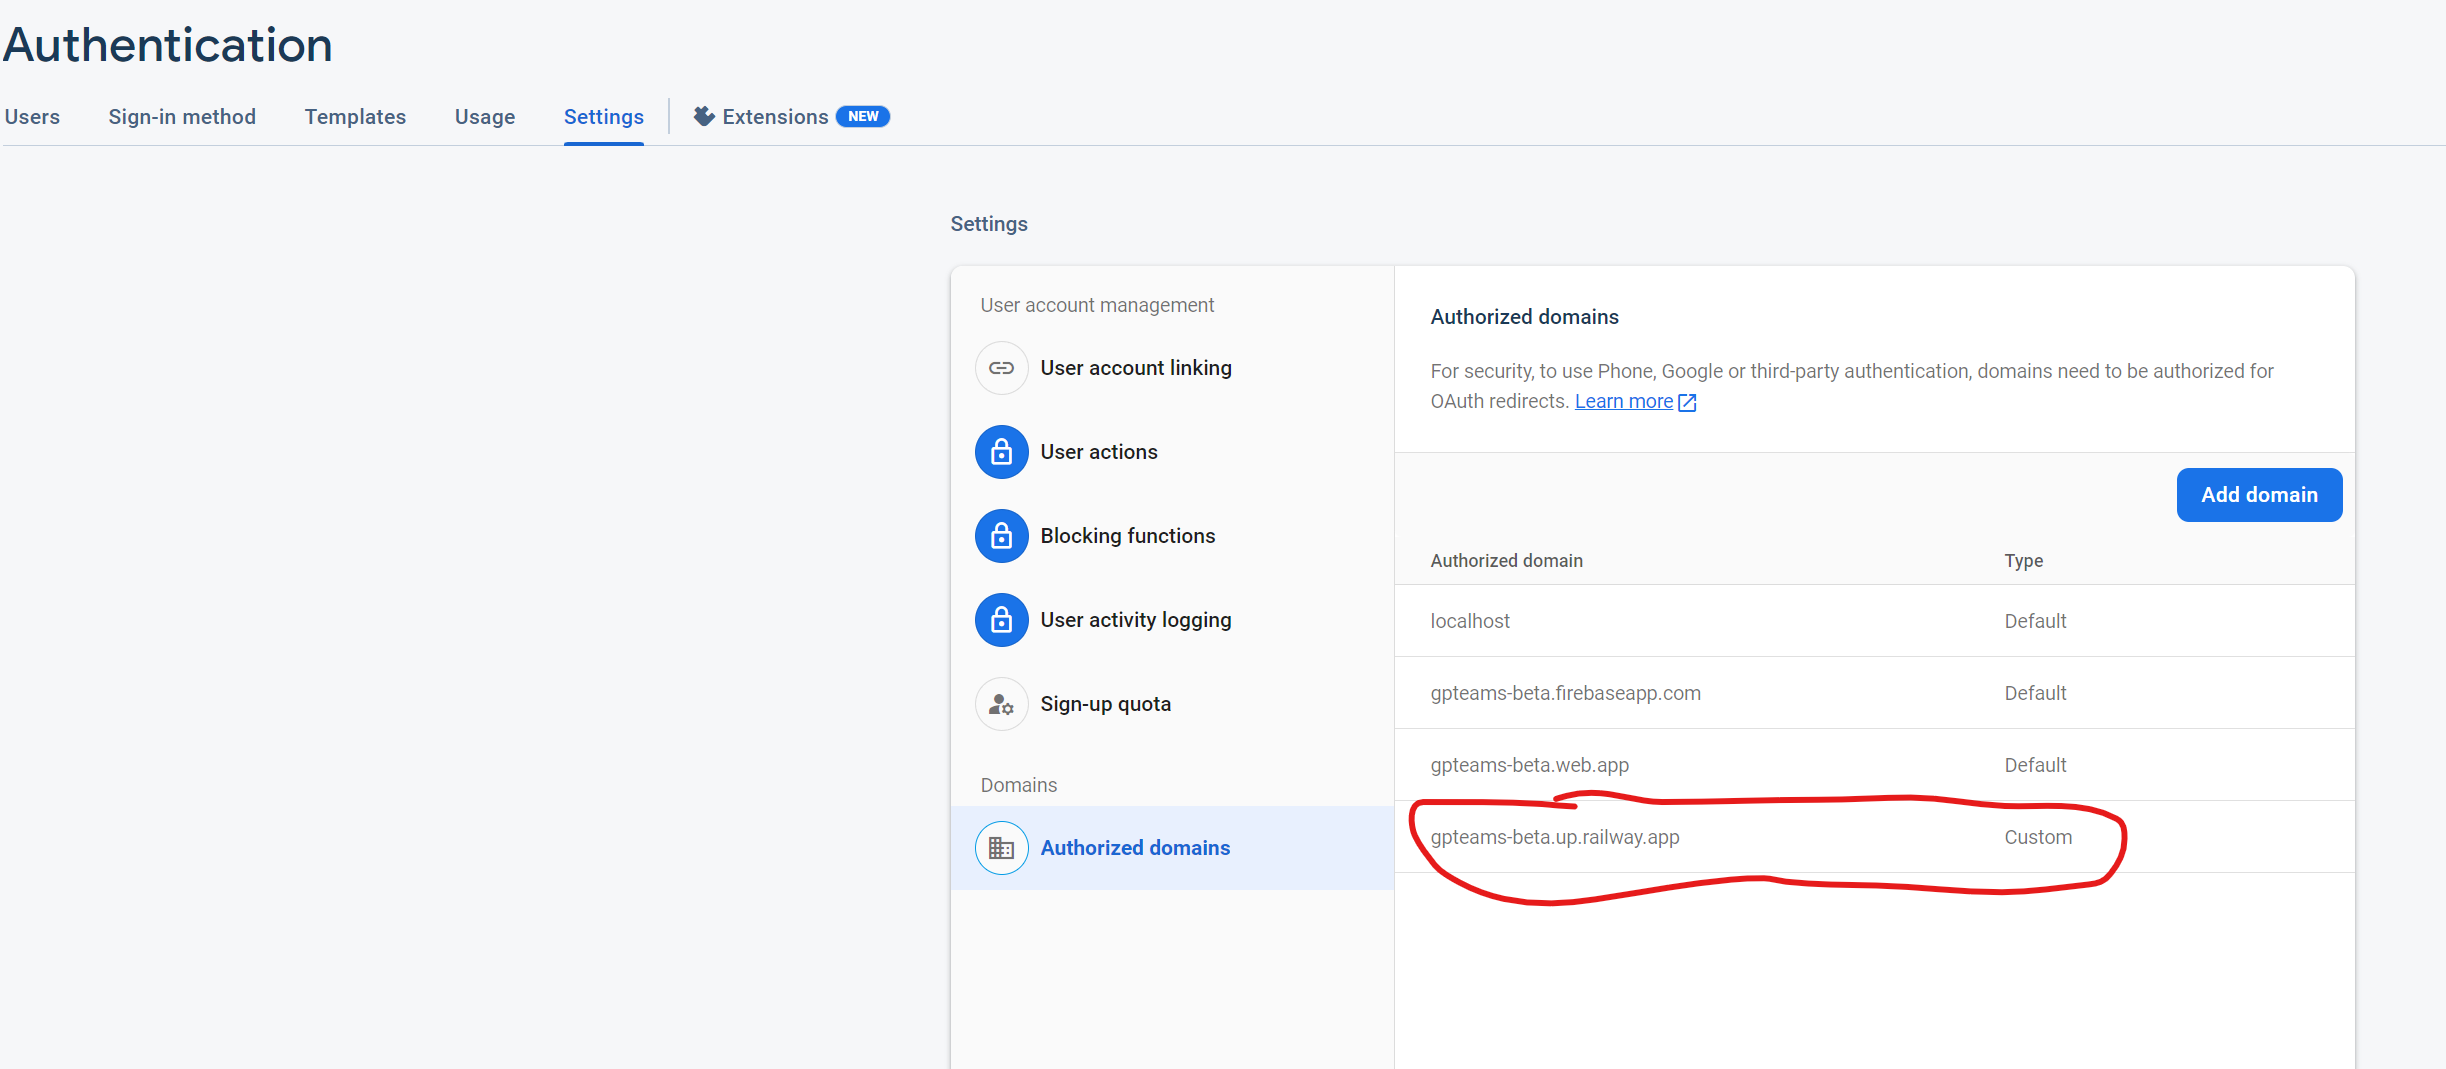
完成上述操作后,请千万不要忘记在 'Settings' 这一栏中添加你自己的域名:
通过以上操作我们已经完成了 Authentication 相关的配置。
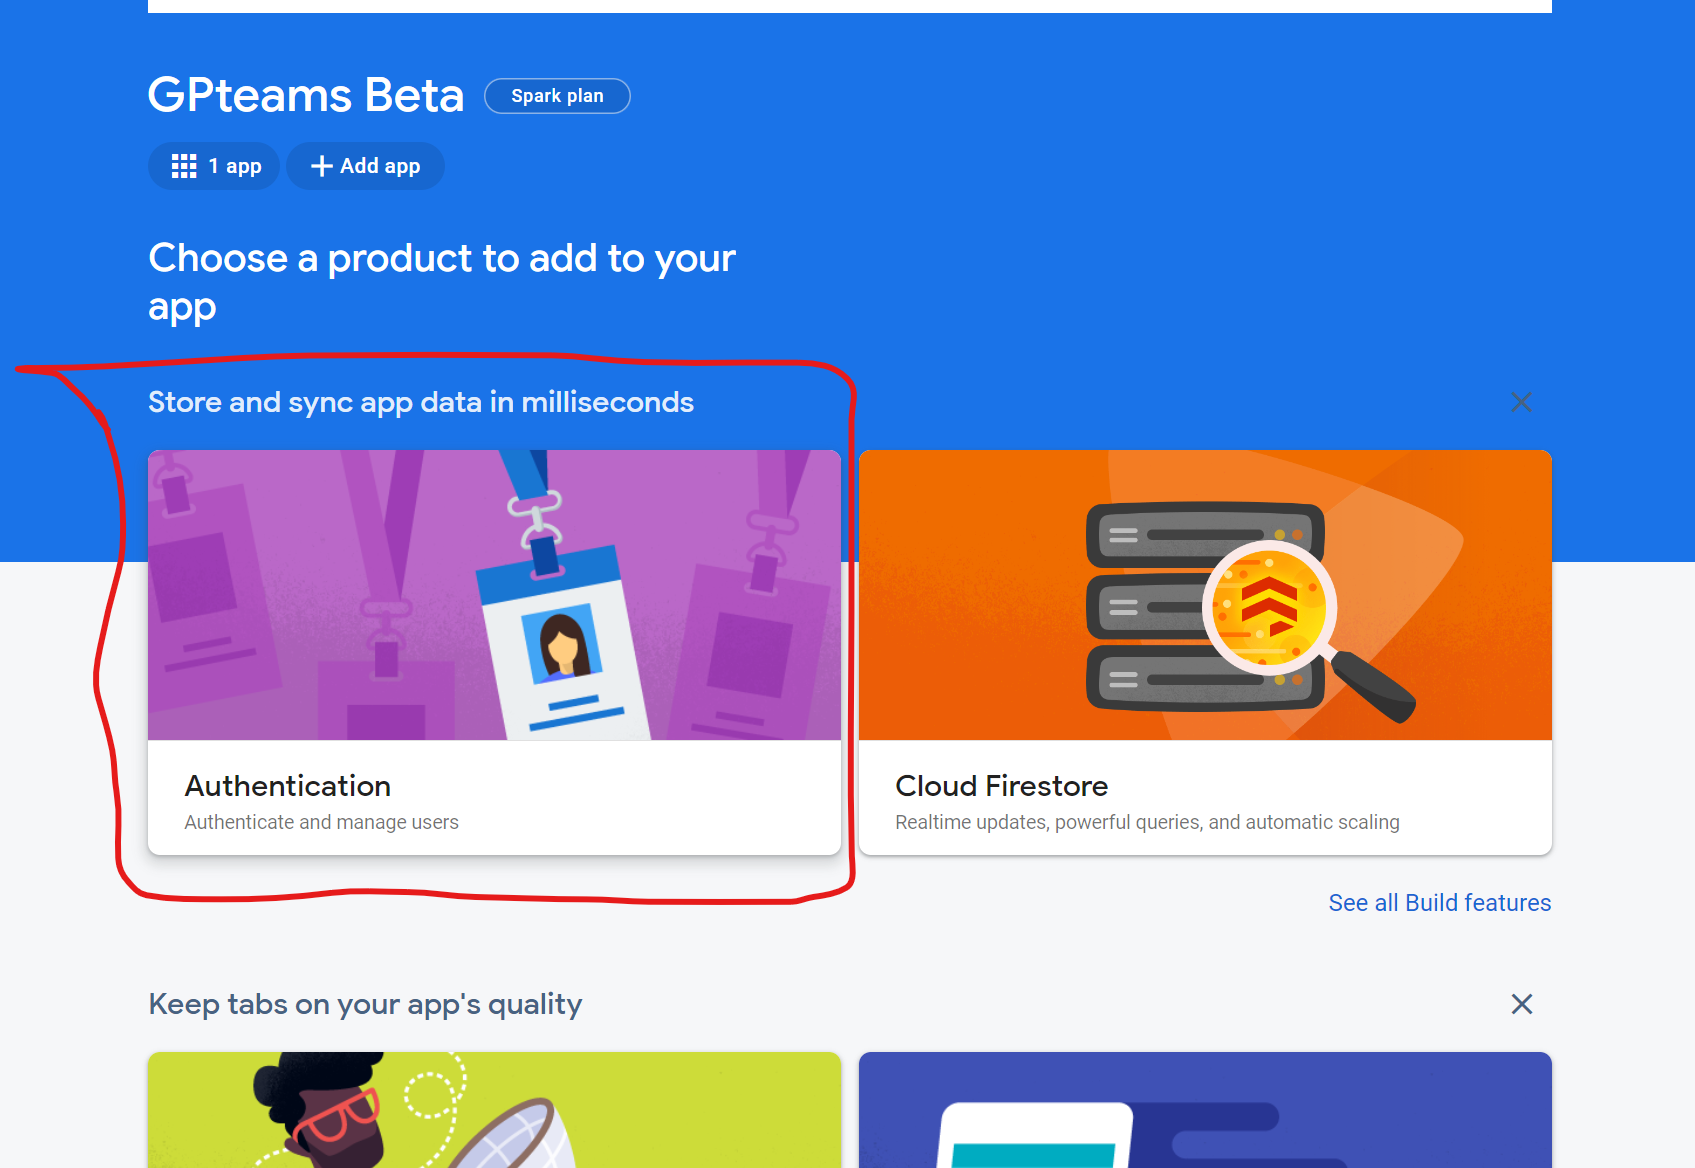
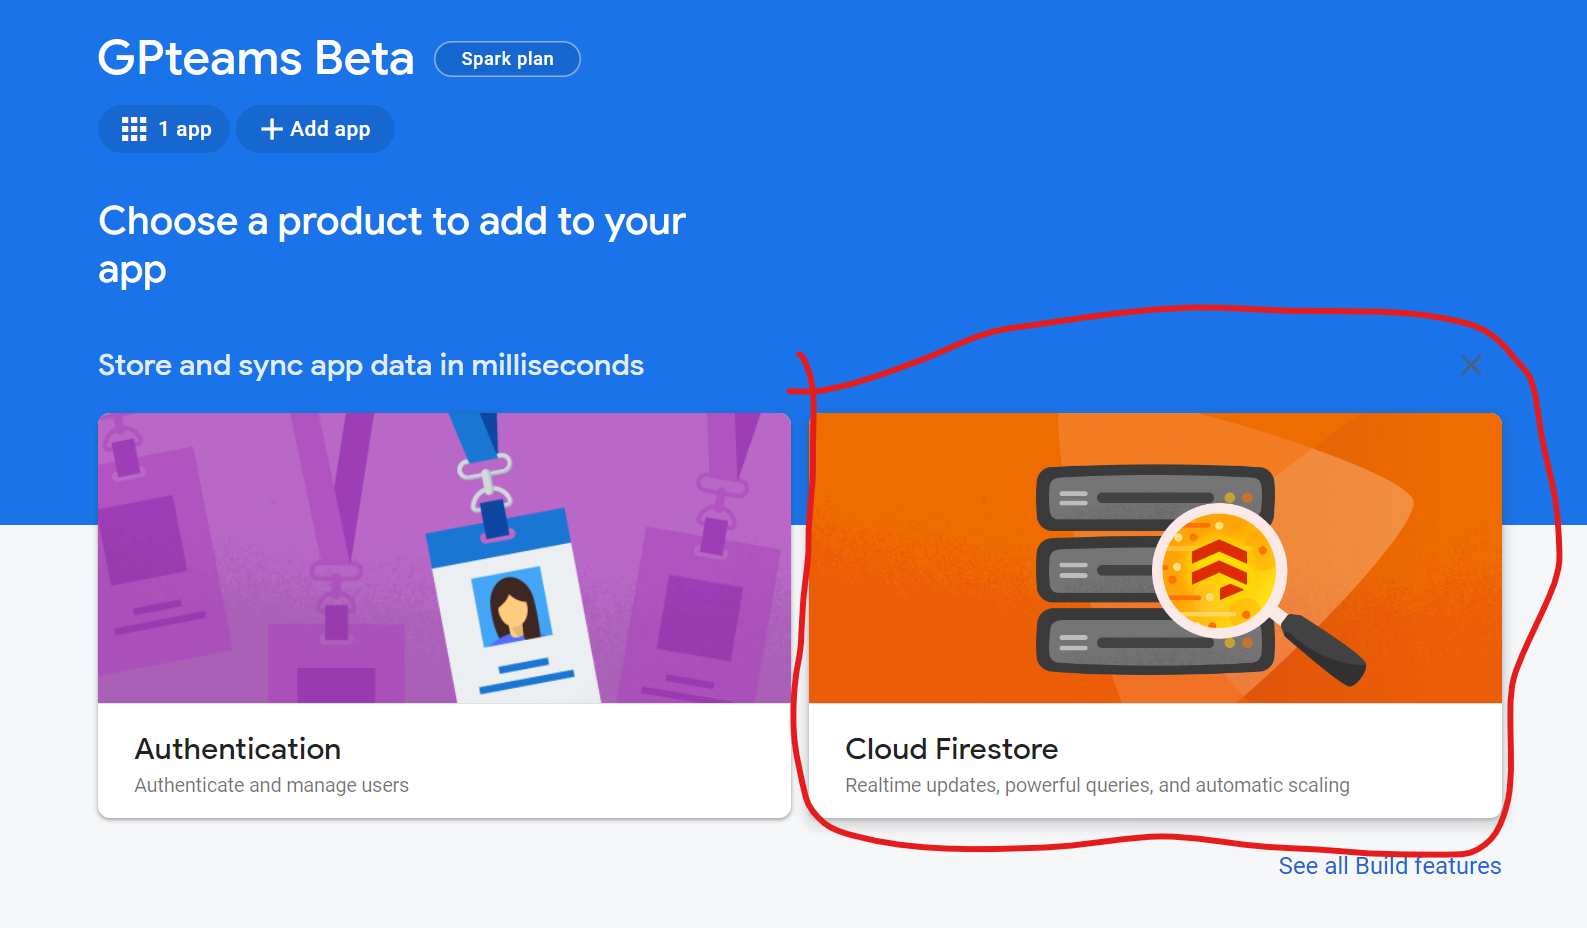
接下来我们配置 firestore,也就是项目的数据库部分:
点击 'Create database' 按钮:
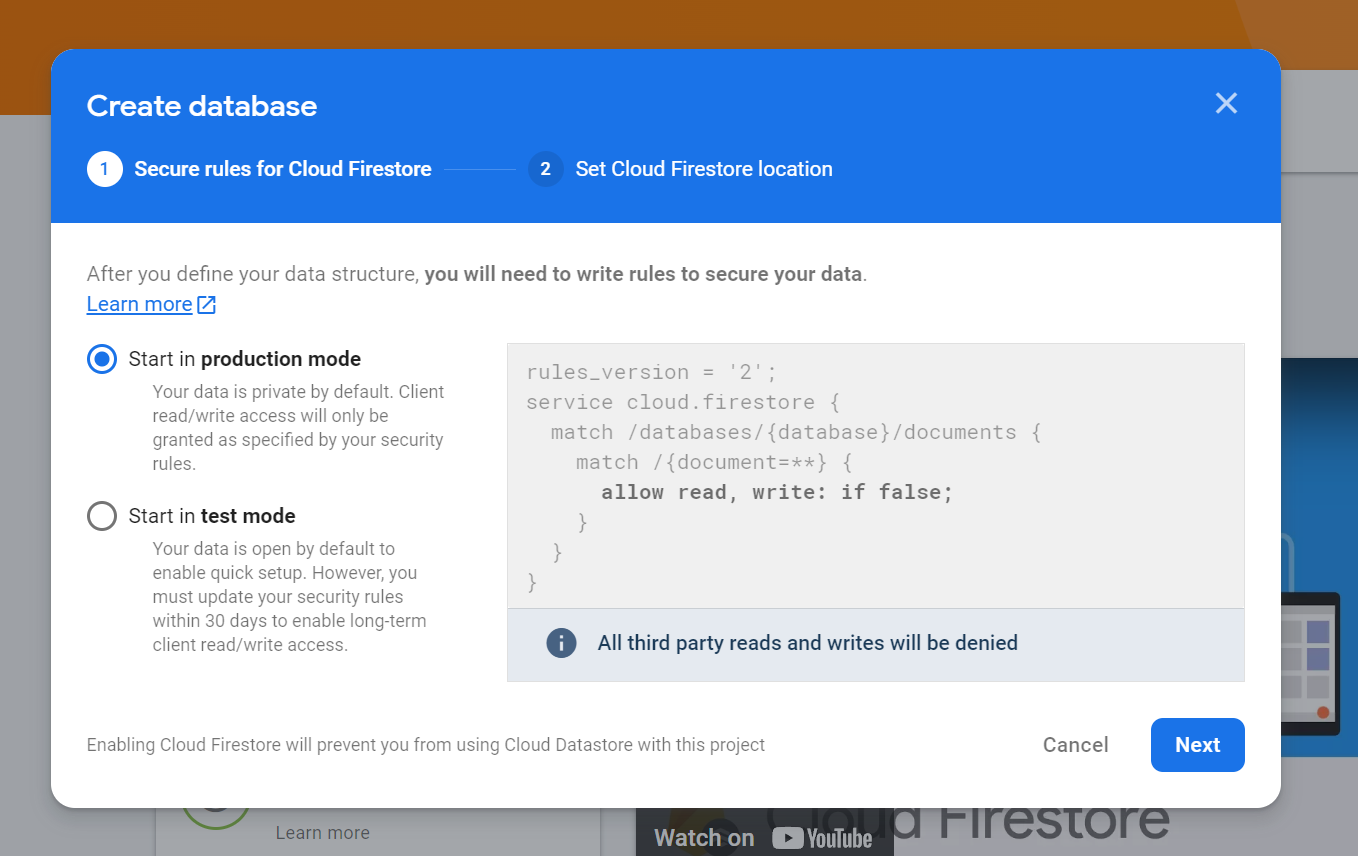
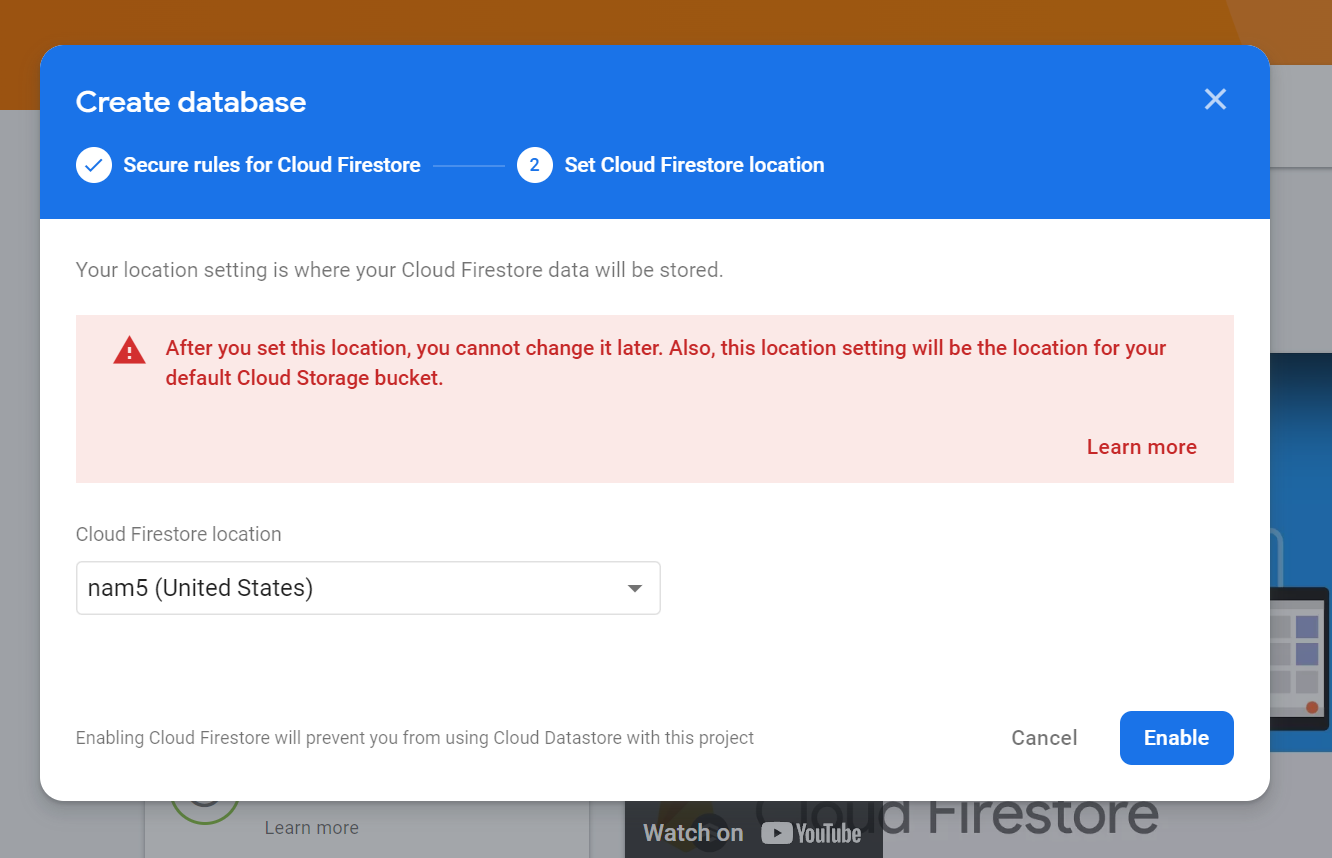
请一定要选择 start in production mode,然后点击 'next':
Cloud Firebase Location 这里请一定要选择离你的服务器比较近的地点,点击 Enable 即完成了配置:
注意,本节中获取的 firebase 私钥文件请一定要妥善保管,切勿泄露
点击左上角的 'project overview' 一旁的设置按钮,点击 'project setting' 进入 project setting 页面,点击 Service Accounts 一栏生成私钥文件:
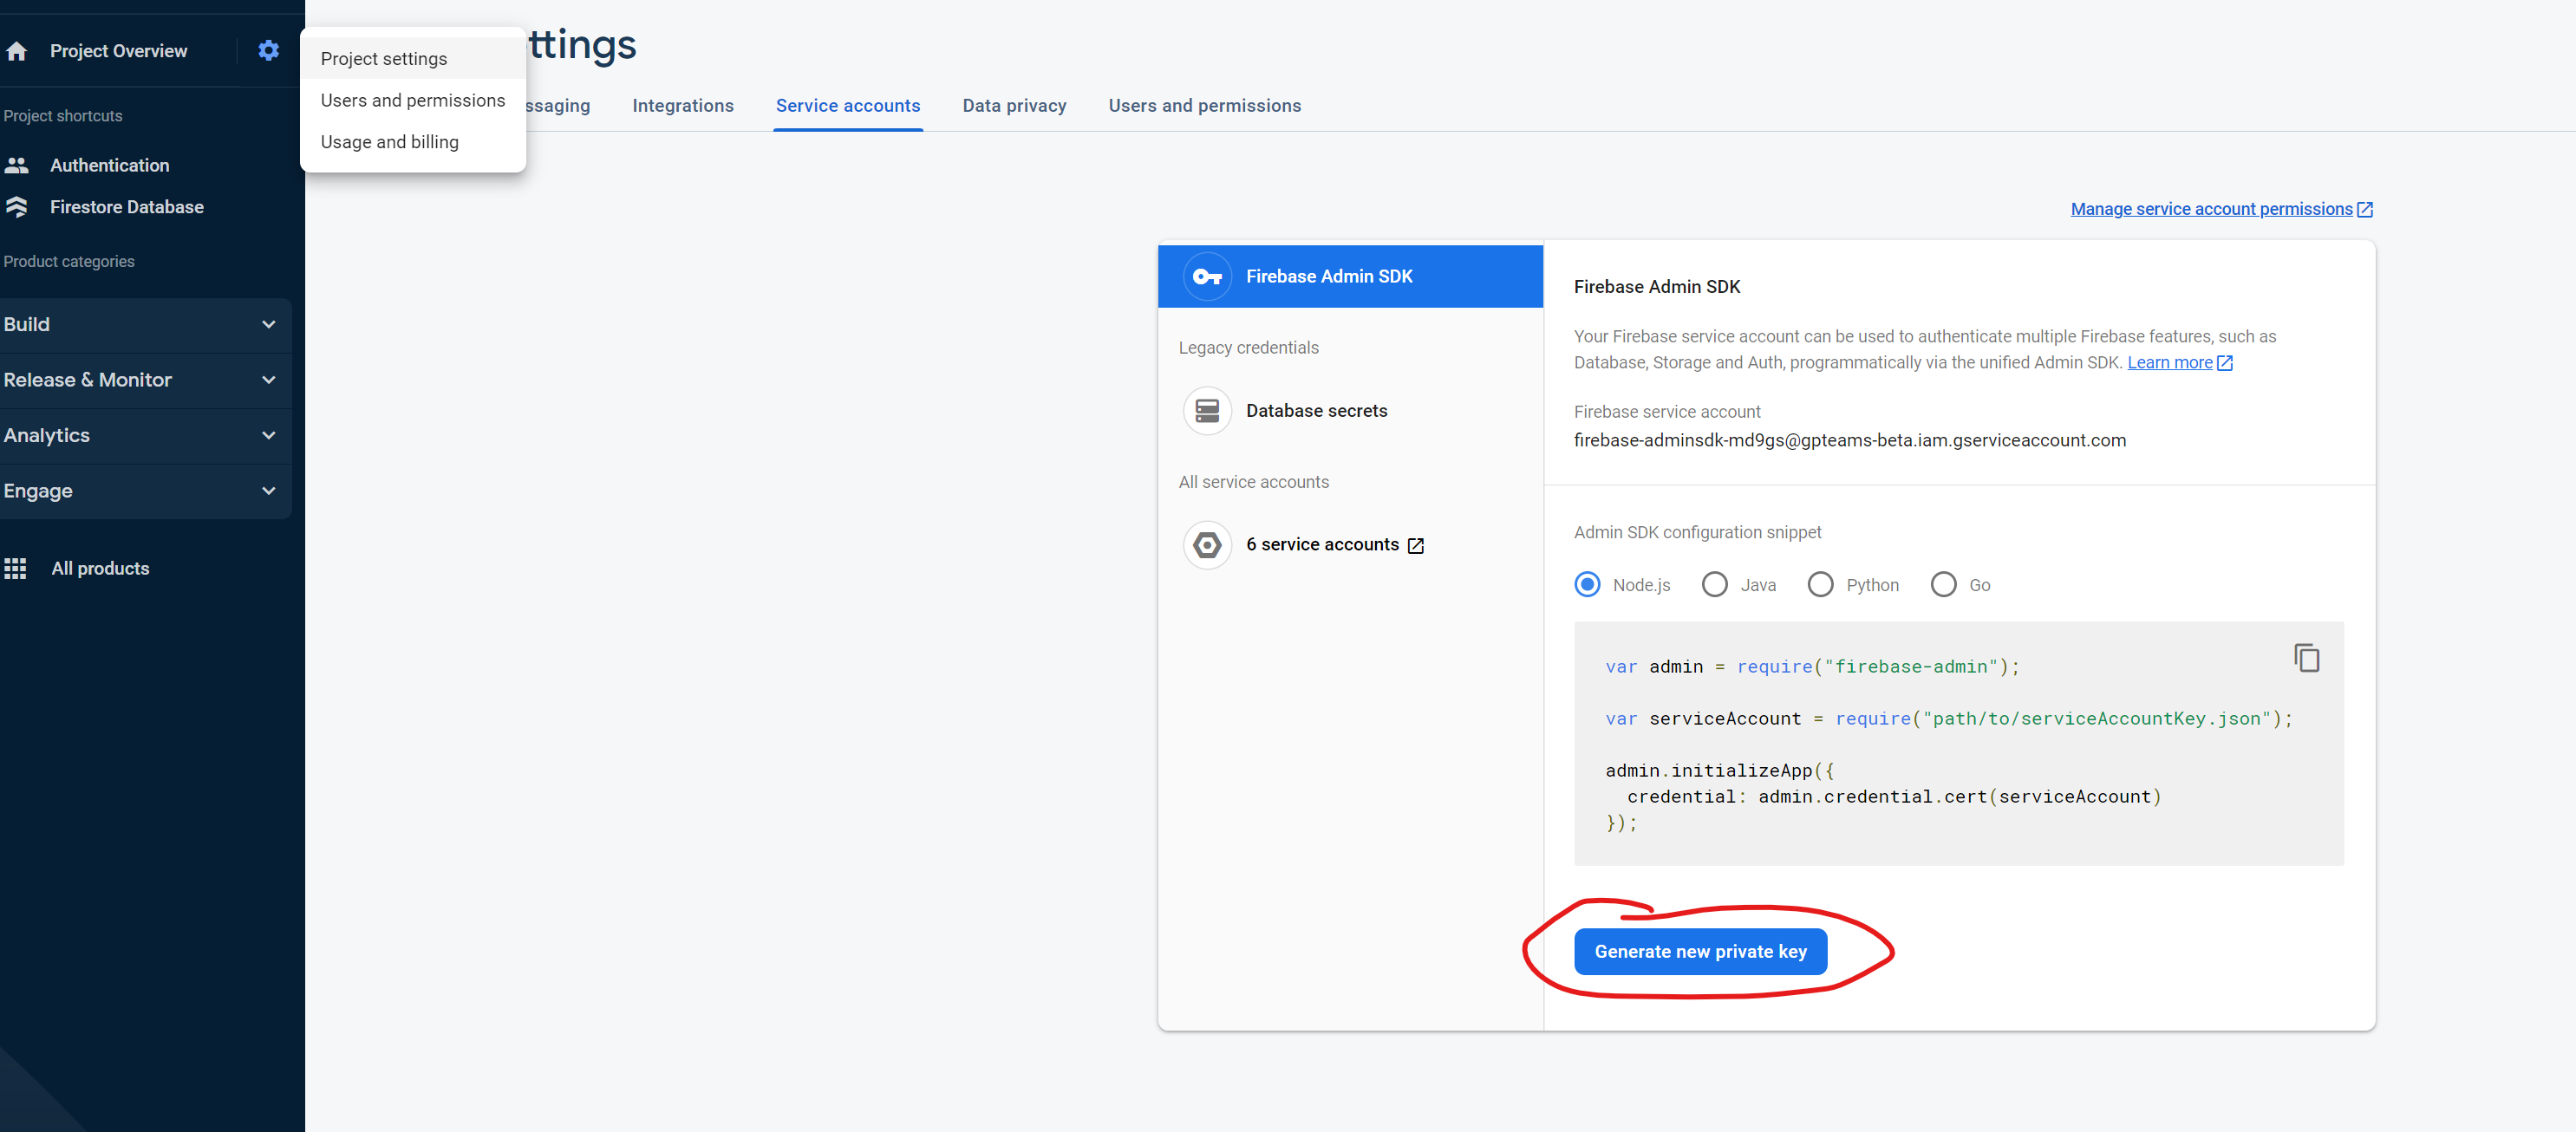
私钥文件即为下文中会用到的 'GOOGLE_APPLICATION_CREDENTIALS_JSON' 环境变量,在下文填写此变量时,直接粘贴文件中的内容即可。
当上述步骤结束时,你应该完成了所有 firebase 相关的配置,并获取到了如下环境变量:
FIREBASE_API_KEY
FIREBASE_AUTH_DOMAIN
FIREBASE_PROJECT_ID
FIREBASE_STORAGE_BUCKET
FIREBASE_MESSAGING_SENDER_ID
FIREBASE_APP_ID
GOOGLE_APPLICATION_CREDENTIALS_JSON
点击此按钮:

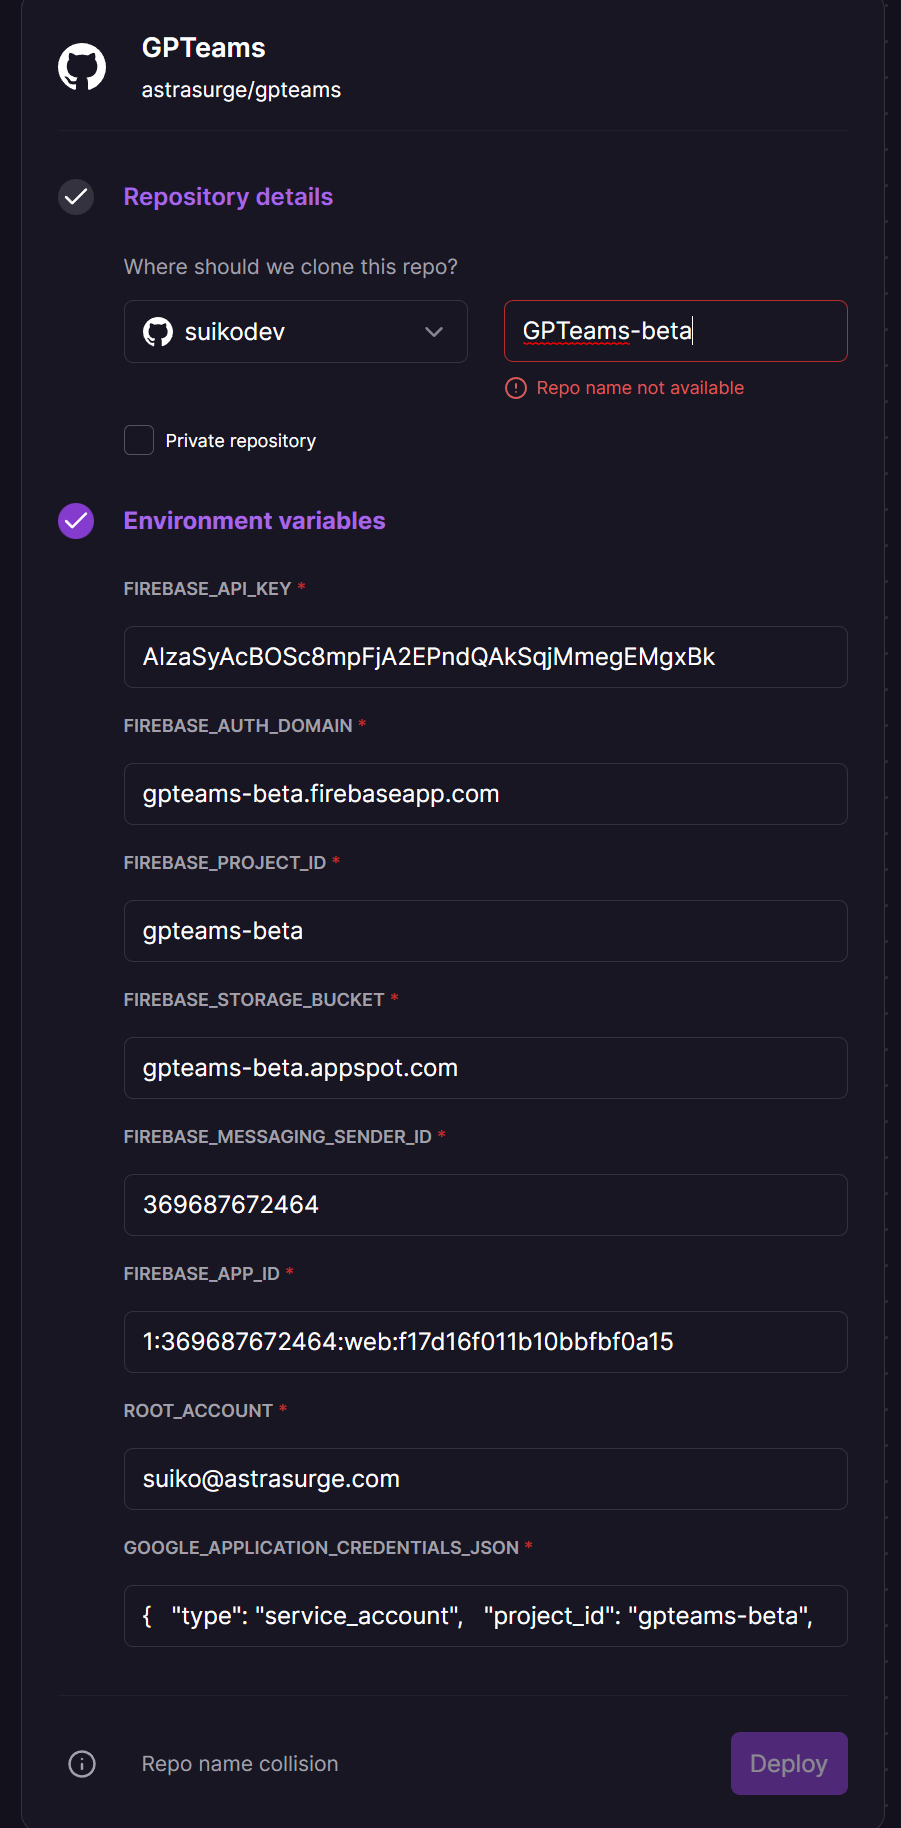
填入上文中获取到的环境变量,这里你可能发现了一个上文中没有出现的环境变量 ROOT_ACCOUNT, 这个环境变量代表管理员账号,可以进入管理员页面,填入你准备用来登录 GPTeams 的账号即可:
点击 'deploy',等待完成部署。
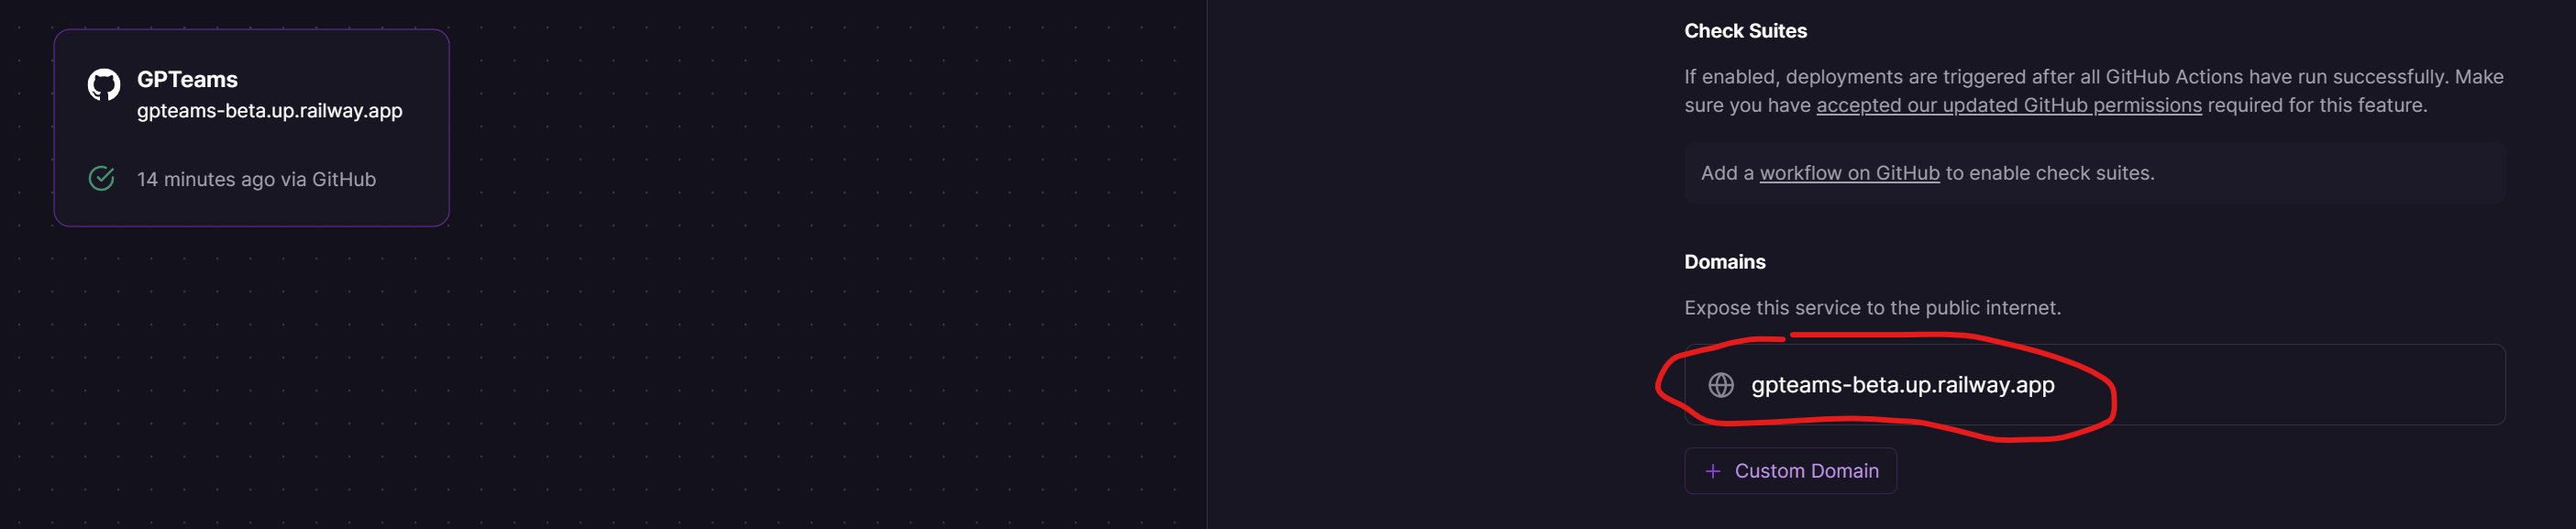
请不要忘记将 railway 提供给你的域名,或你自己添加到 railway 上的域名填写到 firebase authentication 配置中:
至此,你已成功部署 GPTeams (至少我是这样完成了 gpteams-beta.up.railway.app↗ 的部署) 🎉🎉🎉,之后请不要忘记登录网站在 admin 页面配置 OpenAI API key 与 黑/白名单。
###拉取最新的 docker 镜像 在 shell 中运行:
docker pull ghcr.io/astrasurge/gpteams:latest如果不成功,你可能要加上 sudo:
sudo docker pull ghcr.io/astrasurge/gpteams:latest
将上文中获取到的环境变量保存到 env.list 文件中, env.list 示例:
FIREBASE_API_KEY=XXX
FIREBASE_AUTH_DOMAIN=XXX.firebaseapp.com
FIREBASE_PROJECT_ID=XXX
FIREBASE_STORAGE_BUCKET=XXX.appspot.com
FIREBASE_MESSAGING_SENDER_ID=XXX
FIREBASE_APP_ID=XXX
FIREBASE_MEASUREMENT_ID=XXX
ROOT_ACCOUNT=suiko@astrasurge.com
GOOGLE_APPLICATION_CREDENTIALS_JSON={"type":"service_account","project_id":"XXX","private_key_id":"XXX","client_email":"XXX.gserviceaccount.com","client_id":"XXX","auth_uri":"XXX","token_uri":"https://oauth2.googleapis.com/token","auth_provider_x509_cert_url":"https://www.googleapis.com/oauth2/v1/certs","client_x509_cert_url":"XXX"}
ROOT_ACCOUNT是你用来进入管理员页面的账号,可以填入你用来登录 GPTeams 的账号。
sudo docker run --name gpteams -d -p 8000:3002 --env-file env.list ghcr.io/astrasurge/gpteams
此时你应该已经成功部署了 GPTeams, 之后请不要忘记登录网站在 admin 页面配置 OpenAI API key 与 黑/白名单。
GPTeams officially supports deployment using docker and Railway. "Official" here means that the deployment method based on docker and Railway will be tested every time a new version is released. It also means that if you encounter problems when deploying with other methods, you will not receive official support.
Before the formal deployment, you need to configure Firebase in advance and get the Firebase environment variables that will be used below.
Go to the Firebase Console. Click "Add project" and follow the Firebase's instructions to create the project. You will be prompted whether to enable Google Analytics during the process. Click "Disable Google Analytics", then click "Create project", and wait for a moment for the prompt to appear:
Click the "Continue" button, and then you will be redirected to the console of the project we just created:
Click the button surrounded by red box in the following figure:
After entering the project name, click the "Register" button:
The red boxed part is the Firebase configuration of our project that we will use as environment variables later:
The Firebase configuration shown in the above figure is the Firebase environment variables that we will use later:
FIREBASE_API_KEY=<apiKey> # Replace <apiKey> with the apiKey in the previous text.
FIREBASE_AUTH_DOMAIN=<authDomain> # Replace <authDomain> with the authDomain in the previous text.
FIREBASE_PROJECT_ID=<projectId> # Replace <projectId> with the projectId in the previous text.
FIREBASE_STORAGE_BUCKET=<storageBucket> # Replace <storageBucket> with the storageBucket in the previous text.
FIREBASE_MESSAGING_SENDER_ID=<messagingSenderId> # Replace <messagingSenderId> with the messagingSenderId in the previous text.
FIREBASE_APP_ID=<appId> # Replace <appId> with the appId in the previous text.
Then, return to the project console, click the Authentication section surrounded by a red box below:
Click the 'Get Started' button:
Enable the following three login methods in 'Sign In method':
After completing the above steps, do not forget to add your own domain in the 'Settings' section:
We have completed the configuration related to Authentication.
Next, we need to configure Firestore, which is the database part of our project:
Click the "Create database" button:
Be sure to choose "start in production mode", then click "next":
Please select the Cloud Firebase Location that is closer to your server, and click "Enable" to complete the configuration:
Note that the Firebase private key file obtained in this section must be properly secured and not leaked. Click the settings button next to "project overview" in the upper-left corner, click "project settings" to enter the project settings page, click the "Service Accounts" section to generate a private key file:
The private key file is the 'GOOGLE_APPLICATION_CREDENTIALS_JSON' environment variable that will be used in the following steps. When filling in this variable in the following steps, simply copy and paste the content of the file.
When the above steps are completed, you should have completed all Firebase-related configurations and obtained the following environment variables:
FIREBASE_API_KEY
FIREBASE_AUTH_DOMAIN
FIREBASE_PROJECT_ID
FIREBASE_STORAGE_BUCKET
FIREBASE_MESSAGING_SENDER_ID
FIREBASE_APP_ID
GOOGLE_APPLICATION_CREDENTIALS_JSON
Click this button:
Enter the environment variables obtained in the previous steps. Here, you may have noticed an environment variable ROOT_ACCOUNT that did not appear in the previous steps. This environment variable represents the administrator account, which can be used to log in to GPTeams' admin page. Enter the account you plan to use to log in to GPTeams:
Click "Deploy" and wait for the deployment to complete.
Do not forget to add the domain name provided by Railway or your own domain added to Railway to the Firebase Authentication configuration:
Congratulations! You have successfully deployed GPTeams (at least I completed the deployment of gpteams-beta.up.railway.app↗) 🎉🎉🎉. Don't forget to log in to the website and configure the OpenAI API key and black/white list in the admin page.
Run this command in your shell:
docker pull ghcr.io/astrasurge/gpteams:latestIf it fails, you may need to add sudo:
sudo docker pull ghcr.io/astrasurge/gpteams:latest
Save the environment variables obtained in the previous steps to a file named env.list. Here is an example of what env.list should look like:
FIREBASE_API_KEY=XXX
FIREBASE_AUTH_DOMAIN=XXX.firebaseapp.com
FIREBASE_PROJECT_ID=XXX
FIREBASE_STORAGE_BUCKET=XXX.appspot.com
FIREBASE_MESSAGING_SENDER_ID=XXX
FIREBASE_APP_ID=XXX
FIREBASE_MEASUREMENT_ID=XXX
ROOT_ACCOUNT=suiko@astrasurge.com
GOOGLE_APPLICATION_CREDENTIALS_JSON={"type":"service_account","project_id":"XXX","private_key_id":"XXX","client_email":"XXX.gserviceaccount.com","client_id":"XXX","auth_uri":"XXX","token_uri":"https://oauth2.googleapis.com/token","auth_provider_x509_cert_url":"https://www.googleapis.com/oauth2/v1/certs","client_x509_cert_url":"XXX"}
ROOT_ACCOUNT is the account you will use to access the admin page. You can enter the same account you plan to use to log in to GPTeams.
sudo docker run --name gpteams -d -p 8000:3002 --env-file env.list ghcr.io/astrasurge/gpteams
You should have successfully deployed GPTeams at this point. Don't forget to log in to the website and configure the OpenAI API key and black/white list in the admin page.