7. Pipeline integration
The ultimate goal of the CLI is to simplify the API-Developer (Service-Provider) experience and enable larger teams to manage APIs in an automated self-service fashion. This requires, that API-Developers can manage APIs on their own, without the requirement to interact with a centralized team to manage the CI/CD- or the API-Management-Platform.
To achieve this goal, it's strongly recommended to integrate the APIM-CLI into a CI/CD pipeline for instance using Jenkins, Bamboo, GitHub-Actions, etc. This page describes the best practice approach using Jenkins to integrate with Bitbucket or GitHub. As an alternative you may also use GitHub-Actions.
You may watch this demo video on YouTube to see how to setup and use the Jenkins integration:
Developers might work in different teams and not everybody should see everything. This is managed by Access-Groups in Bitbucket or GitHub, that can be used to control access permissions for each repository.
Using the described approach of "Organization folders" no centralized Jenkins Admin-Team is required to create Jobs/Workflows in Jenkins. Once an initial setup has been done by a Jenkins-Administrator, API-Developers can control Jenkins-Job on their own.
Even if the API-Developer experierence should be simple and automated, in many enterprise companies approval or quality gates must be established. Also it must be possible to trace back to a certain version of an API exposed.
Developers implementing an API should not be able to see or maintain configuration data for other stages, such as Pre-Production or Production.
To allow API-Developers to control Jenkins-Pipelines/Workflows on their own, they have to provide a Jenkinsfile that is used by Jenkins to automatically create a job or pipeline in Jenkins instead of using the UI.
Now, the remaining question is, how to tell Jenkins from where to read the Jenkins files automatically, as we don't want to configure each API-Project individually? The answer are so called Organization-Folders.
With an organization folder you can auto-discover new API projects including the belonging Jenkinsfile that creates the Job or Pipeline. You basically get the following:

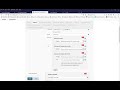
There are Jenkins-Plugins available for GitHub and Bitbucket.
Once the plugin has been installed, you can configure where to scan for new projects and automatically create and execute the job/pipeline as defined in each Jenkinsfile:

For instance, when having the following Repositories in Bitbucket, they will be reflected in Jenkins like so fully automated and each API-Project has it's own Pipeline/Job:

The following screenshot shows an overview about three individual projects, that may contain just the API-Definition for Swagger-Promote or additional source-code for the application/service itself. Of course, each repository must contain the required Jenkinsfile.
We are using Maven in these examples, hence every project also contains a pom.xml

In many companies, it is best practice to create packages/artifacts, some kind of releases for software projects. These artifacts are managed by repositories, such as Nexus, JFrog-Artifactory and used to share assets between teams and finally these artifacts are deployed to the target system. This provides several benefits, such as version auditing, segregation of concerns, rollbacks to previous version and CI/CD-Gates can be established.
We recommend to use the same approach also for promoting and deploying APIs into all different API-Management stages.
It starts with the API-Developer/Service-Provider and of course he expects the flexibility to code/deploy/test frequently until he is satisfied with his code and creates a release package.
The process for the API-Developer might looks like this:

- The developer is maintaining the APIs in the version control system as explained above
- providing a Jenkins-File to creates the Jenkins pipeline
- a pom.xml used to package the API (and perhaps the application itself)
- and of course the API-Configuration for the CLI itself
- During development, for each commit, the Development-Pipeline for that API starts, that
- Creates a SNAPSHOT artifact that is uploaded into the SNAPSHOT repository
- This artifact is then automatically deployed into the Development API-Management stage
- The developer can test & review the API and repeat the process
- for instance running a test-suite manually or as part of the pipeline
- Once the API is good to go, he starts a Release-pipeline based on Maven
- He manually starts the release process on Jenkins providing the release version, etc.
- Jenkins checks out the code, builds the package, tags the code and uploads the artifact into the Release-Repository
Please note: Also with that process it might be efficient to use CLI directly.
When the process above is finished, the API-Release-Package is created to be taken over by the next stage, which might be already PROD or previous stages such TEST. But from this point on, the API-Release-Package is not changed anymore and deployed into the different stages with different configurations.
The process in all remaining stages is different to the development stage and illustrated in the following picture:

In order to control all Non-Dev-Stages, another structure in the version control system is used to reflect the desired state of all APIs in all stages.
The following shows the structure of ONE repository having a number folders for each API. With that, people having access to that repository, are able to manage it. If you have the requirement to distinct between Public, Private & Confidential, ... APIs, were only a limited number of people have access to, you may setup multiple repositories each having a smaller set of APIs.
|-- Jenkinsfile
|-- anotherapi
|   |-- pom.xml
|   |-- prod
|   |   |-- another-image-for-prod.png
|   |   |-- myapi-config.prod.json
|   |   |-- pom.xml
|   |   `-- prod-server-certificate.crt
|   `-- tst
|       |-- myapi-config.tst.json
|       |-- pom.xml
|       `-- test-certificate.crt
`-- myapi
    |-- pom.xml
    |-- prod
    |   |-- another-image-for-prod.png
    |   |-- myapi-config.prod.json
    |   |-- pom.xml
    |   `-- server-certificate-prod.crt
    `-- tst
        |-- myapi-config.tst.json
        |-- pom.xml
        `-- test-server-certificate.crt
This repository might also use a Jenkinsfile, that is used to create the required Jenkins-Pipeline. However, this pipeline is taking care about all APIs in this repository.
- the main API-Folder contains
- the pom.xml contains a dependency to the released API version
- For each stage (tst, preprod, prod) a sub-folder exists
- within each stage a Child-POM exists that might override Mavene properties
- for instance using a different version on prod
- it might contain a stage api-config file to override the CLI API-Config
- it contains required assets such as images, certificates, etc.
- the stage folder might be optional if the API shouldn't exists on a certain stage
When a change is committed to that structure (e.g. a new API is added or an existing API-Version has changed) the Jenkins Deploy pipeline is started. It identifies the changed files (which API is changed), downloads the belonging artifact from the repository and deploys that API into the API-Manager stage using the CLI in the same way as for previous stages.
Please note: Additionally it should be possible to start the deployment pipeline manually. For that Jenkins can be used and is then requesting input parameters such as the API to deploy (which folder) and to which stage.
When using the CLI the distribution package comes with a conf folder that contains Environment-Property files which are referred with the parameter -s (stage). Learn more about Environment-Property files.
But when the CLI is executed directly with Maven it can't locate the conf folder. To allow the CLI anyway to use centralized Environment-Property files you can setup a system environment variable on your Jenkins agents: AXWAY_APIM_CLI_HOME pointing to a folder containing the conf directory. Learn more about AXWAY_APIM_CLI_HOME
An example Jenkinsfile might look like so, which expects Maven configured with key Mvn 3.3.9:
pipeline {
   agent any

   tools {
      // Install the Maven version configured as "M3" and add it to the path.
      maven "Mvn 3.3.9"
   }
   stages {
      stage('Build') {
         steps {
            // Run the CLI as defined in the pom.xml with exec:java (See the pom.xml)
            sh "mvn clean exec:java"

            // If you prefer to use Jenkins-Credentials instead of APIM_CLI_HOME/conf use this instruction
            //withCredentials([usernamePassword(credentialsId: "${stage}", usernameVariable: 'username', passwordVariable: 'password')])  {
            //    sh 'mvn clean exec:java -Dexec.args="-h ${host} -u ${username} -p ${password} -c ./api-definition/1-design-only-config.json -s api-env -f true -returnCodeMapping 10:0"'
            //}

            // To run Maven on a Windows agent, use
            // bat "mvn clean exec:java"
         }
      }
   }
}The Return-Code-Mapping feature is useful for controlling in which situations your pipeline should and should not fail. For example, it might be acceptable when a configured application for an API is missing. In this case, the pipeline should not fail. In contrast, you may want the pipeline to fail when a configured organization is missing. This should be up to customer requirements.
With return code mapping, you can convert the original error code to a different error code.
For example, by default the CLI returns with: 10, when the API has No-Change. This is desirable in some situations, but not when running it as part of the pipeline where you need a return-code 0. You can set the returnCodeMapping parameter either in the environment property file or as a parameter to the executable. With given the example above: 10:0 the return-code 10 is mapped into 0. See the example environment properties file.
This is an example pom.xml telling Maven how to build that API. This pom.xml will be the same for most of the APIs and the most important part to configure/change is:
- apiConfigFile: The API-Configuration file to use containing the desired state
- stage: The stage this API should be deployed to
- artifactId/groupId: As always, when the package should be released
<project xmlns="http://maven.apache.org/POM/4.0.0"
    xmlns:xsi="http://www.w3.org/2001/XMLSchema-instance" xsi:schemaLocation="http://maven.apache.org/POM/4.0.0 http://maven.apache.org/xsd/maven-4.0.0.xsd">
    <modelVersion>4.0.0</modelVersion>

    <artifactId>demo-api</artifactId>
    <groupId>axway.api-management.api</groupId>
    <version>1.0.0-SNAPSHOT</version>
    <packaging>pom</packaging>
    <name>A demo API</name>
    <description>A demo API to explain CI/CD integration</description>

    <properties>
        <apiConfigFile>./api-definition/api-config/weather-api-config.json</apiConfigFile>
        <stage>api-env</stage>
    </properties>

    <distributionManagement>
        <snapshotRepository>
            <id>localNexus</id>
            <url>http://repository:8081/nexus/content/repositories/snapshots</url>
        </snapshotRepository>
        <repository>
            <id>localNexus</id>
            <url>http://repository:8081/nexus/content/repositories/releases</url>
        </repository>
    </distributionManagement>

    <dependencies>
        <dependency>
            <groupId>com.github.axway-api-management-plus.apim-cli</groupId>
            <artifactId>apimcli-apis</artifactId>
            <version>1.12.3</version>
        </dependency>
    </dependencies>

    <build>
        <plugins>
            <plugin>
                <!-- Build step used to create a releaseable artefact -->
                <artifactId>maven-assembly-plugin</artifactId>
                <version>3.2.0</version>
                <executions>
                    <execution>
                        <id>distribution</id>
                        <phase>package</phase>
                        <goals>
                            <goal>single</goal>
                        </goals>
                        <configuration>
                            <finalName>a2a-api-${project.version}</finalName>
                            <appendAssemblyId>false</appendAssemblyId>
                            <descriptors>
                                <descriptor>assembly/assembly.xml</descriptor>
                            </descriptors>
                        </configuration>
                    </execution>
                </executions>
            </plugin>
            <plugin>
                <!-- Build step to execute Swagger-Promote with Java exec -->
                <groupId>org.codehaus.mojo</groupId>
                <artifactId>exec-maven-plugin</artifactId>
                <version>1.6.0</version>
                <executions>
                    <execution>
                        <id>distribution</id>
                        <goals>
                            <goal>java</goal>
                        </goals>
                    </execution>
                </executions>
                <!-- Call the API-Import module class -->
                <configuration>
                    <addResourcesToClasspath>true</addResourcesToClasspath>
                    <mainClass>com.axway.apim.cli.APIManagerCLI</mainClass>
                    <classpath/>
                    <commandlineArgs>
                        api import -c ${apiConfigFile} -s ${stage}
                    </commandlineArgs>
                </configuration>
            </plugin>
        </plugins>
    </build>
</project>
An example project can found here: https://github.com/cwiechmann/airports
With GitHub Actions you can use our Axway APIM-CLI Github Action to easily integrate the APIM-CLI into your GitHub action workflow like so:
jobs:
  importMockedEntities:
    name: Import Mocked Entities
    runs-on: ubuntu-latest

    steps:
      - uses: actions/checkout@v2
        name: Check out
      - name: Import Orgs
        uses: Axway-API-Management-Plus/apim-cli-github-action@v1.5.1
        with:
          apimHostname: ${{ github.event.inputs.apimHost }}
          apimPort: "443"
          apimUsername: ${{ github.event.inputs.apimUsername }}
          apimPassword: ${{ github.event.inputs.apimPassword }}
          apimExtraArgs: '-port ${{ github.event.inputs.apimPort }} -force -returnCodeMapping 10:0'
          orgDirectory: 'apim-cli-data/Organizations'
          apiDirectory: 'apim-cli-data/APIs'