Accelerator
Important
The ALZ Bicep Accelerator has been updated to automate the bootstrapping of your Version Control System and Azure resources. The ALZ Bicep Accelerator's documentation has been moved to aka.ms/alz/accelerator/docs. Head over there now to get started! Use the instructions below only if you need to use the classic version of the ALZ Bicep Accelerator.
Warning
The classic version of the ALZ Bicep Accelerator will be maintained for a limited time. We recommend migrating to the new version as soon as possible.
Note
These instructions now include the -bicepLegacyMode $true parameter, which needs be set explicily to use the classic version.
The ALZ Bicep Accelerator framework was developed to provide end-users with the following abilities:
- Allows for rapid onboarding and deployment of ALZ Bicep using full-fledged CI/CD pipelines with user provided input
Note: Currently we offer support for GitHub Action Workflows and Azure DevOps Pipelines
- Provides framework to not only stay in-sync with new ALZ Bicep releases, but also incorporates guidance around modifiying existing ALZ Bicep modules and/or associating custom modules to the framework
- Offers branching strategy guidance and pull request pipelines for linting the repository as well as validating any existing custom and/or modified Bicep modules
Accelerator Directory Tree:

We attempted to make the pipelines as flexible as possible while also reducing overall complexity. Essentially, the ALZ Bicep Accelerator is made up four distinct deployment pipelines that represent different phases of the ALZ Bicep deployment. Each workflow shares a common set of workflow configurations and deployment scripts including the following:
- Event based triggers (i.e. pushes to main and path filters for each workflow associated Bicep parameter file)
- PowerShell deployment scripts for each module that are referenced within Azure PowerShell Action steps
- The PowerShell scripts reference the modules and parameter files used within the deployment flow documentation. Therefore, we recommend you review the deployment flow documentation to understand the purpose of each module and the parameters that are used within the deployment scripts.
- Environment variables file (.env) which is used to store variables that are accessed within the PowerShell scripts
- What-If Deploment conditions which are triggered automatically if a pull request is created against the main branch. This allows for a user to validate the deployment and potential changes before merging the pull request into the main branch.
- Deployment conditions which are triggered automatically if a push is made to the main branch. This allows for a user to validate the deployment and potential changes before merging the pull request into the main branch.
Note: Currently, the output of the GitHub Action workflows or the Azure DevOps Pipelines need to viewed within the respective portal. We are working on adding support for sending the output to the Pull Request comments section in the future.
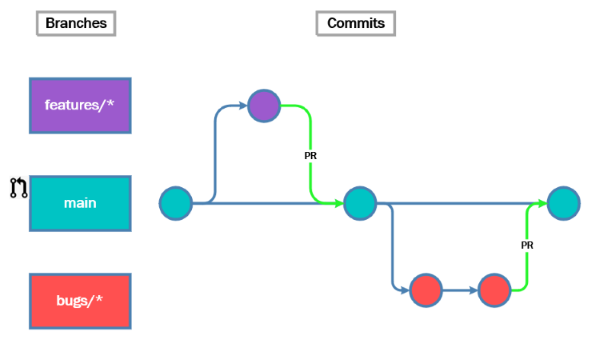
All of the GitHub Actions follow a similar high level workflow as follows:

The only thing that differs across the workflows is which ALZ Bicep modules are deployed as shown in the following low level diagram:

Below are the required pre-requisites that need to be installed prior to using the ALZ Bicep Accelerator framework:
- PowerShell - 7.1 or higher
- Az PowerShell Module - 10.0.0 or higher
- Git
- Bicep
- Visual Studio Code
- ALZ PowerShell Module
In order to setup the Accelerator framework with the production GitHub Action Workflows, the following steps must be completed in the order listed:
-
Follow this GitHub documentation to create a new remote GitHub repository that is not initialized with a README.md file.
-
Within your local workstation, open PowerShell, create and change into a directory (e.g., C:\Repos) of your choice for where you would like to manage the ALZ Bicep Accelerator framework.
-
Clone the non-initialized remote repository to your local workstation with the following command:
# Clones the remote repository to your local workstation
git clone https://github.com/<OrganizationName>/<RepositoryName>.git
-
Create your ALZ Bicep Accelerator framework with the following ALZ PowerShell Module cmdlet:
Deploy-Accelerator -o <output_directory> -i "bicep" -b "alz_github" -bicepLegacyMode $true
Note: If the directory structure specified for the output location does not exist, the module will create the directory structure programatically.
Various prompts will be displayed which will be used to replace parameter values as well as to create an environment variables file (.env) that will be used by the GitHub Action workflows.
-
Depending upon your preferred network topology deployment, remove the associated workflow file for each deployment model
- Traditional VNet Hub and Spoke = .github\workflows\alz-bicep-4a-hubspoke.yml
- Virtual WAN = .github\workflows\alz-bicep-4b-vwan.yml
Note: These workflow files and associated deployment scripts will be programatically removed in the future.
-
Review all parameter files within config/custom-parameters and update the values as needed for your desired ALZ configuration. All files pertaining to the default ALZ Bicep modules are located within the upstream-releases directory. The parameter files are located within the config/custom-parameters directory. For a minimalistic deployment, some example parameters are provided here
Note: To further understand the purpose of each parameter, please review the deployment flow documentation. For design considerations, please review our page in the Azure Architecture Center.
-
Run the following Git commands to get your remote branch in-sync with the local branch
# Adds all changes in the working directory to the staging area
git add .
# Records a snapshot of your repository's staging area
git commit -m "Initial commit"
# Updates the remote branch with the local commit(s) if you did not initialize your remote repository.
git push
-
Now that the remote branch has the latest commit(s), you can configure your OpenID Connect (OIDC) identity provider with GitHub which will give the workflows access to your Azure environment.
- Create an Microsoft Entra service principal
-
Add your federated credentials
- Add one federated credential with the entity type set to 'Branch' and with a value for "Based on Selection" set to 'main'
- Add a secondary federated credential with the entity type set to 'Pull Request'
-
Create GitHub secrets
Note: The workflows reference secret names AZURE_TENANT_ID and AZURE_CLIENT_ID. If you choose to use different names, you will need to update the workflows accordingly.
- Grant permissions for the service principal to be able to deploy the resources
-
All workflows are now ready to be deployed! For the initial deployment, manually trigger each workflow in the following order
- ALZ-Bicep-1-Core
- ALZ-Bicep-2-PolicyAssignments
- ALZ-Bicep-3-SubPlacement
- ALZ-Bicep-4A-HubSpoke or ALZ-Bicep-4B-VWAN
-
As part of the branching strategy, setup the branch protection rules against the main branch with the following selected as a starting point:
- Require a pull request before merging
- Require approvals
- Require conversation resolution before merging
- Do not allow bypassing the above settings
- Require a pull request before merging
In order to setup the Accelerator framework with the production ready Azure DevOps Pipelines, the following steps must be completed in the order listed:
-
Follow this Azure DevOps documentation to create a new remote Azure DevOps Git repository that is not initialized with a README.md file.
-
Within your local workstation, open PowerShell, create and change into a directory (e.g., C:\Repos) of your choice for where you would like to manage the ALZ Bicep Accelerator framework.
-
Clone the non-initialized remote repository to your local workstation with the following command:
# Clones the remote repository to your local workstation
git clone https://<OrganizationName>@dev.azure.com/<OrganizationName>/<ProjectName>/_git/<RepositoryName>
-
Create your ALZ Bicep Accelerator framework with the following ALZ PowerShell Module cmdlet:
Deploy-Accelerator -o <output_directory> -i "bicep" -b "alz_azuredevops" -bicepLegacyMode $true
Note: If the directory structure specified for the output location does not exist, the module will create the directory structure programatically.
Various prompts will be displayed which will be used to replace parameter values as well as to create an environment variables file (.env) that will be used by the Azure DevOps pipelines.
-
Depending upon your preferred network topology deployment, remove the associated pipeline file for each deployment model
- Traditional VNet Hub and Spoke = .azuredevops\pipelines\alz-bicep-4a-hubspoke.yml
- Virtual WAN = .azuredevops\pipelines\alz-bicep-4b-vwan.yml
Note: These workflow files and associated deployment scripts will be programatically removed in the future.
-
Review all parameter files within config/custom-parameters and update the values as needed for your desired ALZ configuration. All files pertaining to the default ALZ Bicep modules are located within the upstream-releases directory. The parameter files are located within the config/custom-parameters directory. For a minimalistic deployment, some example parameters are provided here
Note: To further understand the purpose of each parameter, please review the deployment flow documentation. For design considerations, please review our page in the Azure Architecture Center.
-
Grant permissions for the service principal to be able to deploy the resources
-
Create an Azure Resource Manager Service Connection within Azure DevOps at the Scope Level of Management Group. All pipeline files, except for the PR pipeline files reference a variable called SERVICE_CONNECTION_NAME. You will need to update the variable with the name of the service connection you created within this step.
-
Run the following Git commands to get your remote branch in-sync with the local branch
# Adds all changes in the working directory to the staging area
git add .
# Records a snapshot of your repository's staging area
git commit -m "Initial commit"
# Updates the remote branch with the local commit(s) if you did not initialize your remote repository.
git push
-
Create your new pipelines within Azure DevOps. Ensure you select "Existing Azure Pipelines YAML file" when prompted and select the pipeline files from the .azuredevops/pipelines
-
Assign pipeline permissions to access the Service Connection you created previously ```
-
All pipelines are now ready to be deployed! For the initial deployment, manually trigger each workflow in the following order
- ALZ-Bicep-1-Core
- ALZ-Bicep-2-PolicyAssignments
- ALZ-Bicep-3-SubPlacement
- ALZ-Bicep-4A-HubSpoke or ALZ-Bicep-4B-VWAN
-
As part of the branching strategy, setup the branch protection rules against the main branch with the following selected as a starting point:
- Require a pull request before merging
- Require approvals
- Require conversation resolution before merging
- Do not allow bypassing the above settings
- Setup automated and required build valdiation reuquirements for all of the pipelines. This will ensure that all changes to the main branch are validated before merging as well as to provide a What-If analysis for the changes made to your ALZ environment. Finally, ensure you match the path filters for each build validation to what is specified in the pipeline files.
Note: This last step is required if you are using GitHub and Bitbucket as your repository and integrating with Azure DevOps Pipelines.
- Require a pull request before merging
Branching strategies offer the ability to manage and organize changes to a codebase, reduce errors, improve collaboration, and support best practices such as testing, continuous integration and deployment, and release management.
For this framework, we recommend utilizing the GitHub Flow branching strategy which is a lightweight, branch-based workflow.
As part of the framework, we include two PR workflows. The pipelines will perform the following tasks:
| Workflow Name | Trigger | Tasks |
|---|---|---|
| ALZ-Bicep-PR1-Build | Pull request against main branch and changes to any Bicep file or Bicep config file. | Checks to see if there are any modified or custom modules residing within the config\custom-modules directory and if so, the workflow will lint the modules and ensure they can compile. |
| ALZ-Bicep-PR2-Lint | Pull request against main branch. | Using Super-Linter, the workflow will lint everything in the codebase apart from the Bicep modules/files. |
Important: YAML PR triggers are supported only in GitHub and Bitbucket Cloud. If you use Azure Repos Git, you can configure a branch policy for build validation to trigger your build pipeline for validation. For more information, please refer to Azure DevOps: Branch policies and settings - Build validation | Microsoft Learn
The ALZ-Bicep repository regularly releases new versions. With each new release, the ALZ Bicep modules are updated to include new features and bug fixes. Therefore, we recommend that you upgrade to the latest version of ALZ Bicep as soon as possible.
With the ALZ Accelerator framework, we have designed the pipelines and directory structure to make it easy to upgrade to the latest ALZ Bicep version. The following steps will guide you through the upgrade process.
-
Prior to upgrading, read the release notes for the version you are upgrading to. The release notes will provide you with information on any breaking changes that may impact your deployment. This is especially important if you have created any custom modules or have modified any of the ALZ Bicep modules that may have dependencies on the modules that are being upgraded.
-
Using the ALZ PowerShell Module, you can update to the latest or a specified version. You must specifiy the same IaC, Bootstrap and Output directory that you used when you initially deployed the ALZ Bicep Accelerator.
Here is an example of using the cmdlet to upgrade to the latest version:
Deploy-Accelerator -i "bicep" -b "alz_github" -o "C:\Repos\ALZ\accelerator" -bicepLegacyMode $true
Here is an example of using the to upgrade to version v0.17.2:
Deploy-Accelerator -i "bicep" -b "alz_github" -v "v0.17.2" -o "C:\Repos\ALZ\accelerator" -bicepLegacyMode $true
You will be prompted for inputs again and the upgrade will be run for you.
Verify that the cmdlet has updated the environment variables file (.env):
UPSTREAM_RELEASE_VERSION="v0.17.2" -
You can now deploy the updated modules.
Tip: The current pipelines trigger What-If deployment in PRs for changes in the Bicep parameter files. If you also want to include the What-If deployment process in the module upgrade process, consider the following options:
- Adding the environment variables file (.env) as an additional trigger in the module pipelines
- Introducing inputs/parameters in the module pipelines so you can manually trigger What-If deployments in a controlled manner.
Some organizations may want to start with a Landing Zone with the least cost possible, sacrificing recommended security settings, as a way to learn how to start governing their infrastructure using an Enterprise Scale approach. In that case, you may want to disable some networking settings like the DDoS network protection plan (which is the item with the highest cost when using the defaults), Firewall and VPN or Expressroute gateways, and deploy just the skeleton of your network in a first iteration, which can be easily modified later.
Here you can find the detailed changes for a minimal hub-and-spoke deployment. For vWAN, use the file config/custom-parameters/vwanConnectivity.parameters.all.json instead, and look for the equivalent parameters.
-
Remove the DDos Plan: edit config/custom-parameters/hubNetworking.parameters.all.json and set parDdosEnabled to false.
"parDdosEnabled": {
  "value": false
},
Then you can either disable the automatic Policy assignment by adding the following in config/custom-parameters/alzDefaultPolicyAssignments.parameters.all.json:
"parExcludedPolicyAssignments": {
  "value": [
    "Enable-DDoS-VNET"
  ]
},
OR if you want to still deploy the assignment to track the compliance against ALZ recommendations, set the enforcement mode to DoNotEnforce in the same parameter file by setting
parDdosEnabledtofalse:"parDdosEnabled": { "value": true },
-
Remove Bastion or Firewall: edit config/custom-parameters/hubNetworking.parameters.all.json and set parAzBastionEnabled and/or parAzFirewallEnabled to false. You can also keep it enabled and switch to the Bastion Basic/Developer SKU and Firewall Basic Tier for a cost-efficient yet functional starting point.
"parAzBastionEnabled": {
  "value": false
},
"parAzFirewallEnabled": {
  "value": false
},
-
Remove VPN or ExpressRoute gateways: edit config/custom-parameters/hubNetworking.parameters.all.json and set parVpnGatewayEnabled and/or parExpressRouteGatewayEnabled to false. Optionally the parameter parVpnGatewayConfig and/or parExpressRouteGatewayConfig could be set to an empty object or removed. For vWAN, look for the parVpnGatewayEnabled and parExpressRouteGatewayEnabled parameters instead.
"parVpnGatewayEnabled": {
  "value": false
},
"parVpnGatewayConfig": {
  "value": {}
},
"parExpressRouteGatewayEnabled": {
  "value": false
},
"parExpressRouteGatewayConfig": {
  "value": {}
},
We recommend that you do not modify the ALZ Bicep modules directly within the upstream-releases directory. Instead, we recommend that you copy the module file (e.g., logging.bicep, hubNetworking.bicep, etc.) that you would like to modify to the config\custom-modules directory. This will allow you to easily upgrade the ALZ Bicep version without having to worry about losing your customizations.
-
Copy logging.bicep module file from upstream-releases directory to config\custom-modules directory
-
Modify the copied module file in custom-modules directory as needed. If new parameters are added to the module, you will need to update the relevant parameter file in the config\custom-parameters directory as well.
-
Update the config\custom-modules\logging.bicep file with the following comment at the top of the file:
// This module has been modified from the upstream-releases version <UpstreamReleaseVersion> -
Update the pipeline-scripts\Deploy-ALZLoggingAndSentinel.ps1 file and change the TemplateFile variable to point to the modified module file location as shown below:
[Parameter()]
[String]$TemplateFile = "config\custom-modules\logging.bicep",
-
In order to trigger new deployments when subsequent changes are made, add the new module file path to the path-based filter workflow trigger in the ALZ-Bicep-1-Core workflow file as shown below:
on:
  push:
    paths:
      - "config/custom-modules/logging.bicep"
-
You are now ready to commit your changes to the main branch and trigger a new deployment.
Here are additional scenarios and/or implementations to consider incorporating to enhance your Azure Landing Zone architecture and associated processes for both your platform and application teams:
-
Azure Monitor Baseline Alerts (AMBA) Integration: Consider integrating Azure Monitor Baseline Alerts (AMBA) into your framework. AMBA provides a comprehensive set of baseline alerts and thresholds tailored to monitor your Azure environment for security and compliance issues.
-
Bicep Landing Zone Vending Module: You might be curious about the absence of spoke networking modules in the Accelerator. This is because we recommend leveraging the Bicep landing zone vending module instead of the Spoke Networking module within ALZ-Bicep. The vending module not only establishes a virtual network for spoke connectivity (Hub & Spoke or VWAN) but also provides various capabilities for application landing zones. Subscription vending standardizes the process for requesting, deploying, and governing subscriptions so that application teams can deploy their workloads faster. This includes:
- Linking the spoke networks to existing DDoS Network Protection Plans
- Specifying Custom DNS Servers for the spoke networks
- Subscription creation and management group placement
- Role assignments
- Tags
- Registration of resource providers and their features
Note: Explore the different types of landing zones in the Azure Landing Zones documentation: What is an Azure landing zone? - Platform vs. application landing zones