Developing REST Applications on BVC
If you've been following along in the other wiki pages such as SDN Applications, you will recall that we have identified different types of SDN applications. Some applications are reactive, meaning they occasionally receive packets forwarded from switches, and respond by setting flows appropriately. Others, called proactive, tend to set longer-lived flows or policy configurations. These proactive applications can be dynamic in the sense that they periodically change the flows or configurations on devices, but they do so in response to external stimuli - not as a result of packets forwarded to the controller.
We also discussed the different SDN application execution environments. Internal SDN applications execute inside the OSGi container of the controller. In the OpenDaylight case, internal applications must be written in Java and must operate in the MD-SAL environment. On the other hand, external applications can be written in any language you prefer, and execute outside of the controller's OSGi environment - they can even run on remote hosts or separate virtual machines.
The REST APIs for OpenDaylight (and hence for the Brocade SDN Controller) are well suited for writing proactive, external applications. In this page we will be examining guidelines and instructions for writing these types of SDN applications.
The best way to examine the REST APIs that are available for the Brocade SDN Controller is via the user interface provided at what is sometimes called the "apidoc/explorer" user interface. This is accessed by opening a browser and pointing it at http://:8181/apidoc/explorer/index.html. This URL will display a page that looks something like this:
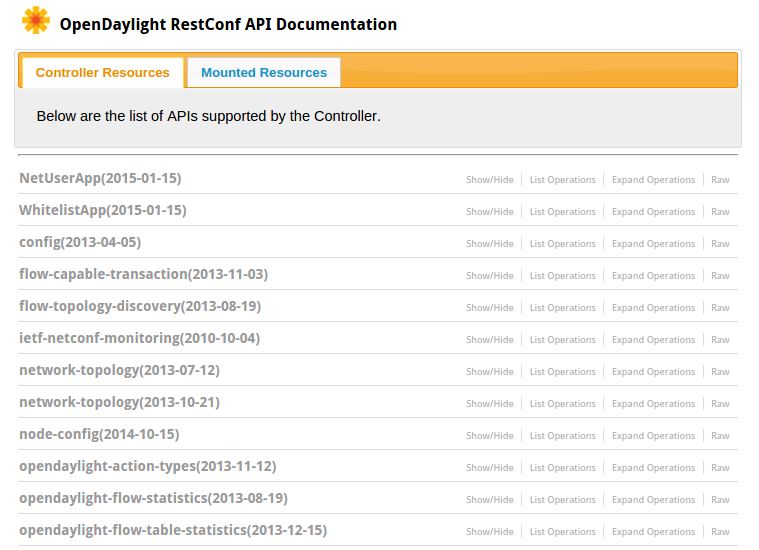
In the image you can see the page "OpenDaylight RestConf API Documentation", and two tabs, one for "Controller Resources" and one for "Mounted Resources". The Controller Resources page shows the APIs available from the controller itself; the Mounted Resources shows APIs available from whatever resources that have been mounted, e.g. NETCONF-supporting network devices.
Clicking on one of the API groups opens up all the APIs available in that category. You can examine these APIs via the GUI in order to get an idea about what is available to you. The ODL wiki as well as other locations have many examples of using this APIs.
Now that you know something about where to go to get basic information about the ODL REST APIs, we look into some of the basic skills that you will need to acquire in order to write this type of SDN application.
Writing an SDN application using the REST API is far simpler than writing an application using MD-SAL. Here are the basic skills you will need to have in order to create an SDN Application using REST APIs.
-
Making HTTP Requests: REST makes use of the HTTP protocol, so it comes as no surprise that you will need to know how to make HTTP requests - GETs, POSTs, PUTs, DELETEs - from your chosen programming language.
-
Subscribing Listeners: Your application may want to respond to changes in the network, such as topology changes, new network devices, new hosts, etc. In order to do this in an efficient manner, you will want to be notified when changes occur. Hence, you will need to know how to register your application as a listener for these types of events.
-
Reading the Model: If you have read about OpenDaylight's Helium release, you will know that a central component of the controller is this thing we call the "Model". Many things are modeled in ODL, probably the most significant being the topology - all the network devices, hosts, and their interconnections, collectively referred to as the "Inventory". In order to write an SDN application that deals with the network, you will need to know how to read and understand this inventory.
-
Communicating with Devices: Once your SDN application knows what it wants to do to the network - configuring devices using NETCONF, setting flows using Openflow - it will need to communicate with those devices in order to pass them the information required to implement your solution. Device communication will allow your application to do exactly that.
With this overview, let's dig into each of these areas. We will consider writing an SDN application using RESTful APIs using Python, since it seems to be one of the most popular languages for both "programmers" and "non-programmers" alike. The same principles will apply whether you are using Python, PERL, Ruby, Bash, or other languages.
Note: Videos and code for performing all the tasks listed below can be found in various places in the Brocade SDN Controller Blog and at this GitHub site. The blog can be found here. The code will soon be posted to this GitHub, check the main GitHub site here for availability.
In making HTTP requests you will need to import your chosen library containing HTTP functionality, and then you will need to reference those library calls when making requests.
For Python, the most popular library at this time seems to be 'requests' (some helpful documentation on 'requests' can be found here. You will need to install the library first. Once this has been done, importing the library in Python is simple, just place the import statement at the top of your code.
import requests
from   requests.auth import HTTPBasicAuth
Using the library functions is also straightforward, just a matter of referencing requests and specifying the REST method and parameters you wish to access, as in the following examples:
requests.get(  url, headers=headers, auth=HTTPBasicAuth( user, password ) )
requests.post( url, data=payload, headers=headers, auth=HTTPBasicAuth( user, password ) )
requests.put(  url, data=payload, headers=headers, auth=HTTPBasicAuth( user, password ) )
The above examples showing how to invoke the functions for get, post, and put. Of course we have not discussed how to set the input parameters, e.g. 'url', 'headers', 'data', and 'auth'). These parameters are somewhat self-descriptive, but here are some sample details:
url = 'http://' + bvcIp + ':8181/restconf' + '/operational/network-topology:network-topology'
headers = { 'content-type' : 'application/json',
            'accept'       : 'application/sjon' }
The 'payload' parameter will vary depending on what specific API you are calling, and how it expects the payload data to be formatted (JSON, XML, etc.). We have examples further below; you can also consult the apidoc/explorer pages for more details on each specific API and the format of the data it expects.
The response data can be in different formats as well. however, if using JSON, receiving and decoding this type of data in the reply can be done using the json() function:
responseData = requests.get(  url, headers=headers, auth=HTTPBasicAuth( user, password ) )
topoInfo = responseData.json()
From here, the information can be further parsed (in this case, topology information from the model inventory), and used in whatever manner is desired.
The general process for creating a listener is a little more involved than just making HTTP requests. The reason for this is because we are going to have to interact with the controller in order to create a stream on which these notifications will be sent. We will then need to associate that stream with our web socket, on which we will then listen for the subscribed events.
The process goes like this:
- Request the Stream: Make a call to the controller to register us as a listener for a specific type of events - in this case, inventory events. This returns us a stream name.
- Subscribe to the Stream: Make a call to the controller to subscribe to this stream name from the previous step. This returns a stream listener URL on which we will listen for events from the controller.
- Create Web Socket: Create a web socket and associate it with our stream listener URL from the previous step.
- Listen: Wait on the web socket for our events to which we have subscribed from the controller.
Code snippets from each of those steps are provided below.
Note: Again, the best reference will probably be the actual code, or the videos which go into greater detail about each step along the way.
We request the stream from the controller by making a POST HTTP request to the data change subscription URL for OpenDaylight:
url = baseURL + 'operations/sal-remote:create-data-change-event-subscription'
headers = ...
payload = '<input xmlns="urn:opendaylight:params:xml:ns:yang:controller:md:sal:remote"> \
               <path xmlns:a="urn:TBD:params:xml:ns:yang:network-topology">/a:network-topology</path> \
               <datastore xmlns="urn:sal:restconf:event:subscription">OPERATIONAL</datastore> \
               <scope xmlns="urn:sal:restconf:event:subscription">SUBTREE</scope> \
           </input>'

responseData = requests.post( url, data=payload, headers-headers, auth=... )
streamName = responseData.text
In the example above, we set the URL to point to the 'data change event subscription'. Then we set the payload to the XML that specifies for what we are subscribing: the path is 'network-topology', the datastore is 'operational', and the scope is 'SUBTREE'. SUBTREE means the actual node ('network-topology'), and everything below it in the YANG data tree.
We then make the call ('requests.post(...)'), and are returned the stream name. We will use that stream name in the next step.
Actually subscribing to this stream is a little bit easier:
url = baseUrl + '/streams/stream/' + streamName
headers = ...

responseData = requests.get( url, headers=headers, auth=... )
streamListenUrl = responseData.headers[ 'location' ]
The URL we pass in references the streams resource of the controller, and we pass in our newly-received streamName from the previous step.
We use a GET request to the controller, passing that URL, and we receive in return a URL onto which the controller promises to post the events that we have requested - in this case, data change events to the 'network-topology' portion of the model.
Now that we have the URL to which the controller will post events, we can create a web socket, associated with this URL, on which we will listen for these data change events.
Note: Since we are just listening on a web socket, we will want to replace the 'http:' item of the URL with the web socket value, 'ws:'.
streamWs = streamUrl.replace( "http:", "ws:", 1 )
webSock = create_connection( streamWs )
In the code above, we take the URL string passed to us ('streamUrl'), modify the 'http:' value to be 'ws:', then we create a web socket at that URL using the create_connection function.
Note: The create_connection function we are using comes from the websocket library, so we need to include that as well, as shown below.
from websocket import create_connection
At this point, we have done the following:
- Requested and received our stream.
- Subscribed and received our stream URL.
- Created our web socket, associated with that stream URL.
The next step is to use that web socket to listen for the events that the controller will send our way. In our sample application (and the one in the video), we just sit and wait for changes.
Here is some sample code that listens on our web socket.
while True:
    result = webSock.recv()
    ...

webSock.close()
A word about Python: If you are not familiar with Python, just be aware that leading indentation is used to define blocks of code, block which often (in other programming languages) are delimited by curly braces '{' and '}'. So in the code above, the while loop continues until the line of code that goes back to the indentation of the initial while statement. The final webSock.close() statement is executed when that while loop is interrupted and exits.
This has hopefully given you the basics for creating a listener which will get informed by the controller when certain events occur. Now we move to the next topic: understanding how to read the model and examine its contents.
Whether or not you have created a listener, or if you just want to read the network inventory of switches and hosts, you will need to know how to parse the output of a request to get the topology. As we have seen, you can get the topology with the following code:
url = 'http://' + bvcIp + ':8181/restconf' + '/operational/network-topology:network-topology'
....
responseData = requests.get(  url, headers=headers, auth=HTTPBasicAuth( user, password ) )
Now that we have the topology, how can we parse it? For starters you may benefit from just printing out the raw JSON data (responseData) that was returned. Also, printing the processed topology data (topoInfo) may be helpful as well. You can pars the data from JSON into a structured object using the 'json()' call as follows:
topoInfo = responseData.json()
As you can see, the requests library also has a handy JSON decoder, which places the data into a structure from which is easy to access and extract the data you are interested in.
Access specific portions of the topology is actually quite simple in Python, by referencing the elements based on the specific piece of data which is of interest. For example:
networkTopology = topoInfo[ 'network-topology' ]
This gives you the data representing the network topology. Going further:
topologyList = networkTopology[ 'topology' ]
This gives you one or more topologies. Within topology you can get a specific topology, since there can be multiple topologies within the network. The following code allows you to iterate through all the topologies:
for topology in topologyList:
    topo_id = topology[ 'topology_id' ]
    if 'node' in topology:
        nodeList = topology[ 'node' ]
        for node in nodeList:
            node_id = node[ 'node_id' ]
            if 'host:' in node_id:
               ...
            else if "switch:' in node_id:
               ...
The code above extracts a single topology, then begins to parse it, looking for node elements, which can be either host or switch nodes. Once so identified, the code can take the appropriate action.
The best way to learn about this or other items received from your RESTful calls is to dump the output and examine it. Or possibly to look at code which does this very thing. The point here that reading Model data is straightforward, using basic programming control functionality.
Once you have this data, you can set about performing the device control that is appropriate to your application.
When your application knows how to communicate with the controller's REST API via your HTTP library, knows how to listen for events from the controller, and is able to read the network inventory and other information from the model, at some point it will be time to communicate your wishes to the devices in the network.
Communication with devices through the Brocade SDN Controller will take one of two forms:
-
Openflow: If using Openflow, you will be setting flows on your devices, giving you great control of forwarding and policy behavior, but the high level of granularity comes at a cost, requiring more work for setting all behaviors desired on the device.
-
NETCONF: If using NETCONF, you will be setting higher-level policy such as Quality of Service, Access Control, Security, Static Routes, etc. This will be easier than Openflow but may provide less granular control.
Going into all details of communicating these settings is beyond the scope of this page on writing SDN applications using the REST API. There are many sources of information, including videos on our Blog, which provide step-by-step instructions. We will also be posting code on this GitHub site which will provide you with actual examples of setting flows and configuration on Openflow and NETCONF devices.
We have discussed the main skills you will require for writing proactive, external SDN applications using the REST APIs available on the Brocade SDN Controller. These skills include knowing how to make HTTP requests, how to register listeners for events from the controller, and how to read the model data from the controller. Lastly we provided advice and pointers to assist you in performing device communication using Openflow or NETCONF.
Hopefully, armed with this information here and at other sites like the videos on our blog, you will be up and writing RESTful SDN application in no time.