This project is the improvement of the connectivity_manager project I created.
The only difference between this repository and connectivity_manager is that the Internet connectivity change is tracked with a StreamProvider instead of a StateNotifierProvider.
Today, applications work by communicating with various services over the Internet. For this reason, having an active Internet connection is one of the vital points of mobile application/web development. In this project, we will examine how we can effectively control the Internet connection and update the user interface in Flutter.
In order to check the active connection, we can use 2 packages on pub.dev. You can find the packages that are used in this project below:
connectivity_plus riverpod The connectivity_plus package was used to make the Internet connection control and the riverpod package was used for state management.
After completing the codes below, we will have an app that changes its UI depending on the Internet connectivity.
UI changes will be done on the following:
- Specific routes (connectivity changes are listened inside the route)
- A component that is similar to a SnackBar which becomes visible regardless of the route (connectivity changes are listened in the MaterialApp builder)
First things first, let's import these packages
dependencies:
  # state management
  flutter_riverpod: ^2.2.0
  # network connectivity
connectivity_plus: ^3.0.3In order to be notified of the network status changes we can create a StreamProvider that uses onConnectivityChanged() function of the Connectivity class (from the connectivity_plus package). This method returns a Stream<ConnectivityResult> that we can map to a boolean variable. If this boolean variable is true it means that there is an Internet connection, if false, then there is no Internet connection.
We can map the ConnectivityResult values with the help of a method. For this, I created a ConnectivityUtility class that provides a static method that determines if the ConnectivityResult is viable or not.
import 'package:connectivity_plus/connectivity_plus.dart';
import 'package:flutter_riverpod/flutter_riverpod.dart';

final streamProvider = StreamProvider<bool>((ref){
  return Connectivity().onConnectivityChanged.map((event) => ConnectivityUtility.checkConnectivity(event));
});


class ConnectivityUtility{
  static bool checkConnectivity(ConnectivityResult result){
    switch(result){
      case ConnectivityResult.wifi:
      case ConnectivityResult.ethernet:
      case ConnectivityResult.mobile:
        return true;
      case ConnectivityResult.bluetooth:
      case ConnectivityResult.none:
      default:
        return false;
    }
  }
}
With the StreamProvider, we don't have to use steps 2,3, and 4 in the connectivity_manager project.
Let's say we have a widget that is used as a route. When consuming providers we have 3 options.
- If we have a StatelessWidget we can extend from ComsumerWidget and override its build method that has a WidgetRef parameter.
- If we have a StatefulWidget we can extend from ComsumerStatefulWidget and ConsumerState and directly use the "ref" inside of our state class
- Alternatively regardless of whether we have a Stateless or Statefull widget, we wrap our widget with Consumer widget and use its builder method
In this project, the first option was used as an example:
class HomeView extends ConsumerWidget {
const HomeView({Key? key}) : super(key: key);
@override
Widget build(BuildContext context, WidgetRef ref) {
return Scaffold(
appBar: buildAppBar(),
body: buildBody(ref),
);
}
AppBar buildAppBar() {
return AppBar(
title: const Text(Constants.homeViewTitle),
);
}
Center buildBody(WidgetRef ref) {
final connectivityStream = ref.watch(streamProvider);
return Center(
child: connectivityStream.when(
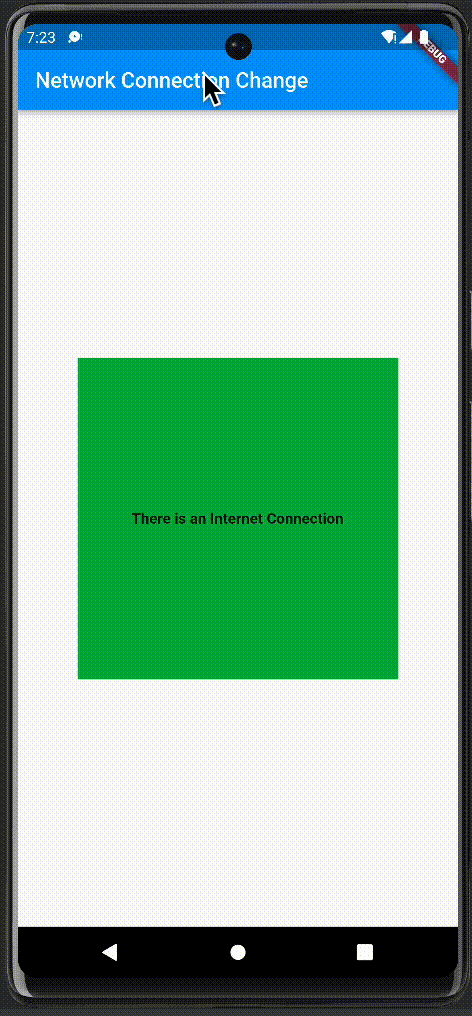
data: (data) => data
? const ColoredMessageBox(
color: Colors.green,
message: "There is an Internet Connection",
)
: const ColoredMessageBox(
color: Colors.red,
message: "No Internet Connection",
),
error: (error, stackTrace) => const ColoredMessageBox(
color: Colors.grey,
message: "Error in Internet Connection",
),
loading: () => const CircularProgressIndicator(),
),
);
}
}We can use ref.watch(streamProvider) to get notified inside the build method.
- Now, connectivityStream variable's type is AsyncValue. We can use when method on connectivityStream to return widgets depending on the state (when there is data, error, and when it is loading).
- In this example, different ColoredMessageBox was shown depending on the data (a boolean variable that indicates the Internet connectivity status).
- ColoredMessageBox is just a Container that holds a Text widget inside it. You can check its code here.
We could also use ref.listen() to show an AlertDialog or a SnackBar that is specific to the route.
However, we can have this feature with a different approach. Plus, fortunately, with this "different" approach, we don't have to use ref.listen() in our every route.
We can design our custom widget to show connection state changes throughout the whole app. We can insert this widget on top of every route. For this, we can use the "builder" property of the MaterialApp.
Builder property is used for inserting widgets above the Navigator or - when the WidgetsApp.router constructor is used - above the Router but below the other widgets created by the WidgetsApp widget, or for replacing the Navigator/Router entirely.
Let's create an animation widget that shows the Internet connection loss. By using this example widget, we can have a widget that looks like SnackBar and notifies the user no matter which route they're in our app. This way we don't have to write route/page-specific controls. The builder property will insert our widget on top of every page.
import 'features/home/home_view.dart';
void main() {
  runApp(const ProviderScope(child: MyApp()));
}
class MyApp extends StatelessWidget {
  const MyApp({super.key});
  // This widget is the root of your application.
  @override
  Widget build(BuildContext context) {
    return MaterialApp(
      title: 'Flutter Demo',
      theme: ThemeData(
        primarySwatch: Colors.blue,
      ),
      home: const HomeView(),
      builder: MainBuilder.build, //Use it here
    );
  }
}
The builder expects a type of Widget Function(BuildContext, Widget?)? builder. For this, let's write a class that is responsible for providing this function. Let's name it MainBuilder and have it provide a static method of the same type. We can then use it inside the MaterialApp as above.
import 'package:flutter/material.dart';
import 'components/no_network_widget.dart';

class MainBuilder {
  MainBuilder._privateConstructor();

  static Widget build(BuildContext context, Widget? child) {
    return Column(
      children: [
        Expanded(
          child: child!,
        ),
        const NoNetworkWidget(),
      ],
    );
  }
}- Let's also restrict the object creation from this class by writing a private constructor.
- Inside the build method, we have a Column widget that has 2 children.
- The first child is the actual route (In this case HomeView because we assigned HomeView() to the home property of the MaterialApp). The child parameter of the build method changes with the route.
- The second child is our custom widget that will be displayed only when there is no Internet connection.
Let's create an animation that looks like a SnackBar and tells the user that there is no Internet Connection. In this step, we can choose any design/layout or animation we like. However, in this project an Implicit Animation was used as an example.
class NoNetworkWidget extends ConsumerWidget {
  const NoNetworkWidget({Key? key}) : super(key: key);

  @override
  Widget build(BuildContext context, WidgetRef ref) {
    final connectivityStream = ref.watch(streamProvider);

    return connectivityStream.when(
      data: (data) => AnimatedCrossFade(
        firstChild: buildEmptySizedBox(context),
        secondChild: Material(
          child: buildErrorMessageContainer(context),
        ),
        crossFadeState:
            data ? CrossFadeState.showFirst : CrossFadeState.showSecond,
        duration: const DurationItems.durationLow(),
      ),
      error: (error, stackTrace) => buildEmptySizedBox(context),
      loading: () => buildEmptySizedBox(context),
    );
  }

  Container buildErrorMessageContainer(BuildContext context) {
    return Container(
      alignment: AlignmentDirectional.center,
      width: context.width,
      height: context.dynamicHeight(0.05),
      color: context.colorScheme.primary,
      child: const Text(Constants.noNetworkMessage),
    );
  }

  SizedBox buildEmptySizedBox(BuildContext context) {
    return SizedBox(
      width: context.width,
      height: 0,
    );
  }
}
Here, we have an AnimatedCrossFade that switches between "Error Message Container" and an "Empty SizedBox" depending on the data that is provided by the streamProvider. Here, in order to consume the state, a ConsumerWidget was used as well.