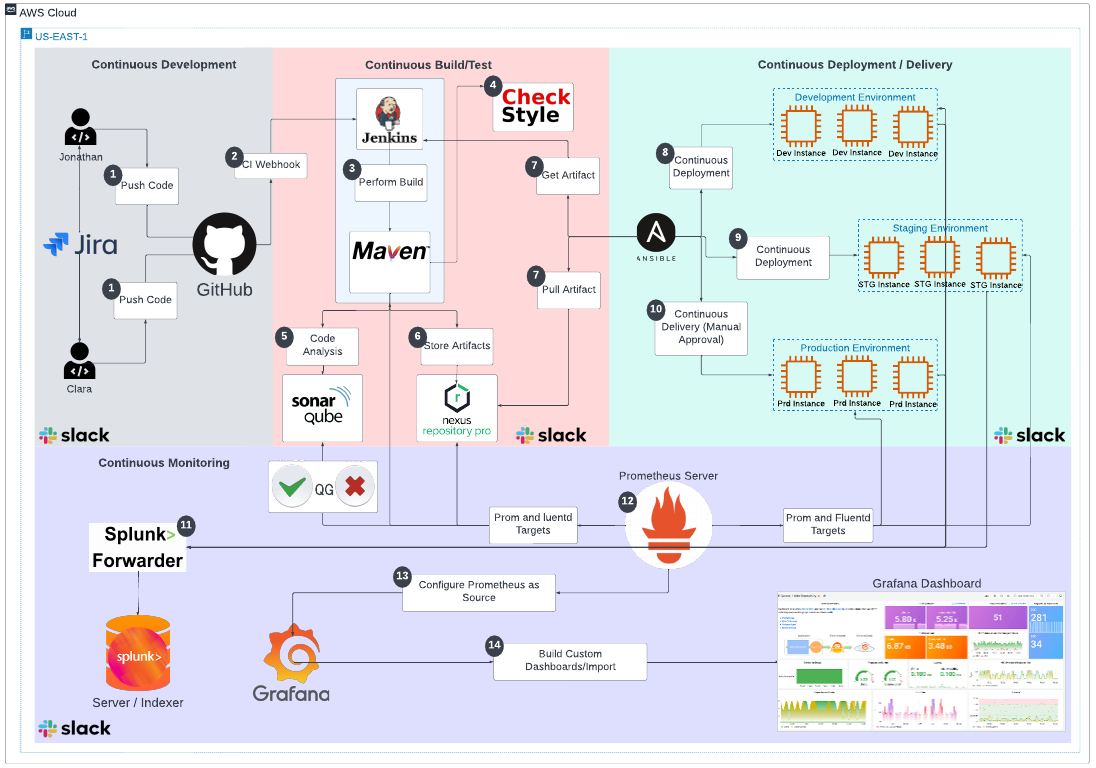
- Git Git will be used to manage our application source code.
- Github Github is a free and open source distributed VCS designed to handle everything from small to very large projects with speed and efficiency
- Jenkins Jenkins is an open source automation CI tool which enables developers around the world to reliably build, test, and deploy their software
- Maven Maven will be used for the application packaging and building including running unit test cases
- Checkstyle Checkstyle is a static code analysis tool used in software development for checking if Java source code is compliant with specified coding rules and practices.
- SonarQube SonarQube Catches bugs and vulnerabilities in your app, with thousands of automated Static Code Analysis rules.
- Nexus Nexus Manage Binaries and build artifacts across your software supply chain
- Ansible Ansible will be used for the application deployment to both lower environments and production
- EC2 EC2 allows users to rent virtual computers (EC2) to run their own workloads and applications.
- Slack Slack is a communication platform designed for collaboration which can be leveraged to build and develop a very robust DevOps culture. Will be used for Continuous feedback loop.
- Prometheus Prometheus is a free software application used for event/metric monitoring and alerting for both application and infrastructure.
- Grafana Grafana is a multi-platform open source analytics and interactive visualization web application. It provides charts, graphs, and alerts for the web when connected to supported data sources.
- Splunk Splunk is an innovative technology which searches and indexes application/system log files and helps organizations derive insights from the data.
-
Create a GitHub Repository with the name
Jenkins-CICD-Projectand push the code in this branch(main) to your remote repository (your newly created repository).- Go to GitHub (github.com)
- Login to your GitHub Account
- Create a Repository called "Jenkins-CICD-Project"
- Clone the Repository in the "Repository" directory/folder in your local
- Download the code in in this repository "Main branch": https://github.com/awanmbandi/realworld-cicd-pipeline-project.git
- Unzip the code/zipped file
- Copy and Paste everything from the zipped file into the repository you cloned in your local
- Add the code to git, commit and push it to your upstream branch "main or master"
- Confirm that the code exist on GitHub
-
Jenkins/Maven/Ansible
- Create an Amazon Linux 2 VM instance and call it "jenkins-maven-ansible"
- Instance type: t2.medium
- Security Group (Open): 8080, 9100 and 22 to 0.0.0.0/0
- Key pair: Select or create a new keypair
- User data (Copy the following user data): https://github.com/awanmbandi/realworld-cicd-pipeline-project/blob/maven-nexus-sonarqube-jenkins-install/jenkins-install.sh
- Launch Instance
-
SonarQube
- Create an Create an Ubuntu 20.04 VM instance and call it "SonarQube"
- Instance type: t2.medium
- Security Group (Open): 9000, 9100 and 22 to 0.0.0.0/0
- Key pair: Select or create a new keypair
- User data (Copy the following user data): https://github.com/awanmbandi/realworld-cicd-pipeline-project/blob/maven-nexus-sonarqube-jenkins-install/sonarqube-install.sh
- Launch Instance
-
Nexus
- Create an Amazon Linux 2 VM instance and call it "Nexus"
- Instance type: t2.medium
- Security Group (Open): 8081, 9100 and 22 to 0.0.0.0/0
- Key pair: Select or create a new keypair
- User data (Copy the following user data): https://github.com/awanmbandi/realworld-cicd-pipeline-project/blob/maven-nexus-sonarqube-jenkins-install/nexus-install.sh
- Launch Instance
-
EC2 (Dev/Stage/Prod)
- Create 3 Amazon Linux 2 VM instance and call them (Names: Dev-Env, Stage-Env and Prod-Env)
- Instance type: t2.micro
- Security Group (Open): 8080, 9100, 9997 and 22 to 0.0.0.0/0
- Key pair: Select or create a new keypair
- User data (Copy the following user data): https://github.com/awanmbandi/realworld-cicd-pipeline-project/blob/tomcat-splunk-installation/tomcat-ssh-configure.sh
- Launch Instance
-
Prometheus
- Create an Ubuntu 20.04 VM instance and call it "Prometheus"
- Instance type: t2.micro
- Security Group (Open): 9090 and 22 to 0.0.0.0/0
- Key pair: Select or create a new keypair
- Launch Instance
-
Grafana
- Create an Ubuntu 20.04 VM instance and call it "Grafana"
- Instance type: t2.micro
- Security Group (Open): 3000 and 22 to 0.0.0.0/0
- Key pair: Select or create a new keypair
- Launch Instance
-
EC2 (Splunk)
- Create an Amazon Linux 2 VM instance and call it (Names: Splunk-Indexer)
- Instance type: t2.medium
- Security Group (Open): 22, 8000, 9997, 9100 to 0.0.0.0/0
- Key pair: Select or create a new keypair
- Launch Instance

-
Slack
- Go to the bellow Workspace and create a Private Slack Channel and name it "yourfirstname-jenkins-cicd-pipeline-alerts"
- Link: https://join.slack.com/t/realworldcicdproject/shared_invite/zt-1tryd7x1v-g8a~zEJBKKchVvvK87jkeQ
- You can either join through the browser or your local Slack App
- Create a
Private Channelusing the naming conventioncicd-pipeline-project-alerts - Click on the Drop down on the Channel and select Integrations and take
Add an App - Search for
Jenkinsand click onView-->>Configuration/Install-->>Add to Slack - On Post to Channel: Click the Drop Down and select your channel above
cicd-pipeline-project-alerts - Click
Add Jenkins CI Integration - SAVE SETTINGS/CONFIGURATIONS
- Leave this page open

- Go back to your local, open your "Jenkins-CICD-Project" repo/folder/directory on VSCODE
- Open your "Jenkinsfile"
- Update the slack channel name on line "97" (there about)
- Change name from "cicd-project-alerts" (or whatever name thst's there) to yours
- Add the changes to git, commit and push to GitHub
- Confirm the changes are available on GitHub
- Save and Push to GitHub
- Login/SSH to your Prometheus Server
- Clone the following repository: https://github.com/awanmbandi/realworld-cicd-pipeline-project.git
- Change directory to "realworld-cicd-pipeline-project"
- Swtitch to the "prometheus-and-grafana" git branch
- Run: ./install-prometheus.sh
- Confirm the status shows "Active (running)"
- Exit
- Login/SSH to your Grafana Server
- Clone the following repository: https://github.com/awanmbandi/realworld-cicd-pipeline-project.git
- Change directory to "realworld-cicd-pipeline-project"
- Swtitch to the "prometheus-and-grafana" git branch
- Run: ls or ll (to confirm you have the branch files)
- Run: ./install-grafana.sh
- Confirm the status shows "Active (running)"
- Exit
Configure The "Node Exporter" accross the "Dev", "Stage" and "Prod" instances including your "Pipeline Infra"
- Login/SSH into the "Dev-Env", "Stage-Env" and "Prod-Env" VM instance
- Perform the following operations on all of them
- Install git by running: sudo yum install git -y
- Clone the following repository: https://github.com/awanmbandi/realworld-cicd-pipeline-project.git
- Change directory to "realworld-cicd-pipeline-project"
- Swtitch to the "prometheus-and-grafana" git branch
- Run: ls or ll (to confirm you have the branch files)
- Run: ./install-node-exporter.sh
- Confirm the status shows "Active (running)"
- Access the Node Exporters running on port "9100", open your browser and run the below
- Dev-EnvPublicIPaddress:9100 (Confirm this page is accessible)
- Stage-EnvPublicIPaddress:9100 (Confirm this page is accessible)
- Prod-EnvPublicIPaddress:9100 (Confirm this page is accessible)
- Exit
- Login/SSH into the "Jenkins-Maven-Ansible", "Nexus" and "SonarQube" VM instance
- Perform the following operations on all of them
- Install git by running: sudo yum install git -y (The SonarQube server already has git)
- Clone the following repository: https://github.com/awanmbandi/realworld-cicd-pipeline-project.git
- Change directory to "realworld-cicd-pipeline-project"
- Swtitch to the "prometheus-and-grafana" git branch
- Run: ls or ll (to confirm you have the branch files including "install-node-exporter.sh")
- Run: ./install-node-exporter.sh
- Make sure the status shows "Active (running)"
- Access the Node Exporters running on port "9100", open your browser and run the below
- Jenkins-Maven-AnsiblePublicIPaddress:9100 (Confirm the pages are accessible)
- NexusPublicIPaddress:9100
- SonarQubePublicIPaddress:9100
- Exit

Update the Prometheus config file and include all the IP Addresses of the Pipeline Instances that are
running the Node Exporter API. That'll include ("Dev", "Stage", "Prod", "Jenkins-Maven-Ansible", "Nexus" and "SonarQube")
- SSH into the Prometheus instance either using your GitBash (Windows) or Terminal (macOS) or browser
- Run the command: sudo vi /etc/prometheus/prometheus.yml
- Navigate to "- targets: ['localhost:9090']" and add the "IPAddress:9100" for all the above Pipeline instances. Ecample "- targets: ['localhost:9090', 'DevIPAddress:9100', 'StageIPAddress:9100', 'ProdIPAddress:9100', 'Jenkins-Maven-AnsibleIPAddress:9100'] ETC..."
- Save the Config File and Quit
- Open a TAB on your choice browser
- Copy the Prometheus PublicIP Addres and paste on the browser/tab with port 9100 e.g "PrometheusPublicIPAddres:9100"
- Once you get to the Prometheus Dashboard Click on "Status" and Click on "Targets"
- Confirm that Prometheus is able to reach everyone of your Nodes, do this by confirming the Status "UP" (green)
- Done

- Copy your Grafana Instance Public IP and put on the browser with port 3000 e.g "GrafanaPublic:3000"
- Once the UI Opens pass the following username and password
- Username: admin
- Password: admin
- New Username: admin
- New Password: admin
- Save and Continue

- Once you get into Grafana, follow the below steps to Import a Dashboard into Grafana to visualize your Infrastructure/App Metrics
- Click on "Configuration/Settings" on your left
- Click on "Data Sources"
- Click on "Add Data Source"
- Select Prometheus
- Underneath HTTP URL: http://PrometheusPublicOrPrivateIPaddress:9090
- Click on "SAVE and TEST"
- Navigate to "Create" on your left (the
+sign)- Click on "Import"
- Copy the following link: https://grafana.com/grafana/dashboards/1860
- Paste the above link where you have "Import Via Grafana.com"
- Click on Load (The one right beside the link you just pasted)
- Scrol down to "Prometheus" and select the "Data Source" you defined ealier which is "Prometheus"
- CLICK on "Import"
- Refresh your Grafana Dashbaord
- Click on the "Drop Down" for "Host" and select any of the "Instances(IP)"
.png)
- Click on the "Drop Down" for "Host" and select any of the "Instances(IP)"
.png)
-
NOTE: Execute and Perform all operations across all your
Dev, Stage and ProdEnvironments -
NOTE: Run all commands and queries across all your VMs (Dev, Stage and Prod)
- Download the Splunk RPM installer package for Linux
wget -O splunk-9.0.5-e9494146ae5c.x86_64.rpm "https://download.splunk.com/products/splunk/releases/9.0.5/linux/splunk-9.0.5-e9494146ae5c.x86_64.rpm"- Install Splunk
sudo yum install ./splunk-9.0.5-e9494146ae5c.x86_64.rpm -y- Start the splunk server
sudo bash cd /opt/splunk/bin ./splunk start --accept-license --answer-yes -
Enter administrator
usernameandpassword, remember this because you will need this to log into the application -
NOTE: The Password must be up to
8characters. You can assignadminadmin
-
Access your Splunk Installation at http://Splunk-Server-IP:8000 and log into splunk
- Username:
admin, Password:Same Password You Just Configured Above
- Username:
-
NOTE(MANDATORY): Once you login to the splunk Indexer
-
Click on
Settings- Click
Server Settings - Click
General Settings - Go ahead and Change the
Pause indexing if free disk spacefrom5000 to 50
- Click
-
Click on
Save -
Confirm that

-
NOTE: If You Do Not Complete This Part Your Splunk Configuration Won't Work
-
IMPORTANT: Navigate Back to your
Terminalwhere you'reConfiguring the Indexer- Restart Splunk (For those changes to be captured):
./splunk restart
- Restart Splunk (For those changes to be captured):
-
Refresh The Splunk Tab at http://Splunk-Server-IP:8000 and log back into splunk
-

-
NOTE: Execute every command mentioned bellow across all application servers in all the enviroments
-
NOTE: Do Not install the Splunk Server in these resources/environments
-
SSH Into your instances, as normal user
ec2-useror ubuntu or centos etc -
Download the Splunk forwarder RPM installer package
wget -O splunkforwarder-9.0.5-e9494146ae5c.x86_64.rpm "https://download.splunk.com/products/universalforwarder/releases/9.0.5/linux/splunkforwarder-9.0.5-e9494146ae5c.x86_64.rpm"
- Install the Forwarder
ls -al
sudo yum install ./splunkforwarder-9.0.5-e9494146ae5c.x86_64.rpm -y- Change to the splunkforwarder bin directory and start the forwarder
- NOTE: The Password must be at least
8characters long. - Set the port for the forwarder to
9997, this is to keep splunk server from conflicting with the splunk forwarder
sudo bash
cd /opt/splunkforwarder/bin
./splunk start --accept-license --answer-yes
- Set the forwarder to forward to the splunk server on port
9997, and will need to enter username and password (change IP address with your own server IP address). When prompted for username and password, enter what you set above for username and password.
./splunk add forward-server SPLUNK-SERVER-Public-IP-Address:9997
- Restart Splunk on the VM you are configuring the Forwarder
./splunk restart
- Set the forwarder to monitor the
/var/log/tomcat/directory and restart
./splunk add monitor /var/log/tomcat/
- Navigate Back to Your
Splunk Indexer/Server
- Set the port for the Splunk Indexer or Server to listen on 9997 and restart
cd /opt/splunk/bin
./splunk enable listen 9997- Restart Splunk on the VM you are configuring the Forwarder
./splunk restart
-
Login to your
Splunk Serverat http://Splunk-Server-IP:8000 -
Click on
Search and Reporting-->>Data Summary-->> Select any of the displayedEnvironments Hostto visualizeApp Logs
-
Application Log Indexed

-
Copy your Jenkins Public IP Address and paste on the browser = ExternalIP:8080
- Login to your Jenkins instance using your Shell (GitBash or your Mac Terminal)
- Copy the Path from the Jenkins UI to get the Administrator Password
- Run:
sudo cat /var/lib/jenkins/secrets/initialAdminPassword - Copy the password and login to Jenkins

- Run:
- Plugins: Choose Install Suggested Plugings
- Provide
- Username: admin
- Password: admin
- Name and Email can also be admin. You can use
adminall, as its a poc.
- Continue and Start using Jenkins

-
- Click on "Manage Jenkins"
- Click on "Plugin Manager"
- Click "Available"
- Search and Install the following Plugings "Install Without Restart"
- SonarQube Scanner
- Maven Integration
- Pipeline Maven Integration
- Maven Release Plug-In
- Slack Notification
- Nexus Artifact Uploader
- Build Timestamp (Needed for Artifact versioning)
- Once all plugins are installed, select Restart Jenkins when installation is complete and no jobs are running

-
-
Click on Manage Jenkins -->> Global Tool Configuration

JDK -->> Add JDK -->> Make sure Install automatically is enabled -->>
Note: By default the Install Oracle Java SE Development Kit from the website make sure to close that option by clicking on the image as shown below.
- Click on Add installer
- Select Extract .zip/.tar.gz -->> Fill the below values
- Name: localJdk
- Download URL for binary archive: https://download.java.net/java/GA/jdk11/13/GPL/openjdk-11.0.1_linux-x64_bin.tar.gz
- Subdirectory of extracted archive: jdk-11.0.1
-
Git -->> Add Git -->> Install automatically(Optional)

-
SonarQube Scanner -->> Add SonarQube Scanner -->> Install automatically(Optional)

-
Maven -->> Add Maven -->> Make sure Install automatically is enabled -->> Install from Apache -->> Fill the below values
- Name: localMaven
- Version: Keep the default version as it is
-
Click on SAVE

-
-
- Click on Manage Jenkins -->> Manage Credentials -->> Global credentials (unrestricted) -->> Add Credentials
-
-
- Login to your SonarQube server (http://SonarServer-Sublic-IP:9000, with the credentials username: admin & password: admin)
- Click on profile -->> My Account -->> Security -->> Tokens
- Generate Tokens: Fill
SonarQube-Token - Click on Generate
- Copy the token
-
- Click on
Add Credentials - Kind: Secret text!!
- Secret: Fill the SonarQube token value that we have created on the SonarQube server
- ID:
SonarQube-Token - Description: SonarQube-Token
- Click on Create
- Click on
-
-
- Click on
Add Credentials - Kind: Secret text
- Secret: Place the Integration Token Credential ID (Note: Generate for slack setup)
- ID:
Slack-Token - Description: slack-token
- Click on Create
- Click on
-
-
- Access Nexus: http://Nexus-Pub-IP:8081/
- Default Username: admin
- NOTE: Login into your "Nexus" VM and "cat" the following file to get the password.
- Command:
sudo cat /opt/nexus/sonatype-work/nexus3/admin.password - Password:
Fill In The Password and Click Sign In - Click Next -->> Provide New Password: "admin"
- Configure Anonymous Access: "Enable anonymous access" -->> Finish
-
- Click on
Add Credentials - Kind: Username with password
- Username:
admin - Enable Treat username as secret
- Password:
admin - ID:
Nexus-Credential - Description: nexus-credential
- Click on Create
- Click on
-
-
- Click on
Add Credentials - Kind: Username with password
- Username:
ansibleadmin - Enable Treat username as secret
- Password:
ansibleadmin - ID:
Ansible-Credential - Description: Ansible-Credential
- Click on Create

- Click on
-
- Click on Manage Jenkins -->> Manage Credentials -->> Global credentials (unrestricted) -->> Add Credentials
-
-
- Click on
Manage Jenkins-->>Configure System SonarQube Servers
- Click on
-
- Click on Manage Jenkins -->> Configure System
- Go to section Slack
- Use new team subdomain & integration token credentials created in the above slack joining step
- Workspace: Replace with Team Subdomain value (created above)
- Credentials: select the slack-token credentials (created above)
- Default channel / member id: #PROVIDE_YOUR_CHANNEL_NAME_HERE
- Test Connection
- Click on Save

-
-
-
Click on -->> Quality Gate

-
Click on -->> Create

-
Add a Quality Gate Condition to Validate the Code Against (Code Smells or Bugs)

-
Add Quality to SonarQube Project
-
NOTE:Make sure to update theSonarQubestage in yourJenkinsfileand Test the Pipeline so your project will be visible on the SonarQube Project Dashboard. -
Click on Projects -->> Administration -->> Select
Quality Gate
-
-
-
Still on
Administration -
Select
Webhook -
Click on
Create Webhook- Name:
jenkinswebhook - URL:
http://Jenkins-Server-Private-IP:8080/sonarqube-webhook
- Name:
-
Go ahead and Confirm in the Jenkinsfile you have the “Quality Gate Stage”. The stage code should look like the below;
stage('SonarQube GateKeeper') {
    steps {
      timeout(time : 1, unit : 'HOURS'){
      waitForQualityGate abortPipeline: true
      }
   }
}
- Run Your Pipeline To Test Your Quality Gate (It should PASS QG)
- (OPTIONAL) FAIL Your Quality Gate: Go back to SonarQube -->> Open your Project -->> Click on Quality Gates at the top -->> Select your Project Quality Gate -->> Click EDIT -->> Change the Value to “0” -->> Update Condition
- (OPTIONAL) Run/Test Your Pipeline Again and This Time Your Quality Gate Should Fail
- (OPTIONAL) Go back and Update the Quality Gate value to 10. The Exercise was just to see how Quality Gate Works
-
-
Update The
JenkinsfileIf Neccessary -
Update
SonarQube IP addressin yourJenkinsfile -
Update the
SonarQube projectKey or namein yourJenkinsfile -
Update your
Slack Channel Namein theJenkinsfile- Log into Jenkins: http://Jenkins-Public-IP:8080/
- Click on New Item
- Enter an item name: Jenkins-Complete-CICD-Pipeline & select the category as Pipeline
- Now scroll-down and in the Pipeline section -->> Definition -->> Select Pipeline script from SCM
- GitHub project:
Provide Your Project Repo Git URL - GitHub hook trigger for GITScm polling:
Check the box- NOTE: Make sure to also configure it on GitHub's side
- SCM: Git
- Repositories
- Repository URL: FILL YOUR OWN REPO URL (that we created by importing in the first step)
- Branch Specifier (blank for 'any'):
*/main - Script Path:
Jenkinsfile
- Save
- NOTE: Make Sure Your Pipeline Succeeds Until
SonarQube GateKeeper. Upload to Artifactory would fail. - TEST Pipeline
-
Jenkins Pipeline Job

-
SonarQube Code Inspection Result

-
Slack Continuous Feedback Alert

-
SonarQube GateKeeper Webhook Payload

- 1st ISSUE: If you experience a long wait time at the level of
GateKeeper, please check if yourSonar Webhookis associated with yourSonarQube ProjectwithSonarQube Results
- If you check your jenkins Pipeline you'll most likely find the below message at the
SonarQube GateKeperstage
JENKINS CONSOLE OUTPUT

Checking status of SonarQube task 'AYfEB4IQ3rP3Y6VQ_yIa' on server 'SonarQube'
SonarQube task 'AYfEB4IQ3rP3Y6VQ_yIa' status is 'PENDING'
-
The nexus service on port 8081. To access the nexus dashboard, visit http://Nexus-Pub-IP:8081. You will be able to see the nexus homepage as shown below.
- Default username:
admin - Default Password:
sudo cat /app/sonatype-work/nexus3/admin.password - NOTE: Once you login, you will be prompted to reset the password
-
CREATE 1st REPO: Click on the Gear Icon -->> Repository -->> Create Repository -->> Select
maven2(hosted)-->> Name:maven-project-releases-->> Create Repository -
CREATE 2nd REPO: Click Create Repository -->> Select
maven2(hosted)-->> Name:maven-project-snapshots-->> Version Policy: SelectSnapshot-->> Create Repository -
CREATE 3rd REPO: Click Create Repository -->> Select
maven2(proxy)-->> Name:maven-project-central-->> Remote Storage: provide this link https://repo.maven.apache.org/maven2 -->> Create Repository -
CREATE 4th REPO: Click Create Repository -->> Select
maven2(group)-->> Name:maven-project-group-->> Version Policy: SelectMixed-->> Assign All The Repos You Created to The Group -->> Create Repository -
Once you select create repository and select maven2(group)

- Default username:
A) Update Maven POM.xml file
- Update the Following lines of Code
(Line 32 and 36)in the mavenPOMfile and save
<url>http://Nexus-Server-Private-IP:8081/repository/maven-project-snapshots/</url>

<url>http://Nexus-Server-Private-IP:8081/repository/maven-project-releases/</url>-
Add the following Stage in your Jenkins pipeline config and Update the following Values (nexusUrl, repository, credentialsId, artifactId, file etc.). If necessary
-
The following
environmentconfig represents the NEXUS CREDENTIAL stored in jenkins. we're pulling the credential with the use of the predefineNEXUS_CREDENTIAL_IDenvironment variable key. Which jenkins already understands.environment { WORKSPACE = "${env.WORKSPACE}" NEXUS_CREDENTIAL_ID = 'Nexus-Credential' } -
Here we're using the
Nexus Artifact Uploaderstage config to store the app artifactstage("Nexus Artifact Uploader"){ steps{ nexusArtifactUploader( nexusVersion: 'nexus3', protocol: 'http', nexusUrl: '172.31.82.36:8081', groupId: 'webapp', version: "${env.BUILD_ID}-${env.BUILD_TIMESTAMP}", repository: 'maven-project-releases', //"${NEXUS_REPOSITORY}", credentialsId: "${NEXUS_CREDENTIAL_ID}", artifacts: [ [artifactId: 'webapp', classifier: '', file: '/var/lib/jenkins/workspace/jenkins-complete-cicd-pipeline/webapp/target/webapp.war', type: 'war'] ] ) } }
-
After confirming all changes, go ahead and save, then push to GitHub.
-
Test your Pipeline to
Make Sure That The Artifacts Upload Stage Succeeds. -
Navigate to Jenkins Dashboard (Run/Test The Job)

-
Navigate to
Nexusas well to confirm that the artifact wasStoredin themaven-project-releasesrepository
- NOTE: That you passed a Userdata in the Jenkins/Maven/Ansible and Dev,Stage and Prod Instances to Configure the Environments already. So you do not have to perform these operations again. You just Have to confirm, the Configurations where all Successful.
- NOTE: Make sure you
Assign an IAM ROLE / PROFILEwithEC2 Full Accessto yourJENKINS server - NOTE: Update
ALL Pipeline Deploy Stageswith yourAnsible Credentials ID(IMPORTANT) - Also Make sure the following Userdata was executed across all the Environment Deployment Nodes/Areas
#!/bin/bash
# Tomcat Server Installation
sudo su
amazon-linux-extras install tomcat8.5 -y
systemctl enable tomcat
systemctl start tomcat

# Provisioning Ansible Deployer Access
useradd ansibleadmin
echo ansibleadmin | passwd ansibleadmin --stdin
sed -i 's/PasswordAuthentication no/PasswordAuthentication yes/g' /etc/ssh/sshd_config
systemctl restart sshd
echo "ansibleadmin ALL=(ALL) NOPASSWD: ALL" >> /etc/sudoers-
Navigate to your GitHub project repository
- Open the repository
- Click on the repository
Settings- Click on
Webhooks - Click
Add webhook- Payload URL: http://JENKINS-PUBLIC-IP-ADDRESS/github-webhook/
- Content type:
application/json - Active: Confirm it is
Enable - Click on
Add Webhook
- Click on
-
Confirm that this is Enabled at the Level of the Jenkins Job as well
- Navigate to your Jenkins Application: http://JENKINS-PUBLIC-IP-ADDRESS:8080
- Click on the
Job Name - Navigate to
Build Triggers- Enable/Check the box
GitHub hook trigger for GITScm polling
- Enable/Check the box
- Click on
Apply and Save
- Click on the
- Navigate to your Jenkins Application: http://JENKINS-PUBLIC-IP-ADDRESS:8080
-
Confirm/Confirm that your deployments where all successful accross all Environments

-
Verify/Confirm Slack Success Feedback.

-
Confirm Access to your application: http://Dev-or-Stage-or-Prod-PubIP:8080/webapp/

You've been able to accomplish something very unique and special which most people only dream of in their IT journey. Remmber that during an interview, you may be asked some challenging questions or be faced with a trial assignment that require you to both utilize your existing skillsets and think out of the box. During this time you must be very confident and determined in your pursuit.
Never forget that you have what it takes to add more than enough VALUE to any organization out there in the industry and to STAND OUT in any interview setting no matter who is sitted on the interview seat.