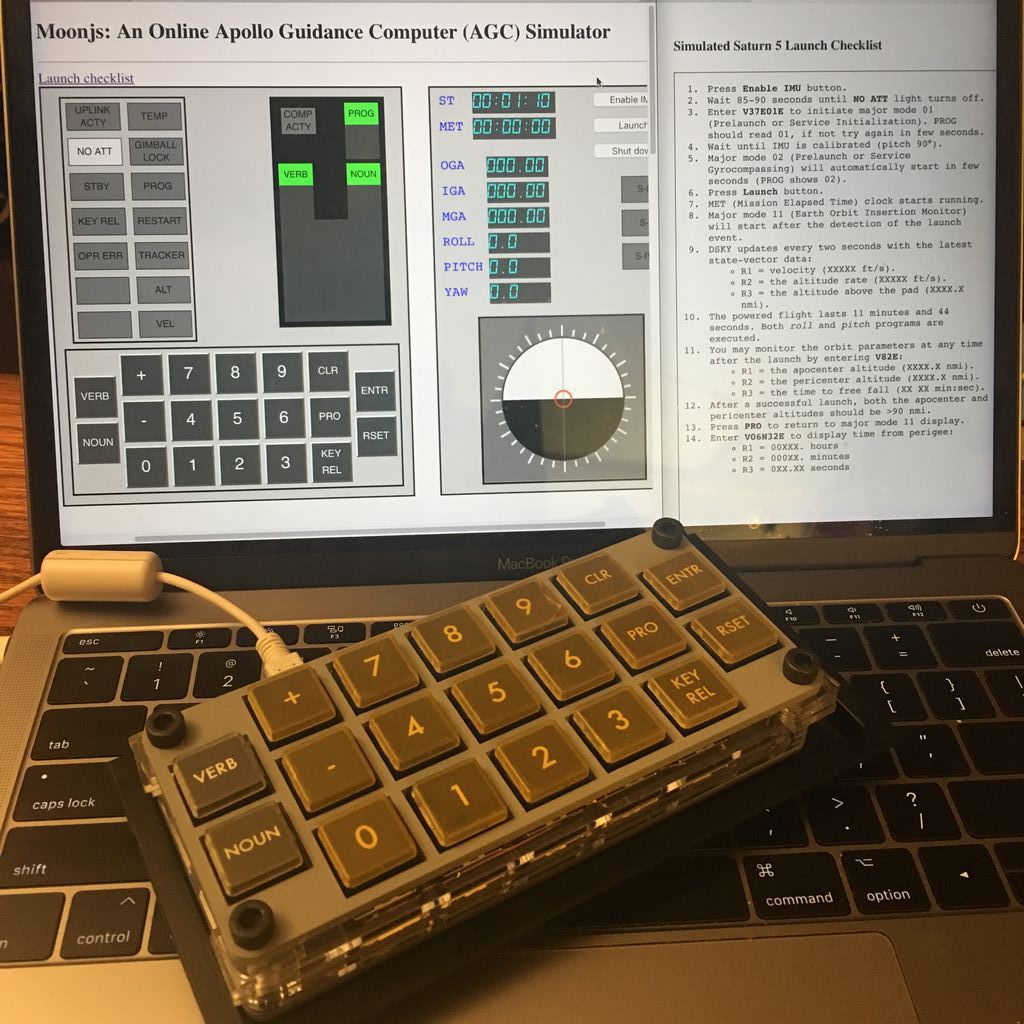
This is a USB and Arduino keyboard heavily inspired by the NASA/Apollo project's DSKY interface to the Apollo Guidance Computer (AGC)
It's made to look like the keypad of the DSKY, although slightly smaller due to the components I had while making it.
The authentic "Block II" DSKY has buttons that are roughly 1 inch between centers. Mine is about 70 percent smaller, at 21mm between centers.
It is implemented as matrix of Cherry MX Black keys with diodes as three rows and 7 columns. Due to the use of diodes, there's no ghosting of keys.
I've found that the best use of this is along with Moonjs: An Online Apollo Guidance Computer Simulator However, there is one issue. It does not support any method to get keyboard hits in to the DSKY keys. I've fixed this by creating a bookmarklet whose code is in the Emulation subdirectory. Just create a new bookmark, then edit the URL for it and paste in the javascript as provided. Once you load the above page, just select that bookmkarklet from your bookmarks, and it will add in a keypress catcher that will forward button press events to the correct DSKY buttons on the screen.
The enclosure was made to closely reproduce the look of the real DSKY. Mine was created using laser-cutting acrylic sheets (printable pdfs included in the "enclosure" directory.) and sandwiching them all together with M5 hex/allen socket screws. The specific stack of sheets and their sandwich ordering is currently TBD, as I'm still working that out. ;)
I painted the top and bottom layers with a few thin coats of gray primer, then a few coats of semi-gloss clear coat; all from "rattle cans".
More photos of construction and the enclosure can be found in the Images/ subdirectory.
The included Arduino project is for a "Pro Micro" which is based on the Arduino Leonardo, running an ATmega 32u4. The wiring configuration is also included in the project here. I did wire up the diodes wrong compared to what I intended, so I have to scan the matrix backwards. (7 polls, check 3 rows each time rather than 3 polls, check 7 columns each time.) Oops.
The sketch is a pretty simple matrix scanner, which keeps track of whether each of the 19 buttons has changed and if it had been previously pressed or not. Based on this, it will send key up and key down USB HID events to the host computer.
The current key mapping is:
- "VERB" sends 'v'
- "NOUN" sends 'n'
- "+"/"-" send '+'/'-'
- "0".."9" send '0'..'9'
- "CLR" sends 'c'
- "PRO" sends 'p'
- "KEY REL" sends 'k'
- "ENTR" sends 'e'
- "REST" sends 'r'
This is the mapping for the poweron "bank 0". You can change the content in the 9 other banks to suit your application's needs. There's also a direct-ascii mode avaialble as well.
There are 10 banks of keys you can use to send different keysets. All programmed keycodes are stored in EEPROM. Support for these is limited currently, as it only can send single keystrokes of ASCII characters. So typeable characters are OK, but meta/shift keys as well as multimedia keys are not supported yet.
To select one of the keymap banks, hold down [PRO], and press a digit key [0] to [9], then release both keys.
To reset back to the power-on starting bank (0) and clear the key press state, hold down [PRO] and press [RSET], then release both keys. Pressing this combination four times in a row will erase the EEPROM and all user programmed remappings.
To remap a key in a bank, hold down [PRO], and press [KEY REL], then release both keys. You're now in key code remap mode. The first thing you press now is the key you want to configure. For example, press [5]. Next, type in a three digit number for a base-10 ASCII character. For example, if you want to send a space, press [3], [2]. Then press [ENTR] to set the key, or [CLR] to cancel.
Now, any time you're in the current bank, and you press the [5] button, it will send a space ' ' character.
You can type as many digits as you want. the last three are the only ones that are used. As mentioned earlier, only ASCII values below 127 are allowed due to current limitations.
So if you were to type [2],[4],[9],[0],[8],[3], then the value will be the last three, or '083'. 83 is the base-10 ASCII code for "S". On unixy systems, you can type "man ascii" to get the table of values you can use. Look for "The decimal set".
Also note that bank 0 is not programmable, and will always be the preset values mentioned above.
There is also a direct ASCII mode. you hold down [PRO], press [NOUN] and then release them both, it will be in Direct ASCII mode.
In this mode, you can type digits as above, then when you press [ENTR], it will immediately send the character value entered.
Press [CLR] to clear out the current value, [ENTR] to send the current value, and [RSET] to exit from this mode.
For example, to send the string "Hello!\n", you would type:
- [PRO]+[NOUN] to enter the mode
- [7],[2],[ENTR],[1],[0],[1],[ENTR] 'H', 'e'
- [1],[0],[8],[ENTR],[ENTR] 'l', 'l'
- [1],[1],[1],[ENTR] 'o'
- [0],[3],[3],[ENTR] '!'
- [0],[1],[0],[ENTR] '\n'
Note that as above, there's a rolling window of three digits, and you're entering a decimal value. As above, values above 127 will not work currently.
