![]()
The Capture Android SDK gives you the ability to auto-capture high quality images of identity documents in a user-friendly way. The SDK provides you with a rectified image of the document that ensures high success rate in extracting document text or verifying the document validity.
User is guided to avoid glare, blurred images, bad lighting conditions, fingers over the document or too much tilt. The SDK is able to recognize if a document is single sided (i.e. passport) or double sided (i.e. driving license) and prompt the user to scan the back side of the document when needed.
In the results, you can get a cropped, perspective-corrected image of the document, along with the original frame. Those can be processed by your app in any way required. The SDK is lightweight and can be easily integrated into your mobile app and bland in your design.
- Quick Start
- Device requirements
- Customizing the look and UX
- Changing default strings and localization
- Completely custom UX with Direct API (advanced)
- Troubleshooting
- Additional info
- Open Android Studio.
- In Quick Start dialog choose Open project
- In File dialog select CaptureSample folder.
- Wait for the project to load. If Android studio asks you to reload project on startup, select
Yes.
-
app demonstrates quick and straightforward integration of the Capture SDK by using the provided UX and limited customization options to capture document images and display the results.
-
app-direct-api demonstrates custom integration using the Direct API, where the integrator is responsible for preparing input image stream (or static images) for analysis and building completely custom UX from scratch, based on the image-by-image feedback from the SDK.
The Capture library is available on Microblink maven repository.
In your project root, add Microblink maven repository to repositories list:
repositories {
    maven { url 'https://maven.microblink.com' }
}
Add Capture as a dependency in module level build.gradle(.kts):
dependencies {
    implementation("com.microblink:capture-ux:1.3.0")
}
-
A valid license key is required to initialize scanning. You can request a free trial license key, after you register, at Microblink Developer Hub. License is bound to application ID of your app, so please make sure you enter the correct application ID when asked.
Download your licence file and put it in your application's assets folder. Make sure to set the license key before using any other classes from the SDK, otherwise you will get a runtime exception.
We recommend that you extend Android Application class and set the license in onCreate callback like this:
public class MyApplication : Application() {
    override fun onCreate() {
        CaptureSDK.setLicenseFile("path/to/license/file/within/assets/dir", this)
    }
}
-
In your activity, define and create
ActivityResultLauncherobject by usingMbCapturecontract and define the result callback.private val captureLauncher = registerForActivityResult(MbCapture()) { captureResult -> when (captureResult.status) { CaptureResult.Status.DOCUMENT_CAPTURED -> { // do something with the result, you can use analyzerResult captureResult.analyzerResult?.let { analyzerResult -> // use result } } CaptureResult.Status.CANCELLED -> { // Capture process has been canceled by the user, or because // of any other unexpected error. } CaptureResult.Status.ERROR_LICENCE_CHECK -> { // Capture process has been canceled because of the licence // check error. This happens if you use licence which has to // be online activated, and activation fails. CaptureResult.Status.ERROR_ANALYZER_SETTINGS_UNSUITABLE -> { // Capture process has been canceled because of the AnalyzerSettings // validation error. This error means that the given analyzer settings // are not suitable for capturing the document from the input image // (image resolution is too small to fulfill all requirements from AnalyzerSettings). } } }
-
Start capture process by calling
ActivityResultLauncher.launch:// method within MyActivity from previous step public fun startScanning() { // Start scanning resultLauncher.launch() }
The results are going to be available in result callback, which was defined in the previous step.
After capture is finished, SDK returns object of tipe CaptureResult. You first need to check the CaptureResult.status. If the status is DOCUMENT_CAPTURED, CaptureResult.analyzerResult will be available and you can use it.
You can check the API documentation to see which data fields are available in the AnalyzerResult.
Capture SDK requires Android API level 21 or newer.
Camera video preview resolution also matters. In order to perform successful scans, camera preview resolution must be at least 1080p. Note that camera preview resolution is not the same as video recording resolution.
Capture SDK is distributed with ARMv7 and ARM64 native library binaries.
Capture is a native library, written in C++ and available for multiple platforms. Because of this, Capture cannot work on devices with obscure hardware architectures. We have compiled Capture native code only for the most popular Android ABIs.
If you are combining Capture library with other libraries that contain native code in your application, make sure you match the architectures of all native libraries. For example, if third party library has only ARMv7 version, you must use exactly ARMv7 version of Capture with that library, but not ARM64. Using this architectures will crash your app at initialization step because JVM will try to load all its native dependencies in same preferred architecture and will fail with UnsatisfiedLinkError.
To avoid this issue and ensure that only architectures supported by the Capture library are packaged in the final application, add the following statement to your android/defaultConfig block inside build.gradle.kts:
android {
    ...
    defaultConfig {
        ...
        ndk {
        // Tells Gradle to package the following ABIs into your application
        abiFilters 'armeabi-v7a', 'arm64-v8a'
        }
    }
}
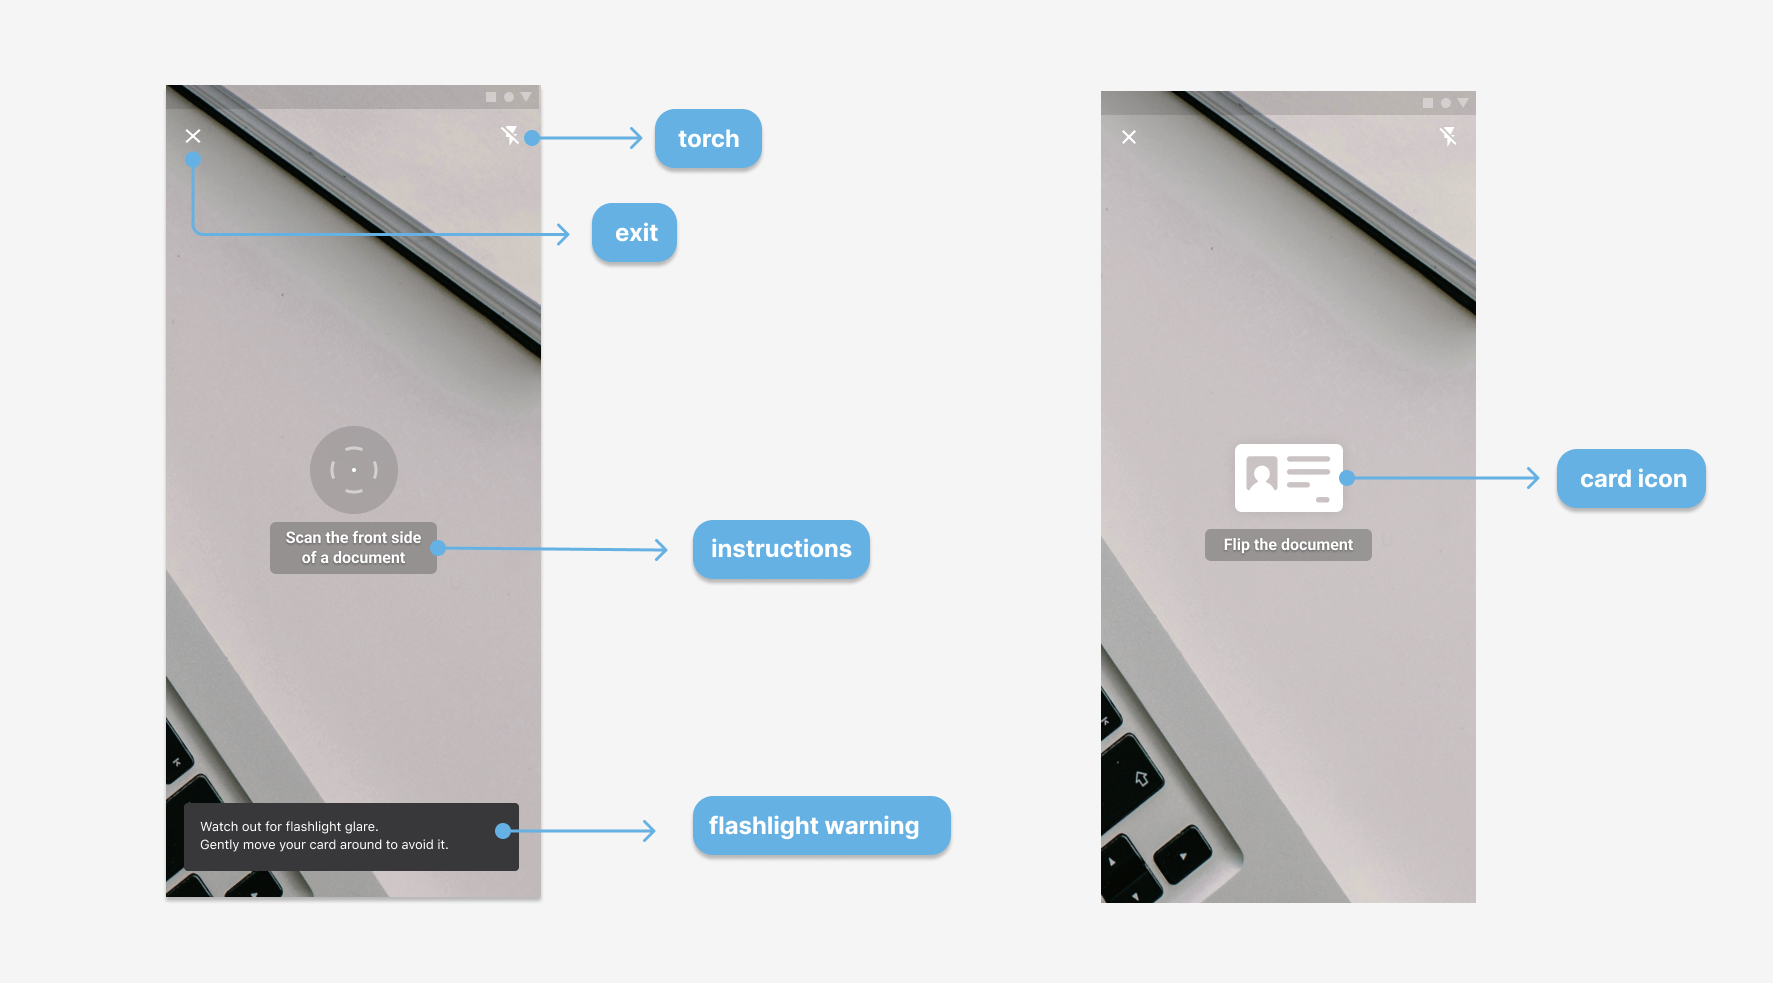

To customise the scanning overlay, provide your custom style resource via CaptureSettings constructor by defining the style property. You can customise elements labeled on screenshots above by providing the following properties in your style:
exit
mb_capture_exitScanDrawable- icon drawable
torch
mb_capture_torchOnDrawable- icon drawable that is shown when the torch is enabledmb_capture_torchOffDrawable- icon drawable that is show when the torch is disabled
instructions
mb_capture_instructionsTextAppearance- style that will be used asandroid:textAppearancemb_capture_instructionsBackgroundDrawable- drawable used for background
flashlight warning
mb_capture_flashlightWarningTextAppearance- style that will be used asandroid:textAppearancemb_capture_flashlightWarningBackgroundDrawable- drawable used for background
card icon
mb_capture_cardFrontDrawable- icon drawable shown during card flip animation, representing front side of the cardmb_capture_cardBackDrawable- icon drawable shown during card flip animation, representing back side of the card
reticle
mb_capture_reticleDefaultDrawable- drawable shown when reticle is in neutral statemb_capture_reticleSuccessDrawable- drawable shown when reticle is in success state (scanning was successful)mb_capture_reticleErrorDrawable- drawable shown when reticle is in error state
inner reticle
mb_capture_reticleColor- color of the shapes displayed during reticle animations
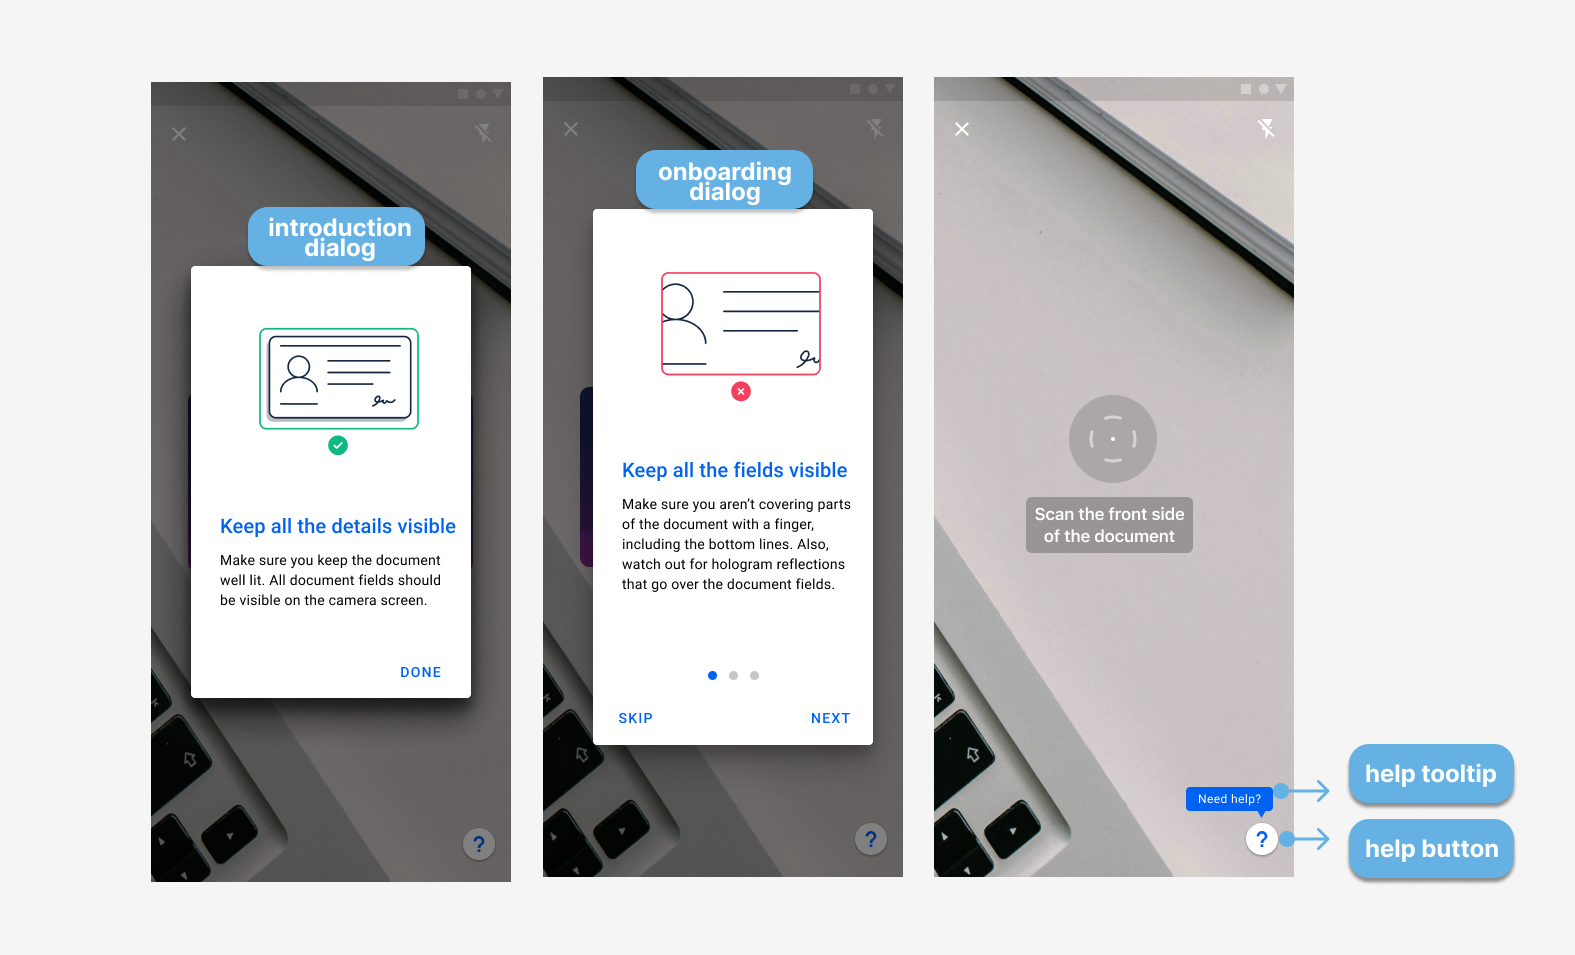
introduction dialog
mb_capture_introductionTitleTextAppearance- style that will be used asandroid:textAppearancefor introduction dialog titlemb_capture_introductionMessageTextAppearance- style that will be used asandroid:textAppearancefor introduction dialog messagemb_capture_introductionBackgroundColor- background color of the introduction dialogmb_capture_introductionImage- drawable displayed in the introduction dialog
onboarding dialog
mb_capture_onboardingImageColor- color of the onboarding imagesmb_capture_onboardingTitleTextAppearance- style that will be used asandroid:textAppearancefor onboarding titlesmb_capture_onboardingMessageTextAppearance- style that will be used asandroid:textAppearancefor onboarding messagesmb_capture_onboardingButtonTextAppearance- style that will be used asandroid:textAppearancefor onboarding buttonsmb_capture_onboardingBackgroundColor- onboarding screens background colormb_capture_onboardingPageIndicatorColor- color of the onboarding page indicator
help button
mb_capture_helpButtonDrawable- icon drawable of the help button
help tooltip
mb_capture_helpTooltipColor- background color of the help tooltipmb_capture_helpTooltipTextAppearance- style that will be used asandroid:textAppearancefor the help tooltip text
alert dialog
mb_capture_alertDialogButtonTextAppearance- style that will be used asandroid:textAppearancefor the alert dialog buttonmb_capture_alertDialogTitleTextAppearance- style that will be used asandroid:textAppearancefor the alert dialog titlemb_capture_alertDialogMessageTextAppearance- style that will be used asandroid:textAppearancefor the alert dialog messagemb_capture_alertDialogBackgroundColor- alert dialog background color
You can control the visibility of the introduction dialog by using UxSettings property showIntroductionDialog and onboarding screens by using showOnboardingInfo when defining the CaptureSettings.
There is also an option for controlling the delay of the "Show help?" tooltip that is shown near the help button. The button and tooltip will be shown if the previous option for showing onboarding is true.
To change the default delay length of the tooltip, use UxSettings.showHelpTooltipTimeIntervalMs. Time parameter is set in milliseconds. The default setting of the delay is 12 seconds (12000 milliseconds).
SDK has built-in support for several languages.
You can modify strings and add your own language. For more information on how localization works in Android, check out the official Android documentation.
For the capture screen, you can define your own string resources that will be used instead of predefined ones by using the custom CaptureOverlayStrings while creating the CaptureSettings.
val captureSettings = CaptureSettings(
    strings = CaptureOverlayStrings(
        helpTooltip = R.string.your_help_tooltip_text,
        flashlightWarning = R.string.your_flashlight_warning_message,
        onboardingStrings = OnboardingStrings(
            onboardingSkipButtonText = R.string.your_onboarding_skip_button_text,
            onboardingBackButtonText = R.string.your_onboarding_back_button_text,
            onboardingNextButtonText = R.string.your_onboarding_next_button_text,
            onboardingDoneButtonText = R.string.your_onboarding_done_button_text,
            onboardingTitles = intArrayOf(
                R.string.your_onboarding_title_1,
                R.string.your_onboarding_title_2,
                R.string.your_onboarding_title_3
            ),
            onboardingMessages = intArrayOf(
                R.string.your_onboarding_msg_1,
                R.string.your_onboarding_msg_2,
                R.string.your_onboarding_msg_3
            ),
            introductionDialogTitle = R.string.your_introduction_dialog_title,
            introductionDialogMessage = R.string.your_introduction_dialog_message,
            introductionDoneButtonText = R.string.your_introduction_done_button_text
        ),
        instructionsStrings = InstructionsStrings(
            scanFrontSide = R.string.your_scan_front_side_instructions,
            scanBackSide = R.string.your_scan_back_side_instructions,
            flipDocument = R.string.your_flip_document_instructions,
            rotateDocument = R.string.your_rotate_document_instructions,
            rotateDocumentShort = R.string.your_rotate_document_short_instructions,
            moveFarther = R.string.your_move_farther_instructions,
            moveCloser = R.string.your_move_closer_instructions,
            keepDocumentVisible = R.string.your_keep_document_visible_instructions,
            alignDocument = R.string.your_align_document_instructions,
            increaseLightingIntensity = R.string.your_increase_lighting_instructions,
            decreaseLightingIntensity = R.string.your_decrease_lighting_instructions,
            eliminateBlur = R.string.your_eliminate_blur_instructions,
            eliminateGlare = R.string.your_eliminate_glare_instructions,
        ),
        alertStrings = AlertStrings(
            errorDialogMessageScanningUnavailable = R.string.your_scanning_unavailable_message,
            errorDialogMessageCheckInternet = R.string.your_check_internet_message,
            errorDialogMessageNetworkCommunicationError = R.string.your_network_communication_error_message,
            errorDialogButtonText = R.string.your_error_dialog_button_text
        )
    )
)
When using the Direct API, you are responsible for preparing input image stream (or static images) for analysis and building a completely custom UX from scratch based on the image-by-image feedback from the SDK.
Direct API gives you more flexibility with the cost of a significantly larger integration effort. For example, if you need a camera, you will be responsible for camera management and displaying real-time user guidance.
For Direct API, you need only Capture SDK core library: capture-core, capture-ux is not needed.
In your project root, add Microblink maven repository to the repositories list:
repositories {
    maven { url 'https://maven.microblink.com' }
}
Add capture-core library as a dependency in module level build.gradle(.kts):
dependencies {
    implementation("com.microblink:capture-core:1.3.0")
}
For the Direct API integration, use the AnalyzerRunner. It is a singleton object, meaning it is possible to capture a single document at a time.
Like in the default UX, you can configure the AnalyzerRunner with desired AnalyzerSettings. It is allowed to update settings at any time during analysis.
AnalyzerRunner.settings = AnalyzerSettings(
    // set supported options
)
When starting the analysis of the next document, be sure that Analyzer has been reset to the initial state:
AnalyzerRunner.reset()During analysis and after analysis is done, the current result is available via AnalyzerRunner.result.
After analysis is done, and you don't need the AnalyzerRunner anymore, be sure to terminate it to release the allocated memory for processing:
AnalyzerRunner.terminate()After terminating, the AnalyzerRunner could be used later again. Just start feeding the frames for the next document.
When you have a larger number of images coming from the stream, e.g. camera stream or pre-recorded video stream, use AnalyzerRunner.analyzeStreamImage method.
It is expected that you will call this method multiple times to analyze the single document and all analyzed images are considered for building the final AnalyzerRunner.result.
For each frame, all relevant info for the current status of the analysis and the capture process is returned by FrameAnalysisResultListener as FrameAnalysisResult, which could be used to guide the user through the scanning process and give real-time feedback.
When FrameAnalysisResult.captureState becomes CaptureState.DocumentCaptured, this means that the document has been successfully captured and you can use the AnalyzerRunner.result as a final capture result. To immediately reset the Analyzer to its initial state and avoid further result changes, you can use AnalyzerRunner.detachResult().
When you have a fixed number of images to analyze, e.g. one (or few) for the front side and another (or few) for the back side of the document, use AnalyzerRunner.analyzeImage, which is optimized for single image analysis.
Make sure that you have set appropriate settings to enable capturing of the document side from the single image:
AnalyzerRunner.settings = AnalyzerSettings(
    // here we have to use single frame strategy, because we have one frame per document side
    captureStrategy = CaptureStrategy.SingleFrame
)In case of problems with SDK integration, first make sure that you have followed integration instructions and device requirements. If you're still having problems, please contact us at help.microblink.com.
If you are having problems like undesired behaviour on specific device(s), crashes inside Capture SDK or anything unmentioned, please contact us at help.microblink.com describing your problem and provide following information:
- high resolution scan/photo of the item that you are trying to read
- information about device that you are using - we need exact model name of the device. You can obtain that information with any app like this one
- please stress out that you are reporting problem related to Android version of Capture SDK
We recommend that you distribute your app using App Bundle. This will defer apk generation to Google Play, allowing it to generate minimal APK for each specific device that downloads your app, including only required processor architecture support.
Here is the SDK size, calculated for supported ABIs:
| ABI | APK file size increase | APK download size increase |
|---|---|---|
| armeabi-v7a | 2.6 MB | 2.4 MB |
| arm64-v8a | 2.6 MB | 2.5 MB |
SDK size is calculated as application size increase when Capture SDK is added, with all its dependencies included.
You can find the Capture SDK KDoc documentation here.
For any other questions, feel free to contact us at help.microblink.com.