NanoMito3D-Platform contains software applications for:
- CellCounterApp: Deep Learning assisted cell counting from phase constrast images
- BleedThroughCorrection: Fluorescent bleed-through correction from two-color 3D single molecule localization microscopy files
- NanoMito3D: 3D mitochondrial network analysis with GPU acceleration from (multicolor) 3D single molecule localization microscopy files
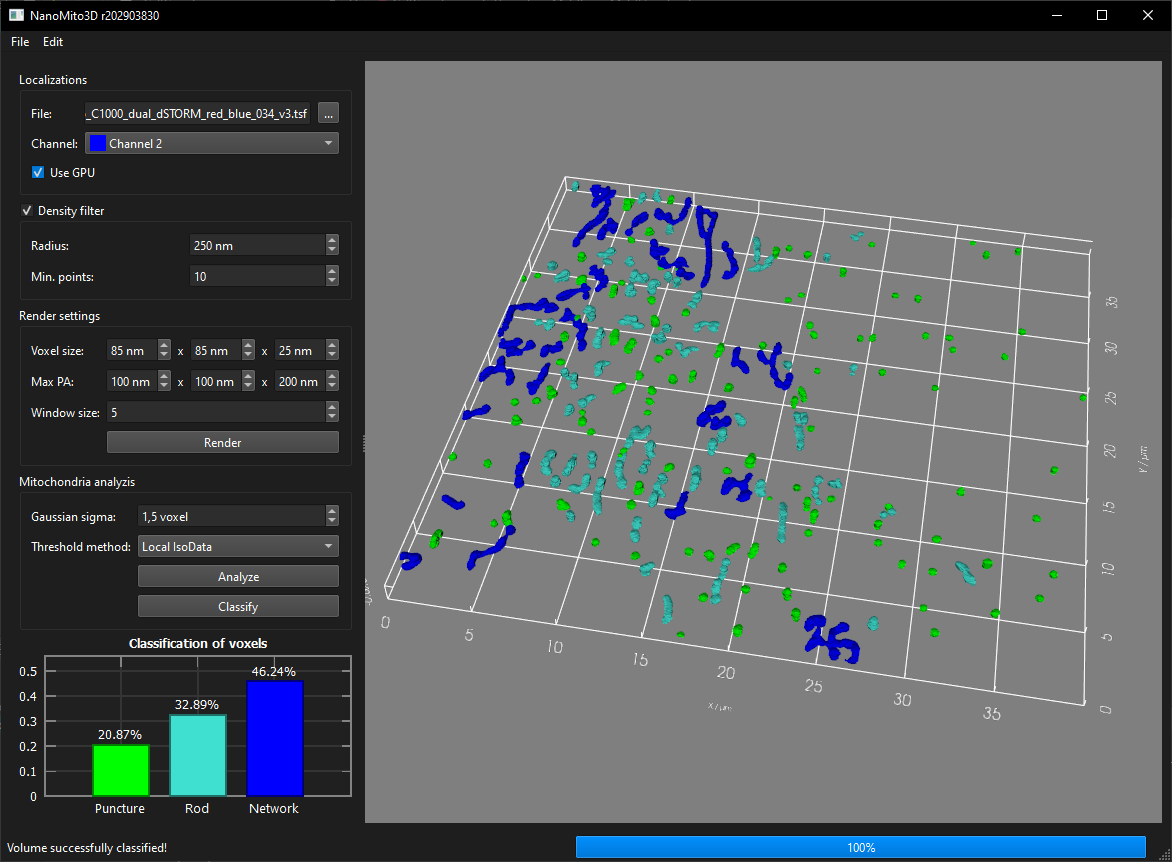
Run NanoMito3D.exe (with CUDA support) or NanoMito3D_OnlyCPU.exe (without CUDA dependencies). Select a TSF file in the Localizations frame and select the correct channel (if the file contains multiple channels). Select the filtering and rendering parameters and click on the "Render" button. Select the analysis parameters and the classification model in the Mitochondrial analyzis frame. The classification model can be a *.json file exported by OpenCV or a training *.csv file. Click on Analyze and then on Classify for a final voxel classification. The rendered volume, the filtered volume and the skeleton volume can be exported via the File/Export menu. The result of the segmentation can also be exported as *.csv via the File/Export/Segmentation ... menu. Furthermore, a screenshot of the 3D viewer can be exported as an image via File/Export/3D Renderer ... and the background can be changed via Edit/Set background color ....
Exact values for the percentage classification of the voxels cannot be guaranteed, but the tendency of the classification is correct. Furthermore, in the current OpenCV implementation of Random Forest, it is not possible to set a fixed seed, and different versions produce different results. To mitigate this discrepancy, a deep neural network classifier could be trained instead of Random Forest.
- Skeletonize3D (ImageJ Plugin)
- AnalyzeSkeleton (ImageJ Plugin)
- cuNSearch (compute neighborhood information on GPU)
A python wrapper for the CUDA accelerated mitochondria segmentation and classisifcation is available in the subfolder python. Dependencies: pandas, numpy, matplotlib, cv2

Run CellCounterApp.exe and select an image file (*.png, *.jpg, *.tif) and the correct pixel size in the Microscopy Image frame and click on the 'Calculate' button. The results of the detected nuclei can be adjusted by changing the threshold (0-1, how confident the model is to detect a nucleus) and the window size. The deep neural network can be modified by replacing the CellCounterModel.onnx (in the same directory as CellCounterApp.exe) and training it with the CellCounter/train/CellCounterTrain.ipynb notebook (Dependencies: tensorflow, numpy, matplotlib, h5py, onnx, cv2, skimage, scipy).
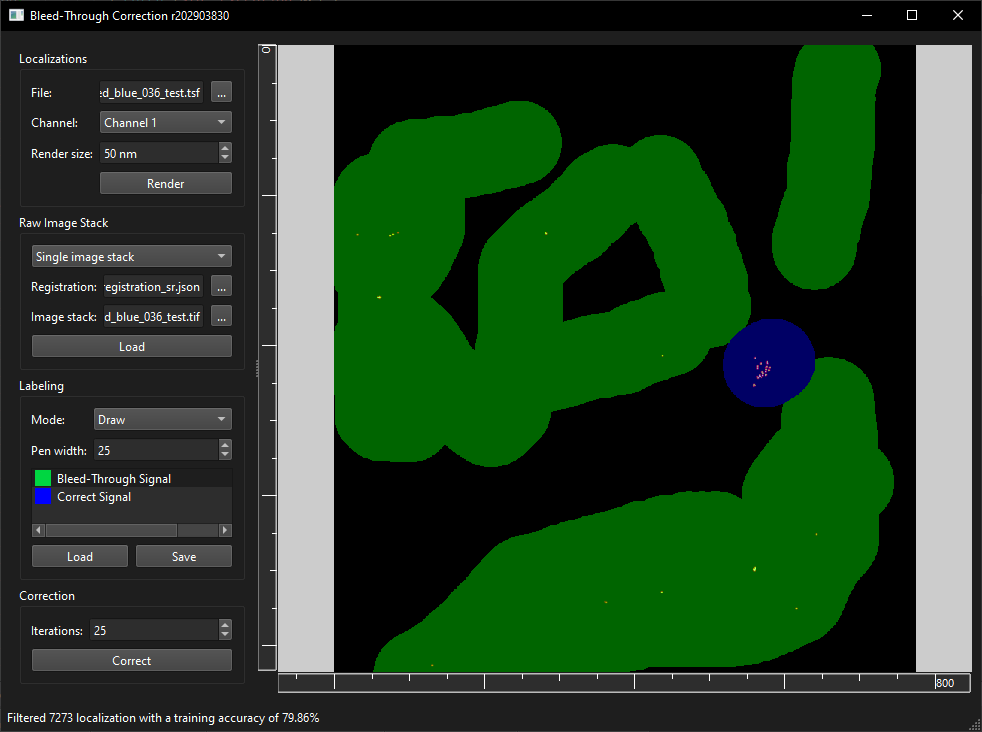
Run BleedThroughCorrection.exe and select a localization file (TSF) in the Localizations frame. Select the channel where the bleed-through occurred and render a preview with the "Render" button. Optinally, select a single raw image file (*.tif) with json registration (e.g. OptoSplit setup, see examples for a json description file) or two separate image channels (e.g. dual camera setup) and click "Load". If no raw image stack is loaded, the correction algorithm only uses Intensity, Background, PAX, PAY, PAZ, which results in a lower accuracy (e.g. 25% compared to 80% with loaded raw image stacks). Select the Bleed-Through Signal and label (draw) areas with the image where the bleed through occurred. Do the same for Correct Signals in areas where no bleed through has occurred. Finally, click on Correct and Save to export the correct TSF file.
Please cite our paper Single Molecule Studies of Dynamic Platelet Interactions with Endothelial Cells, Front. Bioeng. Biotechnol., Volume 12, (2024) (DOI: 10.3389/fbioe.2024.1372807)
- Windows 10/11
- Visual Studio 2019
- QT 5.15.2/6.4.2/6.6.2
- OpenCV 4.5.5/4.9.0
- VTK 9.0/9.2.6/9.3.0
- Qwt 6.1.6/6.2.0
- protobuf 21.12/3.21.9
- CUDA 7.0
- CMake 3.18.1
- Python 3.12
- Protobuf version 21.12 is recommended, since starting with version 22 protobuf is using Abseil (which gave me problems).
TSFProto.protoby Nico Stuurman is modified to support protobuf-lite and the syntax is set toproto2.