Making Your First Game
Here is how to make your first HeliumJS game.
In this tutorial you will learn:
- How to make a basic game with HeliumJS
- How to make sprites
- How to add scripts to sprites
- How to get input
(The finished product can be found here)
Let's start with the HTML, here's the base code:
<!DOCTYPE html>
<html lang="en">
<head>
    <meta charset="UTF-8">
    <title>My First Game</title>
    <link href="style.css" rel="stylesheet" type="text/css" />  <!-- Change this to your path to your style (Optional) -->
    <script src="../lib/lib.js"></script> <!-- Change this to your path to lib.js -->
</head>
<body>

</body>
</html>
When linking the script remember to put in the correct path to lib.js, or it wont work.
Now lets add the canvas inside the body for the game to draw on:
...
<body>
    <canvas id="gameScreen"></canvas>
</body>
...
In my example the canvas' id is gameScreen, but you can change it to something else if you want, just remember it for later!
Now lets make the script:
<script>
let canvas=helium.Canvas(300,200,"gameScreen");
let game=helium.Game(canvas,60);
</script>
This will make a new Canvas object with the dimensions 300 x 200 (width x height), and the id set to gameScreen (if you have a different id for the canvas, then change this too).
Next, it makes a Game object with the canvas we just defined, and a frame rate of 60fps.
Now add the Camera:
let camera=helium.Camera(0,0);

game.setCamera(camera);
This makes a Camera at position (0,0) and sets the game's active camera to it.
Now add the player:
let player=helium.Rectangle(40,30,20,20,"#ff0000");

game.addSprite(player)
This makes a Rectangle at position (40,30), the dimensions 20x20, and the color set to #ff0000 (red).
Note: (40,30) is the center of the rectangle, not the top-left corner.
Now lets make the game start:
game.start()Now the script should look like this:
let canvas=helium.Canvas(300,200,"gameScreen");
let game=helium.Game(canvas,60);
let camera=helium.Camera(0,0);

let player=helium.Rectangle(40,30,20,20,"#ff0000");

game.addSprite(player);
game.setCamera(camera);

game.start();Congratulations! You just made your first game with HeliumJS!
If you open the html file in the browser, it should look something like this: (Your canvas border might look a bit different, but that doesn't matter)
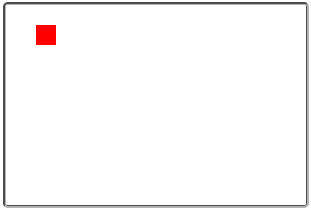
It works, but it doesn't do anything, so let's make the player move!
First, let's make a new script called movementScript and add it to the player:
...
let player=helium.Rectangle(40,30,20,20,"#ff0000");
let movementScript=helium.Script(function(self){
  //Movement code here (we'll add this later)
});

player.addScript(movementScript);
...
The game will run the script every update loop.
To get input, use if (game.pressedKeys.[key]) and replace [key] with the key you want to get.
To make the player move right, add this to the movement script:
if (game.pressedKeys.d) self.x++;Here's how it works: if the key d is pressed, the player's x position will increase by 1.
Note: The self argument in the script function is the sprite that uses the script, in this case its the player.
Now let's add the other three directions (the w key moves up, s moves down, and a moves left):
if (game.pressedKeys.a) self.x--;
if (game.pressedKeys.w) self.y--;
if (game.pressedKeys.s) self.y++;
The game script should look like this:
let canvas=helium.Canvas(300,200,"gameScreen");
let game=helium.Game(canvas,60);
let camera=helium.Camera(0,0);

let player=helium.Rectangle(40,30,20,20,"#ff0000");
let movementScript=helium.Script(function(self){
  if (game.pressedKeys.d) self.x++;
  if (game.pressedKeys.a) self.x--;
  if (game.pressedKeys.w) self.y--;
  if (game.pressedKeys.s) self.y++;
});

player.addScript(movementScript);

game.addSprite(player);
game.setCamera(camera);

game.start();
Now it's done! Open the html file in your browser and the player should respond to input.
Good job :)