Uses openpose to identify people in an video feed, from v4l2 or NDI, and issue VISCA over IP PTZ commands to a networked camera. MQTT can be used to issue commands to turn the control on/off.
Currently tested and used with a BirdDog P200 using ffmpeg with NDI support to feed a v4l2 loopback device on Ubuntu. Companion on a StreamDeck, and its' MQTT module, is used to toggle automatic control on/off. It's setup and run in Docker for tidiness sake. NDI testing is ongoing.
It tracks the middle of all people it finds, so it probably won't do much if there are several people visible.
This is the third major iteration of this program, after trying various face/people tracking options.
- Install Docker and nvidia-container-toolkit, and confirm it works.
- Clone or download this repository:
$ wget -O openpose-ptz-control.tar.gz https://github.com/Cameron-D/openpose-ptz-control/archive/main.tar.gz
$ tar xvf openpose-ptz-control.tar.gz
- Build the docker container
$ cd openpose-ptz-control
$ docker build -t ptzcontrol:11.2 .
- Wait a while for it to download and build... ☕
Running the program will read from /dev/video0 by default...
If you have ffmpeg with NDI support, the following will work to expose it as a video device (limiting to 10 FPS to reduce processing later):
sudo modprobe v4l2loopback
ffmpeg -f libndi_newtek -extra_ips "10.1.1.174" -i "BIRDDOG-ABC123 (CAM)" -vf "fps=fps=10" -pix_fmt yuv420p -f v4l2 /dev/video0
By default the program will automatically start controlling the camera when launched. If you enable MQTT support and provide an MQTT host (-m --mqtt_host 10.1.1.175) commands can be provided to the program through an MQTT broker. It is easiest to use Docker to run a broker:
docker run -d --restart unless-stopped --name mosquitto -p 1883:1883 eclipse-mosquitto
Will read from /dev/video0 and automatically start controlling the camera at the supplied IP by default.
$ docker run --gpus all --name ptztrack --restart unless-stopped -it \
    --device /dev/video0 ptztrack:11.2 10.1.1.174
If all goes well it should start up with no errors, print out in the console when it's moving, and actually move the camera.
- ✅ Smooth acceleration for panning (start slow, accelerate if the person nears the edges of the frame)
- Support for multiple people in view, but following only one
- ✅ Read direct NDI frames rather than relying on a custom build of ffmpeg and v4l2loopback
- More focus on tracking a persons head rather than the full body bounding box
- An alternative library for people detection (i.e. tf-pose-estimation seems to be faster?)
There are a handful of options that can be configured and passed to the container as launch parameters. The only required parameter is the camera's IP.
| Option | Default | Description |
|---|---|---|
| Camera IP | None | IP address of the PTZ camera. IP or hostname accepted. Provided as a direct parameter. |
-p /--visca_port |
52381 |
Port that camera accepts VISCA commands on. |
-m/--mqtt |
False |
Whether or not to enable to MQTT funtionality. True or False. |
--mqtt_host |
127.0.0.1 |
IP address of MQTT broker. IP or hostname accepted. |
-c/--control |
False |
Whether to start controlling the camera automatically or wait for a start command. Can be True or False. |
-b/--boundary |
0.35 |
How far toward the screen edge can the person move before the camera starts following (default is 35% of screen size either side). 0 - 0.5 accepted. |
-s/--speed_min |
1 |
Minimum panning speed for smooth accelerating. 0-23 accepted. Must be less than MAX_SPEED |
-S/--speed_max |
16 |
Maximum panning speed for smooth accelerating. 1-24 accepted. Must me more than MIN_SPEED |
--net_resolution |
-1x128 |
Parameter sent directly to openpose. See the Openpose documentation. |
--ui |
0 |
Show the processed video in a window. Requires futher setup (see below). Can be 1 or 0. |
-v / --video_source |
device |
Which video input source to use. Can be device or ndi for webcamera/v4l2 device, or NDI source. |
--video_device |
0 |
Which video device to use when source type is device. Defaults to 0 (/dev/video0) |
--ndi_source |
None | Name of NDI device and source to read video from |
--ndi_extra_ips |
None | Additional IPs for NDI to search for the source. Usually required when using Docker as multicast packets generally won't be received |
If you have a StreamDeck running BitFocus Companion its straightforward to add a button to show and toggle the automatic control state.
- Add a new instance of "Generic MQTT".
- Configure it with Protocol:
mqtt://, Broker IP: (As above, probably the control computer IP) and Port:1883. - Add a new Regular Button.
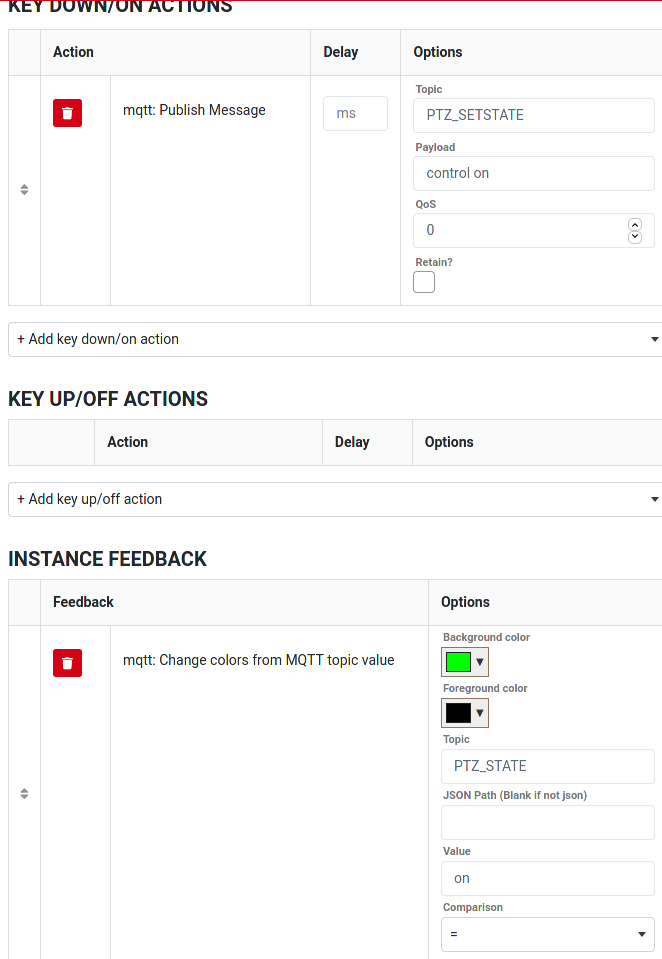
- To show the camera state on the button:
- In Instance Feedback add
mqtt: Change colors from MQTT topic value. - Set the Topic to
PTZ_STATE. - Set the Value to either
onoroffdepending on what you want the button to show. - Set colours as desired.
- In Instance Feedback add
- To turn the control on/off:
- Add a new Key Down/On action of
mqtt: Publish Message - Set the topic to
PTZ_SETSTATE - Set the Payload to one of the following:
- Add a new Key Down/On action of
| Payload | Description |
|---|---|
control on |
Turn automatic control on |
control off |
Turn automatic control off |
control toggle |
Toggle the state of the automatic control |
control state |
Force the program to republish the current control state (it does this automatically every 50 frames anyway) |
Nice to confirm what the program is actually seeing, but displaying windows from in Docker requires several changes (some which introduce possible security issues).
Open up X rendering to everyone (probably unsafe in untrusted environments):
$ xhost +
Launch the docker container with access to required host computer resources:
$ docker run --gpus all --name ptztrack \
    --rm -it \
    --net=host --ipc=host \
    -e DISPLAY=$DISPLAY \
    -v /tmp/.X11-unix:/tmp/.X11-unix \
    --device /dev/video0 ptztrack:11.1 \
    -m --mqtt_host 10.1.1.175 -c --ui 10.1.1.174
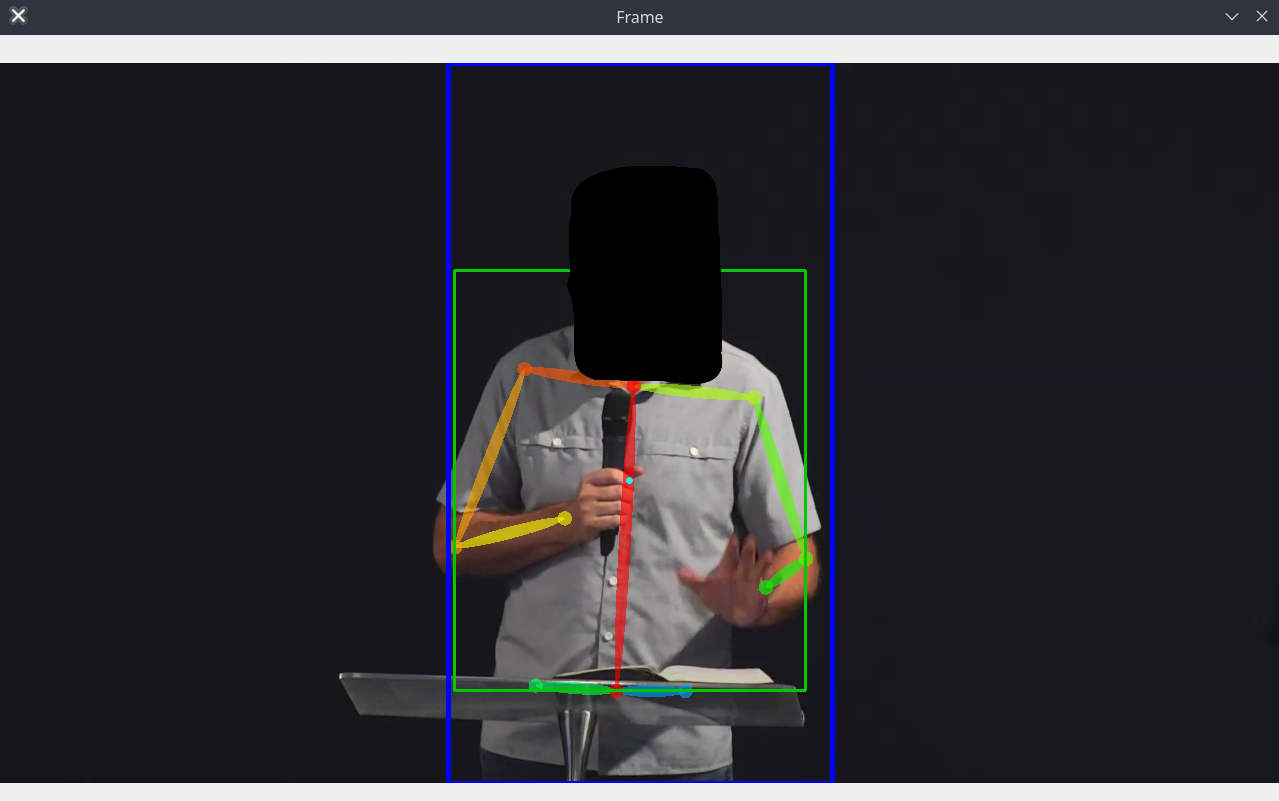
After a moment a window should pop up with dark blue lines representing the movement boundaries, people marked in colours, a green box around the people and a light blue point in the middle. If the blue point is outside the dark blue lines the camera will move in the required direction. Press Q to exit.