Keycloak MySQL Setup
Keycloak comes with its own embedded Java-based relational database called H2. This is the default database that Keycloak will use to persist data and really only exists so that you can run the authentication server out of the box. It's fine for development purposes, but for production it is recommended to replace it with a more production ready external database. Given my history and affinity with MySQL, we use the MySQL Community Edition v5.7 for www.bookmarks.dev, which is the freely downloadable version of the world's most popular open source database. It is available under the GPL license and is supported by a huge and active community of open source developers.
This guide presents what we need to do to run Keycloak on MySQL. Check out the Relational Database Setup official documentation, for configuring other Relational database management system(RDBMS)
The installation of the MySQL Community Edition is not in scope, of this guide, but I can tell you is a straight forward process. You can find instructions about installing MySQL on the different platforms in the official documentation
If you have already data in the embedded database, consider exporting and importing it first to spare you the extra work. This ability can be also very useful if you want to migrate your whole Keycloak database from one environment to another.
Connect to the MySQL shell as root and create a schema and user needed for Keycloak:
$ mysql -uroot -p
Welcome to the MySQL monitor.  Commands end with ; or \g.
Your MySQL connection id is 3
Server version: 5.7.17 MySQL Community Server (GPL)

Copyright (c) 2000, 2016, Oracle and/or its affiliates. All rights reserved.

Oracle is a registered trademark of Oracle Corporation and/or its
affiliates. Other names may be trademarks of their respective
owners.

Type 'help;' or '\h' for help. Type '\c' to clear the current input statement.

mysql> CREATE USER 'keycloak'@'%' IDENTIFIED BY 'keycloak';
Query OK, 0 rows affected (0.01 sec)

mysql> CREATE DATABASE keycloak CHARACTER SET utf8 COLLATE utf8_unicode_ci;
Query OK, 1 row affected (0.00 sec)

mysql> GRANT ALL PRIVILEGES ON keycloak.* TO 'keycloak'@'%';
Query OK, 0 rows affected (0.00 sec)
After giving in your password you have done the following
- created keycloak database
- created keycloak user with the password keycloak (please use a strong password for production)
- granted all privileges to the keycloak on the keycloak database
If you prefer it visual, then MySQL Workbench is the right tool for this job.
Now that we have the database prepared there are a couple of steps steps we will need to perform to get an RDBMS configured for Keycloak:
- Locate and download a JDBC driver for your database
- Package the driver JAR into a module and install this module into the server
- Declare the JDBC driver in the configuration profile of the server
- Modify the datasource configuration to use your database's JDBC driver
- Modify the datasource configuration to define the connection parameters to your database
JDBC is a Java API that is used to connect to a RDBMS. There are different JDBC drivers per database type that are provided by your database vendor.
First thing we need to do is find and download the JDBC driver JAR for MySQL. MySQL Connector/J is the official JDBC driver for MySQL. We can download it from the official page. We download the .zip version and place it in our tmp folder:
$ wget -P ~/tmp/  https://dev.mysql.com/get/Downloads/Connector-J/mysql-connector-java-5.1.42.zip
$ unzip ~/tmp/mysql-connector-java-5.1.42.zip -d ~/tmp
Before we can use this driver, we must package it up into a module and install it into the server. Modules define JARs that are loaded into the Keycloak classpath and the dependencies those JARs have on other modules. They are pretty simple to set up.
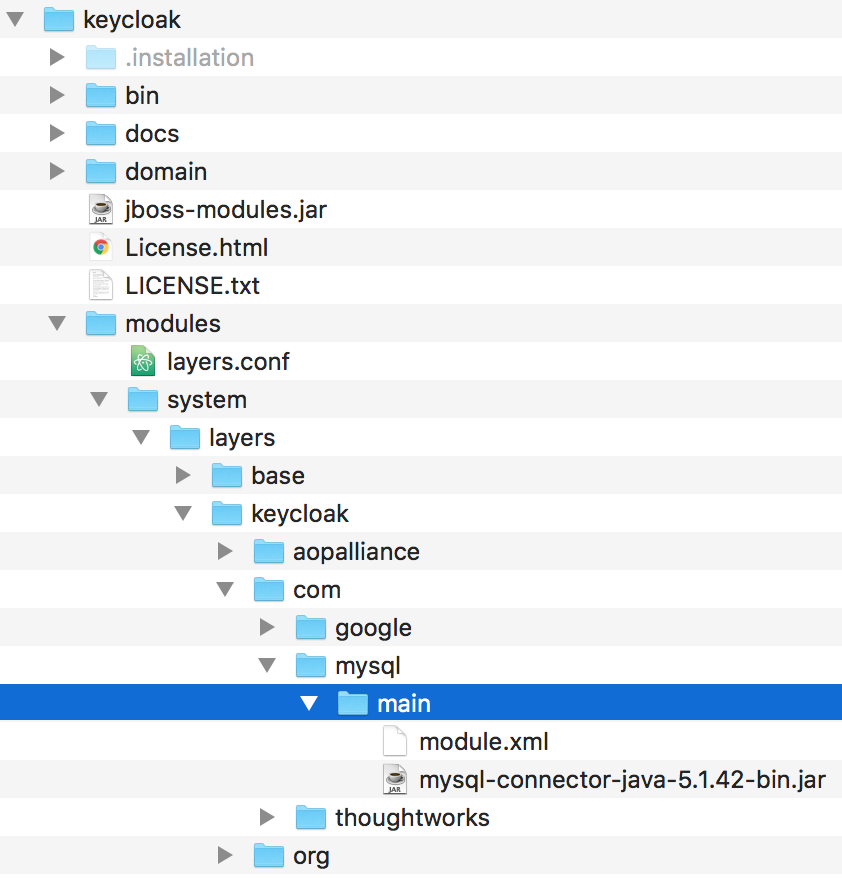
Within the …/modules/ directory of our Keycloak distribution, we need to create a directory structure to hold our module definition. The convention is use the Java package name of the JDBC driver for the name of the directory structure. For MySQL, create the directory com/mysql/main. Copy your database driver JAR into this directory and create an empty module.xml file within it too:
$ sudo mkdir -p /opt/keycloak/modules/system/layers/keycloak/com/mysql/main
$ sudo cd /opt/keycloak/modules/system/layers/keycloak/com/mysql/main
$ sudo cp ~/tmp/mysql-connector-java-5.1.42/mysql-connector-java-5.1.42-bin.jar .
$ sudo touch module.xml
The
-poption of themkdircommand, it makes parent directories as needed, and throws no error if they are existing
After we've done this, we open up the module.xml file and create the following XML:
<?xml version="1.0" ?>
<module xmlns="urn:jboss:module:1.3" name="com.mysql">
 <resources>
  <resource-root path="mysql-connector-java-5.1.42-bin.jar" />
 </resources>
 <dependencies>
  <module name="javax.api"/>
  <module name="javax.transaction.api"/>
 </dependencies>
</module>
The module name should match the directory structure of your module. So, com/mysql maps to com.mysql. The resource-root path attribute should specify the JAR filename of the driver. The rest are just the normal dependencies that any JDBC driver JAR would have.
The next thing we have to do is declare your newly packaged JDBC driver into your deployment profile so that it loads and becomes available when the server boots up. Because our current operation mode is standalone, we need to edit KEYCLOAK_HOME/standalone/configuration/standalone.xml.
You should know I am a big fan of aliases, so to open and edit this file I have created an alias:
$ alias keycloak-vim-standalone.xml='vim /opt/keycloak/standalone/configuration/standalone.xml'
$ keycloak-vim-standalone.xml
Within the profile, search for the drivers XML block within the datasources subsystem. You should see a pre-defined driver declared for the H2 JDBC driver. This is where you’ll declare the JDBC driver for your external database. This is how it looks like after we have declared the additional MySQL JDBC driver:
    <subsystem xmlns="urn:jboss:domain:datasources:4.0">
        <datasources>
          ...
          <drivers>
              <driver name="mysql" module="com.mysql">
                  <driver-class>com.mysql.jdbc.Driver</driver-class>
              </driver>
              <driver name="h2" module="com.h2database.h2">
                  <xa-datasource-class>org.h2.jdbcx.JdbcDataSource</xa-datasource-class>
              </driver>
          </drivers>
      </datasources>
    </subsystem>
Note:
-
nameis set tomysql, but can be everything we want - we speciy the
moduleattribute which points to themodulepackage we created earlier for the driver JAR - finally, we specify the driver's Java class, which in case of MySQL is
com.mysql.jdbc.Driver
After declaring the JDBC driver, we have to modify the existing datasource configuration that Keycloak uses to connect it to your new external database. We’ll do this within the same configuration file and XML block that we registered the JDBC driver in. Here’s how the complete datasources subsystem looks like, once we do this:
<subsystem xmlns="urn:jboss:domain:datasources:4.0">
<datasources>
<datasource jndi-name="java:jboss/datasources/ExampleDS" pool-name="ExampleDS" enabled="true" use-java-context="true">
<connection-url>jdbc:h2:mem:test;DB_CLOSE_DELAY=-1;DB_CLOSE_ON_EXIT=FALSE</connection-url>
<driver>h2</driver>
<security>
<user-name>sa</user-name>
<password>sa</password>
</security>
</datasource>
<datasource jndi-name="java:/jboss/datasources/KeycloakDS" pool-name="KeycloakDS" enabled="true">
<connection-url>jdbc:mysql://localhost:3306/keycloak?useSSL=false&characterEncoding=UTF-8</connection-url>
<driver>mysql</driver>
<pool>
<min-pool-size>5</min-pool-size>
<max-pool-size>15</max-pool-size>
</pool>
<security>
<user-name>keycloak</user-name>
<password>keycloak</password>
</security>
<validation>
<valid-connection-checker class-name="org.jboss.jca.adapters.jdbc.extensions.mysql.MySQLValidConnectionChecker"/>
<validate-on-match>true</validate-on-match>
<exception-sorter class-name="org.jboss.jca.adapters.jdbc.extensions.mysql.MySQLExceptionSorter"/>
</validation>
</datasource>
<drivers>
<driver name="h2" module="com.h2database.h2">
<xa-datasource-class>org.h2.jdbcx.JdbcDataSource</xa-datasource-class>
</driver>
<driver name="mysql" module="com.mysql">
<driver-class>com.mysql.jdbc.Driver</driver-class>
</driver>
</drivers>
</datasources>
</subsystem>
What we modified:
- we've searched for
datasourcedefinition forKeycloakDS. - we modified the
connection-urlto point to the MySQL server - we defined the
driverwe use for the connection; this is the logical name of the JDBC driver we declared in the previous section (mysql) - it is expensive to open a new connection to a database every time you want to perform a transaction. To compensate, the datasource implementation maintains a pool of open connections. The
max-pool-sizespecifies the maximum number of connections it will pool. We may want to change the value of this depending on the load of the system. - finally we need to define the database
user-nameandpassword, that is needed to connect to the database.
The configuration for this component is found in standalone.xml, because we are running in standalone mode. We keep the default database configuration in the keycloak-server subsystem, as it serves well our purposes:
<subsystem xmlns="urn:jboss:domain:keycloak-server:1.1">
    ...
    <spi name="connectionsJpa">
        <provider name="default" enabled="true">
            <properties>
                <property name="dataSource" value="java:jboss/datasources/KeycloakDS"/>
                <property name="initializeEmpty" value="true"/>
                <property name="migrationStrategy" value="update"/>
                <property name="migrationExport" value="${jboss.home.dir}/keycloak-database-update.sql"/>
            </properties>
        </provider>
    </spi>
    ...
</subsystem>
Note the configured parameters:
-
dataSource- JNDI name of the dataSource -
initializeEmpty- initialize database if empty. If set to false the database has to be manually initialized. If you want to manually initialize the database set migrationStrategy tomanualwhich will create a file with SQL commands to initialize the database. Defaults to true. -
migrationStrategy- strategy to use to migrate database. Valid values areupdate,manualandvalidate. Update will automatically migrate the database schema. Manual will export the required changes to a file with SQL commands that you can manually execute on the database. Validate will simply check if the database is up-to-date. -
migrationExport- path for where to write manual database initialization/migration file.
These configuration switches and more are described in the Keycloak Server Installation docs.
Database schema in Keycloak only accounts for Unicode strings in the following special fields:
- Realms: display name, HTML display name
- Federation Providers: display name
- Users: username, given name, last name, attribute names and values
- Groups: name, attribute names and values
- Roles: name
- Descriptions of objects
Otherwise, characters are limited to those contained in database encoding which is often 8-bit. However, for some database systems, it is possible to enable UTF-8 encoding of Unicode characters and use full Unicode character set in all text fields. Often, this is counterbalanced by shorter maximum length of the strings than in case of 8-bit encodings.
In MySQL unicode characters are properly handled provided the database was created with Unicode support in VARCHAR and CHAR fields in the CREATE DATABASE command (e.g. by using utf8 character set as the default database character set in MySQL 5.5+. Please note that utf8mb4 character set does not work due to different storage requirements to utf8 character set footnote:[Tracked as https://issues.jboss.org/browse/KEYCLOAK-3873]). Note that in this case, length restriction to non-special fields does not apply because columns are created to accomodate given amount of characters,not bytes. If the database default character set does not allow storing Unicode, only the special fields allow storing Unicode values.
At the side of JDBC driver settings, it is necessary to add a connection property characterEncoding=UTF-8 to the JDBC connection settings.