git
##GIT
Revision/Version control is a system that records changes to a file or set of files over time so that you can recall specific versions later.
The traditional version control systems(VCS) are centralised, which have a single server that contains all versions of the files. The clients check out files from that central server, edit them and then push it to the central server. Distributed VCS is the counterpart to traditional centralized VCS. In distributed systems, each client has a fully functional repository to work on, which can be merged with the server repository.
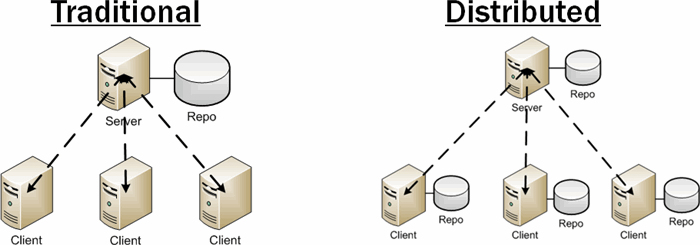
The benefits to Distributed Version Control include:
- No network required
- Faster operations
- Allows private work without having to publish
- Removes the risk of having the server be a single point of failure
- Still allows centralized control of the server "release" version of the project
Git is a fast and scalable distributed revision Control System. Developed in 2005 by Linus Torvalds for use with the Linux Kernel, Git has become the most widely used VCS in software development.
old VCS's store the differences or patches between different versions of files and when recalled, they recreate how the old file looks like from the differences whereas Git takes snapshots for each version. Every time you save the state of your project by committing, Git basically takes a picture of what all your files look like at that moment and stores a reference to that snapshot. Git thinks about its data more like a stream of snapshots. Git identifies these snapshots (or commits) using a SHA-1 hash that looks something like this
bd15c0b4349b9fa50a4ad8fb3c5bbcbf73abcffe
In Git (As in any VCS), you can lose or mess up changes you haven’t committed yet; but after you commit a snapshot into Git, it is very difficult to lose, especially if you regularly push your database to another repository.
Git has three main states that your files in working directory can reside in: modified, staged and committed.
- Modified means that you have changed the file but have not committed it to your database yet.
- Staged means that you have marked a modified file in its current version to go into your next commit snapshot.
- Committed means that the data is safely stored in your local database.
The basic Git workflow goes something like this:
You modify files in your working directory.

You stage the files, adding snapshots of them to your staging area.

You do a commit, which takes the files as they are in the staging area and stores that snapshot permanently to your Git directory.
Repository : A storage place where all versions of a project are stored. (local repository refers to a repository on your computer and remote repository refers to a repository on a server like github.com)
Cloning : To get a copy of a remote repository to your local computer.
Fetching : To get latest changes from remote repository without merging
Pushing : To commit the changes to the remote repository
Pulling : To get latest changes from remote repository and merge them with your local
repository
Commit : To save changes in the local repository
Checkingout means to get a snapshot of a file or a set of files in a specific version to your working directory.
Untracked basically means that Git sees a file you didn’t have in the previous snapshot (commit);
Working directory is a single checkout of one version of the project. These files are pulled out of the compressed database in the .git directory and placed on disk for you to use or modify.
HEAD refers to a pointer pointing to the currently checked out commit. The HEAD pointer changes whenever you run a git checkout -- command.
To create a Git repository for an existing project/directory in your local computer, type the following commands in the projects root directory but not in sub-folders
git init    # initializes git by creating a .git subdirectory in the project root
git add * # add all files in the project directory to staging area
git commit -m "msg" # takes the files as they are in the staging area and stores in git's local database
To get a copy of an existing Git repository from another server, type the following commands
`git clone [url] # gets all the data in the remote repository and checks out a working copy of the latest version`
Lets say, in a working directory, there are four files - README.md, prog1, prog2 & prog3. Now, you have modified the README.md, prog1 files and deleted the prog2 file. To stage and commit these changes to the Git repository, type the following commands
git status # shows the current state of your working directory(files to be added, and files staged for commit)
git add README.md prog1 # stages a file exactly as it is when you run the git add command
git rm prog2 # files are removed from your working directory and their removal is also staged.
git status # to get status of your working directory
git commit -m "msg"  # takes the files as they are in the staging area and stores in git's local database
For undoing changes made during staging & committing phase, the following commands are useful
git reset HEAD CONTRIBUTING.md # to unstage a staged file
git checkout -- [file] # to revert a file back to previous snapshot file
git commit --amend # used to try a commit again. This command takes to staging area
To view and modify any previous commit, run
git log # to view the commit history
git commit -- [commit's hashtag] # to view the commit
To completely revert to any previous commit, run
git revert [] # creates a new commit by undoing changes made between the current commit and the commit you want to revert to
The following links provide more information on undoing changes,
http://git-scm.com/book/en/v2/Git-Basics-Undoing-Things https://www.atlassian.com/git/tutorials/resetting-checking-out-and-reverting/commit-level-operations
To add a remote repository to your local repository, run
`git remote add [url] [shortname]`
To get a list of all the remotes added to your local repository, run
git remote -v
To remove a remote added to your local repository, run
git remote rm [shortname]
After connecting a remote to your local repository, pull and push are used to sync your local repository and remote repository together.
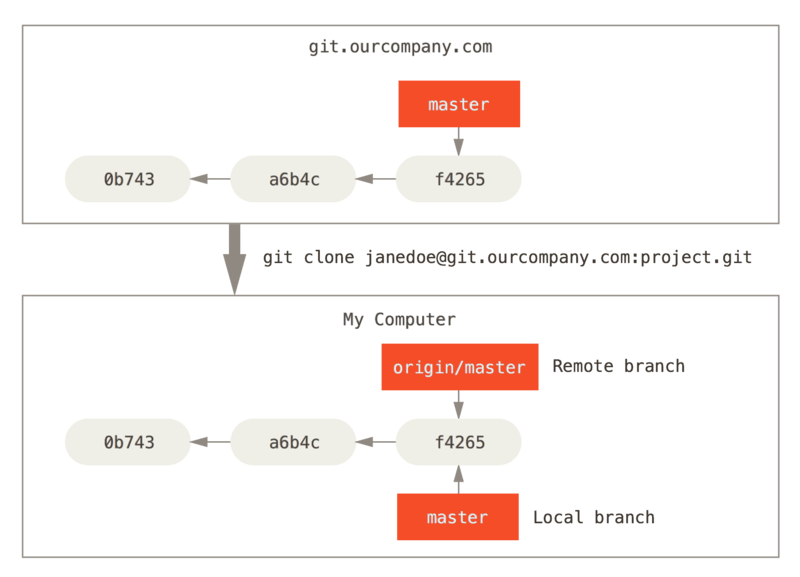
Lets say, you have cloned a repository from github.com. After the initial clone, the commit history at your local computer and at the server(github.com) looks like
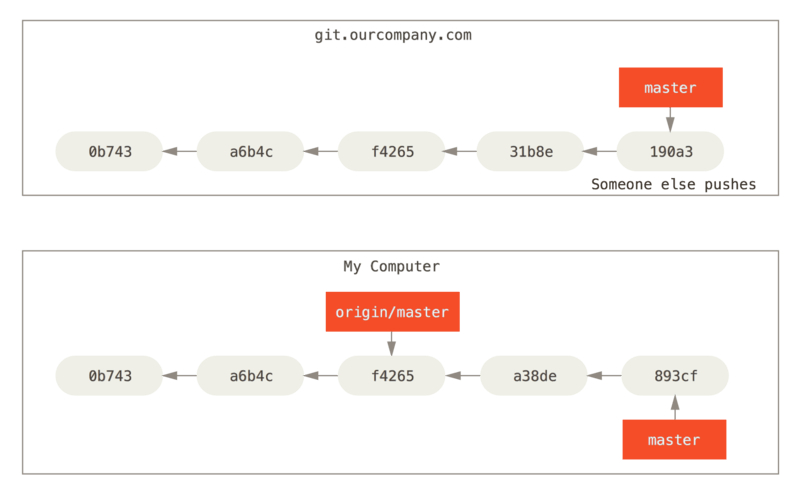
If you do some work on your local master branch, and, in the meantime, someone else pushes to github.com and updates its master branch, then your commit histories move forward differently.
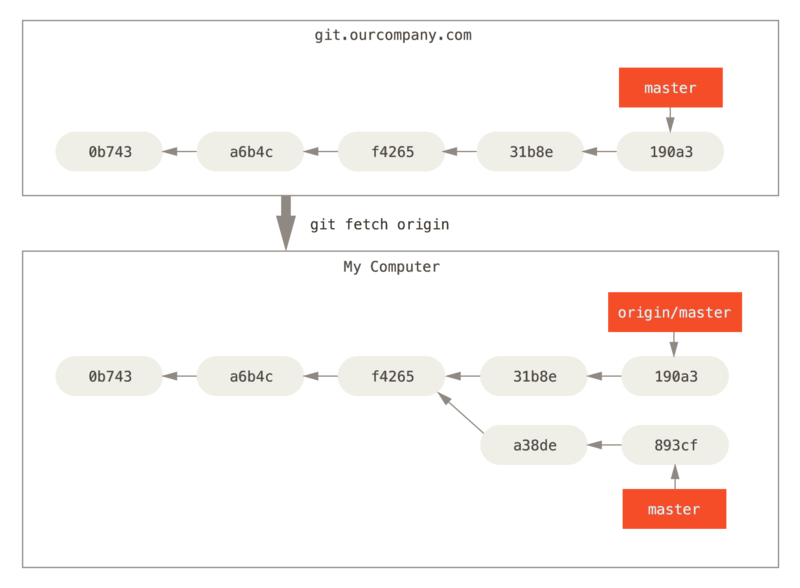
To synchronize your work, you run a git fetch origin command. This command looks up which server “origin” is (in this case, it’s github.com), and updates your origin/master pointer in your local repository to its new, more up-to-date position. (Note: Fetching doesn't merge the data)
Now, if you run git merge origin master , it gets the latest changes (i.e., changes between the commit pointed by the origin/master pointer before fetching and the commit pointed by master pointer at github.com) and tries to merge with the current commit.
git push [remote URL shortname] [branch at remote] mirrors the latest commit at the local repository to the branch specified at the remote repository.
git pull [remote URL shortname] [branch at remote] gets the latest changes and tries to merge them to the local repository.
Another important feature of git is Branching. Branching is essentially creating a separate line of development that can eventually be merged back into master branch. This should be used for adding new features or files to an existing repository.
To see available branches type
git branch
To create a new branch type
git branch newBranchName
To delete a branch (after merging) type
git brach -d branchToDelete
Once a branch is created, in order to work on that branch you must check it out. The following command essentially allows you to switch between existing branches.
git checkout existingBranchName
Once on a new branch, this is a common workflow
Do your editing
git add file
git commit -m "my commit"
Move back to main branch
git checkout master
And then merge
git merge existingBranchName
git branch -d existingBranchName
Setting Git for the first time Git Basics Git Basics - Working with Remotes https://www.atlassian.com/git/ http://readwrite.com/2013/09/30/understanding-github-a-journey-for-beginners-part-1 [Torvalds Google Talk on Git circa 2007] (https://www.youtube.com/watch?v=4XpnKHJAok8)