Thank you for being interested in contributing your application to the DMI-CADE System!
This guide will help you setup your exported application for a seamless integration into the system.
If you just start developing your game or if you're already done and want to set it up, either way there are some things you need to keep in mind and configure before exporting.
-
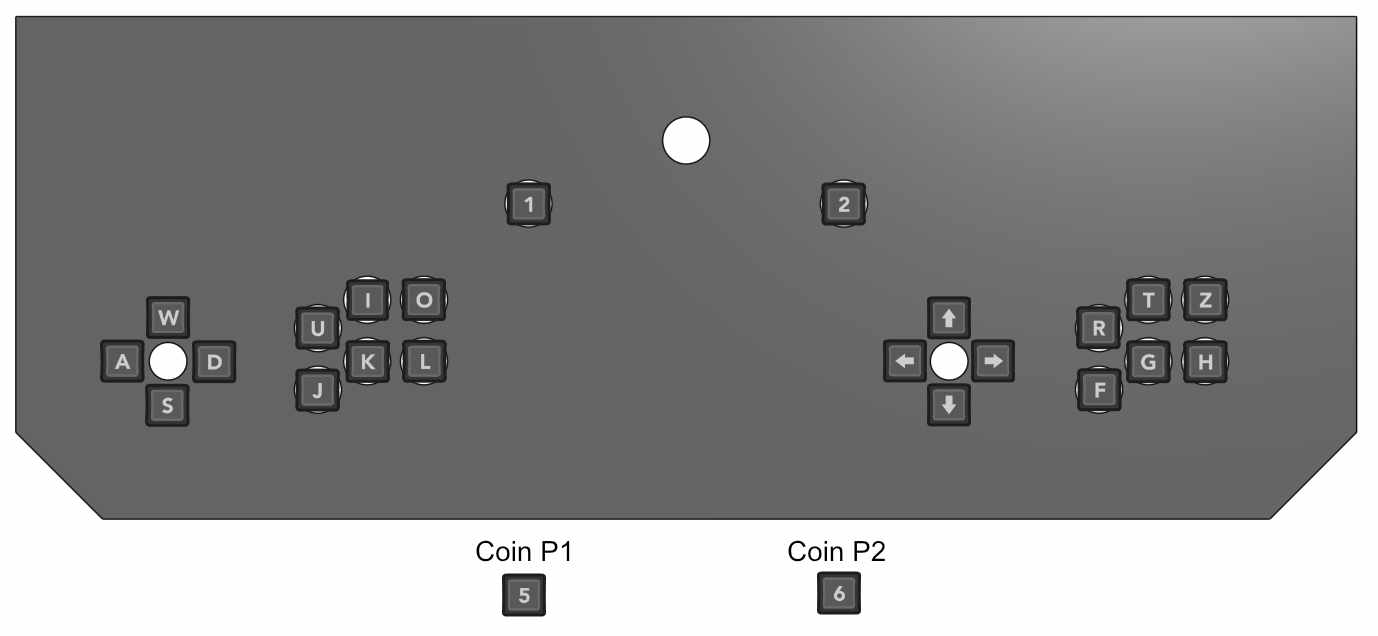
Input Mapping: The DMI-CADE uses a keyboard encoder to register inputs. Each button or joystick press is equivalent to pressing a button on the keyboard. For your game to be playable on the system, it should use these button mappings:
(Written form here)Click To Expand
-
Menu Navigation: If your game has a menu (e.g. for game mode selection or pausing) keep in mind that it must be controllable with the available Inputs i.e. with keyboard inputs.
-
Mouse Cursor: Since the DMI-CADE does not use mouse inputs but is build on Ubuntu, in the current system version a pointer will be visible if your application does not hide it. It is recommended that your game hides the mouse cursor.
Your application must run in fullscreen mode when started.
The DMI-CADE can quickly launch and close many different games. We expect the interaction time to be within the timeframe of a break, i.e. 10-30min. The user should not be required to adjust settings before playing.
If you have an option menu we would request you not to expose any graphics options to the player.
We would advise you to use fixed values for volume and button mappings.
We recommend presenting options that effect the gameplay (e.g. difficulty, input layouts or the like), when navigating to the gameplay rather than in a separate options menu.
Your game must be exported as a 64-bit executable program file for Linux (e.g. My_Game.x86_64).
You can setup the directories yourself or download the Game Template and edit it.
The name of the root folder is used internally as an ID to handle your application. Rename the folder (game-template) to your apps title preferably in kebab-case (dash-case).
E.g.: my-awesome-game
The folder contains at least three entries:
📂 my-awesome-game
 ┣ 📂 PreviewMedia
 ┣ 📜 config.json
 ┣ 🎮 My_Game.x86_64
 ┗ ...
PreviewMedia: Contains all the preview elements.config.json: Specifies how the system interacts with your application.My_Game.x86_64: The file required to run your app.
If your application needs additional files and/or directories to run (e.g. other files generated when exporting like .pck or the unity player) also drop them in here, next to your executable.
The config.json file contains information on how your app is handled. Adjust the contents accordingly:
{
    "type": "unity",
    "exe": "My_Game.x86_64"
    "buttonColors": {
        "P1A": "FF0", "P1B": "90F", "P1D": "0F0", "P1Start": true,
        "P2A": "FF0", "P2B": "90F", "P2D": "0F0"
    }
}type: The type of application. Available options:unity,godot,executable. If your game uses an engine or the like that is not listed, useexecutable.exe: The file name of the executable. This must be exact name of the file inside the root folder that runs the app.buttonColors: An object defining which buttons light up while the game is running. Use the button color config to display to the player which buttons do something in your game. When left out, the default colors are used (all white). Keep in mind that the colors will probably be off a bit when used as RGB LED values, some in person adjustment might be necessary. The following keys are available:
Hex values:ALL,P1A,P1B,P1C,P1D,P1E,P1F,P2A,P2B,P2C,P2D,P2E,P2F
Boolean values:P1Start,P2Start,P1Coin,P2Coin- Hex values are represented as strings with 3 or 6 characters representing a hex color code (e.g.
"2FA"will expand to"22FFAA"). - Boolean values represent the on and off state of the button LED. All boolean values are set to false/turned off by default.
P1A-P1FandP2A-P2Fset the color of the individual player buttons.- The
ALLkeyword sets the color for all player buttons as a base, any further color data overwrites the base color.
(I.e. if{"ALL": "F00", "P2A": "00F"}is given, all buttons will light up red except the Player-2-A-Button which will light up blue.) When any color data is specified every non specified button is turned off, only useALLwhen all buttons are required to play the game. P1StartandP2Startrepresent the start button LEDs.P1CoinandP2Coinrepresent the coin button LEDs at the base of the machine.
- Hex values are represented as strings with 3 or 6 characters representing a hex color code (e.g.
The contents of the PreviewMedia folder determine how a game is previewed in the UI. It must at least contain the preview_config.json file and a logo image. Additionally we recommend that you add a visual preview i.e. videos and/or images and short information about the game. From our experience a gameplay video is the best and quickest way to communicate to the user what your game is about.
All preview files go directly into this folder. What each image/video is used for will be configured in the preview_config.json file.
Use jpg or png as image formats, other formats need testing.
The preview images are displayed in a small section of the info panel as a slide show. They will get auto fitted into the preview space on a black background. Use images of ingame screenshots or artwork to preview your game.
The logo is an important part of the preview. It is used as a selection element and functions as a visual queue to find a game quickly in the catalog. The logo should be readable on a dark background. We encourage you to use transparency around the image so the user can get a glimpse of what is next in the selection. (Export as .png with alpha channel enabled.) Aim for a resolution around 1080p. The logo image will scale to the largest possible size fitting in the center of the 20:9 logo area.

As a simple logo idea: Write the name of your game in a font that is already used in your game and combine it with an image of a core asset, e.g. the player character. A quick image search for "arcade game logos" will give you more inspiration.
When creating a preview video (e.g. recording gameplay) keep in mind that the video will be displayed in a rather small window. Don't worry too much about high resolution. Try to keep the file size reasonable, 30 seconds of gameplay should suffice in most cases. Preview videos play without sound.
Note that videos can only be displayed when exported as .webm using the VP8 compression format with Vorbis audio compression (even though the audio is muted when previewed in the UI). You can find a short guide on how to convert a video file to this format here.
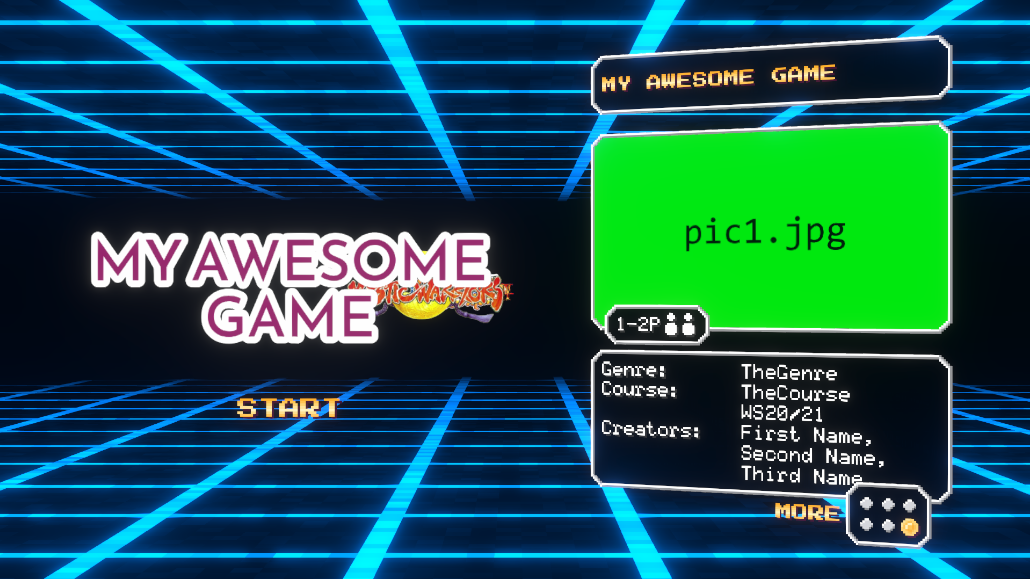
The preview_config.json file configures how your preview is displayed in the UI.
{
    "displayName": "The Apps Name",
    "gameFormats": ["1p", "coop"],

    "logo": "logo.png",

    "images": ["pic1.png", "pic2.jpg", "pic3.png"],
    "videos": ["trailer.webm"],

    "info1": ["Genre", "TheGenre"],
    "info2": ["Course", "TheCourse WS20/21"],
    "info3": ["Creators", "First Name, Second Name, Third Name"],
    "info4": ["", ""],

    "moreInfoText": "In this game you engage in an artificial conflict, defined by rules, that results in a quantifiable outcome.\n\nWe created it under these circumstances. This is how we came up with the idea.\n\nThis is more other cool information."
}displayName: The display name of the game.gameFormats: The play modes your game supports.
Available options:vs: Players can play against each other,1p: A player can play alone,coop: Players can cooperate with each other.logo: The exact file name of the logo image.images: The exact file names of all preview images present. Try to use.pngor.jpgformats. The images get displayed in the preview window as a dia show after any configured video(s) played.videos: The exact file names of all preview videos present in your preview folder. Note the requirements for preview videos.info1-info4(optional but recommended): String pairs containing short information about the game, displayed below the image/video preview. The first string of each pair is displayed on the left, as a descriptor. The second string is the information itself displayed next to it on the right.
The descriptor is shortened to 10 characters. (I.e.MylongdescriptorbecomesMylongdesc:,CreatorsbecomesCreators:)
The actual information (i.e. the second strings) combined have 96 characters in total, but they break lines automatically. There are 6 lines available, each 16 characters long. So try to keep the information short.
We recommend using these fields to give information that is interesting to the players. Let them know from which context (e.g. course, lecture or game jam) the game comes. Give yourself credit as creators/developers by displaying your names or nicknames. Let them know in which semester the game was released/created.
If you only need 2 or 3 info fields, leave the rest out or empty.moreInfoText(optional): More info text displayed in the additional info panel. Put more information, background, instructions and credits here. Use\nfor line breaks. The 'more info panel' has 960 characters available with 20 lines, 48 characters per line and auto line break.
The preview config found in the template would look like this: (Preview circles through preview media: video>pic1>pic2>video>...)
Now that you configured your game for the DMI-CADE, if you haven't already, get in touch with us on the DMI-CADE Discord Server (Linked on the FSR Medien Website) to submit your build. We're looking forward to host your game!