Token Based XSLT Generator and Editor
XSLT style sheets allow you to customize or ‘Transform’ the display of data to your exact specification. However, for those unfamiliar with XSL (eXtensible Stylesheet Language) syntax, creating XSL transformation style sheets can be very difficult.
The Form and List Token Based XSLT Generator/Editor allows you to create complex XSLT scripts with very little XSL knowledge, simply by selecting fields/columns from a drop down list. Each content column or context [Token] you select is inserted into an HTML template. You can also select options to enabling Sorting, Paging, Detail View and Searching functionality.
After you set a few options and complete the layout of your HTML template, you create an XSL script by clicking the Generate from HTML Template button. The XSLT generated by Form and List is immediately displayed. You may modify the generated XSLT, allowing for further customization. Or if you prefer HTML, return to the HTML template, make modifications to the HTML code, then click the Generate… button again to re-generate your XSLT! Once you save your generated XSLT, you may reuse it in other Form and List instances, too.
The Form and List Token Based XSLT Generator and Editor is a great tool for building powerful XSLT solutions, and to learn more about XSL syntax and functionality.

XSLT using Self Made or Generated Stylesheets
If you already have an XSL file you would like to use with Form and List, select Upload New File (Figure 7-1) to upload an XSL style sheet file from your PC to the website.
Choose the appropriate folder where you wish to store XSL files. Select a folder where you have write permissions. XslStyleSheets/ may be available on your website.
You may select an XSL file previously saved or uploaded to your site. If you have just begun working with XSL, no style sheets will be found, and the File Name field will be empty.
If you are new to Form and List, the following process assumes that you have first created the Form and List instance described in Chapter 3, Quick Start, and you have added a few records as described in Chapter 3. Before following these steps, first navigate to the Form and List instance created in Chapter 3.
If you have already created your own Form and List instance, the screens you see in this chapter will vary depending on the columns defined in your Form and List instance.
Click Generate New to create a new XSL transformation style sheet using the Token Based XSLT Generator and Editor. (Figure 7-2)
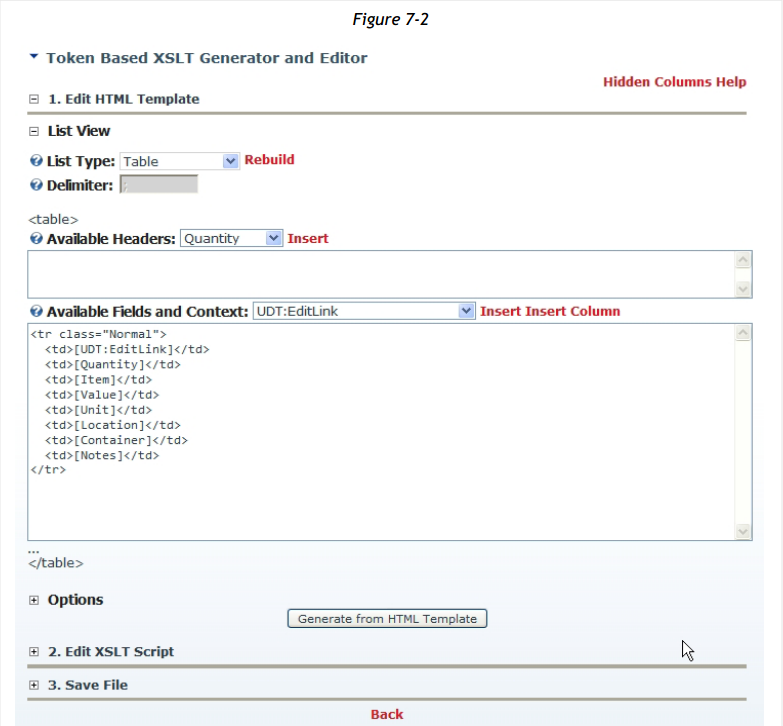
Based on the columns defined in the Form and List column definition list, XSLT Generator will display a default layout for your data. Depending on your current Form and List instance, the Available Fields and Context will vary. If you created the Chapter 3 Form and List example instance, the above columns would be displayed.
Each time you Generate New using the Token Based XSLT Generator/Editor, a simple table layout will first display in the HTML template window. You can manually change this HTML to your specification, or use List Type to change the basic template layout.
List Type
To change the basic layout of the HTML template, choose one of several HTML elements. To see how it works, select various List Types from the dropdown list, and watch the basic layout of the HTML template change with each selection.
Delimiter
Choose a delimiter to insert between columns. A delimiter can be one or more characters, or even a tag, for example,
to place a break between columns.
Available Headers
Choose columns as headers from the dropdown list that includes all Form and List columns. If ‘Add Sorting Support to the Style Sheet’ is enabled, Header columns also allow for a user click to alter the list order (ascending or descending) based on a column.
Available Fields and Context
All available Form and List columns (including hidden/system columns) are listed in this dropdown list. Select a column, or other special Context content, to insert the [Token] in the current cursor position in the HTML text box.
Please Note
All code in the HTML template must be HTML in well-formed XML format, otherwise the Generator will fail to make an XSLT. At the very least, well-formed XML means that you must be sure that all open tags are closed (<p> … </p>), and use <br /> instead of <br>.
Options

Figure 7-3 lists several built-in options that are available to enhance your XSL template.
Please note that these options also increase the complexity of your XSLT style sheets. If you are new to XSL and using the Generator to create style sheets for learning, you might choose to leave all Options disabled. This will simplify the XSL created by the Generator.
Add Sorting Support to the Style Sheet: If you have set Sort Column and Sort Direction in your Form and List instance, this option will use those settings to sort data.
Add Paging Support to the Style Sheet: This option provides 100% XSLT paging control. This is not the same pager control used by the Default Grid Display.
Add Search Box to the Style Sheet: This option adds a case-sensitive Search Box that allows the user to search any columns marked as ‘Searchable’ in the column definition list. This setting is marked (Obsolete) to indicate that an improved caseinsensitive search can be enabled in XSL Mode using a brief online tutorial that shows you how to customize your XSL for search case insensitivity:
http://www.formandlist.com/Documentation/CustomSearchwithRecordFilter.aspx
Add Detail View: This option will add a magnifier to the side of each record, allowing the user to click the magnifier for more details about a record.

Creating an XSLT script from an HTML template is quick and easy. Just click Generate from HTML Template (Figure 7-4) to make your XSLT style sheet (Figure 7-5).

The HTML template is instantly transformed into an XSL script. The field/column and context [Tokens] are replaced by their XSL equivalents, normally xsl:value-of commands. If, however, you have placed a token inside a HTML attribute, it will be handled as an Attribute Value Template {token}.
Enter a File Name for your style sheet, then click Save File and Return. You do not need to add the file extension; the .XSL extension will be added for you automatically.
To return to this XSLT style sheet, click Edit located to the left of Generate New from the Manage Form and List screen.
You may also return directly to the XSLT Generator/Editor by using the Form and List action menu option, Edit Current XSL Script (Figure 7-6):

Not only can you return to edit the generated XSL script, but you can also return to the HTML template! You may edit the HTML template and regenerate a fresh XSLT to include changes you have made to the HTML template and associated options.
Form and List maintains the memory representation of its data inside a dataset. The dataset contains 3 tables named Data, Fields and Context. This dataset gets converted as XML and is given to the XSL transformation for access to data and context.
| Table | Content |
|---|---|
| Data | Form and List Table (including the hidden columns) |
| Fields | Field definitions and their settings |
| Context | (see Context Data table below) |
The Context Data Table provides additional information for creating better style sheets:
| Columns | Comments |
|---|---|
| ModuleId, TabId, PortalId | Ids to identify the current module |
| UserName, BestUserName | BestUserName is usually the display name of the current user. If the user is deleted it defaults to UserName. |
| Homepath, ApplicationPath | Path to the portal root and path of the application <img src="[Homepath]/img/myimage.gif"
|
| UserRoles | Roles are concatenated and surrounded by | . Example: |role1|role2|role3| You can test whether a user is in a certain role using: <xsl:if test="contains(/udt:Context/udt:UserRoles,'|role1|'"> |
| IsAdministratorRole | “True” if user is in the AdminstratorRole |
| CurrentCulture, LocalizedDate, Now, LocalizedSearchString | Useful for Localization |
| Parameter | No longer used; see ‘Parameter Support’ below |
| NowInTicks, TicksPerDay | XSL has no date functions, but every date column has also its value in ticks inside a hidden column. You can use this to compare date times or to calculate time spans. <xsl:value-of select="(d_UDT_Ticks -NowInTicks) /TicksPerDay"/> (Pseudo Code!!) |
Parameter Support
The new XSLT Generator engine integrates the ModuleID as part of the parameter name. Each querystring or form parameter should start with udt_{moduleId}_param.
We recommend adding this definition to the top of every XSL script:
<!--
This prefix is used to generate module specific query strings
Each querystring or form value that starts with udt_{ModuleId}_param
will be added as parameter starting with param
-->
<xsl:variable name="prefix_param">udt_<xsl:value-of select="//udt:Context/udt:ModuleId" />_param</xsl:variable>
If you wish to ‘pass-back’ the query string or form value, use this ‘how to’ example:
<!-- query string -->
<a href="?&{$prefix_param}_demo1={$paramvalue}" >...</a>
<!-- form based -->
<input type="text" name="{$prefix_param}_demo2" /> All query string / form parameters that start with the correct string are returned to the XSL script as XSLT parameters:
<xsl:param name="param_demo1" />
<xsl:param name="param_demo2" />