An Website which helps you to get all your importants links to your projects,social media handles etc at one place so that you can avoid the hustle of gathering all those importants links at the time of their need and from here you can directly share them to different websites too.
- Features
- Tech Used
- Requirements
- Getting Started
- 1. Get Started to start contributing
- 2. Star and Fork this Repository
- 3. Clone the Repository
- 4. Download Xampp Server, Composer
- 5. Add PHP to your System Envrionment Path Variables
- 6. Open the Project
- 7. Create New Branch
- 8. Commit and Push
- 9. Update Local Repository
- 10. Configure a Remote for the Fork
- 11. Sync the Fork
- 12. Create Pull Request
- Connect with us
- User can login.
- User can add a profile picture or choose a avatar.
- User can seperate their links in sections.
- User can save links of github,linkin,behance etc seperately.
- User can edit profile.
- User can share his profile.
- PHP 7 and Above.
- Laravel 7.3
GitHub repository URLs will reference both the username associated with the owner of the repository, as well as the repository name. For example, DSC-JSS-NOIDA is the owner of this repository, so the GitHub URL for this project is:
https://github.com/DSC-JSS-NOIDA/DSCFOLIOS
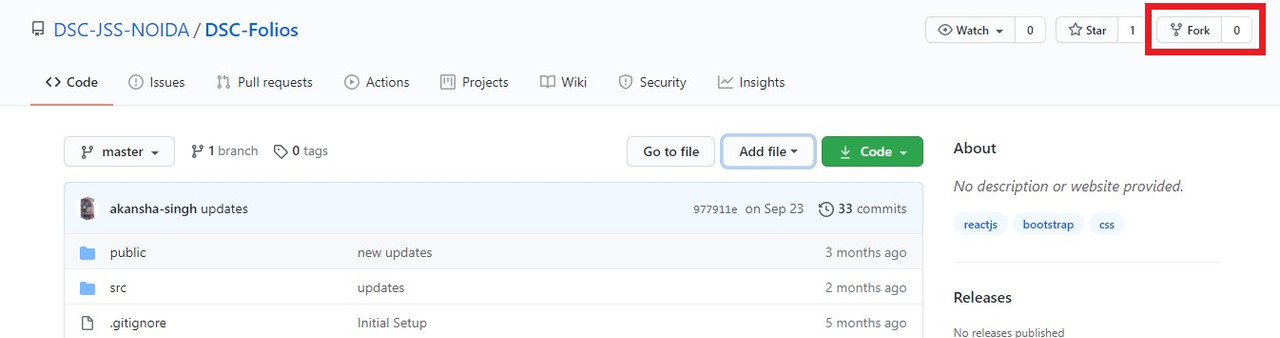
When you’re on the main page for the repository, you’ll see a button to "Star" and “Fork” the repository on your upper right-hand side of the page, underneath your user icon.
To make your own local copy of the repository you would like to contribute to, let’s first open up a terminal window.
This URL will be similar to the URL above, except now it will end with .git. In the example above, the URL will look like this:
https://github.com/your-username/DSCFOLIOS.git
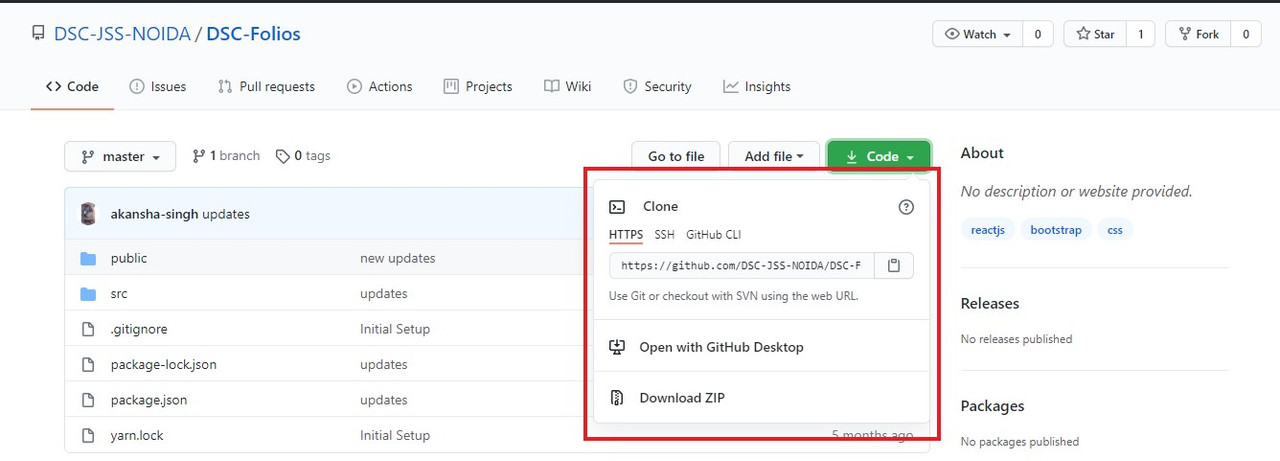
You can alternatively copy the URL by using the green “Clone or download” button from your repository page that you just forked from the original repository page. Once you click the button, you’ll be able to copy the URL by clicking the binder button next to the URL:
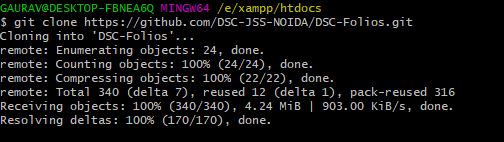
Once we have the URL, we’re ready to clone the repository. To do this, we’ll combine the git clone command with the repository URL from the command line in a terminal window:
git clone https://github.com/your-username/DSCFOLIOS.git
Link to Developers page: https://www.apachefriends.org/download.html
Composer: https://getcomposer.org/download/
Go to Xampp installed directory and navigate to php folder, copy this path and paste it in environment variables PATH.

Note: You must have Nodejs installed
Switch to the repo folder
cd DSCFOLIOS
Compile the Front-End
npm install
npm run dev
Install all the dependencies using composer
composer install
Copy the example env file and make the required configuration changes in the .env file
cp .env.example .env
Generate a new application key
php artisan key:generate
Generate a new JWT authentication secret key
php artisan jwt:secret
Run the database migrations (Set the database connection in .env before migrating)
php artisan migrate
Start the local development server
php artisan serve
You can now access the server at http://127.0.0.1:8000

Once the project is opened create a new branch and checkout in it where you can make the changes in the code.
git branch new-branch
git checkout new-branch
Click on Git symbol in the bottom-left corner in Visual Studio Code and create a new branch from there and checkout to it.

git add . or git add -A
git commit -m <Your-commit-message>

git push --set-upstream origin new-branch
While working on a project alongside other contributors, it is important for you to keep your local repository up-to-date with the project as you don’t want to make a pull request for code that will cause conflicts. To keep your local copy of the code base updated, you’ll need to sync changes.
You’ll have to specify a new remote upstream repository for us to sync with the fork. This will be the original repository that you forked from. you’ll have to do this with the git remote add command.
git remote add upstream https://github.com/DSC-JSS-NOIDA/DSC-FOLIOS
In this example, // upstream // is the shortname we have supplied for the remote repository since in terms of Git, “upstream” refers to the repository that you cloned from. If you want to add a remote pointer to the repository of a collaborator, you may want to provide that collaborator’s username or a shortened nickname for the shortname.
Once you have configured a remote that references the upstream and original repository on GitHub, you are ready to sync your fork of the repository to keep it up-to-date.
To sync your fork, from the directory of your local repository in a terminal window, you’ll have to use the // git fetch // command to fetch the branches along with their respective commits from the upstream repository. Since you used the shortname “upstream” to refer to the upstream repository, you’ll have to pass that to the command:
git fetch upstream
git checkout master
Now merge any changes that were made in the original repository’s master branch, that you will access through your local upstream/master branch, with your local master branch:
git merge upstream/master
Now navigate to your forked repository, and press the “New pull request” button on your left-hand side of the page.


Need help? Feel free to contact us @ dscjssnoida@gmail.com
