Join us for a 90-minute tutorial on how to build an end-to-end open-source modern data platform for biomedical data using Python-based tools. In this tutorial, we will explore the technologies related to data warehousing, data integration, data transformation, data orchestration, and data visualization. We will use open-source tools such as DBT, Apache Airflow, Openmetadata, and Querybook to build the platform. All materials will be available on GitHub for attendees to access.
Data engineering has experienced enormous growth in recent years, allowing for rapid progress and innovation as more people than ever are thinking about data resources and how to better leverage them. In this tutorial, we will build an end-to-end modern data platform for the analysis of medical data using open-source tools and libraries.
We will start with an overview of the platform components, including data warehousing, data integration, data transformation, data orchestration, and data visualization. We will then dive into each component, exploring the technologies and tools that make up the platform.
We will use Python-based tools such as DBT, Apache Airflow, Openmetadata, and Querybook to build the platform. We will walk through the process step-by-step, from creating a data warehouse to integrating data from multiple sources, transforming the data, orchestrating data workflows, and visualizing the data.
Attendees will benefit from this tutorial if they are interested in learning how to build an end-to-end modern data platform for biomedical data using Python-based tools. They will also benefit from learning about the open-source tools and libraries used in the tutorial, which they can then apply to their own data engineering projects.
No specific background knowledge is needed to attend this tutorial, although familiarity with Python and basic data engineering concepts will be helpful. All materials will be available on GitHub, and attendees will have the opportunity to follow along and build the platform themselves.
- Introduction and overview (10 minutes)
- Data warehousing (20 minutes)
- Data integration (20 minutes)
- Data transformation (20 minutes)
- Data orchestration (15 minutes)
- Data visualization (15 minutes)
- Q&A (10 minutes)
- Install Python
- Install Java
- Install docker
- in Linux edit your /etc/hosts and add
172.17.0.1 docker.host.internal
- in Linux edit your /etc/hosts and add
- Download synthea patient data generator: synthea-with-dependencies.jar or download provided data.zip
- Download OMOP vocabularies
- Install PostgreSQL:
docker pull postgres- Install psql
- Install a SQL client such as PgAdmin or DBeaver or VSCode SQL tools
- Install Querybook
git clone https://github.com/pinterest/querybook.git
cd querybook
make
- Clone this repo
git clone https://github.com/bsc-health-data/pydatalondon23-modern-data-stack.git
- Generate or download synthetic data
- Install Meltano:
When it comes to installing meltano, the guide in its website is pretty good, this is just a summary of it https://meltano.com/docs/installation.html#local-installation
The process is simple: create your venv, activate it and install meltano with pip (this is to be run from a pre-created folder where you want the project to live)
python3.9 -m venv .venv
source .venv/bin/activate
# to avoid any issues during the installation we will update pip
python -m pip install -U pip
python -m pip install meltano
Now, let's setup meltano. First, let's create out meltano project. We will call it demo
meltano init demo
Check Meltano getting started guide for a detailed explanation
cd demo
We are now going to need Extractors and Loaders to extract data from a source and to load it somewhere else. Once data is loaded, we could transform it with dbt. (ELT)
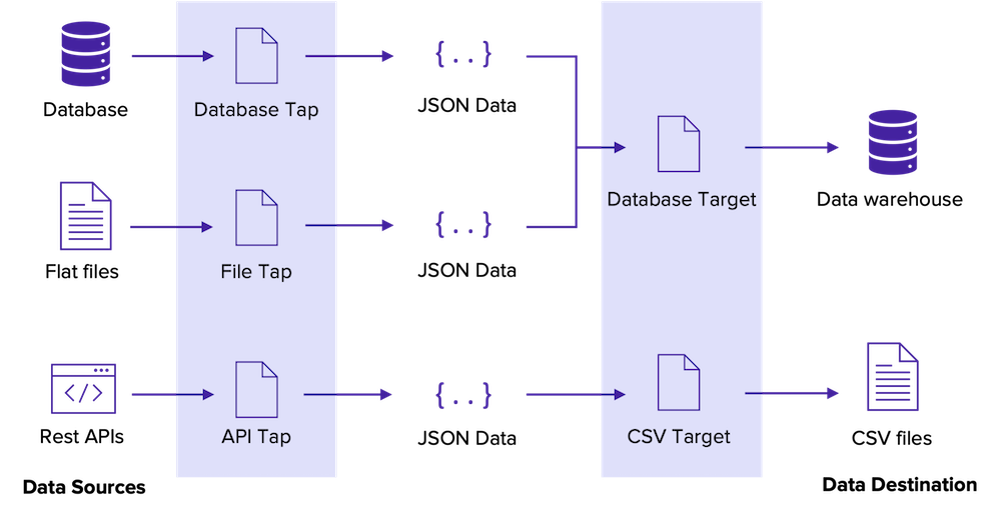
We will use a csv extractor and we will load it to an instance of PostgreSQL.
Setting up the extractor and the loader
Now that we have our db instance up and running, let's setup a csv extractor. To find the right extractor, we can explore them by doing:
meltano discover extractors
And then we can add it (and test it):
meltano add extractor tap-csv --variant=meltano
meltano invoke tap-csv --version
For more details see https://hub.meltano.com/extractors/csv
Similarly, we can add our loader which will be required for loading the data from the csv file to PostgreSQL.
meltano add loader target-postgres --variant meltanolabs
https://hub.meltano.com/loaders/target-postgres--meltanolabs/
Now, let's configure our plugins in the meltano.yml file that meltano created within the dags folder when we initialised it.
This file will have some configuration and we will add extra configuration for the extractor and the loader. Modify this file so it looks like this (your project_id will be different):
version: 1
send_anonymous_usage_stats: false
project_id: 59aca8ad-597d-47fc-a9f4-f1327774bd55
plugins:
  extractors:
  - name: tap-csv
    variant: meltano
    pip_url: git+https://gitlab.com/meltano/tap-csv.git
    config:
      files:
        - entity: patients
          file: ../synthea/patients.csv
          keys:
            - id
  loaders:
  - name: target-postgres
    variant: meltanolabs
    pip_url: https://github.com/MeltanoLabs/target-postgres.git
    config:
      host: localhost
      port: 5432
      user: postgres
      dbname: datadb
or download the provided meltano.yml
But then, we need a database to load our date. We will use docker to bring up a PostgreSQL instance
docker run --name demo_postgres -e POSTGRES_PASSWORD=londonpie -e POSTGRES_USER=postgres -p 5433:5432 -v ${PWD}/postgres:/var/lib/postgresql/data -v ${PWD}/backup:/backup -d postgres
We can check the configuration needed
> meltano config target-postgres list

> meltano config target-postgres set default_target_schema raw

> meltano config target-postgres
For PostgreSQL password, we use the .env file (remember to use the same password as the one you used when running the docker container)
echo 'export TARGET_POSTGRES_PASSWORD=password' > .env
Now we can run our extraction-load task:
meltano run tap-csv target-postgres
or
meltano elt tap-csv target-postgres --transform=skip
- We can install DBT independently as a Python library:
pip install dbt-postgres
or as a Meltano utility
meltano add utility dbt-postgres
Configure:
meltano config dbt-postgres list
meltano config dbt-postgres set --interactive
or add env variables to .env
DBT_POSTGRES_HOST=localhost
DBT_POSTGRES_PORT=5433
DBT_POSTGRES_DATABASE=hospital_edge
DBT_POSTGRES_SCHEMA=cdm
DBT_POSTGRES_USER=postgres
DBT_POSTGRES_PASSWORD=password
DBT models
- sources.yml
version: 2

sources:
  - name: raw # tables copied from source DB
    database: hospital_edge
    schema: raw
    tables:
      - name: patients
- models/
-- stg_person

{{ config(
    materialized='table',
	enabled=true
)
}}

with patients as (

    select * from {{ source('raw', 'patients') }}

),
person as (

select
    {{ create_id_from_str("id::text")}} AS person_id,
    {{ gender_concept_id ("gender") }} AS gender_concept_id,
    date_part('year', birthdate::DATE)::INT AS year_of_birth,
    date_part('month', birthdate::DATE)::INT AS month_of_birth,
    date_part('day', birthdate::DATE)::INT AS day_of_birth,
    birthdate::TIMESTAMP AS birth_datetime,
    {{ race_concept_id("race") }}  AS race_concept_id,
    {{ ethnicity_concept_id("ethnicity") }} AS ethnicity_concept_id,
    NULL::INT AS location_id,
    NULL::INT AS provider_id,
    NULL::INT AS care_site_id,
    id::VARCHAR(50) AS person_source_value,
    gender::VARCHAR(50) AS gender_source_value,
    0 AS gender_source_concept_id,
    race::VARCHAR(50) AS race_source_value,
    0 AS race_source_concept_id,
    ethnicity::VARCHAR(50) AS ethnicity_source_value,
    0 AS ethnicity_source_concept_id
from patients
where birthdate is not null -- Don't load patients who do not have birthdate and sex (change variable names if necessary)
      and gender is not null

)

select * from person
Macros
-- OMOP TABLE: person
--- Macro to transform 'M' and 'F' sex values into their concept_id
{% macro gender_concept_id(sex) %}
(CASE WHEN {{ sex }} = 'M' THEN 8507::int -- Male
      WHEN {{ sex }} = 'F' THEN 8532::int -- Female
      WHEN {{ sex }} is null THEN 0::int -- No data
      ELSE 8551::int -- Unknown
      END)
{% endmacro %}
DBT tests
version: 2

models:
  - name: stg_person
    columns:
      - name: person_id
        tests:
          - unique
          - not_null
{% test not_null(model, column_name) %}
select *
from {{ model }}
where {{ column_name }} is null
{% endtest %}
**DBT artifacts**

Most dbt commands produce artifacts:

- manifest.json: produced by commands that read and understand your project
- run results.json: produced by commands that run, compile, or catalog nodes in your DAG
- catalog.json: produced by docs generate
- sources.json: produced by source freshness

### Data gobernance with OpenMetadata

- Install OpenMetadata
pip install openmetadata-ingestion[docker] metadata docker --start -db postgres
curl -SL https://github.com/open-metadata/OpenMetadata/releases/download/1.0.2-release/docker-compose-postgres.yml -o docker-compose-postgres.yml docker compose up -d
Then go to http://localhost:8585 (admin/admin). The insgetion service (Airflow) runs at http://localhost:8080

### Analyzing data with Superset and Querybook

- Install [Superset](https://github.com/apache/superset)
meltano add utility superset --variant apache
- name: superset variant: apache pip_url: apache-superset>=2.0.0 markupsafe==2.0.1 Werkzeug==2.0.3 WTForms==2.3.0 duckdb-engine==0.6.4 cryptography==3.4.7 config: ENABLE_PROXY_FIX: true
meltano config superset set SECRET_KEY $(openssl rand -base64 42) meltano invoke superset:create-admin meltano invoke superset:ui
You can also `meltano invoke superset:load-examples` load some example data to play with

The go to http://localhost:8088 and start analyzing your data

- Install [Querybook](https://github.com/pinterest/querybook)
git clone https://github.com/pinterest/querybook.git cd querybook make
or run it directly
cd querybook docker compose up
Then go to http://localhost:10001/
and configure the system.
- **Environment**: Environment ensures users on Querybook are only allowed to access to information/query they have permission to. All DataDocs, Query Engines are attached to some environments.
- **Metastore**: Metastore is used to collect schema/table information from the metastore. Different loaders are needed depending on the use case
- **Query Engine**: Query engine configures the endpoints that users can query. Each query engine needs to be attached to an environment for security measures. They can also attach a metastore to allow users to see table information while writing queries.
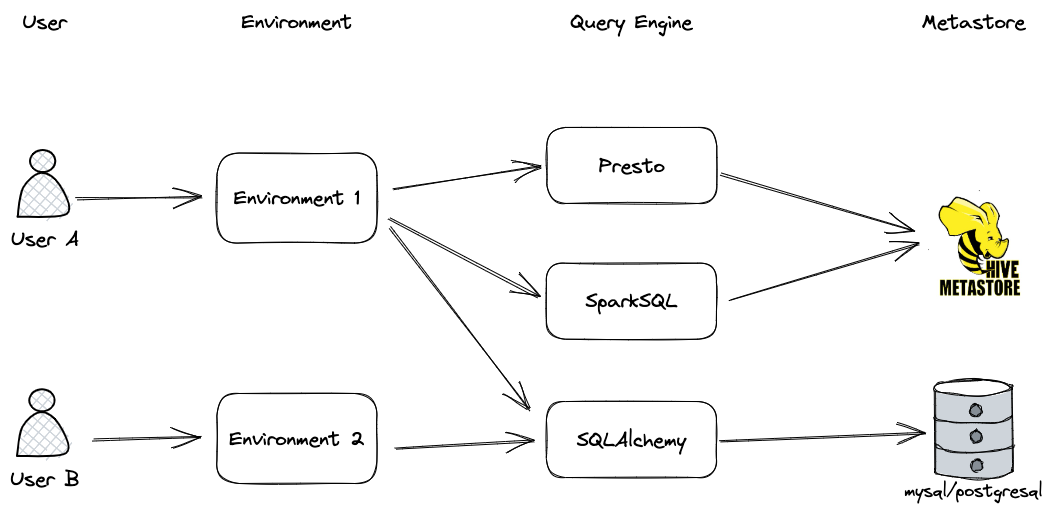
- A query engine can be associated with a metastore.
- An environment can contain multiple query engines.
- A user can be added to one or many environments, depending on the data source(s) they are granted access to and the environment(s) that have access.
- Metastore can be shared between environments since they are only referenced indirectly by query engines.
### Extras
- Install [Airflow](https://airflow.apache.org/docs/apache-airflow/stable/start.html)
- Install [Datahub](https://datahubproject.io/docs/quickstart/)
- Install [Lightdash](https://www.lightdash.com/)
### Have a drink, and relax ...

- https://www.youtube.com/watch?v=y3TxcejHw-4