
Use MOLGENIS/Armadillo to make data available for privacy protecting federated analysis using DataSHIELD protocol. Armadillo service provides the following features:
- manage data projects. Projects can either hold tabular data in the efficient 'parquet' format or any other file use DataSHIELD 'resources' framework.
- grant users access permission. We use a central OIDC service like KeyCloak or FusionAuth in combination with a trused identity provider like Life Sciences AAI to authenticate users.
- configure DataSHIELD analysis profiles. DataSHIELD analysis profiles are Docker images that contain a collection of multiple DataSHIELD analysis packages.
Armadillo requires Java to run, Docker to access the DataSHIELD profiles, and OIDC for authentication (not needed for local tests). Below instructions how to run Armadillo directly from Java, as a Docker container, as a service on Ubuntu or from source code. Note that for production you should add a https proxy for essential security. And you might need to enable 'Docker socket' on your docker service.
Software developers often run Armadillo as java jar file:
- Install Java and Docker (for the DataSHIELD profiles)
- Download Armadillo jar file from releases, for example: molgenis-armadillo-3.3.0.jar
- Run armadillo using
java -jar molgenis-armadillo-3.3.0.jar - Go to http://localhost:8080 to see your Armadillo running.
Default Armadillo will start with only 'basic-auth' and user 'admin' with password 'admin'. You can enable 'oidc' for connecting more users. You can change by providing and editing application.yaml file in your working directory and then run command above again.
For testing without having to installing Java you can run using docker:
- Install docker-compose
- Download this docker-compose.yml.
- Execute
docker-compose up - Once it says 'Started' go to http://localhost:8080 to see your Armadillo running.
The command must run in same directory as downloaded docker file. We made docker available via 'docker.sock' so we can start/stop DataSHIELD profiles. Alternatively you must include the datashield profiles into this docker-compose. You can override all application.yaml settings via environment variables (see commented code in docker-compose file).
We run Armadillo in production as a Linux service on Ubuntu, ensuring it gets restarted when the server is rebooted. You might be able to reproduce also on CentOS (using yum instead of apt).
apt update
apt install openjdk-19-jre-headless
apt install docker.io
Note: you might need 'sudo'
This step will install most recent release:
wget https://raw.githubusercontent.com/molgenis/molgenis-service-armadillo/master/scripts/install/armadillo-setup.sh
bash armadillo-setup.sh \
    --admin-user admin \
    --admin-password xxxxx
    --domain my.server.com \
    --oidc \
    --oidc_url https://lifecycle-auth.molgenis.org \
    --oidc_clientid clientid \
    --oidc_clientsecret secret \
    --cleanup
Note: adapt install command to suit your situation. Use --help to see the options. https://lifecycle-auth.molgenis.org is MOLGENIS provided OIDC service but you can also use your own, see FAQ below.
You can run from source code as follows:
- Install Java and Docker
- Checkout the source using
git clone https://github.com/molgenis/molgenis-service-armadillo.git - Optionally copy
application.template.ymltoapplication.ymlto change settings (will be .gitignored) - Compile and execute the code using
./gradlew run
Note: contact MOLGENIS team if you want to contribute and need a testing OIDC config that you can run against localhost.
Armadillo has three main screens to manage projects, user access and DataSHIELD profiles:
Data stewards can use the Armadillo web user interface or MolgenisArmadillo R client to create 'projects' and upload their data into those. Data tables need to be in parquet format that supports fast selections of the columns (variables) you need for analysis. Other files can be configured as 'resources'.
Data stewards can use the permission screen to give email adresses access to the data. Everybody signs in via single sign on using an OIDC central authentication server such as KeyCloack or Fusion auth that federates to authentication systems of connected institutions, ideally using a federated AAI such as LifeScience AAI.
To analyse data, users must choose a datashield profile. Armadillo owners can use the web user interface to configure new profiles. Assuming you installed docker you can also start/stop these images. Alternatively you can use docker-compose for that.
There are DataSHIELD packages for standard statistical analysis , exposome studies , survival studies , microbiome studies and analysis tools for studies that are using large genetic datasets . These packages can all be installed in the Armadillo suite.
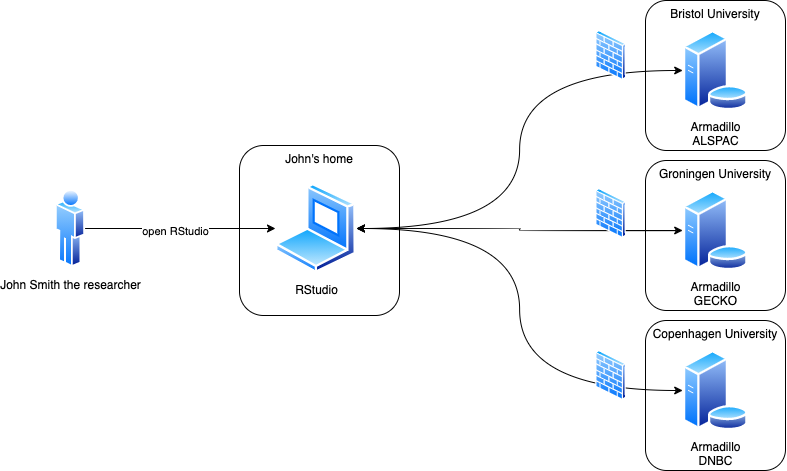
A researcher connects from an R client to one or multiple Armadillo servers. The data is loaded into an R session on the Armadillo server specifically created for the researcher. Analysis requests are sent to the R session on each Armadillo server. There the analysis is performed and aggregated results are sent back to the client.
We use gradle to build:
- run using
./gradlew run - run tests using
./gradlew test
We use intellij to develop
- To run or debug in intellij, right click on armadillo/src/main/java/org.molgenis.armdadillo/ArmadilloServiceAppliction and choose 'Run/Debug Armadillo...'
- To run using oidc, create a copy of application.yml in root of your project
We have a swagger-ui to quickly see and test available web services at http://localhost:8080/swagger-ui/
As package developer will want to push your new packages into a DataSHIELD profile
- You can start Armadillo with defaults as described above; then use admin/admin as authentication
- to see what profile are available and has been selected:
curl -u admin:admin http://localhost:8080/profiles
- to change selected profile 'my-profile':
curl -X POST http://localhost:8080/select-profile \
  -H 'Content-Type: application/json' \
  -d 'default'
- to install-packages in DataSHIELD current using admin user:
curl -u admin:admin -v \
-H 'Content-Type: multipart/form-data' \
-F "file=@dsBase_6.3.0.tar.gz" \
-X POST http://localhost:8080/install-package
- to update whitelist of your current profile:
curl -u admin:admin -X POST http://localhost:8080/whitelist/dsBase
- to get whitelist of current profile:
curl -u admin:admin http://localhost:8080/whitelist
You might need to enable Docker socket. On Docker desktop you can find that under 'settings' and 'advanced'.
Instead of making Armadillo start/stop DataSHIELD profiles you can also use docker compose. See commented section in docker-compose.yml file.
Yes, it is standard spring.
Yes, you can run in 'offline' profile
./gradlew run -Dspring.profiles.active=offline
To export data from and Armadillo 2 server take the following steps:
du -h
Compare to:
du -h /var/lib/minio
Available space should be at least twice the size of the MinIO folder.
mkdir armadillo2-backup
rsync -avr /usr/share/armadillo armadillo2-backup
cp /etc/armadillo/application.yml armadillo2-backup/application-armadillo2.yml
N.B.change /usr/share to path matching your local config.
Login to your server as root, using ssh.
apt update
apt install pip
pip install minio
pip install fusionauth-client
pip install simple_term_menu
If you get a purple message asking to update, accept and install everything. Restart of server is recommended after this.
N.B. Note that the commands in this manual are for Ubuntu, on other linux systems,
the apt command needs to be replaced with another one.
List all docker images
docker ps -a
Stop and remove all Armadillo 2 related images (except for MinIO), e.g.
docker rm armadillo_auth_1 armadillo_console_1 armadillo_rserver-default_1 armadillo_rserver-mediation_1 armadillo_rserver-exposome_1 armadillo_rserver-omics_1 armadillo_armadillo_1 -f
Check with docker ps -a if there are still containers running, if so remove these (except for the MinIO) in the same way as the others.
apt update
apt install openjdk-19-jre-headless
apt install docker.io
The docker.io step might fail because containerd already exists, if that's the case, remove containerd and try again:
apt remove containerd
apt install docker.io
Get armadillo:
wget https://raw.githubusercontent.com/molgenis/molgenis-service-armadillo/master/scripts/install/armadillo-setup.sh
bash armadillo-setup.sh \
    --admin-user admin \
    --admin-password xxxxx
    --domain my.server.com \
    --oidc \
    --oidc_url https://lifecycle-auth.molgenis.org \
    --oidc_clientid clientid \
    --oidc_clientsecret secret \
    --cleanup \
Don't forget to set a proper admin password (use a generator), domain, clientid and clientsecret. The client id and secret can be found on the lifecycle auth server in the configuration for your server. If you don't have permissions to receive this, you can ask the support team to get it for you.
Open armadillo in the browser and try to login using basicauth to check if the server is running properly. If it's not running at all, try:
systemctl start armadillo
Look up the user/password in the application.yml of the old armadillo. They're called MinIO access key and minio secret key.
cat /root/armadillo2-backup/application-armadillo2.yml
Do the following step in a separate screen. On ubuntu use:
screen
Navigate to the armadillo folder:
cd /usr/share/armadillo
This step will copy Armadillo 2 data from minio into the folder matching of an Armadillo 3 data folder:
mkdir data
wget https://raw.githubusercontent.com/molgenis/molgenis-service-armadillo/master/scripts/migrate-minio.py
python3 migrate-minio.py  --minio http://localhost:9000 --target /usr/share/armadillo/data
This might take a couple of minutes. You can detach the screen using ctrl+a followed by d and reattach it using
screen -r.
Make sure to move the exported data into the new 'data' folder. Optionally you might need to fix user permissions, e.g.:
chown armadillo:armadillo -R data
Check if armadillo is running by going to the URL of your server in the browser, login and navigate to the projects tab.
If you previously run central authorisation server with MOLGENIS team, they can provide you with procedure to load pre-existing permissions. They will use:
wget https://raw.githubusercontent.com/molgenis/molgenis-service-armadillo/master/scripts/migrate-auth.py
python3 migrate-auth.py  --fusion-auth https://lifecycle-auth.molgenis.org --armadillo https://thearmadillourl.net
Now check if all users and data are properly migrated.
Change /etc/ngninx/sites-available/armadillo.conf to:
server {
  listen 80;
  server_name urlofyourserver.org
  include /etc/nginx/global.d/*.conf;
  location / {
  proxy_pass http://localhost:8080;
  client_max_body_size 0;
  proxy_read_timeout 600s;
  proxy_redirect http://localhost:8080/ $scheme://$host/;
  proxy_set_header Host $host;
  proxy_http_version 1.1;
  }
}
Note that the https:// is missing in the server_name part.
Remove the console and storage file from: /etc/ngninx/sites-enabled/.
system restart ngninx
Make sure the following is added:
server:
forward-headers-strategy: framework
Add the following to the config of your server:
https://yourserver.com/login/oauth2/code/molgenis
Login to armadillo in the browser. Navigate to the "Profiles" tab. Add a new profile with the following properties:
Name: xenon
Image: datashield/armadillo-rserver_caravan-xenon:latest
Package whitelist: dsBase, resourcer, dsMediation, dsMTLBase, dsSurvival, dsExposome
Assign a random 9-number seed and create and start the container.
First remove the MinIO docker container. First check the name of the container using docker ps -a, then:
docker rm containername -f
After that remove the data:
rm -Rf /var/lib/minio/
For armadillo 2.x you can follow instructions at
- for testing we use docker compose at https://github.com/molgenis/molgenis-service-armadillo/tree/armadillo-service-2.2.3
- for production we are using Ansible at https://galaxy.ansible.com/molgenis/armadillo`
We develop Armadillo using IntelliJ.
To build run following command in the github root:
./gradlew build
To execute in 'dev' run following command in the github root:
./gradlew run
This repository uses pre-commit to manage commit hooks. An installation guide can be found
here. To install the hooks, run pre-commit install once in the root folder of this repository. Now
your code will be automatically formatted whenever you commit.
Data is automatically stored in the data folder in this repository. You can choose another location
in application.yml by changing the storage.root-dir
setting.
Note: When you run Armadillo locally for the first time, the
lifecycleproject has not been added to the system metadata yet. To add it automatically, see Application properties. Or you can add it manually:
- Go to the Swagger UI (
http://localhost:8080/swagger-ui/index.html)- Go to the
PUT /access/projectsendpoint- Add the project
lifecycleNow you're all set!
When developing locally, docker has trouble connecting to localhost. This problem becomes clear when working with
resources. Luckily there's a quick fix for the problem. Instead of defining a resource as for example
http://localhost:8080/storage/projects/omics/objects/test%2Fgse66351_1.rda, rewrite it to:
http://host.docker.internal:8080/storage/projects/omics/objects/test%2Fgse66351_1.rda. Here's some example R code
for uploading resources:
## Uploading resources
library(MolgenisArmadillo)
library(resourcer)

token <- armadillo.get_token("http://localhost:8080/")

resGSE1 <- resourcer::newResource(
  name = "GSE66351_1",
  secret = token,
  url = "http://host.docker.internal:8080/storage/projects/omics/objects/test%2Fgse66351_1.rda",
  format = "ExpressionSet"
)

armadillo.login("http://localhost:8080/")
armadillo.upload_resource(project="omics", folder="ewas", resource = resGSE1, name = "GSE66351_1")
And for using them:
library(DSMolgenisArmadillo)
library(dsBaseClient)

token <- armadillo.get_token("http://localhost:8080/")

builder <- DSI::newDSLoginBuilder()
builder$append(
  server = "local",
  url = "http://localhost:8080/",
  token = token,
  driver = "ArmadilloDriver",
  profile = "uniform",
  resource = "omics/ewas/GSE66351_1"
)

login_data <- builder$build()
conns <- DSI::datashield.login(logins = login_data, assign = TRUE)

datashield.resources(conns = conns)
datashield.assign.resource(conns, resource="omics/ewas/GSE66351_1", symbol="eSet_0y_EUR")
ds.class('eSet_0y_EUR', datasources = conns)
datashield.assign.expr(conns, symbol = "methy_0y_EUR",expr = quote(as.resource.object(eSet_0y_EUR)))