@RedBrumbler#6295 ‘s (or u/RedBrumbler) Guide to making custom sabers for the BeatOn Asset replacement mod
CoEdited by Yuuki#0802
At this point in time BeatOn is discontinued, only if you have beat saber version 1.3.0p2 or earlier will you be able to have mods!
DISCLAIMER: Making custom sabers / getting custom sabers to work may require you to reset your assets (thus making you sort your songs again) multiple times, so losing all your song data is not uncommon, I am not responsible for you needing to reset your assets so don't complain about it to me
With the new Beat Saber update some changes have to happen to mods to make them work again,. if you made any of them with my guide files you'll find the updated guide files in the repo where they have always been! I hope to see the mods be updated soon!
If you are at home within asset replacement, you'll be able to use this information to update your mods yourself:
Sabers - old will install, but can't uninstall -> need updated sharedassets file in json (12 -> 13)
Notes - old won't install as far as I can tell -> need updated sharedassets file in json (13 -> 14)
Platforms - no changes
Trails - old won't install as far as I can tell -> need updated sharedassets file in json (12 -> 13)
Hitsounds - no changes
Menusounds - no changes
Menumodels - no changes
Menutitles - no changes
Hook mods - no idea
Don't forget to change the gameversion in your beatonmod.json!
- Useful Links
- Required Programs/Files
- Get Your Saber Model
- Converting Your Objects to a Mod
- Add Your Sabers to the Repo
- Custom menu text (The neon sign that says 'beat saber' by default in the main menu)
- Custom platforms (The thing you are standing on, not the entire stage)
- Adding your mods to Sidequest
- BeatOn by Emulamer
- Sidequest Discord
- Beat Saber Modding Group Discord (BSMG)
- Fusion360
- Blender
- Custom Sabers
- Custom Blocks/Notes
- Other Asset Mods
- Unity version 2018.3.10f1(any lower or higher and BeatSaber will crash)
- This unity project. Source: here
- Model program of your choice (I prefer fusion360)
- UnityAssetBundleExtractor (UABE) NOT my program, be careful when downloading programs from the internet! Source: here
- The Guide Files.zip Contains an .stl SaberTemplate, .obj SaberTemplate and a configured beatonmod.json
You can also make your own models!
I will not make this guide on how to use model software to do so, just how to export the files from your model program to something usable for making the sabers, make sure to have the different parts split up to make sure you can give them the different textures/shaders.
For example, this sword I made is split into different parts:

The blade and shiny accents. Saved this part as Blade.obj

The slightly colored white bits. Saved this part as GlowingEdges.obj

And the handle. Saved this part as Handle.obj
Together these make the sword possible:

Meshes don’t have to be connected to function as one mesh! So, whatever you do, if you have multiple meshes that need to be one, export them as one file, otherwise you won’t be able to get them into the mod correctly.
Please keep in mind that before you export, you should resize and orient the saber to the provided SaberTemplate. Move YOUR saber, not the template! This makes sure that we get the sword in the right position. Make sure that the “top” (non-cutting side) of your sword is aligned with the arrow on the template (from the Guide Files.zip), and that the sword is aligned with the template along it's length
I have created a new Model Template, it's way clearer to use and will let you orient the sword correctly no doubt! It also contains some tips on where to put different parts when you are modeling your own sabers (like thickness, where to start the blade, and where to place the hilt and pommel)

export the 3 files separately, preferably as a .obj file, but if you’re like me and use fusion360 or other program that can’t export as .obj, you’ll have to convert the mesh format to .obj using http://www.meshconvert.com/
Note: In order to use your Saber on BeatOn, you MUST have three separate pieces. Each piece represents a different material used in game (like so):


It is also possible for you to have dummy pieces instead of having three separate objects. For example, you can have just a blade and handle and for the glowing edges, you can add an extra mesh hidden inside your model.

After getting your .obj files, you’ll be able to make them into a mod compatible with Beat Saber for Quest
You’ll start by installing unity version 2018.3.10f1 and opening the unity project that you have downloaded (see required files). It might say you opened it with the wrong unity version but that is okay since it should port over fine since we’re only using the project for reference and to make sure that the sabers are the correct size.
Open the unity project by double clicking on sabers.unity

Move in the separate .obj files

To check if they are oriented correctly, move them into the left field

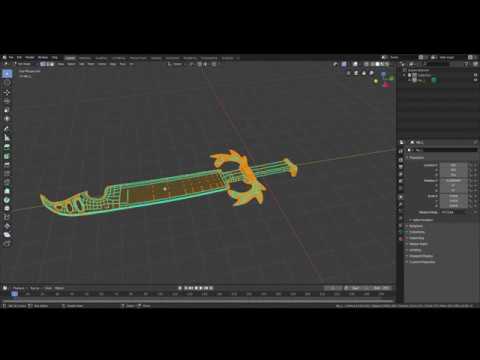
If you look at the sword, it should be facing down, and what you want to be the upside to be in Beat Saber should be pointing in the direction of the sabers which are there, and the handle should be sticking up somewhat on top of them (just like in the image)
If the orientation is not correct you need to go back to your model software and change the placement and orientation of your models in there, and then save them and get them in unity again. DELETE THE OLD MODELS FROM UNITY, THEY’LL ONLY MAKE THE NEXT STEP HARDER (if orientation is correct, of course, don't delete the models)
Now that your orientation is right it’s time to convert them into raw unity mesh files. To start off with that, you’ll need to build the scene, press Ctrl + shift + b to open build settings, and build the scene for windows, mac and linux

Let it build in a folder of your choice (I would create a new folder called "Build") and open UABE

Once in UABE, go to file -> open and navigate to the folder you built the scene in.
Inside the build folder should be a folder called customSabers_data, go into that folder and open sharedassets0.assets with UABE

You’ll get this screen, and your models will have a name, to know which is which you can look at the sizes, for example the size of the handle was the largest, so we know that the largest file here is the handle mesh. Looking at the sizes before you make the raw files and after can help you identify them. To get the raw unity mesh data you click on export Raw.
Remember earlier: we named each object based on the material we wanted them to have. This is important now as well:
Blade.obj should become SaberBlade.dat.
Handle.obj should become SaberHandle.dat.
GlowingEdges.obj should become SaberGlowingEdges.dat

Put these files in a new folder that is the name of your saber (we will be converting this folder to .zip for easy uploading later)

Now to make the actual mod, if you haven’t already download the Guide Files.zip and open the beatonmod.json in a text editor (would not recommend regular notepad, something like notepad++ works way better)
A new update to Beaton (0.9.8) Brought us the possibility of adding cover images to our mods, it doesn't matter too much what the image is (make it recognizable! for sabers I recommend using a picture of the saber, look at my saber pictures/mod Cover images for a way to do this!) just make sure the image is 150 (w) x 200 (h) and is named "Cover.png" that way it will show up in BeatOn
Before starting, you will need to zip your saber up and drag it onto BeatOn's Upload screen. Make sure your saber is installed.
- Start Beat Saber (not through BeatOn as this will cause the Quest's screencapture capabilities to not work)
- Head to the tutorial
- Go back to the Quest home screen and click "Sharing" at the bottom
- Click record or capture image
- If you want to capture image: Hold your left saber diagonally across your left eye (close your right eye if necessary)
- If you want to record: Hold your saber diagonally and stop the recording.
- Plug your Quest up to your PC
- Open SideQuest
- Go to the "Files" tab
- Head to the Oculus -> Screenshots folder
- Export to your saber's folder
- If you recorded a video, export the video to a location on your pc, open the video and find a good spot to take a screen shot. Save the screenshot in your saber's folder
At the top of the json you’ll see this info, now all you have to do is input your own info in there and name things correctly. I recommend to only change the id, name, author, description and version numbers
"id": "ModID",
  "name": "Mod name",
  "author": "YourName",
  "description": ["Mod Description"],
  "gameVersion": "1.1.0",
  "version": "1.0.0.0",
  "platform": "Quest",
  "category": "Saber",
  "coverImageFilename": "Cover.png",
  "components":
for my sword I changed it to this:
"id": "ConnieSwordV1", --Unique mod ID, this makes sure that when you release an update it won't install the mod again, but overwrite the old one
  "name": "Connie's Sword V1", --The name displayed within BeatOn
  "author": "RedBrumbler", --Your name here, so people know who made that saber
  "description": ["Connie's sword Bismuth made for her from the Cartoon Network Show 'Steven Universe'"], --description, can be used to credit others whose work you worked off of, or a great place to make meta jokes
  "gameVersion": "1.1.0",
  "version": "1.0.1.0", --Version of the mod, I reccommend to bump the last number up for small changes, but for larger redesigns use the second number
  "platform": "Quest",
  "category": "Saber",
  "coverImageFilename": "Cover.png", --it's easier to just name the cover image to Cover.png than to keep editing this one IMO -Redbrumbler
  "components":
Now that you have all your files ready you can bundle them into a zip file (winrar or 7zip work fine for this) make sure your zip file contains:
- beatonmod.json
- SaberBlade.dat
- SaberHandle.dat
- SaberGlowingEdges.dat
- Cover.png
Now you should be ready to upload to BeatOn!

If you get "invalid mod", you likely are missing an argument in the info part I just listed, make sure all of it is there!
If it doesn’t work you might have to reset your assets (will lose all loaded songs, be careful!) but pressing reload songs will load back most of them, if it says invalid mod file you might miss some files or made an incomplete json
If sabers (even confirmed working ones) don't show up at all then you might even need to completely reinstall beat saber
I also support adding your sabers to the repository here! (explanation adapted from @Yuuki#0802 from BSMG, and by that I mean mostly blatantly copied)
- Make a Github account if you haven't already
- Click the "fork" button in the top right of this repository
- Download github desktop
- Go to your forked repo (so, yourname/BeatOnCustomSabers) and click "Clone or Download", Copy that link
- Go to Github Desktop: File -> Clone repository -> URL and paste the link, then click clone (keep note of the local path you put the repo in)
- Head to where you saved the repo in your file explorer (C:\User\GitHub\BeatOnCustomSabers)
- Go to the "Sabers" folder.
- Create a new folder for your sabers (ex. "LaBandit915's sabers")
- Drag your zip file in this folder
- Head back to Github desktop
- Add a summary for your commit at the bottom left (ex. "Added {saberName} by LaBandit915")
- Press commit
- Press push
- Go back to your forked repo and press "Create pull request" and submit!
Once I or Yuuki accepts your pull request your saber will be added here!
Please test your mods before submitting. Make sure they have correct JSON formatting and appear correctly on the BeatOn mod screen.