Skip to content
New issue

Have a question about this project? Sign up for a free GitHub account to open an issue and contact its maintainers and the community.

By clicking “Sign up for GitHub”, you agree to our terms of service and privacy statement. We’ll occasionally send you account related emails.

Already on GitHub? Sign in to your account

First action - Dockerfile #2

Merged
merged 5 commits into from Sep 5, 2019
Merged

First action - Dockerfile #2

merged 5 commits into from Sep 5, 2019

Conversation

DrewFitz
Copy link
Owner

@DrewFitz DrewFitz commented Sep 5, 2019

No description provided.

@github-learning-lab
Copy link

Nice work, you committed a Dockerfile. You'll notice at the end of the Dockerfile, we refer to an entrypoint script.

ENTRYPOINT ["/entrypoint.sh"]

The entrypoint.sh script will be run in Docker, and it will define what the action is really going to be doing.

Step 2: Add the action's script

An entrypoint script must exist in our repository so that Docker has something to execute.

⌨️ Activity: Add an entrypoint script and commit it to your branch

  1. As a part of this branch and pull request, create a file in the ./action-a/ directory titled entrypoint.sh. You can do so with this quicklink
  2. Add the following content to the entrypoint.sh file:
    #!/bin/sh -l
    
    sh -c "echo Hello world my name is $MY_NAME"
  3. Stage and commit the changes
  4. Push the changes to GitHub

I'll respond when I detect a new commit on this branch.

@github-learning-lab
Copy link

Nice work adding the entrypoint.sh script. This script will help define the action.

In entrypoint.sh, all we're doing is outputting a "Hello world" message using an environment variable called MY_NAME, which we'll define in the next step.

Next, we'll define a workflow that uses the GitHub Action.

Workflow Files

Workflows are defined in special files in the .github/workflows directory, named main.yml.

Workflows can execute based on your chosen event. For this lab, we'll be using the push event.

We'll break down each line of the workflow in the next step.

Step 3: Add a workflow file

First, we'll add the bones of the workflow. We'll add the action itself in a later step.

⌨️ Activity: Name and trigger your workflow

  1. Create a file titled .github/workflows/main.yml. You can do so using this quicklink or manually:
    • As a part of this branch and pull request, create a workflows directory nested inside the .github directory.
    • In the new .github/workflows/ directory, create a file titled main.yml
  2. Add the following content to the main.yml file:
    name: A workflow for my Hello World file
    on: push
  3. Stage and commit the changes
  4. Push the changes to GitHub
Trouble pushing? Click here.

The main.yml file cannot be edited using an integration. Try editing the file using the web interface, or your command line.

It is possible that you are using an integration (like GitHub Desktop or any other tool that authenticates as you and pushes on your behalf) if you receive a message like the one below:

To https://github.com/your-username/your-repo.git
 ! [remote rejected] your-branch -> your-branch (refusing to allow an integration to update main.yml)
error: failed to push some refs to 'https://github.com/your-username/your-repo.git'


I'll respond when I detect a new commit on this branch.

@github-learning-lab
Copy link

Nice work! 🎉 You added a workflow!

Here's what it means:

  • name: A workflow for my Hello World file gives your workflow a name. This name appears on any pull request or in the Actions tab. The name is especially useful when there are multiple workflows in your repository.
  • on: push indicates that your workflow will execute anytime code is pushed to your repository, using the push event.

Next, we need to specify a job or jobs to run.

Actions

Workflows piece together jobs, and jobs piece together steps. We'll now create a job that runs an action. Actions can be used from within the same repository, from any other public repository, or from a published Docker container image. We'll use an action that we'll define in this repository.

We'll add the block now, and break it down in the next step.

Step 4: Use an action in your workflow

Let's add the expected action to the workflow.

⌨️ Activity: Add an action block to your workflow file and commit it to your branch

  1. As a part of this branch and pull request, edit .github/workflows/main.yml to append the following content:
    jobs:
      build:
        name: Hello world action
        runs-on: ubuntu-latest    
        steps:
        - uses: actions/checkout@master
        - uses: ./action-a
          env:
            MY_NAME: "Mona"
  2. Stage and commit the changes
  3. Push the changes to GitHub
Trouble pushing?

The main.yml file cannot be edited using an integration. Try editing the file using the web interface, or your command line.

It is possible that you are using an integration (like GitHub Desktop or any other tool that authenticates as you and pushes on your behalf) if you receive a message like the one below:

To https://github.com/your-username/your-repo.git
 ! [remote rejected] your-branch -> your-branch (refusing to allow an integration to update main.yml)
error: failed to push some refs to 'https://github.com/your-username/your-repo.git'


I'll respond when I detect a new commit on this branch.

@github-learning-lab
Copy link

Nice, you just added an action block to your workflow file! Here are some important details about why each part of the block exists and what each part does.
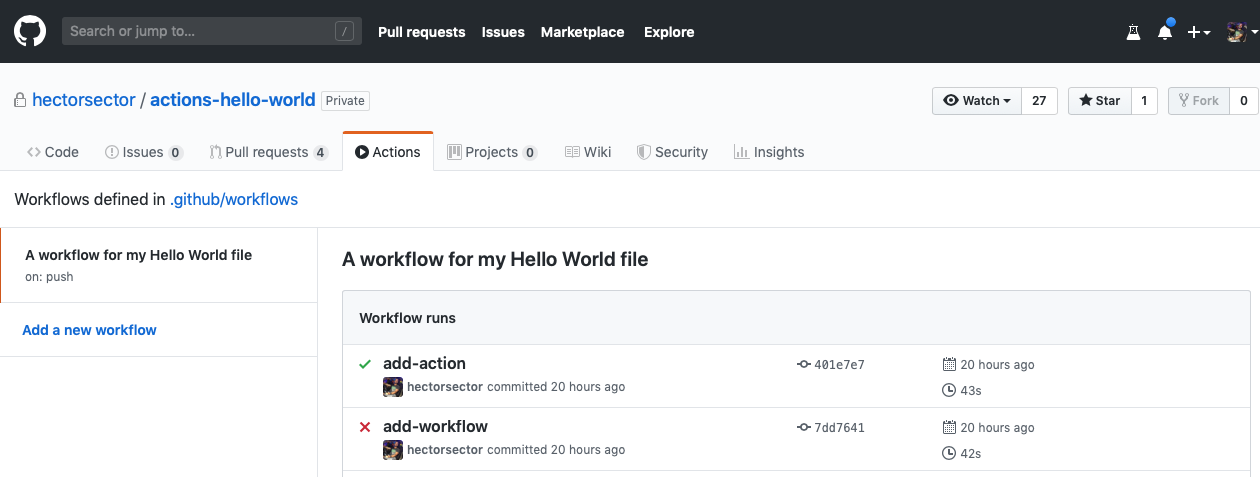
  • jobs: is the base component of a workflow run
  • build: is the identifier we're attaching to this job
  • name: is the name of the job, this is displayed on GitHub when the workflow is running
  • steps: the linear sequence of operations that make up a job
  • uses: actions/checkout@master uses an action called checkout to use a copy of our code repository
  • uses: ./action-a uses an action named action-a by referencing the path to the action's directory, relative to our repository
  • env: is used to specify the environment variables that will be available to your action in the runtime environment. In this case, the environment variable is MY_NAME, and it is currently initialized to "Mona".

Your action is about to be triggered!

Your repository now contains everything it needs for the action to be defined (in the ./action-a/ folder) and everything it needs to be triggered (in the ./github/main.yml file).

The action will run anytime a commit is recognized on the remote repository. Since you just pushed, let's wait for the workflow to be triggered. This might take a few minutes since it's the first time running in this repository.

Seeing your Action in action

You can see the action status reported below, or you can click the "Actions" tab in your repository. From there you will see the actions that have run, and you can click on the action's "Log" link to view details.

View an action's log

Step 5: Trigger the workflow

⌨️ Activity: See your action trigger the workflow

  1. You've done the work, now sit back and see your action trigger the workflow!

I will respond when I detect your action has run and reported a status.

Actions can take a minute or two to run. Sometimes, I also respond too fast for the page to update! If you don't see a response from your action, wait a few seconds and refresh the page.

Note: This course will only work for members of the GitHub Actions limited public beta. If you're not in the GitHub Actions limited public beta, you won't receive a response from the action.

Copy link

@github-learning-lab github-learning-lab bot left a comment

Choose a reason for hiding this comment

The reason will be displayed to describe this comment to others. Learn more.

Success! 🎉 Your workflow ran! You can see the output here.

You should see the string "Hello world, I'm Mona!" printed at the bottom to stdout.

Actions successful log file

Step 6: Merge the workflow to master

As a final step, merge this pull request so the action will be a part of the main master branch.

Anyone that uses this repository, and any future code can benefit from this workflow and your new action!

⌨️ Activity: Merge your workflow into the master branch

  1. Merge this pull request
  2. Delete your branch

I'll respond when I detect this branch has been merged.

@DrewFitz DrewFitz merged commit 349db24 into master Sep 5, 2019
@github-learning-lab
Copy link


Great work merging your pull request! I created a new issue, look for my next response there.

@DrewFitz DrewFitz deleted the first-action branch September 5, 2019 16:06
Sign up for free to join this conversation on GitHub. Already have an account? Sign in to comment
Labels
None yet
Projects
None yet
Development

Successfully merging this pull request may close these issues.

None yet

2 participants