Adding classes to ENVO
- Introduction
- For co-editors and sustained contributors
- Steps for smaller contributions by non-editors
This page will brief you on how to add content to ENVO. Everyone's welcome to suggest additions for review and we're always happy to expand our editorial team.
This guide assumes that you already have a good knowledge of how to work with git and GitHub's development patterns. If not, don't worry: there's great documentation and tutorials online to get you up to speed. Once you try that out and feel confident, head back here and continue reading!
Of course, we also assume you know how to edit OWL ontologies using a tool like Protégé and follow some best practices on writing ontological definitions.
We strongly recommend you read the git daily workflow for the Gene Ontology, as editing ENVO is quite similar (a strength of being in a federation of ontologies that use much the same rules)
To avoid conflicting code or development actions, it's a good idea to let us know you're going to send in a revision. Create an issue on our tracker letting us know what you're up to, what your time frame is, and what kind of (if any) support you'll need.
If you'd like to join our Editor's Slack to have more interactive discussions, please let us know via our issue tracker.
Most editors will be using Protégé. We recommend that:
- Enable a view to allow relations to be visible in the hierarchy (View > Display relationships in class hierarchy)
- Install the ELK-0.5.0-SNAPSHOT reasoner to check for logical consistency and avoid overactive warnings
- To install: Place the file org.semanticweb.elk.jar in the plugins directory of your Protégé installation (this can be a little tricky on Mac - right click on the Protege application icon and select “show package contents” to find the right folder (Contents > Java > plugins)
- If you are using ELK 0.5, also copy the “puli” jar file to the same place
We like to nano-credit all contributors. If you're adding classes, make sure to add the full URL of your your ORCID as the value of one dc:creator (http://purl.org/dc/elements/1.1/creator) annotation property. Also add in a dc:date (http://purl.org/dc/elements/1.1/date) annotation property to keep track of when the term was created. You can use the database_cross_reference (http://www.geneontology.org/formats/oboInOwl#hasDbXref) property to credit any sources for your term, but please make sure all values of this AP are either URLs/IRIs or CURIEs.
To make the contribution process easier, you can configure Protégé to auto-generate your new term's IRI, a dc:creator annotation property with your ORCID, and a dc:date annotation property with a time stamp when a new term is created.
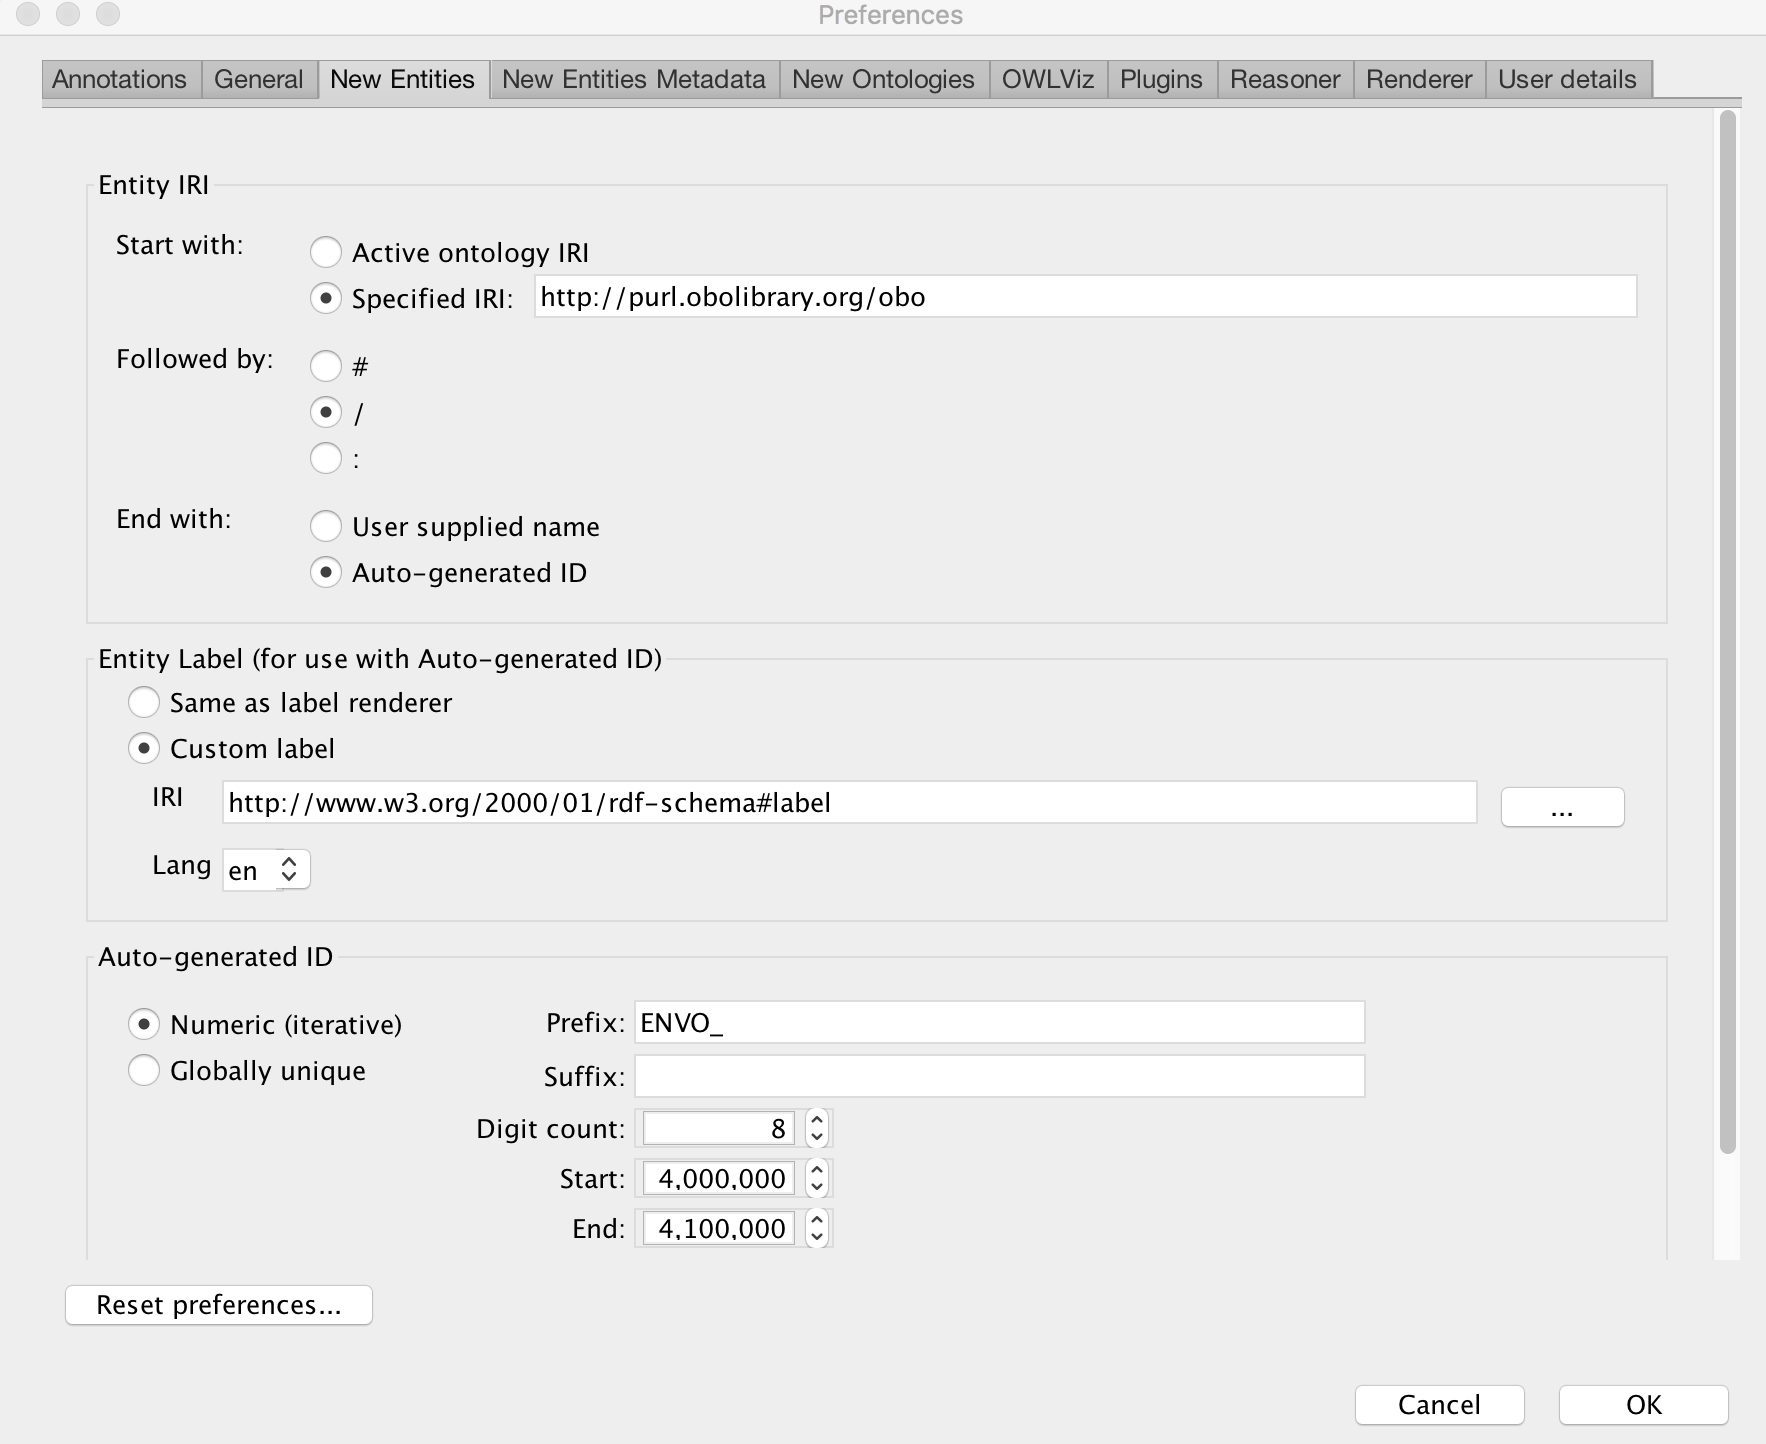
Step 1: In Protégé, click on the 'Protege' menu, then choose 'Preferences'. Select the 'New Entities' tab.
Step 2: In the 'Entity IRI' section, 'Start with' subsection, select the 'Specified IRI' radio button and enter "http://purl.obolibrary.org/obo".
Step 3: In the 'Followed by:' subsection, select the '/' radio button.
Step 4: In the 'End with' subsection, select 'Auto-generated ID'.
Step 5: In the 'Auto-generated ID' section (at the bottom), select 'Numeric (iterative). In the 'Prefix' box type in "ENVO_". For "Digit count" type in "8". The "Start" and "End" boxes indicate the ID range for your terms. You should contact the editing team to be assigned a range of IDs.
After the steps above are completed, your screen should look similar to below:
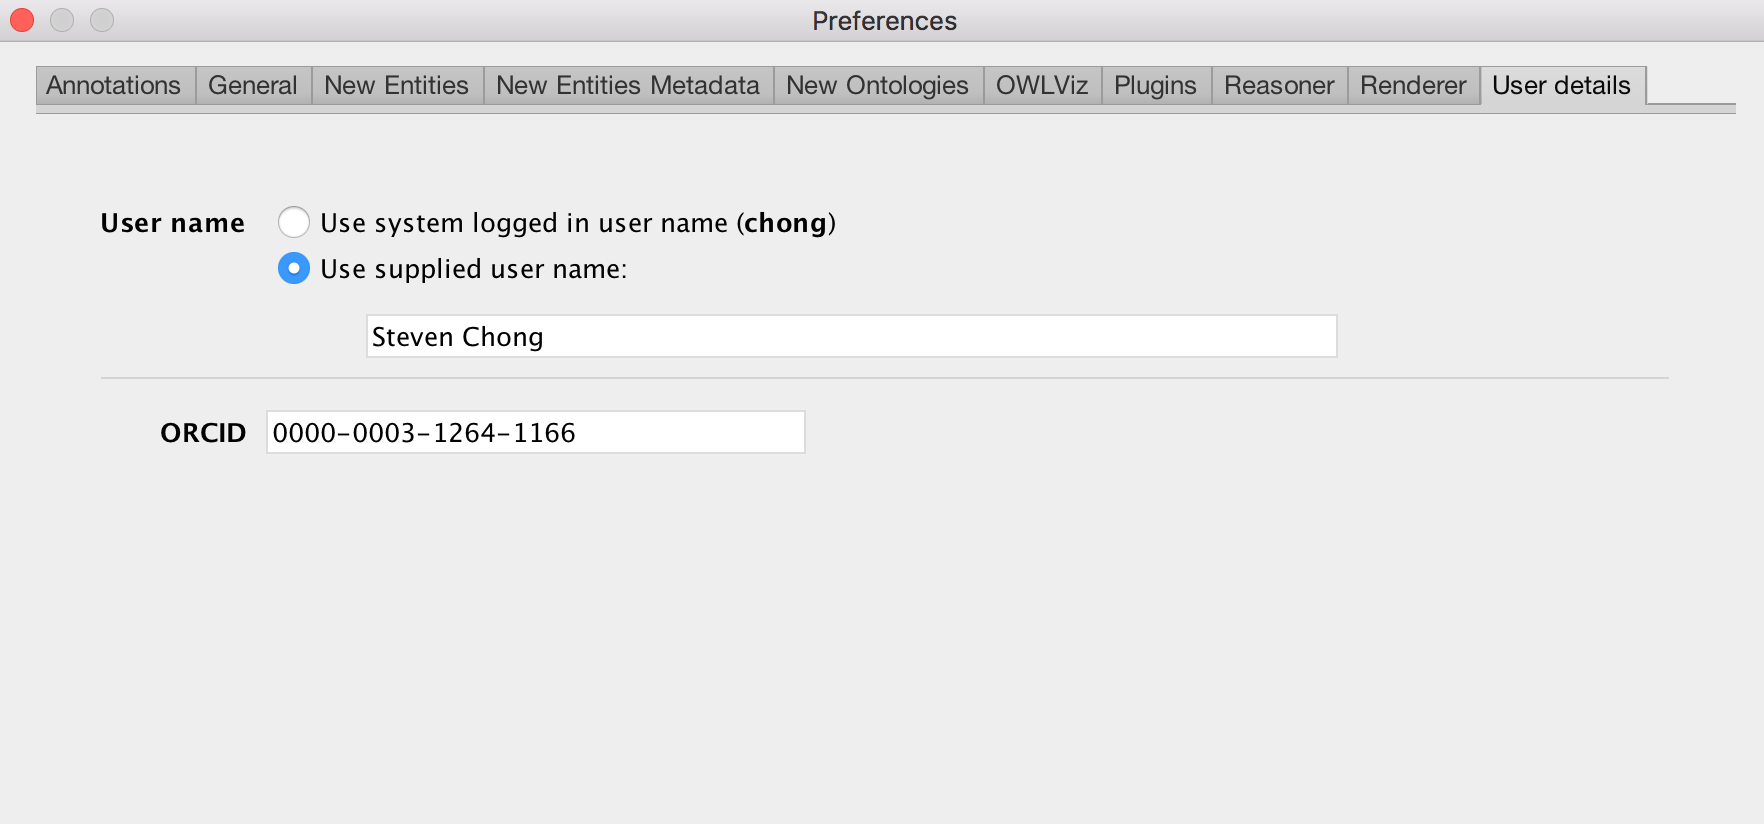
Step 6: Switch over to the 'User details' tab.
Step 7: Choose 'Use supplied user name' and enter your full name. In the ORCID box, enter in your ORCID, including dashes.
Your screen should look similar to the following:
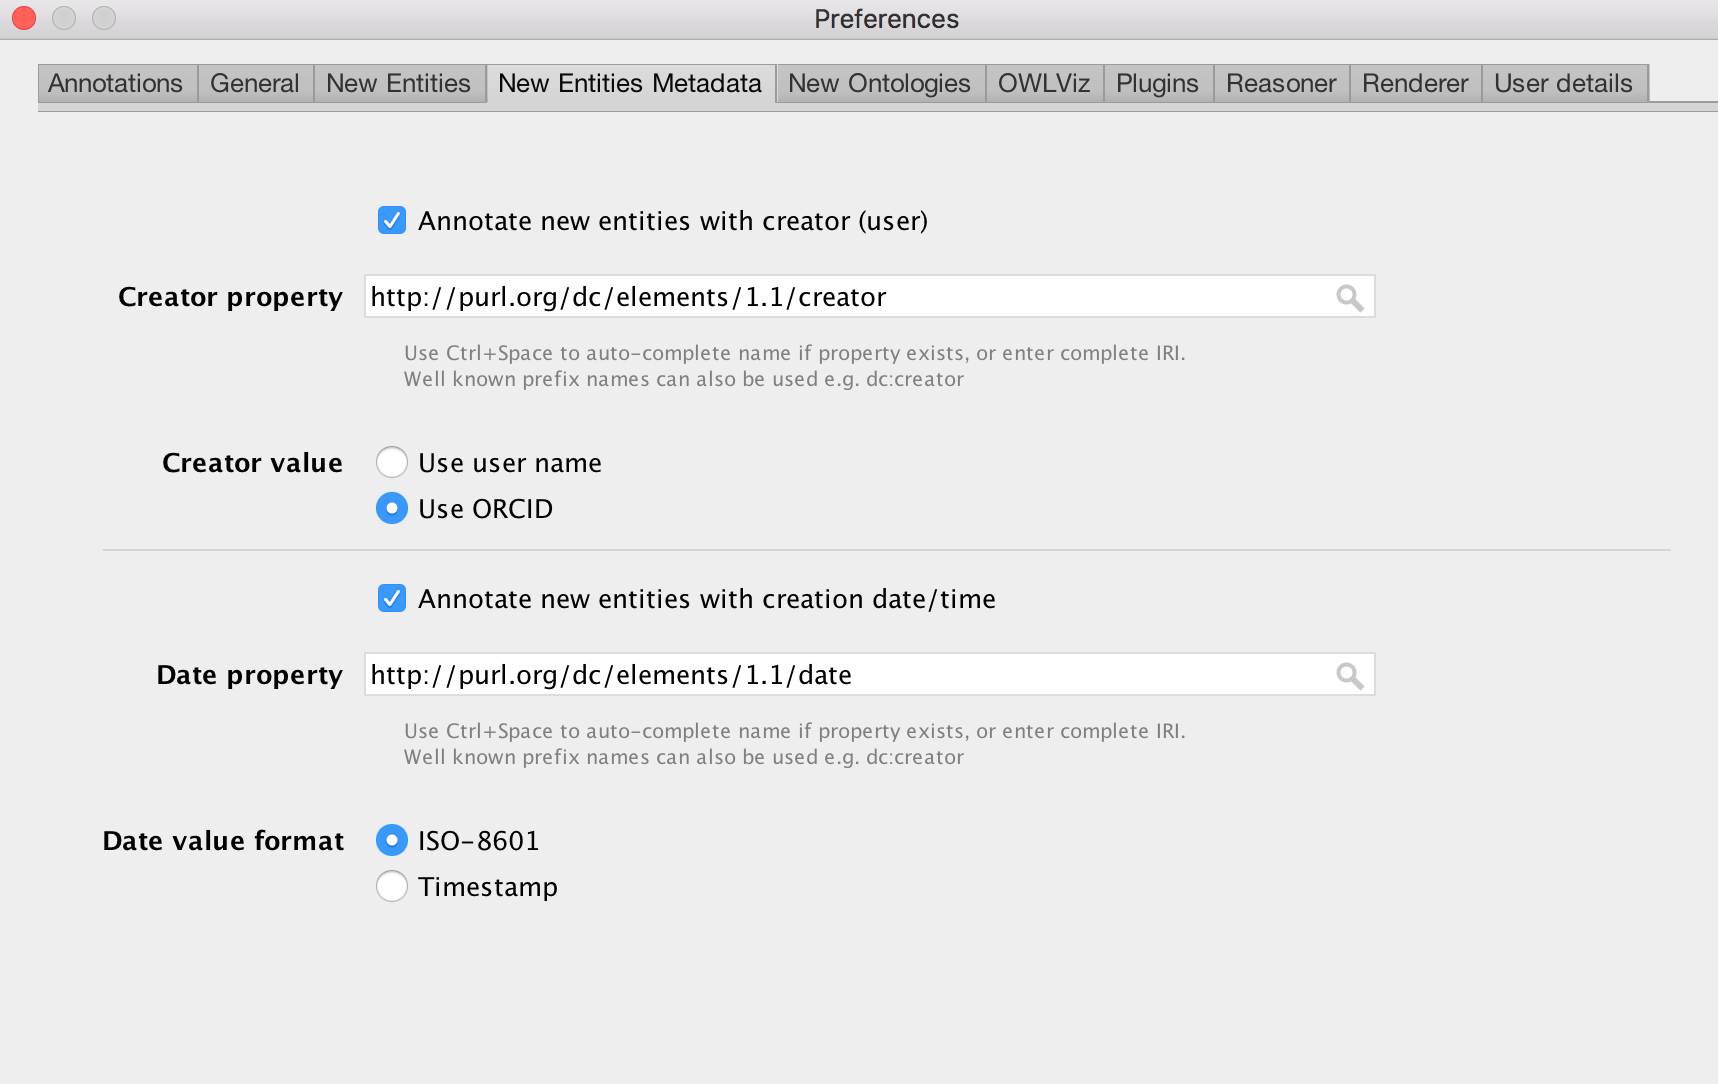
Step 8: Choose the 'New Entities Metadata' tab.
Step 9: Check the box 'Annotate new entities with creator (user)'. The 'Creator property' box should have: http://purl.org/dc/elements/1.1/creator.
Step 10: For the 'Creator value section' choose 'Use ORCID'.
Step 11: Check the box 'Annotate new entities with creation date/time'. The Date property should be: http://purl.org/dc/elements/1.1/date.
Step 12: In the 'Date value format' section, choose 'ISO-8601'.
Your screen should look like:
Typically, we'd prefer to add contributors as GitHub collaborators to sustain a broad editorial team. Below, we outline how to work with us to make sure EnvO is shaped to your individual, institutional, and disciplinary needs. If you'd prefer to make a one-off contribution, see the section on forking below.
If you're planning to make a whole bunch of contributions or would like to join our editorial team, it's a good idea to request "Collaborator" status on our GitHub repo. This would allow you to use the branch-and-merge workflow.
Also, send in a request via our issue tracker to join our Editor's Slack to have more interactive discussions.
Before starting, get up to speed on branching and merging and read around on good practices (e.g. some safety tips).
After that, editing is pretty straightforward. You can check out an example of adding a new term courtesy of @StevenChong in this issue. A slightly more involved set of edits can be found in another of @StevenChong's contributions and the discussion/review on the corresponding pull request.
As a general rule, it's good to keep edits small, of the same kind, and modular: merging a large set of very different edits can make error tracking pretty tough and slow things down.
- Post an issue on our tracker announcing what you're going to work on and your rough timeline. Here's the issue posted for a New Term Request for "adfreezing"
- Either in the terminal or via the GitHub web interface, create a new branch to do your work on and give it a sensible name. Usually, the name of the issue is fine, e.g. "issue-701"
- In your working copy of the EnvO repo, use your GitHub Desktop Client or
git checkout [your branch name]to switch to your new branch. Your edits will be insulated from the master branch. If the master branch moves forward, you may need to sync up again (another reason to keep edits small and quick). - Make your edits and commit / push to your new branch. Make sure to run ELK if you've made any edits to envo-edit.owl to make sure there are no unsatisfiable classes or similar logical errors. Check the GitHub web interface for the status of your branch - it will typically tell you right away if there are any code conflicts.
- When you're done and have cleaned up any residual files, create a pull request and assign one or more reviewers to look over your contributions. There may be a back and forth here to make sure everything's copacetic. 5.1 Note: When you create a pull request, our Travis CI routine will kick off, and let you know if there are any reasoning errors or the like.
- When things are reviewed and approved, let the reviewer merge the pull request into master. You can then delete your branch.
The following is an example of how to create and merge branches:
To make changes to github repository via pull requests protocol based on GO Daily workflow
- Make sure you're up to date:
git pull
- Start or address an issue on envo github:
e.g. issue 848 Much of the work sorting out what the definition axioms and references should be done in the issue thread.
- checkout a branch corresponding to that issue.
git checkout -b issue-848
-
Make changes
-
Add/commit changes (-a for all files staged to commit) with a message:
git commit -am 'Add monsoon season address #848' Best to have one commit message per new class added or changed.
You can alternatively do the following to just commit one file (instead of all staged files):
git add envo-edit.owl
git commit envo-edit.owl -m 'Add monsoon season address #848'
- Push your branch to origin to create a pull request
For example the command would be something like git push origin issue-848. However you can just run git push and it should prompt you with the line to run.
click on Compare and Create Pull Request
-
On envo pull requests page editors can view the pull request and check if the build passes.
-
Switch from branch back to master:
git checkout master
- Request reviews of pull request and or make changes as necessary:
Leave this step for the lead ENVO editors click Merge Pull Request
- Delete the branch after the changes are merged:
git pull To get the new origin with the merged branch.
git branch -d issue-848
If you need to make changes to a branch, which has not yet been merged or deleted you can do the following:
git checkout issue-848
Make your changes
git commit -am 'Fix monsoon definition address #848'
git push --set-upstream origin issue-848
If you just need to get one or two contributions (which can have a few or many terms) into ENVO, you can use GitHub's fork-and-pull approach.
You don't need to be a "Collaborator" on our GitHub project for this.
Fork the latest state of the EnvironmentOntology/envo repo and clone your fork into your working directory.
Keep in mind that if there are any updates to the main repo (which you should set as your "upstream" remote), you'll have to fetch these and merge the upstream/master with your own master.
On the forked repo, create a branch where you'll do your editing and switch to it with git checkout.
Once you're on your branch, start editing! In most cases, you'd probably be working on envo-edit.owl in our src/envo/ directory.
Never edit anything that's not in the /src/envo directory! The release versions of ENVO are not generated manually, so keep your edits to the src files.
Before committing any changes you've made to envo-edit.owl, be sure to run the ELK reasoner and check for any unsatisfiable classes (they'll show up under NoThing in the inferred view of the hierarchy). ELK will throw out a few errors, which are expected (about cardinality and other things that ELK can't reason through) which you can dismiss. The main thing is to be sure there are no logical errors in any axioms you've created before pushing to your local branch.
Once you've made your changes, make sure you check if any edits have been made on upstream/master (that should correspond to ENVO's master branch) and, if needed, fetch it and merge it with your own master branch before rebasing your branch (careful when rebasing!). Then, go ahead and push your commits to your branch. We don't mind if your commits are granular, so there's usually no need to squash them before making a pull request.
Once you're done, you can use the GitHub web interface to send us a pull request!
Along the way, you can see if there any conflicts between your branch and the envo master through the GitHub web interface. It's a good idea to resolve these early on to make merging straightforward. There should be no conflicts detected before you send in a pull request.
In a comment on your pull request, tag one or more the EnvO editorial team (e.g. @pbuttigieg, @cmungall) to look over the changes and provide feedback. When all is well, we'll merge your pull request!