Home
Raster functions are operations that process imagery and raster datasets by applying the processing directly to the pixels. Imagine you have imagery of the entire world and you want to calculate the Normalized Difference Vegetation Index (NDVI), which is computed like this:
 / (NIR + Red)")
The traditional approach is to take the red and near infrared bands, perform this calculation, and write that into a new raster that shows NDVI. Remember, this is global imagery. If you’re only interested in a specific location, why create a raster for the entire globe? What a raster function does is apply that calculation to the pixels of the original data as it is drawn so it is only processing the pixels that are visible on your screen. As you zoom and pan around, the calculations are performed on the fly and no intermediate datasets are created. Why stop at NDVI? You can use functions to create many different information layers which all use the same underlying dataset.
ArcGIS comes with dozens of out of the box functions that can be used for radiometric and geometric correction, data management, visualization, and analysis. Functions can be applied individually or combined to create function chains. There are several methods for applying functions depending on the structure of the dataset.
| Type of dataset | Application method |
|---|---|
| Raster dataset or raster product | Use the f(x) button in the Image Analysis Window. |
| Mosaic dataset | Use the property windows. |
| Image Service | Directly publish functions with the image service or allow the end user to apply them. |
One of the main reasons this repository was created was to have a community where users can learn how to create custom functions and share their work. We’ve decided to use Python as the language for creating custom functions because of its familiarity to the ArcGIS user community. There are advantages to using custom functions. Obviously, if the function you need doesn’t come with ArcGIS, you can create a custom function using Python. We hope to grow the image processing and analytical capability of ArcGIS through this repository by encouraging the user community to contribute.
Beyond increasing functionality there are other practical needs for using custom functions. For example, if you need to point to specific rasters within a mosaic dataset or call different variables as part of your analysis, that is going to be straight forward using Python. Aggregating rasters is as well. Creating parameters for end users to manipulate is also easier with Python than asking them to break open a function chain (*.rft.xml). Finally, if you have a function chain that relies on many different functions, you can use Python to create an elegant workflow.
Python raster functions will not work with ArcPy. You cannot add them to a geoprocessing model because functions process on the fly and models do not. Custom functions must use the structure laid out in the Anatomy of a Python Raster Function.
Python raster functions are inserted into function chains just like any other function. It accepts one of two inputs: a .py file or a .pyd (complied Cython) file. The parameters for the function are controlled within the Python script, therefore end users can simply point to a script and the function dialog will be populated.
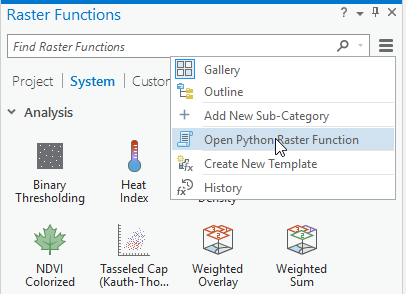
Add Python raster function to the Raster Functions Pane by selecting the the options button on the top right-hand corner of the functions pane then selecting Open Python Raster Function.
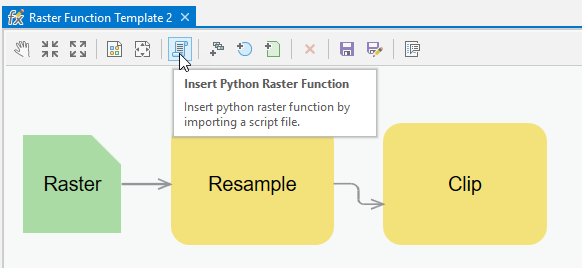
You can also add a Python raster function to a raster function template by selecting the Insert Python Raster Function button on the editor toolbar.
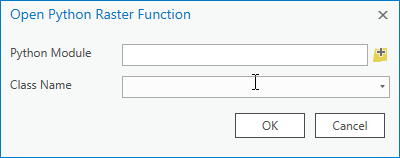
When the Open Python Raster Function dialog opens, browse to the python script containing your Python Raster Function. Choose the class that you would like to use. A Python file can contain more than one Python function. If this is the case, the Class Name drop-down will contain more than one item. If your Python script contains only one function, it will chosen by default. Click ok to add the Python Raster Function.
If you are adding the function via the function pane it will open the function and prompt you to save it as a template. Click the Save as button. Give the template a name and choose which category and sub-category you would like to save it to. Custom functions can only be saved to the custom or project categories. The system category is reserved for functions that are installed with the software. When saving a function to the project category, the function will be save within the project. When you share the project the function will be shared with it. However, the Python file does not get saved in the project. You will need to share the python file with whoever you are sharing the project with. Saving the function to the custom category will only make the function available on the machine it was created on. It will not be shared with the project.
If you are adding a Python raster function from the template editor, it will automatically add it as a first class item in your model. It can be use like any other function at this point.
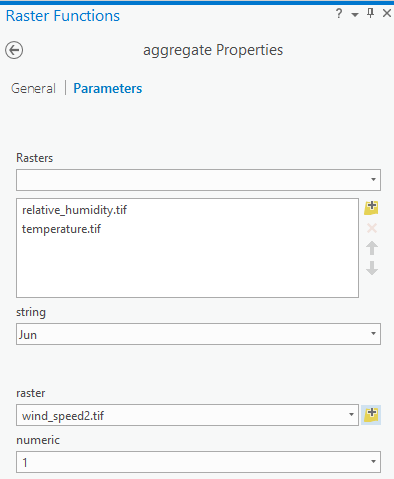
The parameters are defined in the Python script and you can change the values of each parameter here. For example, a function may have default values that are associated with a specific sensor, such as Landsat 8. If you wanted to apply these functions to Landsat 7, you would have to change the red and near infrared bands because Landsat 8 has a blue band that wasn’t available on earlier sensors. There are 5 possible data types that can be used as parameters; numeric, string, raster, rasters and boolean. Domains can be created for parameters in order to limit the list of input values that a user can chose from. In this case when clicking on the value a drop down menu will appear. For more information on the method that controls input parameters go to the getParameterInfo() section of the help document.
Pro will automatically generate each parameter depending on how it was defined in the Python script. The following is an example of what each parameter will look like in the Pro function UI.
Insert custom functions into a function chain by right clicking on an existing function or raster in the function dialog. The Python Raster Function dialog has three components; the input Python module, the class name and the input parameters.

The input Python module parameter will accept a Python script (.py) or a Cython file (.pyd). After pointing to a Python file the rest of the dialog will be populated.
The class name parameter will contain the name of the class being used from the python script. In most cases a Python script will contain one class although it is possible to have multiple classes in one Python script. For example, within one script you could compute a number of different vegetation indices, such as NDVI, EVI, SAVI, TSAVI, etc. Each index would be its own class. To select a class, type in the Class Name. By default, the class that corresponds to the name of the module will be used.
The parameters are defined in the Python script and you can change the values of each parameter here. For example, a function may have default values that are associated with a specific sensor, such as Landsat 8. If you wanted to apply these functions to Landsat 7, you would have to change the red and near infrared bands because Landsat 8 has a blue band that wasn’t available on earlier sensors. There are 5 possible data types that can be used as parameters; numeric, string, raster, rasters and boolean. Domains can be created for parameters in order to limit the list of input values that a user can chose from. In this case when clicking on the value a drop down menu will appear. For more information on the method that controls input parameters go to the getParameterInfo() section of the help document.

If the parameter type is set to rasters a user can click on the value section of the parameter and a second window will open.
This window allows you to add rasters from multiple sources. The following options are available when adding rasters from this dialog.
-
Add raster from disk: Add a raster that is on disk. You can add raster datasets, mosaic datasets, and raster products. -
Add function chain: Add a function chain as an input. -
Add scalar: Add a scalar value. Scalar values must be numeric. -
Add reference to selected input: Add a referenced copy of the selected raster or the selected function chain input. A change in the referenced raster or the function chain will be reflected in this referenced copy. This can be useful when creating many Local functions that may use the same referenced input. -
Add copy of selected input: Add a static copy of the selected function chain input. A change in the copied function chain will not reflect this static copy. This can be useful when creating many similar Local functions where there is a slight change in the function chains.
Raster function templates can be use to store and share a function chains.
These function templates can be applied to a mosaic datasets, rasters and image services.
A raster function template (*.RFT.xml) can be created from any function chain and used as:
- A template describing a function chain to apply when adding raster data to a mosaic dataset
- A function chain to apply to a selection of rasters in a mosaic dataset
- A function chain to apply to a mosaic dataset
- A template used to add raster data to a mosaic dataset using the Table raster type
- A process to apply to an image service using REST that is processed on the server