Adding the Drilldown Widget to a Web AppBuilder Application
This option requires ArcGIS Online or ArcGIS Enterprise 10.4 or above.
This document outlines how you would take a Web AppBuilder application you configured in ArcGIS Online or Portal for ArcGIS and swap the Search widget for the Drilldown widget.
You have to download the application from ArcGIS Online or Portal for ArcGIS, you will need to host the application once you have added in the Drilldown widget.
You will then be able to use the Application either as a single application with the Web Map you originally created it with, or as a template that you can use with several different WebMaps.
You have to download the application from ArcGIS Online or ArcGIS Enterprise. You will need to host the application once you have added in the Drilldown widget. See the separate section on Hosting
Create the Web AppBuilder application and configure the application. Save the application in your portal.
- If you intend to use the application as a Web Application template (with different WebMaps) then you should only use the following widgets.
- About
- Analysis
- Basemap Gallery
- Bookmark
- Directions
- Draw
- Layerlist
- Legend
- Measurement
- Search (this is the widget we will replace with the Drilldown Widget)
- Swipe
- Timeslider
-
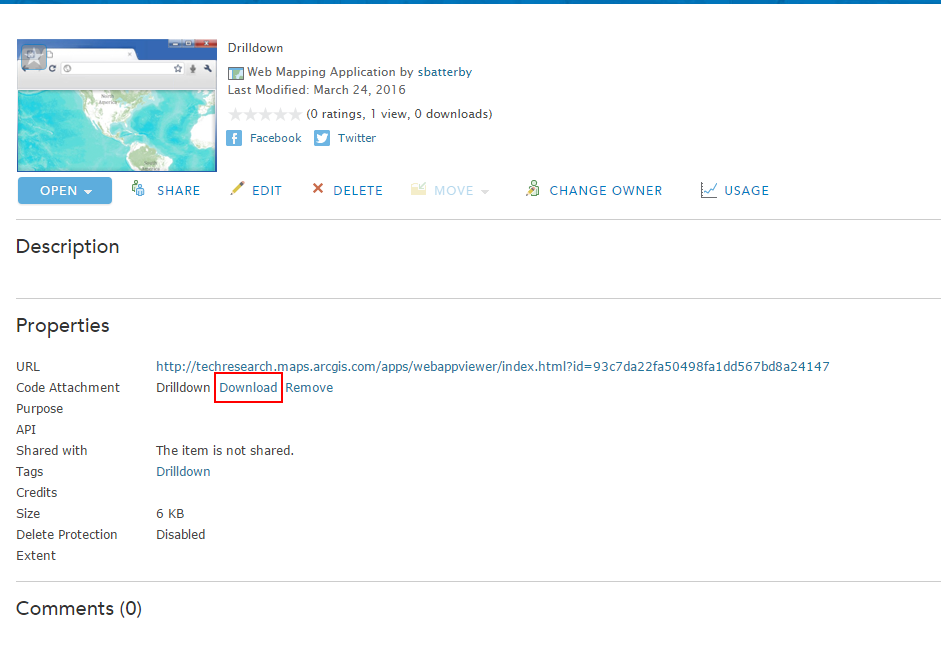
Browse to the newly created Web Mapping Application item in your Portal. Download the code by clicking on the Download link, this is found in the item properties next to the Code Attachment section, then unzip the code to disk. You should unzip the code into the IIS directory of the server you wish to host the application on. See the separate section on Hosting. For example, you might unzip it to C:\inetput\wwwroot\DrilldownTemplate
-
Download the Web AppBuilder Drilldown widget from this repository, from here choose one of the released versions. Extract the folder from the zip file to a temporary folder on disk. Within this folder is another folder called Drilldown�. This contains all of the code we need to put into the downloaded Web AppBuilder application.
-
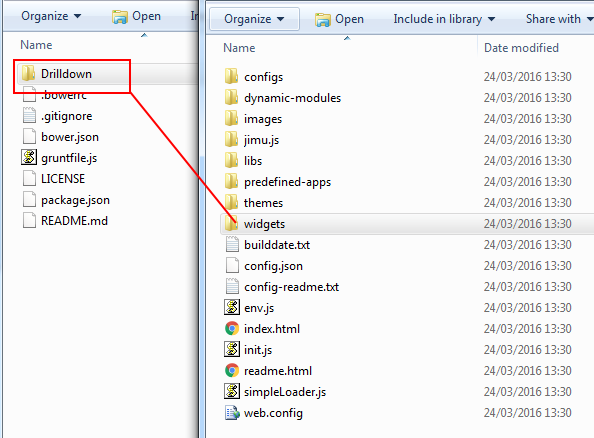
Next, add the Drilldown folder into your Web AppBuilder application, this is the Drilldown folder within the wab-dijit-drilldown-master folder. To do this, copy the folder into the widgets folder of your application, for example to C:\inetput\wwwroot\DrilldownTemplate\widgets.
-
To get the Drilldown widget showing up we need to change the config and swap out the Search widget for the Drilldown widget. To do this find the config file in the root folder of your application, for example in C:\inetput\wwwroot\DrilldownTemplate\config.json.
As a backup, take a copy of the config.json. Name this config.json.old or similar.
Open the config file and find the section that contains the Search widget reference. This should look similar to the config below:
 {
       "uri": "widgets/Search/Widget",
       "position": {
         "left": 55,
         "top": 5
       },
       "version": "2.0"
 }
Where it says Search, change this to be Drilldown, it should then look like this:
   {
	    "uri": "widgets/Drilldown/Widget",
	    "position": {
		  "left": 55,
		  "top": 5
	    },
	    "version": "2.0"
   }
If there is no “config” property already then add one in to the Drilldown section. The section should now look similar to this with a “config” property:
  {
	  "uri": "widgets/Drilldown/Widget",
		  "position": {
			  "left": 55,
			  "top": 5
		  },
		  "version": "2.0",
		  "config": "configs/Drilldown/config_Drilldown.json"
  }
The config property should be exactly the same as above, this loads the Drilldown config from a file contained in the configs folder, which are going to create in the next step...
-
Browse to the configs folder,for example go to C:\inetput\wwwroot\MyDrilldownWebApplication\Configs In the configs folder add a new folder called “Drilldown”, in this folder add a text file called “config_Drilldown.json”.
The config file contains an array of source locators, one or more locators can be set in here. The locatorType should be set to one of the available locator types so the Drilldown widget knows what type of Locator to use, also maxResults should be set to a high number to get a larger list for creating the drilldowns.
An example config file might look like the following:
{ "sources": [ { "url": "http://myserver.com/LocatorHub/arcgis/rest/services/SunnyshireLLPGcopy/ADDRESS/GeocodeServer", "name": "New Geocoder", "singleLineFieldName": "SingleLine", "placeholder": "", "countryCode": "", "maxResults": 5000, "type": "drilldown", "locatorType": "LLPG" } ] } -
Now you are ready to host the application on your Web Server. If you have followed the instructions above you will have already unzipped the application to your web server’s content folder e.g. C:\inetput\wwwroot\DrilldownTemplate
To create the Web application, open up IIS Manager on disk and navigate to the default Web site. The easiest way to do this is: On the Start menu, click All Programs, click Accessories, and then click Run, or search for run in the search bar. In the Open box, type inetmgr and then click OK.

Expand the Default Web Site to find the DrilldownTemplate folder.
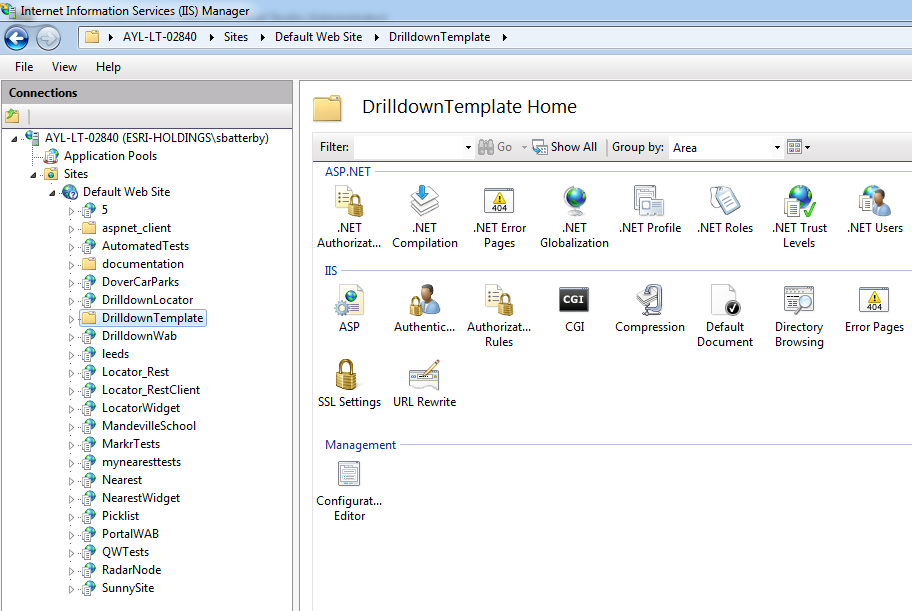
Right-click on the DrilldownTemplate folder and choose “Convert to application”.
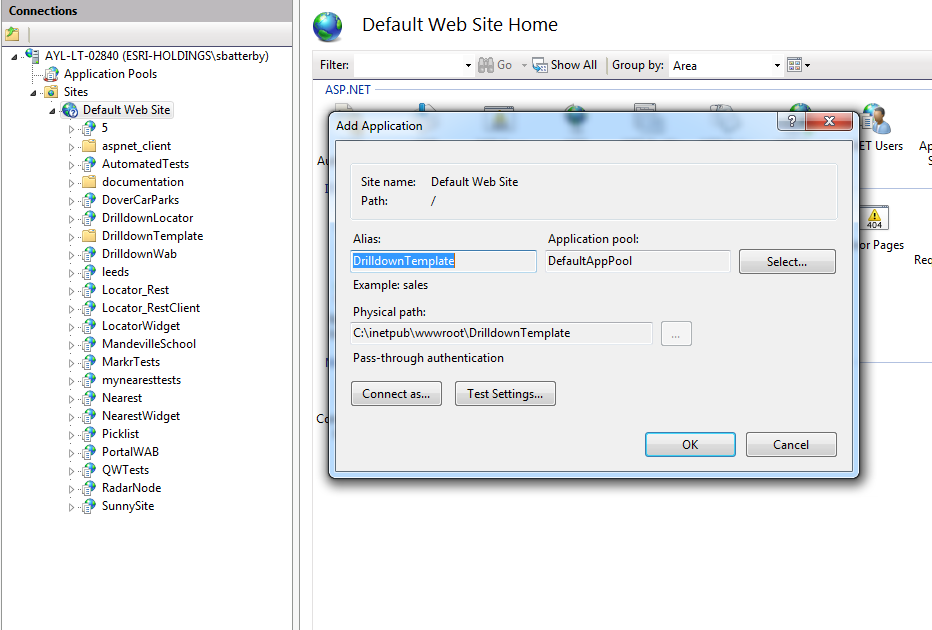
Add in an alias for the application, this will be used to access the application. Then click OK.
-
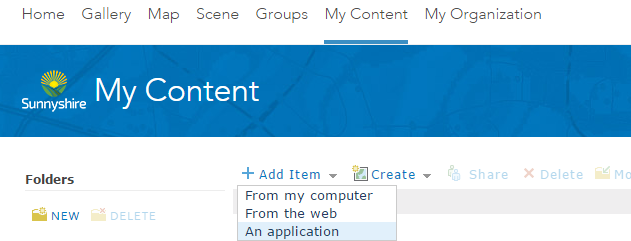
Finally we need to create the application in your ArcGIS Online or Portal for ArcGIS. In an administrator’s My Content, create a new application by Adding An Application as shown in the screenshot.
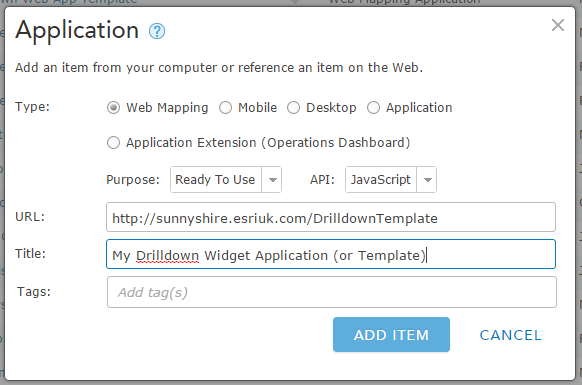
You will need to enter the URL to the application you are hosting. Choose type “Web Mapping Application” and Purpose “Ready to Use”.
You will need to enter the URL to the application you are hosting, which following the example above will be http://<server>/DrilldownTemplate/ Add tags appropriate to your organisation to allow you to find the application or application template again.
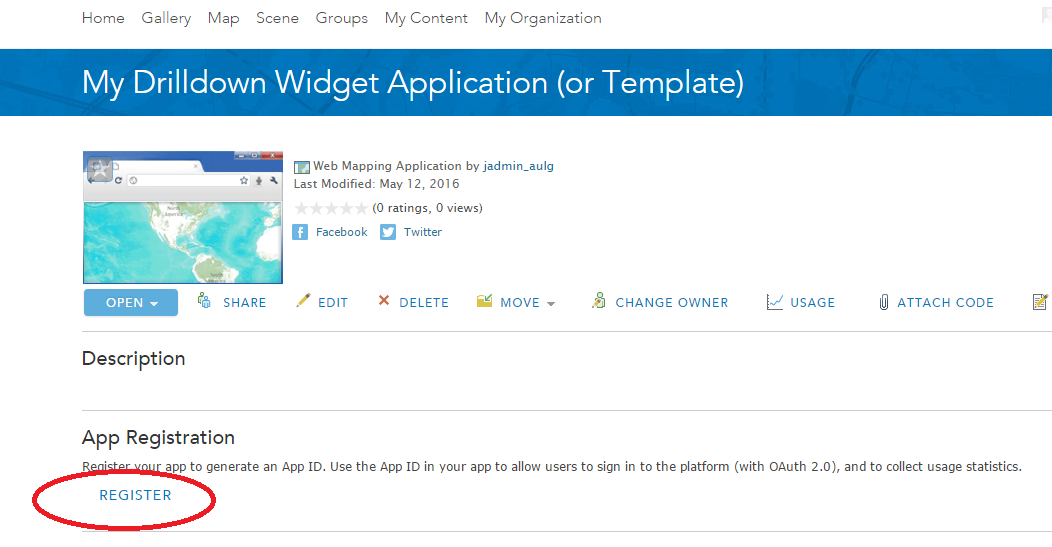
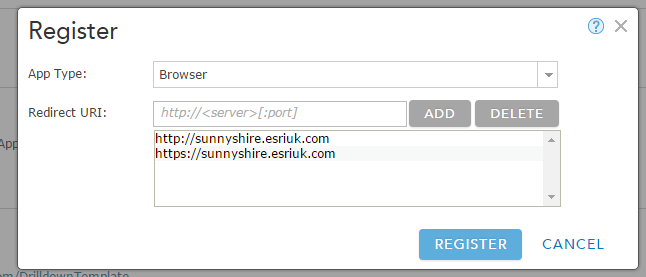
Click Add Item. Then under the App Registration section on the item page, click “REGISTER”.
Choose App Type “Browser” and enter Redirect URIs of both HTTP and HTTPS to the server hosting your application or application template i.e. add both http://<server> and https://<server>. Hit Register.
For the very last step, copy the App Id shown now shown on the item details page:
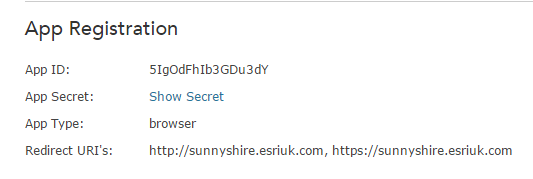
On the server, go back to the Config.JSON file we were editing previously, at C:\inetput\wwwroot\DrilldownTemplate\config.json
Search for the text appId. Paste the AppId copied above into the quotes in the file so it looks like "appId": " 5IgOdFhIb3GDu3dY", Then save the file.