1.Dependency Injection (DI) is a design pattern used to implement IoC.It allows the creation of dependent objects outside of a class and provides those objects to a class through different ways.
2.Types of Dependency Injection are as fallows:
Constructor Injection: In the constructor injection, the injector supplies the service (dependency) through the client class constructor.
Property Injection: In the property injection,the injector supplies the dependency through a public property of the client class.
Method Injection:In this type of injection, the client class implements an interface which declares the method(s) to supply the dependency and the injector uses this interface to supply the dependency to the client class.
Diagram of Dependency Pattern
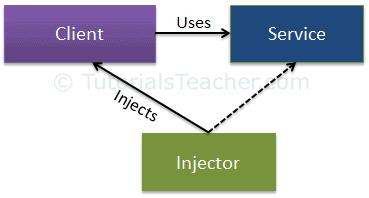
The Dependency Injection pattern involves 3 types of classes.
Client Class:The client class (dependent class) is a class which depends on the service class.
Service Class:The service class (dependency) is a class that provides service to the client class.
Injector Class:The injector class injects the service class object into the client class.
Example Code
Creating Interface
using System;
using System.Collections.Generic;
using System.Text;

namespace DependencyInjectionUsingUnity
{
   public interface ICar
   {
       int Run();
   }
}
Creating Concrete class
using System;
using System.Collections.Generic;
using System.Text;

namespace DependencyInjectionUsingUnity
{
    public class BMW : ICar
    {
        private int _miles = 0;

        public int Run()
        {
            return ++_miles;
        }
    }
}
using System;
using System.Collections.Generic;
using System.Text;
namespace DependencyInjectionUsingUnity
{
public class Ford : ICar
{
private int _miles = 0;
public int Run()
{
return ++_miles;
}
}
}using System;
using System.Collections.Generic;
using System.Text;
namespace DependencyInjectionUsingUnity
{
public class Audi : ICar
{
private int _miles = 0;
public int Run()
{
return ++_miles;
}
}
}Creating Service Class
using System;
using System.Collections.Generic;
using System.Text;

namespace DependencyInjectionUsingUnity
{
    public class Driver
    {
        private ICar _car = null;

        public Driver(ICar car)
        {
            _car = car;
        }

        public void RunCar()
        {
            Console.WriteLine("Running {0} - {1} mile ", _car.GetType().Name, _car.Run());
        }
    }
}
Client Code
using Microsoft.Practices.Unity;
using System;

namespace DependencyInjectionUsingUnity
{
    class Program
    {
        static void Main(string[] args)
        {

            var container = new UnityContainer()
                .RegisterType<ICar, BMW>();

            var driver1 = container.Resolve<Driver>();
            driver1.RunCar();
        }
    }
}
OutPut
.png)
1.The Adapter Design Pattern falls under the category of Structural Design Pattern.
2.The Adapter Design Pattern works as a bridge between two incompatible interfaces.
3.The Adapter Pattern helps two incompatible interfaces to work together.
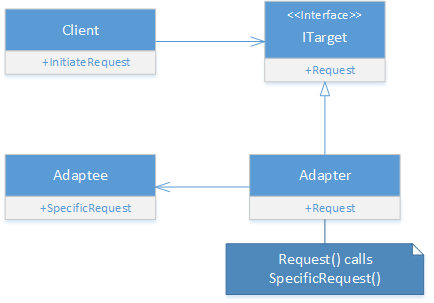
The Adapter Design Pattern is composed of four components.
Client: The Client class can only see the Target interface.
Target:It an interface and this interface needs to be implemented by the Adapter and the client can see only this interface.
Adapter:This is a class which makes two incompatible systems to work together. The Adapter class implements the Trager interface and provides the implementation for the ServiceA method. This class is also composed of the Adaptee i.e. it has a reference to the Adaptee object.
Adaptee: This class contains the functionality which the client requires but it’s not compatible with the existing client code. So, it requires some adaptation before the client code can use it. It means the client will call the Adapter and Adapter will do the conversion if required and then it will make a call to the Adaptee.
Example Code
Step1: Creating Employee class
 using System;
using System.Collections.Generic;
using System.Text;

namespace AdapterPattern
{
   public class Employee
    {
            public int ID { get; set; }
            public string Name { get; set; }
            public string Designation { get; set; }
            public decimal Salary { get; set; }

            public Employee(int id, string name, string designation, decimal salary)
            {
                ID = id;
                Name = name;
                Designation = designation;
                Salary = salary;
            }
   }
}
Step2: Creating Adaptee
using System;
using System.Collections.Generic;
using System.Text;

namespace AdapterPattern
{
        public class ThirdPartyBillingSystem
        {

            public void ProcessSalary(List<Employee> listEmployee)
            {
                foreach (Employee employee in listEmployee)
                {
                    Console.WriteLine("Rs." + employee.Salary + " Salary Credited to " + employee.Name + " Account");
                }
            }
        }
}
Step3: Creating Target interface
using System;
using System.Collections.Generic;
using System.Text;

namespace AdapterPattern
{
   public interface ITarget
    {
        void ProcessCompanySalary(string[,] employeesArray);
    }
}
Step4: Creating Adapter
using System;
using System.Collections.Generic;
using System.Text;

namespace AdapterPattern
{
        public class EmployeeAdapter : ITarget
        {
            ThirdPartyBillingSystem thirdPartyBillingSystem = new ThirdPartyBillingSystem();

            public void ProcessCompanySalary(string[,] employeesArray)
            {
                string Id = null;
                string Name = null;
                string Designation = null;
                string Salary = null;

                List<Employee> listEmployee = new List<Employee>();

                for (int i = 0; i < employeesArray.GetLength(0); i++)
                {
                    for (int j = 0; j < employeesArray.GetLength(1); j++)
                    {
                        if (j == 0)
                        {
                            Id = employeesArray[i, j];
                        }
                        else if (j == 1)
                        {
                            Name = employeesArray[i, j];
                        }
                        else if (j == 1)
                        {
                            Designation = employeesArray[i, j];
                        }
                        else
                        {
                            Salary = employeesArray[i, j];
                        }
                    }

                    listEmployee.Add(new Employee(Convert.ToInt32(Id), Name, Designation, Convert.ToDecimal(Salary)));
                }

                Console.WriteLine("Adapter converted Array of Employee to List of Employee");
                Console.WriteLine("Then delegate to the ThirdPartyBillingSystem for processing the employee salary\n");
                thirdPartyBillingSystem.ProcessSalary(listEmployee);
            }
        }
    }
Step5: Client
using System;

namespace AdapterPattern
{
    class Program
    {
        static void Main(string[] args)
        {
            string[,] employeesArray = new string[5, 4]
             {
                {"101","Lavanya","SE","10000"},
                {"102","Tereena","SE","20000"},
                {"103","Karan","SSE","30000"},
                {"104","Raju","SE","40000"},
                {"105","Shashank","SSE","50000"}
             };

            ITarget target = new EmployeeAdapter();
            Console.WriteLine("HR system passes employee string array to Adapter\n");
            target.ProcessCompanySalary(employeesArray);
            Console.Read();
        }
    }
}
Output
.png)
1.Proxy Design Pattern act on behalf of othe object to control the access to it.
2.Proxy Design Pattern, a class represents the functionality of another class.
There are three types of proxies. They are as follows.
1.Virtual Proxy: A virtual proxy is a place holder for “expensive to create” objects. The real object is only created when a client first requests or accesses the object.
2.Remote Proxy: A remote proxy provides local representation for an object that resides in a different address space.
3.Protection Proxy: A protection proxy control access to a sensitive master object. The surrogate object checks that the caller has the access permissions required before forwarding the request.
UML Diagram of Proxy Pattern
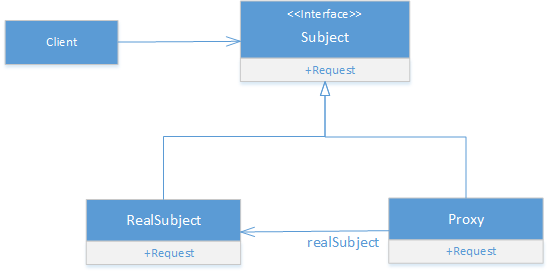
Subject This is an interface that defines members that are going to be implemented by the RealSubject and Proxy class so that the Proxy can be used anywhere the RealSubject is expected.
RealSubject This is a class that we want to use more efficiently by using the proxy class.
Proxy This is a class that holds a reference of the RealSubject class and can access RealSubjecr class members as required.
Example Code
Creating Subject
using System;
using System.Collections.Generic;
using System.Text;

namespace ProxyPattern
{
  public interface IChrome
   {
       string DisplayResult();
   }
}
Creating Real-Object
using System;
using System.Collections.Generic;
using System.Text;

namespace ProxyPattern
{
   public class RealServer : IChrome
    {
        private string Filename { get; set; }

        public RealServer(string filename)
        {
            Filename = filename;
            LoadImageFromDisk();
        }
        public void LoadImageFromDisk()
        {
            Console.WriteLine("Loading  : " + Filename);
        }
        public string DisplayResult()
        {
            Console.WriteLine("Displaying  Result From Real Server : " + Filename);
           return "Displaying  Result From Real Server : " + Filename;
        }

    }
}
Creating Proxy
using System;
using System.Collections.Generic;
using System.Text;

namespace ProxyPattern
{
    public class ProxyServer
    {
        private RealServer real = null;
        List<string> search = new List<string>();
        private bool result = false;
        private string Url;

        public void Search(string url)
        {
            Url = url;
            result = SearchUrlInCache(url);
            DisplayResult();

        }
        public bool SearchUrlInCache(string url)
        {
            bool count = false;
            for(int i=0;i<search.Count;i++)
            {
                if(url.Equals(search[i]))
                {
                    count = true;
                }
            }
            return count;
        }
        public void DisplayResult()
        {
            if(result == false)
            {
                real = new RealServer(Url);

                search.Add(Url);
                real.DisplayResult();
            }
            else
            {
                Console.WriteLine("Displaying Result From Cache  : " + Url);

            }
        }

    }
}
Client Code
using System;

namespace ProxyPattern
{
    class Program
    {
        static void Main(string[] args)
        {

            ProxyServer chrome = null;


                  chrome = new ProxyServer();
                  chrome.Search("Proxy Pattern");
                  chrome.Search("Factory Pattern");
                  chrome.Search("Proxy Pattern");


        }
    }
}
Output
.png)
1.Prototype pattern falls under Creational Pattern Design Patterns.
2.Prototype Design Pattern gives us a way to create new objects from the existing instance of the object. That means it clone the existing object with its data into a new object.
3.In this pattern we can Clone Object in 2 ways that is:
1.Shallow Copy: it will create the new object from the existing object and then copying the value type fields of the current object to the new object. But in the case of reference type, it will only copy the reference, not the referred object itself.
2.Deep Copy: it will create the new object from the existing object and then copying the fields of the current object to the newly created object.If the field is a reference type, then a new copy of the referred object is created.
UML Diagram

IPrototype: Interface that is used for creating objects.
ConcretePrototype1, ConcretePrototype2: Implements IPrototype interface
Client : Client class will make clones of different objects.
Example Code
using System;
using System.Collections.Generic;
using System.Text;

namespace PrototypePattern
{
    public class Employee
    {
        public string Name { get; set; }
        public string Department { get; set; }
        public Address EmpAddress { get; set; }
        public Employee GetClone()
        {
            return (Employee)this.MemberwiseClone();
        }

    }

}
using System;
using System.Collections.Generic;
using System.Text;
namespace PrototypePattern
{
public class Address
{
public string address { get; set; }
public static int PinCode;
public Address GetClone()
{
return (Address)this.MemberwiseClone();
}
}
}Client code
using System;

namespace PrototypePattern
{
  public  class Program
    {
        static void Main(string[] args)
        {
            Employee emp1 = new Employee();
            emp1.Name = "Lavanya";
            emp1.Department = "IT";
            emp1.EmpAddress = new Address() { address = "Kolar"};
            Employee emp2 = emp1.GetClone();
            emp2.Name = "Treena";
            Console.WriteLine("Emplpyee 1: ");
            Console.WriteLine("Name: " + emp1.Name + ", Address: " + emp1.EmpAddress.address + ", Dept: " + emp1.Department);
            Console.WriteLine("Emplpyee 2: ");
            Console.WriteLine("Name: " + emp2.Name + ", Address: " + emp2.EmpAddress.address + ", Dept: " + emp2.Department);
            Console.ReadLine();
        }
    }
}
Output
.png)
1.The Abstract Factory Design Pattern belongs to the creational design pattern category.
2.The Abstract Factory is a super factory that creates other factories.
UML Diagram

AbstractFactory This is an interface which is used to create abstract product
ConcreteFactory This is a class which implements the AbstractFactory interface to create concrete products.
AbstractProduct This is an interface which declares a type of product.
ConcreteProduct This is a class which implements the AbstractProduct interface to create a product.
Client This is a class which uses AbstractFactory and AbstractProduct interfaces to create a family of related objects.
Example Code
Creating Abstract Product
using System;
using System.Collections.Generic;
using System.Text;

namespace AbstractFactoryPattern
{
     public interface IFood
    {
        string ProductDetails();
    }
}
Creating Concrete Product
using System;
using System.Collections.Generic;
using System.Text;

namespace AbstractFactoryPattern
{
   public class KitKat : IFood
    {
        public string ProductDetails()
        {
            return "Name : KitKat ,Cost : Rs 10";
        }
    }
}
using System;
using System.Collections.Generic;
using System.Text;
namespace AbstractFactoryPattern
{
public class Snickers : IFood
{
public string ProductDetails()
{
return "Name : Snickers , cost : Rs 20";
}
}
}using System;
using System.Collections.Generic;
using System.Text;
namespace AbstractFactoryPattern
{
public class SwisChocolate :IFood
{
public string ProductDetails()
{
return "Name : Swis Chocolate , Cost : Rs 110";
}
}
}using System;
using System.Collections.Generic;
using System.Text;
namespace AbstractFactoryPattern
{
public class VanillaDream : IFood
{
public string ProductDetails()
{
return "Name : Vanilla Dream, Cost :Rs 75";
}
}
}Creating the Abstract Factory
using System;
using System.Collections.Generic;
using System.Text;

namespace AbstractFactoryPattern
{

        public abstract class FoodFactory
    {
            public abstract IFood GetProduct(string FoodType);
            public static FoodFactory CreateFoodFactory(string FactoryType)
            {
            if (FactoryType.Equals("Ice Cream"))
                return new IceCreamFactory();
            else
                return new ChocolateFactory();
            }
        }

}
Creating Concrete Factory
using System;
using System.Collections.Generic;
using System.Text;

namespace AbstractFactoryPattern
{
   public class IceCreamFactory : FoodFactory
    {
        public override IFood GetProduct(string FoodType)
        {
            if (FoodType.Equals("Vanilla Dream"))
            {
                return new VanillaDream();
            }
            else
            {
                return new SwisChocolate();
            }

        }
    }
}
using System;
using System.Collections.Generic;
using System.Text;
namespace AbstractFactoryPattern
{
public class ChocolateFactory : FoodFactory
{
public override IFood GetProduct(string FoodType)
{
if (FoodType.Equals("KitKat"))
{
return new KitKat();
}
else
{
return new Snickers();
}
}
}
}Client
using System;

namespace AbstractFactoryPattern
{
    class Program
    {
        static void Main(string[] args)
        {
            IFood food = null;
            FoodFactory foodFactory = null;
            string Details = null;
            foodFactory = FoodFactory.CreateFoodFactory("Ice Cream");
            Console.WriteLine("Food Factory type : " + foodFactory.GetType().Name);
            Console.WriteLine();

            food = foodFactory.GetProduct("Vanilla Dream");
            Details = food.ProductDetails();
            Console.WriteLine(Details);

            Console.WriteLine("--------------------------------------------");

            foodFactory = FoodFactory.CreateFoodFactory("Chocolate");
            Console.WriteLine("Food Factory type : " + foodFactory.GetType().Name);
            Console.WriteLine();

            food = foodFactory.GetProduct("Snickers");
            Details = food.ProductDetails();
            Console.WriteLine(Details);

        }
    }
}
Output
.png)
1.The Iterator Design Pattern falls under the category of Behavioral Design Pattern.Iterator Design Pattern allows sequential access of elements without exposing the inside logic.
2.In this Pattern will traverse a container and access the elements of the container.
3.The main use of the Iterator design pattern is to access the elements of a collection in a sequential manner.
4.We use iterators quite frequently in our daily life. For example remote control of the TV. Any remote control that we use, just pick up the TV remote control and start pressing Up and Down or Forward and Back keys to iterate through the channels.
UML Diagram Of Iterator Pattern

Example Code Create the collection item
using System;
using System.Collections.Generic;
using System.Text;

namespace IteratorPattern
{
      public class Elempoyee
       {
           public int ID { get; set; }
           public string Name { get; set; }
           public Elempoyee(string name, int id)
           {
               Name = name;
               ID = id;
           }
       }
}
Creating Iterator
using System;
using System.Collections.Generic;
using System.Text;

namespace IteratorPattern
{
      public class Iterator
        {
            private ConcreteCollection collection;
            private int current = 0;
            private int step = 1;

            // Constructor
            public Iterator(ConcreteCollection collection)
            {
                this.collection = collection;
            }

            // Gets first item
            public Elempoyee First()
            {
                current = 0;
                return collection.GetEmployee(current);
            }

            // Gets next item
            public Elempoyee Next()
            {
                current += step;
                if (!IsCompleted)
                {
                    return collection.GetEmployee(current);
                }
                else
                {
                    return null;
                }
            }

            // Check whether iteration is complete
            public bool IsCompleted
            {
                get { return current >= collection.Count; }
            }
        }
}
Creating ConcreteCollection
using System;
using System.Collections.Generic;
using System.Text;

namespace IteratorPattern
{
       public class ConcreteCollection
        {
            private List<Elempoyee> listEmployees = new List<Elempoyee>();

            //Create Iterator
            public Iterator CreateIterator()
            {
                return new Iterator(this);
            }

            // Gets item count
            public int Count
            {
                get { return listEmployees.Count; }
            }

            //Add items to the collection
            public void AddEmployee(Elempoyee employee)
            {
                listEmployees.Add(employee);
            }

            //Get item from collection
            public Elempoyee GetEmployee(int IndexPosition)
            {
                return listEmployees[IndexPosition];
            }
        }
}
Client Code
using System;

namespace IteratorPattern
{
        public class Program
        {
            static void Main()
            {
                // Build a collection
                ConcreteCollection collection = new ConcreteCollection();

                collection.AddEmployee(new Elempoyee("Lavanya", 100));
                collection.AddEmployee(new Elempoyee("Tereena", 101));
                collection.AddEmployee(new Elempoyee("Raju", 102));
                collection.AddEmployee(new Elempoyee("Karan", 103));
                collection.AddEmployee(new Elempoyee("Shashank", 104));

                // Create iterator
                Iterator iterator = collection.CreateIterator();

                //looping iterator
                Console.WriteLine("Iterating over collection:");

                for (Elempoyee emp = iterator.First(); !iterator.IsCompleted; emp = iterator.Next())
                {
                    Console.WriteLine("ID:"+emp.ID + " Name:"+emp.Name);
                }
                Console.Read();
            }
        }
}
Output
.png)
1.Strategy Design Pattern falls under Behavioral Pattern.
2.The Strategy Design Pattern attempts to solve the issue where you need to provide multiple solutions for the same problem so that one can be selected at runtime.
3.The Strategy Design Pattern is used when we have multiple algorithms (solutions) for a specific task and the client decides the actual implementation to be used at runtime.
UML diagram for the Strategy Design Pattern
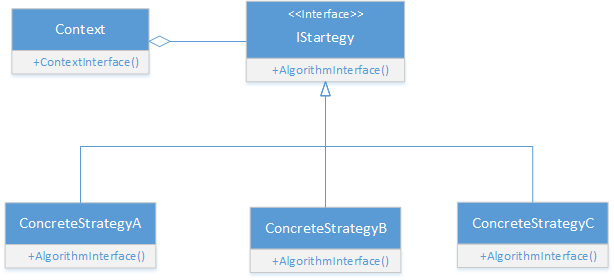
The classes, interfaces, and objects in the above UML class diagram are as follows:
Strategy :The Strategy declares an interface that is going to be implemented by all supported algorithms.
ConcreteStrategy:These are classes and they implement the algorithm defined by the Strategy interface.
Context :This is a class which maintains a reference to a Strategy object, and then uses that reference to call the algorithm defined by a particular ConcreteStrategy
Example Code
Creating Strategy
using System;
using System.Collections.Generic;
using System.Text;

namespace StrategyPattern
{
   public interface ITravelStrategy
    {
      string GotoAirport();

    }
}
Creating Concrete Strategy
using System;
using System.Collections.Generic;
using System.Text;

namespace StrategyPattern
{
   public class AutoTravelStrategy : ITravelStrategy
        {
            public string GotoAirport()
            {
            Console.WriteLine("Traveler is going to Airport by Auto and will be charged Rs 600");

            return "Traveler is going to Airport by Auto and will be charged Rs 600";
            }
        }
}
using System;
using System.Collections.Generic;
using System.Text;
namespace StrategyPattern
{
public class BusTravelStrategy : ITravelStrategy
{
public string GotoAirport()
{
Console.WriteLine("Traveler is going to Airport by bus and will be charged Rs 300");
return "Traveler is going to Airport by bus and will be charged Rs 300";
}
}
}using System;
using System.Collections.Generic;
using System.Text;
namespace StrategyPattern
{
public class TaxiTravelStrategy : ITravelStrategy
{
public string GotoAirport()
{
Console.WriteLine("Traveler is going to Airport by Taxi and will be charged Rs 1000");
return "Traveler is going to Airport by Taxi and will be charged Rs 1000";
}
}
}using System;
using System.Collections.Generic;
using System.Text;
namespace StrategyPattern
{
public class TrainTravelStrategy : ITravelStrategy
{
public string GotoAirport()
{
Console.WriteLine("Traveler is going to Airport by Train and will be charged Rs 200");
return "Traveler is going to Airport by Train and will be charged Rs 200";
}
}
}Creating context
using System;
using System.Collections.Generic;
using System.Text;

namespace StrategyPattern
{
        public class TravelContext
        {
            private ITravelStrategy travelStrategy;

            // The Client will set what TravelStrategy to use by
            // calling this method at runtime
            public void SetTravelStrategy(ITravelStrategy strategy)
            {
                this.travelStrategy = strategy;
            }

            public void gotoAirport()
            {
                travelStrategy.GotoAirport();
            }
        }
}
Client Code
using System;

namespace StrategyPattern
{
   public class Program
    {
        static void Main(string[] args)
        {
            TravelContext travel = new TravelContext();
            Console.WriteLine("Please enter Travel Type : Auto or Bus or Train or Taxi");
            string input = Console.ReadLine();
            switch(input.ToLower())
            {
                case "bus": travel.SetTravelStrategy(new BusTravelStrategy());
                    break;
                case "train": travel.SetTravelStrategy(new TrainTravelStrategy());
                    break;
                case "taxi": travel.SetTravelStrategy(new TaxiTravelStrategy());
                    break;
                case "auto": travel.SetTravelStrategy(new AutoTravelStrategy());
                    break;
                default:
                    break;
            }
            travel.gotoAirport();
            Console.ReadLine();
        }
    }
}
Output
.png)
1.The Observer Design Pattern in which an object maintains a list of its dependents and notifies them automatically whenever any state changes by calling one of their methods.
2.The Observer Design Pattern defines a one-to-many dependency between objects so that when one objects state changes, all its dependents are notified and updated automatically.

1.Subject They are the publishers. When a change occurs to a subject it should notify all of its subscribers.
2.Observers They are the subscribers. They simply listen to the changes in the subjects.
Creating the Subject interface
using System;
using System.Collections.Generic;
using System.Text;

namespace ObserverPattern
{
        public interface ISubject
        {
            string RegisterObserver(IObserver observer);
            string RemoveObserver(IObserver observer);
            void NotifyObservers();
        }
}
Creating Concrete Subject
using System;
using System.Collections.Generic;
using System.Text;

namespace ObserverPattern
{
        public class Subject : ISubject
        {
            private List<IObserver> observers = new List<IObserver>();
            private string Month { get; set; }
            private int SalaryInRs { get; set; }
            private string SalaryStatus { get; set; }

            public Subject(string month, int salaryInrs, string salarystatus)
            {
                   Month = month;
                  SalaryInRs = salaryInrs;
                  SalaryStatus = salarystatus;
            }

            public string getSalaryStatus()
            {
                return SalaryStatus;
            }

            public string setSalaryStatus(string salarystatus)
            {
                   this.SalaryStatus = salarystatus;
                    NotifyObservers();
                   return "Salary status changed";
            }

            public string RegisterObserver(IObserver observer)
            {
                Console.WriteLine("Employee Added : " + ((User)observer).UserName);
                observers.Add(observer);
            return "employee add successfuly";
            }

            public void AddObservers(IObserver observer)
            {
                observers.Add(observer);
            }

            public string RemoveObserver(IObserver observer)
            {
                observers.Remove(observer);
                return "Removed successfully";
            }

            public void NotifyObservers()
            {
                Console.WriteLine("\n Month: "+Month+"\n Rs: "+ SalaryInRs + "\n Salary Status:"+SalaryStatus +" \n So notifying all employees ");

                foreach (IObserver observer in observers)
                {
                    observer.update(SalaryStatus);
                }
            }
        }
}
Creating Observer Interface
using System;
using System.Collections.Generic;
using System.Text;

namespace ObserverPattern
{

        public interface IObserver
        {
            string update(string availability);
        }

}
Creating Concrete Observer
using System;
using System.Collections.Generic;
using System.Text;

namespace ObserverPattern
{
        public class User : IObserver
        {
            public string UserName { get; set; }

            public User(string userName, ISubject subject)
            {
                UserName = userName;
                subject.RegisterObserver(this);
            }

            public string update(string status)
            {
                Console.WriteLine("Hello " + UserName + ",your salary is " + status + " enjoy.");
                return "Updated sucess";
            }
        }

}
Client code
using System;

namespace ObserverPattern
{

        class Program
        {
            static void Main(string[] args)
            {
                Subject april = new Subject("April", 10000, "Not Done");
                User user1 = new User("Lavanya", april);

                User user2 = new User("Tereena", april);

                User user3 = new User("Raju", april);

                Console.WriteLine("April Month current Salary status : " + april.getSalaryStatus());
                Console.WriteLine();


            april.setSalaryStatus("Done");

                Console.Read();
            }
        }
}
Output

1.The Decorator Design Pattern allows us to dynamically add new functionalities to an existing object without altering or modifying its structure.
2.This design pattern acts as a wrapper to the existing class.
3.Decorator design pattern adds additional functionalities to the object by wrapping it.
4.The Decorator Design Pattern provides an alternative approach to inheritance for modifying the behavior of an object. When we use inheritance to extend the behavior of a class, then this takes place at compile time.
UML Diagram of Decorator Design Pattern

Component: This interface contains members that are going to be implemented by the concrete component classes and decorator classes.
ConcreteComponent: This class simply implements the Component interface.
Decorator: This class implements the Component interface and contains a reference to a component instance. This class also acts as the base class for all decorators. The decorator is essentially wrapping the Component.
ConcreteDecoratorA / ConcreteDecoratorB: These are concrete classes and inherited from the Decorator abstract class. This class adds the additional responsibility to the original component.
Creating the Car interface
 namespace DecoratorDesignPattern
{
    public interface ICar
    {
        ICar ManufactureCar();
    }
}
Creating Concrete Car
using System;
namespace DecoratorDesignPattern
{
    public class BMWCar : ICar
    {
        private string CarName = "BMW";
        public string CarBody { get; set; }
        public string CarDoor { get; set; }
        public string CarWheels { get; set; }
        public string CarGlass { get; set; }
        public string Engine { get; set; }

        public override string ToString()
        {
            return "\n CarName=" + CarName + "\n CarBody=" + CarBody + "\n CarDoor=" + CarDoor + "\n CarWheels="
                            + CarWheels + "\n CarGlass=" + CarGlass + "\n Engine=" + Engine ;
        }

        public ICar ManufactureCar()
        {
            CarBody = "carbon fiber material";
            CarDoor = "4 car doors";
            CarWheels ="4 MRF wheels";
            CarGlass = "6 car glasses";
            return this;
        }
    }
}
Creating Car Decorator
namespace DecoratorDesignPattern
{
    public abstract class CarDecorator : ICar
    {
        protected ICar car;
        public CarDecorator(ICar car)
        {
            this.car = car;
        }

        public virtual ICar ManufactureCar()
        {
            return car.ManufactureCar();
        }
    }
}
Creating Diesel Car Decorator
using System;
namespace DecoratorDesignPattern
{
    public class DieselCarDecorator : CarDecorator
    {
        public DieselCarDecorator(ICar car) : base(car)
        {
        }

        public override ICar ManufactureCar()
        {
            car.ManufactureCar();
            AddEngine(car);
            return car;
        }

        public void AddEngine(ICar car)
        {
            if (car is BMWCar)
            {
                BMWCar BMWCar = (BMWCar)car;
                BMWCar.Engine = "Diesel Engine";
                Console.WriteLine("DieselCarDecorator added Diesel Engine to the Car : " + car);
            }
        }
    }
}
Client code
using System;
namespace DecoratorDesignPattern
{
    class Program
    {
        static void Main(string[] args)
        {
            ICar bmwCar1 = new BMWCar();
            bmwCar1.ManufactureCar();
            Console.WriteLine(bmwCar1 + "\n");

            DieselCarDecorator carWithDieselEngine = new DieselCarDecorator(bmwCar1);
            carWithDieselEngine.ManufactureCar();

            Console.WriteLine();

            ICar bmwCar2 = new BMWCar();

            PetrolCarDecorator carWithPetrolEngine = new PetrolCarDecorator(bmwCar2);
            carWithPetrolEngine.ManufactureCar();

            Console.ReadKey();
        }
    }
}
OutPut

-
We need to use the Singleton Design Pattern when we need to ensures that only one instance of a particular class is going to becreated and then provide simple global access to that instance for the entire application.
-
The most important advantage of using the singleton design pattern in C# is that it takes care of concurrent access to the shared resource. That means if we are sharing a resource with multiple clients simultaneously, then concurrent access to that resource is well managed by the singleton design pattern.
-
To share common data i.e. master data and configuration data which is not changed that frequently in an application. In that case we need to cache the objects in memory.

1.No Thread-Safe Singleton design pattern.
2.Thread-Safety Singleton implementation.
3.The Thread-Safety Singleton Design pattern implementation using Double-Check Locking.
4.Thread-Safe Singleton Design pattern implementation without using the locks and no lazy instantiation.
5.Fully lazy instantiation of the singleton class.
1.No Thread-Safe Singleton design pattern
namespace SingletonDemo
{
    public sealed class Singleton
    {
        private static int counter = 0;
        private static Singleton instance = null;
        public static Singleton GetInstance
        {
            get
            {
                if (instance == null)
                    instance = new Singleton();
                return instance;
            }
        }

        private Singleton()
        {
            counter++;
            Console.WriteLine("Counter Value " + counter.ToString());
        }

        public void PrintDetails(string message)
        {
            Console.WriteLine(message);
        }
    }
}
The way we implement the singleton design pattern in the above example is not to thread-safe. It means in a multithreaded environment, it will able to create multiple instances of the singleton class.
2.Thread-Safety Singleton implementation
namespace SingletonDemo
{
    public sealed class Singleton
    {
        private static int counter = 0;
        private static readonly object Instancelock = new object();
        private Singleton()
        {
            counter++;
            Console.WriteLine("Counter Value " + counter.ToString());
        }
        private static Singleton instance = null;

        public static Singleton GetInstance
        {
            get
            {
                lock (Instancelock)
                {
                    if (instance == null)
                    {
                        instance = new Singleton();
                    }
                    return instance;
                }
            }
        }

        public void PrintDetails(string message)
        {
            Console.WriteLine(message);
        }
    }
}
But the problem with this code is slow down your application as only one thread can access the GetInstance property at any given point of time.
3.The Thread-Safety Singleton Design pattern implementation using Double-Check Locking
namespace SingletonDemo
{
    public sealed class Singleton
    {
        private static int counter = 0;
        private static readonly object Instancelock = new object();
        private Singleton()
        {
            counter++;
            Console.WriteLine("Counter Value " + counter.ToString());
        }
        private static Singleton instance = null;

        public static Singleton GetInstance
        {
            get
            {
                if (instance == null)
                {
                    lock (Instancelock)
                    {
                        if (instance == null)
                        {
                            instance = new Singleton();
                        }

                    }
                }
                return instance;
            }
        }

        public void PrintDetails(string message)
        {
            Console.WriteLine(message);
        }
    }
}
4.Singleton Design pattern using Eager Loading
namespace SingletonDemo
{
    public sealed class Singleton
    {
        private static int counter = 0;

        private Singleton()
        {
            counter++;
            Console.WriteLine("Counter Value " + counter.ToString());
        }

        private static readonly Singleton singleInstance = new Singleton();

        public static Singleton GetInstance
        {
            get
            {
                return singleInstance;
            }
        }

        public void PrintDetails(string message)
        {
            Console.WriteLine(message);
        }
    }
}
The advantage of using Eager Loading in the Singleton design pattern is that the CLR (Common Language Runtime) will take care of object initialization and thread-safety.
https://github.com/EzDevPrac/CsharpSamples-Lavanya
Facade is a structural design pattern that provides a simplified interface to a library, a framework, or any other complex set of classes.
UML diagram of Facade Design Pattern

Façade class The Façade class knows which subsystem classes are responsible for a given request and then it delegates the client requests to appropriate subsystem objects.
SubSysyem Class The Subsystem classes Implement their respective functionalities assigned to them and these subsystems do not have any knowledge of the facade.
Example code
Product.cs
using System;
namespace FacadeDesignPattern
{
    public class Product
    {
        public void GetProductDetails()
        {
            Console.WriteLine("Fetching the Product Details");
        }
    }
}
Payment
using System;
namespace FacadeDesignPattern
{
    public class Payment
    {
        public void MakePayment()
        {
            Console.WriteLine("Payment Done Successfully");
        }
    }
}
Invoice
using System;
namespace FacadeDesignPattern
{
    public class Invoice
    {
        public void Sendinvoice()
        {
            Console.WriteLine("Invoice Send Successfully");
        }
    }
}
Creating Facade
using System;
namespace FacadeDesignPattern
{
    public class Order
    {
        public void PlaceOrder()
        {
            Console.WriteLine("Place Order Started");
            Product product = new Product();
            product.GetProductDetails();
            Payment payment = new Payment();
            payment.MakePayment();
            Invoice invoice = new Invoice();
            invoice.Sendinvoice();
            Console.WriteLine("Order Placed Successfully");
        }
    }
}
Client
using System;
namespace FacadeDesignPattern
{
    class Program
    {
        static void Main(string[] args)
        {
            Order order = new Order();
            order.PlaceOrder();
            Console.Read();
        }
    }
}
Output

https://github.com/EzDevPrac/CsharpSamples-Lavanya
Factory Design Pattern :
A factory is an object which is used for creating other objects. we can say that a factory is a class with a method. That method will create and return different types of objects based on the input parameter, it received
The basic principle behind the factory design pattern is that, at run time, we get an object of similar type based on the parameter we pass.
UML Class Diagram

Product This defines the interface of objects the factory method creates.
ConcreteProduct This is a class that implements the Product interface.
CreatorThis is an abstract class and declares the factory method, which returns an object of type Product.
ConcreteCreatorThis is a class that implements the Creator class and overrides the factory method to return an instance of a ConcreteProduct.
Sample Code
Product
 public interface Animal
    {
          string  speak();
          string  dance();
    }
ConcreteProduct
Cat
namespace FactoryMethodDesignPattern
{

    public class Cat : Animal
    {
        public string speak()
        {
            return "Meow Meow";
        }
        public string dance()
        {
            return "Dam Dam";
        }
    }

}
dog
namespace FactoryMethodDesignPattern
{
  public  class Dog:Animal
    {
        public string speak()
        {
            return "Bark bark";
        }
        public string dance()
        {
            return "Ba Ba";
        }
    }
}
Creator
 FactoryMethodDesignPattern
{
     abstract class AnimalFactory
    {
        protected abstract Animal MakeAnimal();
        public Animal CreateAnimal()
        {
            return this.MakeAnimal();
        }
    }
}
ConcreteCreator
namespace FactoryMethodDesignPattern
{
    class CatFactory:AnimalFactory
    {
        protected override Animal MakeAnimal()
        {
            Animal animal = new Cat();
            return animal;
        }
    }
    class DogFactory : AnimalFactory
    {
        protected override Animal MakeAnimal()
        {
            Animal animal = new Dog();
            return animal;
        }
    }
}
Factory Pattern Client Demo
namespace FactoryMethodDesignPattern
{
    class Program
    {
        static void Main(string[] args)
        {
            Animal animal = null;
            Console.WriteLine("Enter the animal you want to create :");

            string ani = Console.ReadLine();
            switch (ani.ToLower())
            {
                case "cat":
                    animal = new CatFactory().CreateAnimal();
                    break;
                case "dog":
                    animal = new DogFactory().CreateAnimal();
                    break;
                default:
                    break;
            }
            if (animal != null)
            {
                Console.WriteLine("Animal Type : " + animal.GetType().Name);
                Console.WriteLine(animal.GetType().Name + " Speak : " + animal.speak());
                Console.WriteLine(animal.GetType().Name + " Dance like : " + animal.dance());

            }
            else
            {
                Console.Write("Invalid Animal Type");
            }
        }
    }
}
Output

https://github.com/EzDevPrac/CsharpSamples-Lavanya
Builder Design Pattern
Builder design pattern falls under the category of "Creational" design patterns. This pattern is used to build a complex object by using a step by step approach.
UML Diagram For Builder Pattern

Builder :This is an interface which is used to define all the steps required to create a product.
ConcreteBuilder:This is a class which implements the Builder interface to create a complex product.
Product:This is a class which defines the parts of the complex object which are to be generated by the Builder Pattern.
Director :This is a class that is used to construct an object using the Builder interface.
Example code
Creating Product (Beverage)
namespace BuilderPatter
{
    public class Beverage
    {
        public int Water { get; set; }
        public int Milk { get; set; }
        public int Sugar { get; set; }
        public int PowderQuantity { get; set; }
        public string BeverageName { get; set; }

        public string ShowBeverage()
        {
            return "Hot " + BeverageName + " [" + Water + " ml of water, " + Milk + "ml of milk, " + Sugar
                            + " gm of sugar, " + PowderQuantity + " gm of " + BeverageName + "]\n";
        }
    }
}
Creating Abstract Builder (BeverageBuilder)
namespace BuilderPatter
{
    public class Beverage
    {
        public int Water { get; set; }
        public int Milk { get; set; }
        public int Sugar { get; set; }
        public int PowderQuantity { get; set; }
        public string BeverageName { get; set; }

        public string ShowBeverage()
        {
            return "Hot " + BeverageName + " [" + Water + " ml of water, " + Milk + "ml of milk, " + Sugar
                            + " gm of sugar, " + PowderQuantity + " gm of " + BeverageName + "]\n";
        }
    }
}
Creating Concrete Builder
        public class CoffeeBuilder : BeverageBuilder
    {
        public override void SetWater()
        {
            Console.WriteLine("Step 1 : Boiling water");
            GetBeverage().Water = 40;
        }

        public override void SetMilk()
        {
            Console.WriteLine("Step 2 : Adding milk");
            GetBeverage().Milk = 50;
        }

        public override void SetSugar()
        {
            Console.WriteLine("Step 3 : Adding Sugar");
            GetBeverage().Sugar = 10;
        }

        public override void SetPowderQuantity()
        {
            Console.WriteLine("Step 4 : Adding 15 Grams of coffee powder");
            GetBeverage().PowderQuantity = 15;
        }

        public override void SetBeverageType()
        {
            Console.WriteLine("Coffee");
            GetBeverage().BeverageName = "Coffee";
        }
    }

    public class TeaBuider : BeverageBuilder
    {
        public override void SetWater()
        {
            Console.WriteLine("Step 1 : Boiling water");
            GetBeverage().Water = 50;
        }
        public override void SetMilk()
        {
            Console.WriteLine("Step 2 : Adding milk");
            GetBeverage().Milk = 60;
        }
        public override void SetSugar()
        {
            Console.WriteLine("Step 3 : Adding Sugar");
            GetBeverage().Sugar = 15;
        }
        public override void SetPowderQuantity()
        {
            Console.WriteLine("Step 4 : Adding 20 Grams of coffee powder");
            GetBeverage().PowderQuantity = 20;
        }
        public override void SetBeverageType()
        {
            Console.WriteLine("Tea");
            GetBeverage().BeverageName = "Tea";
        }
    }
}
Creating the Director (BeverageDirector)
namespace BuilderDesignPattern
{
    public class BeverageDirector
    {
        public Beverage MakeBeverage(BeverageBuilder beverageBuilder)
        {
            beverageBuilder.CreateBeverage();

            beverageBuilder.SetBeverageType();
            beverageBuilder.SetWater();
            beverageBuilder.SetMilk();
            beverageBuilder.SetSugar();
            beverageBuilder.SetPowderQuantity();

            return beverageBuilder.GetBeverage();
        }
    }
}
Client Code
using System;
namespace BuilderDesignPattern
{
    class Program
    {
        static void Main(string[] args)
        {
            Beverage beverage;
            BeverageDirector beverageDirector = new BeverageDirector();

            TeaBuider tea = new TeaBuider();
            beverage = beverageDirector.MakeBeverage(tea);
            Console.WriteLine(beverage.ShowBeverage());

            CoffeeBuilder coffee = new CoffeeBuilder();
            beverage = beverageDirector.MakeBeverage(coffee);
            Console.WriteLine(beverage.ShowBeverage());

            Console.ReadKey();
        }
    }
}
Outpt

https://github.com/EzDevPrac/CsharpSamples-Lavanya
Command Design Pattern :
The Command Design Pattern is used to encapsulate a request as an object and pass to an invoker, wherein the invoker does not know how to service the request but uses the encapsulated command to perform an action.
UML diagram of Command Design Pattern

Client client class sends the command object that needs to be executed to the invoker class.
Invoker The invoker does not know how to handle the request. What the invoker will do is, it will call the Execute method of the command object.
Interface Since all the commands have similar method execute so we will implement interface.
Concrete Command Class that implements the execute operation by invoking on the receiver.
Receiver class Class that performs the Action Associated with the Request.
Example code
Creating Receiver object
using System;
namespace CommandPattern
{
    public class Document
    {
        public void Open()
        {
            Console.WriteLine("Document Opened");
        }
        public void Save()
        {
            Console.WriteLine("Document Saved");
        }
        public void Close()
        {
            Console.WriteLine("Document Closed");
        }
    }
}
Creating a Command
namespace CommandPattern
{
    public interface ICommand
    {
        void Execute();
    }
}
OpenCommand:
namespace CommandPattern
{
    public class OpenCommand : ICommand
    {
        private Document document;
        public OpenCommand(Document doc)
        {
            document = doc;
        }
        public void Execute()
        {
            document.Open();
        }
    }
}
SaveCommand
namespace CommandPattern
{
    class SaveCommand : ICommand
    {
        private Document document;
        public SaveCommand(Document doc)
        {
            document = doc;
        }
        public void Execute()
        {
            document.Save();
        }
    }
}
CloseCommand:
namespace CommandPattern
{
    class CloseCommand : ICommand
    {
        private Document document;
        public CloseCommand(Document doc)
        {
            document = doc;
        }
        public void Execute()
        {
            document.Close();
        }
    }
}
Creating the Invoker
namespace CommandPattern
{
    public class CommandInvoker
    {
        public CommandInvoker ()
         {

          }
        public void Invoke(ICommand cmd)
        {
             cmd.Execute();
        }
    }
}
Client
using System;

namespace CommandPattern
{
    class Program
    {
        static void Main(string[] args)
        {
            Document document = new Document();
            CommandInvoker cmi = new CommandInvoker();
            Console.WriteLine("Enter the command you want to execute");
            Console.WriteLine("1.Open");
            Console.WriteLine("2.Save");
            Console.WriteLine("3.Close");
            string option = Console.ReadLine();
            switch (option.ToLower())
            {
                case "open":  ICommand openCommand = new OpenCommand(document);

                          cmi.Invoke(openCommand);
                      break;
                case "save": ICommand saveCommand = new SaveCommand(document);
                          cmi.Invoke(saveCommand);
                          break;
                case "close":  ICommand closeCommand = new CloseCommand(document);
                         cmi.Invoke(closeCommand);
                         break;

                default:
                 break;
            }

        }
    }
}
Output
