Scripts - Rigify armature overhaul #78
Comments
|
Dang, this looks great! The features shown in that playlist definitely trump what's on the current armature. Thanks for writing these scripts, I'll check them out. |
|
Nevermind, I got it working on 2.93 (didn't seem to work on 3.0). Apparently I didn't know what I was missing because these extra features are a lot of fun to play around with. In addition to the eye controls, it also looks like you made a ton of controls for the face and chest accessible too!
Does Rigify support three spine bones instead of two? Maybe I didn't dig far enough, but out of the three spine bones (Spine, Chest, Upper chest) I only see access to the Chest and Upper chest. The Hips are parented to the Spine, so that third spine bone is essentially lost. Other than that, I think you hit every feature on the original one.
I'll gladly do this! Do you want to make a pull request with these files so you're credited as the original author? I can take care of the addon integration part. |
I actually haven't even downloaded 3.0 yet, maybe Rigify isn't running correctly on it at this time, or they may have made some changes, I'll check it out.
I added a custom shape to anything that could have any kind of deformation effect, be it direct or indirect. In fact the (MCH) layers are entirely made out of bones formerly in layer 10 that have any kind of relation with the deform bones of the face and hair/accessories, but there's probably lots of redundancy there.
Three bones is actually the minimum length of the Rigify spine, you're saying the bone called Spine is missing, or did I misunderstand?
Honestly I'd rather not be credited, this is something I did for my own use and released it on a whim, so while I'm going to try and maintain it I don't plan to spend extra time on issues that wouldn't affect my own work, so I'd prefer it if people didn't come looking for me when you make the next public release. |


Just uploaded the updated version in the OP, now it's compatible with both 2.93 and 3.0, all they changed is adding more granularity to the custom shape transform parameters (a welcome change, actually). |

What I meant was, the Spine_fk bone seems to be doing something similar to the Hips_fk bone. They're both affecting the lower body, but I was trying to get the Spine_fk to affect the upper body. If you check the original armature you can see what I'm talking about. The Spine (along with the Chest and Upper chest) affects the upper body and the Pelvis affects the lower body. The DEF-Spine bone on the Rigify armature looks like it's doing just that, and the chest bone in the Torso section only seems to affect the Chest_fk bone / Upper Chest_fk bone, so am I missing something obvious that allows the Spine_fk bone to affect the upper body?
Okay no problem, I can understand that. Thanks again for sharing these! |
Ah, I see what you were referring to now. |


|
I've added a wrapper for your scripts into the plugin.
That's what I was looking for, thanks! I personally prefer it like this, but if position 2 is the default Rigify setting then I think it'd be better to leave it alone. |
Well done, it's functional and I'll be able to release updated files as they are without worrying about the plugin side of things. |
|
The scripts don't alter any weights, they are in fact designed to work with the original weights. Can you post comparison pictures between the original weights and the resulting weights from using the scripts, so that I may understand what's going on? |
|
@ilcane87 Sorry, I deleted the original post because I noticed that's pretty much exactly what you did. However, I'm still having some issues, specifically with the legs area. I haven't tested everywhere else yet. More extreme examples: |


|
Thanks for posting this, there are definitely issues with both the "cf_s_leg_R/L" and the "cf_s_siri_R/L" bones when moving the legs, probably caused by differences in the leg bone axes compared to the original. |
|
@ilcane87 No problem! Really appreciate the fact that this even exists. You're doing a lot of people a huge favor by having made this! |
|
I double checked a few things and also found erratic behaviors with the waist and shoulder correction bones, but now everything should work like it does in the original armature. |
|
@ilcane87 im having a couple of issues: I repacked everything, and when I click the button for this, I get an error:. That script only has 78 lines of code, so it's actually referencing part of the "Before First Rigify Generate -Public.py" script. So running that in the script editor, I now get this: I decided to investigate and see if there were spaces used instead of tabs, or vice versa. I found everything to be consistent. I decided to erase all of the tabs and then...put them back in. Re-ran the script and it worked. Very strange. I saved the "new" version and retested on a different model, and it worked without issues. I researched the issue and it said that python only allows a user to use tabs OR spaces for indentation. I'm kind of baffled on why I was getting this error when I found no stray spaces at all in the code. [but i also don't really know anything about coding] |
|
Darn, I'm sorry, that was 100% my fault. |
|
Howdy, I bring you new years gifts (and gifs I guess).
And that's it, all custom properties have tooltips to explain them but feel free to ask me if anything is unclear. |


|
looks very promising! i'm still an amateur with blender, so i was wondering if this something that can allow me to apply an armature to my character and stay with her when i export her to unity? reason being i have accessories that don't seem to have non-deform bones from the start so if this automatically assigns bones to the entire mesh it may be useful to me. |
|
Hello, I'm afraid I'm not very knowledgeable when it comes to exporting to game engines, since that's outside the scope of my development, but I can give you a few pointers. But I don't think that's what matters when you are exporting to Unity, I think accessories are supposed to work even if you're just using the default armature of KKBPP, whether their bones are deform or not. If you're having trouble with the procedure shown in FlailingFog's videos, you can open a new issue and ask for help. |
|
Yo @ilcane87 while testing your rigify scripts I have found an issue, they don't seem to work on male cards. I've tested both vanilla and modded male cards but they all give this same error. |
|
Hello, this is not surprising considering I've never tried a male character before. Anyway I threw in a quick fix for that problem, you can get the updated scripts from the zip file uploaded in the first post, but I expect more issues to arise since I couldn't test it properly. Edit: nevermind, I just hadn't updated the exporter for a while, things seem to be working fine aside from some breast bones not having any effect for obvious reasons. |
|
Hi! I am a bit confused what part of it is actually in the latest release and for what extra scripts are required - especially with Blender 3... Although I am kind of new to Blender, I followed the guide as closely as possible, but I still end up with things looking like this:
Is this a bug/missing steps in the documentation (it says to parent with empty weights, but there is no such option - just automatic or envelope) or am I just stupid? ;) |

|
Hi @koshisan, if you're using the latest release of the addon (5.0.1) you don't need anything else, it already includes the latest version of these Rigify scripts, and it works just fine in Blender 3.0. Here's what you should do, starting from a new Blender file:
What you should Not do is edit anything else prior to completing the 8 steps, don't even move or resize any object. If it turns out it's a specific character's problem, you can post it here and I'll take a look. |

|
@ilcane87 Thank you for your quick reply! I indeed may have moved the model, since I was fiddeling around with it quite a bit before I got the rig to generate. However, on a vanilla model strictly following the steps above I still have the same problem:
There is some dependency between the bones, but when posing the arms for example, the hands seem to be pinned in space and the mesh just gets streched. Maybe I am just grabbing her wrong? Rigged test models, however, seem to work fine for me... |

|
Since the rig generated correctly, I think your problem is that you aren't used to manipulating a control rig: for example, I see from the picture that you moved the tweak bones of the arm, which are only for cartoony deformations or subtle shape corrections. The bone you're supposed to move for the arm is the big red square that encompasses the hand, in the Arm.L IK and Arm.R IK layers (you should hide any layer you are not currently using for clarity). But that just scratches the surface, to become able to take advantage of the features of a Rigify rig, I strongly recommend checking out this video for a quick overview: |
|
@ilcane87 Thanks again! It was a combination of that and parenting to the wrong rig, I guess. I am finally getting somewhere:
However, it is a real pain to find the bone/joint you want and move it around in blender (since support for 3d input devices is limited). You wouldn't happen to have a better software in mind I could export to for better posing? The final result would be printed on a 3d printer, so I don't really care about colors/textures... |

|
I'm afraid I'm only familiar with Blender, you could look into retargeting existing animations to your character or exporting to game engines (I linked to useful playlists for those purposes in this thread), but if all you want is poses then that may be more trouble than it's worth, especially for a beginner. If you are fine with Koikatsu poses, this addon you've been using has a quick way to apply them to your character, as explained at the end of part 4 of the newest tutorial by FlailingFog: But with everything considered, if you want to pose and print the character you exported to Blender, I believe the most efficient way is to just get used to making poses yourself, reproducing them from references and following tutorials; your speed will pick up fast and it won't feel awkward anymore if you spend some time on it. |
|
@ilcane87 Thank you for your detailed reply, even though it is a bit off topic here... If anyone else has a similiar problem: Posing one limb at a time and hiding all other layers helps significantly, especially if you work one something with controls all over the place, like hair. |
|
This is extremely off topic. If you dont know how to use blender, github
issue tracking is NOT the place to post about that.
This forum is meant to address bugs with code. It is NOT a beginner help
blog. I suggest you post your questions in help forums, not bug trackers.
…On Wed, Feb 9, 2022, 6:04 PM Jens ***@***.***> wrote:
@ilcane87 <https://github.com/ilcane87> Thank you for your detailed
reply, even though it is a bit off topic here...
You are probably right and I just have to bite the bullet with blender. I
did shortly look into Daz3d and even Poser, but that adds the problem of
importing/exporting, while not making posing significiantly easier...
If anyone else has a similiar problem: Posing one limb at a time and
hiding all other layers helps significantly, especially if you work one
something with controls all over the place, like hair.
—
Reply to this email directly, view it on GitHub
<#78 (comment)>,
or unsubscribe
<https://github.com/notifications/unsubscribe-auth/ASWU22E5ZIM5CFJOSK24FULU2MMJVANCNFSM5JPT6Z7Q>
.
Triage notifications on the go with GitHub Mobile for iOS
<https://apps.apple.com/app/apple-store/id1477376905?ct=notification-email&mt=8&pt=524675>
or Android
<https://play.google.com/store/apps/details?id=com.github.android&referrer=utm_campaign%3Dnotification-email%26utm_medium%3Demail%26utm_source%3Dgithub>.
You are receiving this because you were mentioned.Message ID:
***@***.***>
|
|
@poisenbery I am well aware! Please see my initial comment: since it was unclear in the documentation how much of the scripts was already in the released version. I admit that the discussion got a bit side-tracked, but possible errors/missing information in the project documentation does belong in the issue tracker - especially since this issue was still open and it was therefore unclear how much of this was actually implemented! |
|
@MediaMoots I posted a new issue for easier tracking: #258 |
|
Another question for either @MediaMoots or @FlailingFog, probably the latter: in v5 of the plugin (left) the accessories that have bone chains in their armature are imported with those chains intact, while v6 (right) has them disconnected:
I can't really connect them myself since I have no way to discern whether they're supposed to be connected or just parented without connection. Is there a way to get back the original behavior, or can you at least point me to the old code that managed the bone connections? Edit: it's actually a question for MediaMoots since I tried exporting the same character with the old version of KKBP_Exporter and the bone connections are already there when importing it with CATS. |

|
If you want to do it on the blender side, you should be able to connect the children of the N_Move bone for each ca_slot accessory slot, or leave it alone if it's only a single child. |

|
@FlailingFog I should be able to handle this myself then, thanks a lot. |
|
@MediaMoots
It makes sense that you can't deduce the necessary information from the bone hierarchy alone, considering accessories can be freely rigged and then imported in Koikatsu. So instead, would it be possible to restore the behavior of the earlier versions of KKBP_Exporter when it comes to the hair/accessory bones? |

|
Hmm, this is V5 raw export though? Bones are not connected even in V5 Exporter |

|
@MediaMoots I guess my next question is: is it possible to use a manually imported model with the KKBP addon? Edit: nevermind, I found the relevant function in the CATS repository, apparently the bone connections are just an estimate, pretty much an extension to FlailingFog's criteria, while I previously thought it was information contained in the exported file. |
|
Just uploaded the new version in the first post. Changelog:
@FlailingFog |
|
Awesome! Thanks for these updates. I'll add them in the next release. |
|
Hi @FlailingFog, I'm writing here since it's slightly Rigify related, but I noticed the other day that you committed a useful pose library script, and since I had intended to test retargeting from Koikatsu for some time, I finally got down to it using your instructions as a starting point, and I can give you a few pointers to hopefully solve some issues (assuming you haven't already). First of all you mentioned a problem retargeting bone location with Rokoko, but while I'm not using it myself, from the tutorial video (the dinosaur part at the end) it looks like location is definitely retargeted, so what I think happened to you is something else related to the source armature. I assume the one on the right is the issue you are having, and it's happening because the small 'cf_j_hips' bone, which acts as the root of the armature and is responsible for moving it around, is connected to its parent, which is the huge bone below it: Since connected bones cannot move away from their parents, even though the location keyframes are there, they have no effect, and the problem will propagate to the target armature, so one way to fix it would be to simply disconnect it through the script before retargeting. But the thing is, if you just import the complete armature instead (the one on the left), the issue won't be there in the first place, and the additional bones may actually be useful in some cases. Also, I wanted to mention a few more bone pairs that should be added to your retargeting list (which was missing one of the shoulders btw): The left names are the Koikatsu names and the right ones are the Rigify armature names, though many of them are the same. Note that each bone of that list except the waist and shoulder should have its location and also Scale retargeted as well. Now, even with the addon I'm using, Auto Rig Pro, while you have a checkbox for retargeting location in addition to rotation, there is no option to retarget scale; however, with that addon you can jump to a middle-step of the retargeting process where all bone constraints are applied and can be changed manually, so I'm just using a script to add the 'Copy Scale' constraints (with 'Pose Space') at that stage of the process and everything works out, though it may not be as easy with Rokoko. Lastly, while creating a pose/animation library is really neat, be warned that models with a different height compared to the source armature you are using at the time of retargeting will have erratic behavior, especially with the hips location (their feet might slide or leave the ground), because when retargeting the source armature should always be resized so that the height of its hips bone roughly matches the one of the target armature in order to get accurate results. |


This is good info, but I’m having a slightly different issue. I’ve been using the body_bone entry for the export option, and the hips bone is acting as the root like it should. I just didn’t realize the mesh wasn't exported with it because of the tooltip on the export button, so you’re right you don’t need to unload the mesh:
The actual issue I’m having is that some poses didn’t completely match up after retargeting (like \abdata\studio\anime\04\gravure_00\isu00) Initially I thought it was because I couldn’t get the Rigify armature’s fk bones to move, but looking into it again I don’t think that’s the cause of this. None of the main arm/elbow/wrist bones move on the source armature for this particular pose. They also don’t scale in this pose, only the helper bones (like the cf_d_ ones) move and scale. I also tried retargeting the pose after importing with the Koikatsu armature option on the KKBP panel, which is supposed to replicate the in-game armature, but I got the same result so I don't think it has anything to do with the Rigify armature. Something else must be causing the hands to be off, but I still don’t know what yet
Thanks I’ll add these in.
This is true, but I personally use models that are all around the same height |


Oh right, I also noticed the arms/hands being a bit offset compared to the source in some motions, so it's not a Rokoko problem either, I assume it's a slight difference in the exported armature of KKBP compared to SB3. I've yet to verify whether the same change solves the issue for all animations though, I'll let you know after I've experimented a bit more. |
Yup, @ilcane87 is right, this is caused by the That script has a few inherited scripts like The script loads curve values from, in the case of the body, So, when we export from KK, we are exporting a changed mesh and not the original mesh from SB3U. Maybe one way to fix this would be to somehow get a delta between the bone transforms of the original rig and the exported rig, then apply the delta to the animation after retargeting (or before). What do you guys think? |

|
@MediaMoots Maybe just slightly lengthening the forearms of the KKBP models when they are exported/imported would be enough? |


|
@ilcane87 |
|
There is another interesting thing, for some animations in KK there are 3 versions L.M.S (Large, Medium, Small) and the game blends between them according to the character's height... |
|
V3.99 can now export the shape values. |
Rather then correcting the forearms proportionally to the upper arms, I was thinking along the lines of lengthening just the forearms by 5% (or whatever ratio we determine) of their original length, so even weirdly proportioned characters will still be weird.
Oh so that was the meaning, something to be aware of when deciding what to retarget I guess.
Are these related to the sizes? |

Oops, I realized I made a mistake, it's not the X location but the X scale that must be increased in the forearm bone, otherwise you end up lengthening the upper arm instead. Edit: there are actually several bones that are parented to the forearm bone in the standard armature, and they end up being deformed as well, so there's a bit of tampering to do during the operations. |
Is this the scale of each bone relative to the SB3U armature? And if so, is there a list that correlates each value to a specific bone? I'm also guessing a value of 0.5 is no change?
I'm not sure on scaling the forearms... It works in this case, but characters with even shorter arms (like ones that are an entire hand length short of the reference armature) will need to be stretched out kind of far.
The only poses that would have this issue would probably be ones where the hands line up, so maybe the hand location's distance/location relative to some point on the armature (ex the upper chest) could be found on the imported fbx armature, then the animation could be retargeted, then the hand FK animation could be converted to an IK animation, then the distance of the IK from the upper chest on the reference armature could be increased or decreased to fit to the size of the target model. Something like this where the reference armature arms are the black line bones and the target armature arms are the octahedral bones. It won't work for every pose though, only ones where the hands are supposed to be together... |
That wasn't meant to solve the animation issue for any character, but rather to solve what seems to be a forearms size issue for models imported with KKBP compared to Koikatsu, that's why I said it'd be something like +5% for any character, the fact that it'd fix animations for default sized characters was just a bonus. As far as the animations go, I think it's correct that weirdly proportioned characters will have weird result that require manual fixing, that's what happens in Koikatsu as well as far as I've seen, trying to find an algorithm that makes any animation visually pleasing for any character setup may be an exercise in futility. |
|
Hi @FlailingFog, I just uploaded a small update to the scripts in the first post, it adds compatibility with the head mod (#349) and a few other minor tweaks. |
Thanks, I've added your changes to the master branch.
I wound up trying this and I was wrong. It was on a sample size of 1, but even short armed characters seem to look correct with the 5% scale increase. I'll see if I can add that as a toggle to the asset library creation script |
Nice, I didn't expect that myself to be honest. |
|
Hi @FlailingFog, I uploaded an update to the scripts, I fixed a handful of small bugs and console errors, and added a head tracking mechanism similar to the one for the eyes. There's a new control in the Torso layer, in front of the head, which contains a few properties in the Item panel, one is for limiting the range of rotation of the head, and its angle values: Then there's the head tracking property which will override the head rotation to follow the target instead: Some use cases for this could be to track the camera with both head and eyes, or easily changing the facing direction during animations with lots of body movement, but be warned that some flipping will occur if the character rotates too far out of tracking range, such as when spinning around. |


|
Thanks, I'll add in your updates. Head tracking is a pretty sweet feature. |
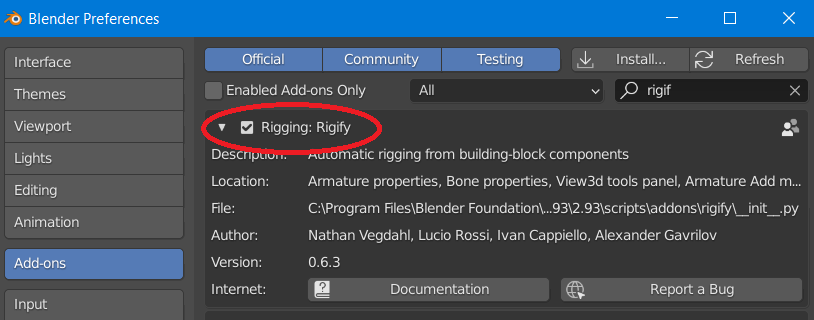
Note from the future: these scripts are now integrated into the addon, so you don't need to download them from here, just do as instructed in the video tutorials, but don't forget to activate the Rigify addon first, by following these steps:
In the Blender preferences, activate the Rigify addon (it's already there):
Enable AutoRun Python Scripts from the Save & Load section:
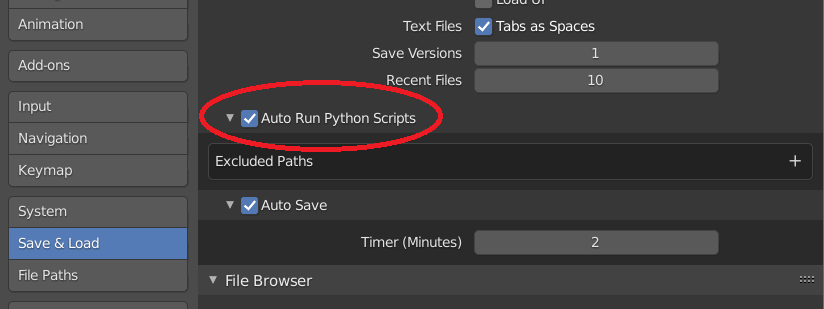
You may need to save the preferences and restart Blender in order for Rigify to run properly.
Rigify Scripts.zip (Updated 2023-04-03)
These scripts will automatically make the KKBSP imported armature Rigify-compliant while preserving all existing joint correction functionalities, meaning you'll be able to generate an elaborate control rig from it that contains a lot of additional features and automations:
I know it looks messy, but everything is actually neatly organized in layers that you can show or hide at will from the side panel.
Warning: these scripts heavily alter the original armature and some vertex groups, which I assume will prevent any of the features of KKBSP that affect them from working, so I advise you to duplicate the whole collection in advance.
If you aren't familiar with Rigify or character rigs in general then the armature may look confusing to you, and you won't be able to leverage all of its features, so I recommend checking out this playlist that will teach you the basics:
https://www.youtube.com/watch?v=-JSFcSxsaTs&list=PLdcL5aF8ZcJv68SSdwxip33M7snakl6Dx
The same youtube channel also contains several videos about working with Rigify armatures for different tasks, like exporting to game engines or retargeting animations, so it's worth spending some time on it if you're interested.
On a side note, expect the hair/accessories layers to be a bit messy since their contents are unpredictable and I had to use a generic algorithm for their controls; you can always go back to the original armature and make a few adjustments and then, while it's selected in Object Mode, click the star-shaped 'Convert for Rigify' button in the 'KKBP Extras' section of the plugin.
And as per Rigify conventions, you'll find all Deform bones in the third to last layer (which isn't shown in the Rig Layers panel), in case you want to adjust some weights.
And that's it, I've tested these scripts with several characters and they work fine, but if you run into any issues you can link to the characters causing them here so I might be able to reproduce them.
Also, let me know if I forgot to carry over any of the features of the original armature so I can make amendments.
The text was updated successfully, but these errors were encountered: