This project is a simple bridge for the Smart Friends Box and devices (Schellenberg, ABUS, Paulmann, Steinel). There is a REST API and an MQTT client.
Tests have been carried out on on the Smart Friends Box but it probably also works on the Schellenberg SH1-Box.
You must have the .Net 8.0 Runtime installed to use this or you must run as the docker/hassio-addon.
A device must be supported by the Smart Friends Box to be controllable. So if you paired a Zigbee or Z-Wave device and do not see it in the Smart Friends app, then is unlikely you be able to control it with this bridge even though you will see the device listed.
Recommended to use the HASSIO add-on. Add to the Supervisor Add-on store
https://github.com/GimpArm/hassio-addons
See readme specific to service type for other install methods.
First decide if using MQTT or REST API.
MQTT will integrate into the Home Assistant MQTT Integration. The devices you setup and map will automatically be discovered by the integration creating devices and entities. It also takes advantage of the push notifications from the Smart Friends Box and relays them to the MQTT broker which informs Home Assistant. It is a more powerful interface but requires that you have configured a broker and the MQTT integration, along with some device mappings because the Smart Friends Box does not give enough information to accurately guess the what kind of device or how to control it in Home Assistant.
REST API is a more simple passive system. You must manually configure entities in Home Assistant to query the service along with polling for changes. This means there is usually a few seonc delay between manually operating a device and seeing its state change in Home Assistant.
Both MQTT and REST API must be configured to talk to the Smart Friends Box.
- Open the (appsettings.json) and change it accordingly:
{
"SmartFriends": {
"Username": "", #---------------> Username (case sensitive)
"Password": "", #---------------> Password
"Host": "", #-------------------> IP of your Smart Friends Box
"Port": 4300, #-----------------> Port of the box, generally 4300/tcp
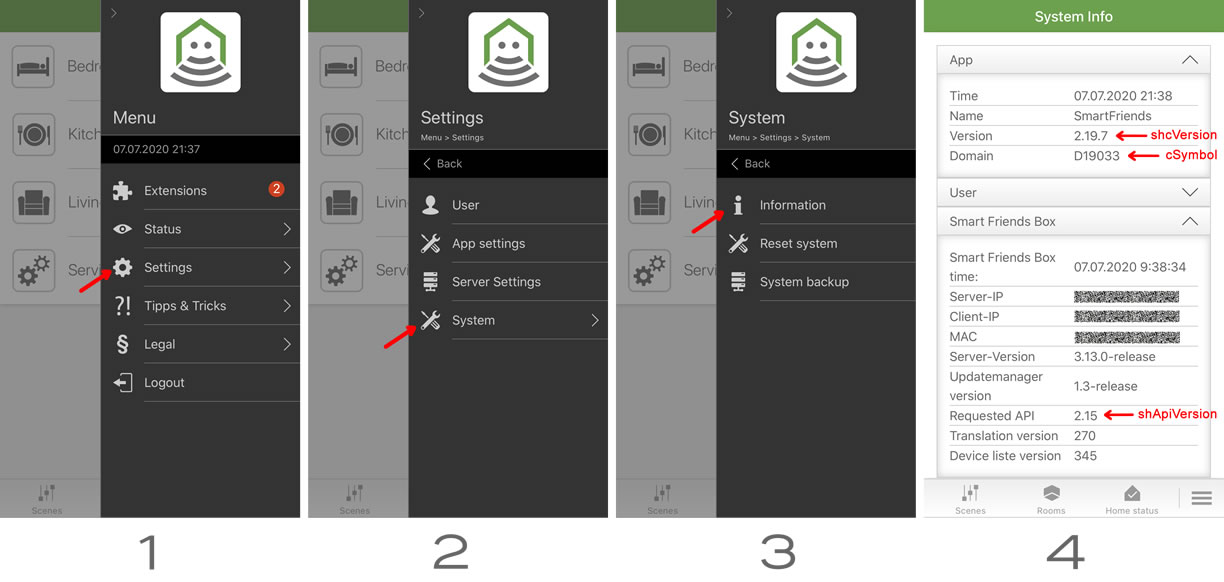
"CSymbol": "D19033", #----------> Extra param 1
"CSymbolAddon": "i", #----------> Extra param 2
"ShcVersion": "2.21.1", #-------> Extra param 3
"ShApiVersion": "2.20" #-------> Extra param 4
},
"Mqtt": {
"Enable": false, #-------------------> Flag whether to enabled or disable the MQTT client.
"DataPath": "/config/smartfriends2mqtt", #---------------------> Directory path to where the deviceMap.json and typeTemplate.json files are stored.
"BaseTopic": "smartfriends2mqtt", #---> Base MQTT topic to store device information. Ok to leave as is.
"Server": "homeassistant", #----------> Broker server name or ip.
"Port": 1883, #-----------------------> Broker port, most likely 1883.
"User": "mqtt", #---------------------> Broker client username.
"Password": "4mqPass!", #-------------> Broker client password.
"UseSsl": false #--------------------> Flag whether the broker requires SSL or not.
}
}Extra API parameters: In order to find these values, simply open the Smart Friends App and go to the information page as illustrated:
Device ID's are important, they will be used to interact with the device itself.
After starting up in a browser go to:
http://homeassistant:5001/list
And you will see an output like this:
[
  {
    "id": 13103,
    "name": "Blinds Dining",
    "room": "Dining Room",
    "gatewayDevice": "SmartFriendsBox",
    "kind": "RollingShutter",
    "manufacturer": "Alfred Schellenberg GmbH",
    "state": "Stop",
    "devices": {
      "rollingShutter": {
        "Id": 2973,
        "description": "SchellenbergBlind",
        "commands": {
          "Stop": 0,
          "Up": 1,
          "Down": 2
        },
        "currentValue": "Stop"
      },
      "position": {
        "Id": 3555,
        "description": "SchellenbergPosition_Blind",
        "max": 100,
        "min": 0,
        "precision": 0,
        "step": 1,
        "currentValue": 0
      },
      "stepper": {
        "Id": 14246,
        "description": "SchellenbergBlind.Steps",
        "commands": {
          "Up": 1,
          "Down": 2
        }
      },
      "default": {
        "Id": 4144,
        "description": "SchellenbergRssi",
        "currentValue": "SignalHigh"
      }
    }
  },
  {
    "id": 1323,
    "name": "Light",
    "room": "LivingRoom",
    "gatewayDevice": "SmartFriendsBox",
    "kind": "switchActuator",
    "manufacturer": "Zigbee Switch Device",
    "state": "Off",
    "devices": {
      "switchActuator": {
        "Id": 14246,
        "description": "Zigbee Switch Device",
        "commands": {
          "Off": 0,
          "On": 1,
          "Toggle": 2
        }
      }
    }
  },
  ...
  ...
]The service exposes a simple REST API, which can be called to control your devices.
-
Open Shutter:
http://127.0.0.1:5001/set/13103/rollingShutter/open -
Close shutter:
http://127.0.0.1:5001/set/13103/rollingShutter/close -
Stop shutter:
http://127.0.0.1:5001/set/13103/rollingShutter/stop -
Go to position 50%:
http://127.0.0.1:5001/set/13103/position/50 -
Get current shutter position:
http://127.0.0.1:5001/get/13103/position -
Move the shutter 1 step down:
http://127.0.0.1:5001/set/13103/stepper/down
Other devices can be controlled by using a command or setting a numeric value. I have only tested Zigbee switches but others should also work.
Simple devices like a light will only have 1 connected device. These can be controlled directly by invoking the set
- Turn light on:
http://127.0.0.1:5001/set/on
or can be more specific for the device:
http://127.0.0.1:5001/set/switchActuator/on
or
As it can be seen, actions are sent using the device ID and the specific device type name.
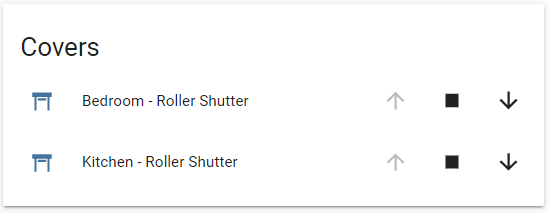
This is a simple use case: Controlling roller shutters (alias covers or rolling shutters...)
See the official Home Assistant documentation for more information https://www.home-assistant.io/integrations/command_line/
The example shown above needs the creation of 3 elements:
- shell commands to interract with the REST API (locally)
- sensors to get the current position of the covers
- the covers themselves declared as templates note: Schellenberg Rollodrive sets and reports position opposite of how Home Assistant covers work. An easy solution is to always substract the value from 100
shell_command:
    shutter_up:        "curl http://127.0.0.1:5001/set/{{ device_id }}/rollingShutter/up"
    shutter_down:      "curl http://127.0.0.1:5001/set/{{ device_id }}/rollingShutter/down"
    shutter_stop:      "curl http://127.0.0.1:5001/set/{{ device_id }}/rollingShutter/stop"
    shutter_position:  "curl http://127.0.0.1:5001/set/{{ device_id }}/position/{{ 100 - position }}"

command_line:
  - sensor:
      name: shutter_position_office
      command : 'curl http://127.0.0.1:5001/get/10433/position'
      unit_of_measurement: '%'
      scan_interval: 5
      value_template: '{{ 100 - value_json.currentValue }}'
  - switch:
      name: Office Light
      command_on: 'curl http://127.0.0.1:5001/set/14106/on'
      command_off: 'curl http://127.0.0.1:5001/set/14106/off'
      scan_interval: 5
      command_state: 'curl http://127.0.0.1:5001/get/14106'
      value_template: '{{ value_json.state }}'

cover:
  - platform: template
    covers:
      shutter_office:
        friendly_name: "Shutter - Office"
        device_class: shutter
        position_template: "{{ states('sensor.shutter_position_office') }}"
        open_cover:
          service: shell_command.shutter_up
          data:
            device_id: 10433
        close_cover:
          service: shell_command.shutter_down
          data:
            device_id: 10433
        stop_cover:
          service: shell_command.shutter_stop
          data:
            device_id: 10433
        set_cover_position:
          service: shell_command.shutter_position
          data_template:
            device_id: 10433
            position: "{{ position }}"
DeviceMap is a map of the Smart Friends Id to the HASSIO type/class with optional device specific overrides.
On start up the deviceMap.json file in the DataPath folder will be loaded. If no file exists then an empty file is created.
If there is no entry in the deviceMap.json file for a device then it will not be available over MQTT. This is required because mapping a device from the information the Smart Friends Box makes available to a HASSIO device cannot currently be done automatically.
{
  "Id": number, #-------> (required) The ´id´ from the above print out.
  "Type": string, #-----> (required) The HASSIO device type to be presented as.
  "Class": string, #----> (optional) The HASSIO device class, not all device types have classes.
  "Paramters": { #------> (optional) Key value override HASSIO settings and TypeTemplate for specific operation of the devices. See HASSIO MQTT device type specific documentation.
    "hassio_key1": value1,
    "hassio_key2": value2
  }
}There are currently 2 variables that can be useful for making templates that apply to all devices of a specific type.
{baseTopic}is simply the value from the settingBaseTopicso the templates can remain generic.{deviceId}the MQTT unique ID for the device, currently it is in the form"sf_" + DeviceMap.Id.
{
  "Id": 13103,
  "Type": "cover",
  "Class": "shutter"
}Set the icon to a lightbulb.
{
  "Id": 1323,
  "Type": "switch",
  "Parameters": {
    "icon": "hass:lightbulb"
  }
}{
"Id": 206,
"Type": "binary_sensor",
"Class": "door"
}TypeTemplates define templates to apply to all devices types/classes to override the basic default behavior. See https://www.home-assistant.io/docs/mqtt/discovery/
On start up the typeTemplate.json file in the DataPath folder will be loaded. If no file exists then a file with the below examples will be created.
TypeTemplates are optional but for proper control of most devices it is probably required. I include the example for the Schellenberg Rolladen because that is all I own. For proper HASSIO integration you will need to do some trial and error and read the MQTT Discovery documentation.
For very basic devices like a Zigbee switch or Zigbee door/window sensor that only needs to read the state information and/or send a single sub device command no template is needed.
{
  "Type": string, #-------> (required) Device type to apply the template to.
  "Class": string, #------> (optional) Some device types have a class which you can use be even more specific about when to apply the template.
  "Parameters": { #-------> (required) Key value override HASSIO settings for specific operation of the devices. See HASSIO MQTT device type specific documentation.
    "hassio_key1": value1,
    "hassio_key2": value2
  }
}There are currently 2 variables that can be useful for making templates that apply to all devices of a specific type.
{baseTopic}is simply the value from the settingBaseTopicso the templates can remain generic.{deviceId}the MQTT unique ID for the device, currently it is in the form"sf_" + DeviceMap.Id.
{
  "Type": "cover",
  "Class": "shutter",
  "Parameters": {
    "command_topic": "{baseTopic}/{deviceId}/rollingShutter/set",
    "position_topic": "{baseTopic}/{deviceId}/position",
    "position_template": "{{ 100 - value | int }}",
    "set_position_topic": "{baseTopic}/{deviceId}/position/set",
    "set_position_template": "{{ 100 - position }}",
    "state_stopped": "Stop",
    "state_opening": "Up",
    "state_closing": "Down",
    "payload_stop": "Stop",
    "payload_open": "Up",
    "payload_close": "Down"
  }
},Special thanks to LoPablo for their work on figuring out how the Schellenberg/SmartFriends API functions.