The video walkthrough of this tutorial can be found here or on YouTube Channel of Gnosis Builders
- Open the terminal of your choice.
- Download
foundryupby using the following command:
curl -L https://foundry.paradigm.xyz | bash- (Optional) If for some reason, step 1 is not working for you, try building this from source using the instructions provided on Foundry's official wiki
- This will download foundryup. Then install Foundry by running:
foundryup- Check whether
forgehas been installed or not by running the following command:
forge --version- Setup the folder that you want to use and initialize forge.
- Navigate to the location of your choice.
- Then use the following commands:
mkdir my-app
cd my-app
forge init- Now open this folder in VS Code (or any editor of your choice). You should get a file structure looking like this:

- You can run
forge buildand thenforge testto see whether the defaults are working correctly or not.

We would be importing an ERC20 token contract from the OpenZeppelin repo, which is the most used and standard repository used across the Solidity development ecosystem.
To install this dependency, use the following command:
forge install @openzeppelin/openzeppelin-contracts --no-commitYou can see all the installed dependencies by navigating to lib/openzeppelin-contracts.
- Under the folder
srccreate a new contract file namedToken.sol(or whatever you like) - Copy and paste the following code into that file:
// SPDX-License-Identifier: MIT
pragma solidity ^0.8.13;

import "lib/openzeppelin-contracts/contracts/token/ERC20/ERC20.sol";

contract TestToken is ERC20 {
    constructor() ERC20 ("TestTokenGnosis", "TTG"){
        _mint(msg.sender, 1000*10**18);
    }
}
-
What this code does is, simply mint new tokens named TestTokenGnosis with symbol TTG to the
msg.senderor whosoever deploys this contract. By default the decimals for TTG would be 18 and hence when you write1000 * (10 ** 18)it simply means 1000 tokens. -
Save the file and use the command
forge buildto see if the contract is compiling correctly. If everything goes well, it should look something like this:

-
Any blockchain is a chain of blocks and the people responsible for creating and adding new blocks to this chain are called miners or stakers. As normal users of blockchain, we provide some fee to these people for their service and to use the computational power of the blockchain which is known as gas fee.
-
Now to deploy your contract and to later interact with it, we would need to pay these miners some gas fee. In an actual blockchain, the fee will be paid in real money denominated in the native currency of the blockchain (ETH for Ethereum, BTC for Bitcoin and xDAI for Gnosis). Similarly there is a concept of mock blockchains called testnets, where we can use mock money to pay gas fee (for example Chiado xDAI for Chiado network which is a Gnosis testnet)
-
To pay these gas fee and later interact with our and other contract, we would need something called a wallet. Wallets store private keys, keeping your crypto safe and accessible. They also allow to receive and send assets, some also to interact with smart contracts and dApps.
-
We will be using a wallet called Metamask, which is arguably the most famous crypto wallet out there right now. However you are free to choose any wallet of your liking.
MetaMask is a web browser extension and mobile app that allows you to manage your Gnosis private keys. By doing so, it serves as a wallet for xDai, GNO and other tokens, and allows you to interact with decentralized applications, or dapps.
Further instructions on how to download and set up your Metamask wallet can be found on the official Gnosis wiki. I would suggest setting up both the Gnosis mainnet and the Chiado testnet so that you can deploy your smart contracts wherever you like.
- Now that we have our wallet, we would need some funds to pay as gas fee to deploy our token smart contract and to later interact with it. Gnosis has created faucets for disbursing small amounts of these funds so that people can get started using the chain. To grab your funds, go to the official Gnosis faucet website and request funds for Chiado testnet (and also the Gnosis mainnet if you want). If things go as expected, you should see a notification like this:

On the website you will realise that while you can get 1 Chiado xDAI from the faucet for the Chiado testnet you only get 0.001 xDAI from the faucet for the Gnosis maninet. The reason for this as explained above is that the Chiado network is a testnet or a mock blockchain to test your applications, hence the gas fee paid here is also in a mock currency called Chiado xDAI. However for the Gnosis mainnet, which is an actual blockchain, you will need to pay the gas fee in real money in terms of a real (crypto) currency called xDAI, and hence the lesser amount.
Post this, you should be able to see the funds in your metamask wallet. Sweet.
- Make sure that your Token contract is compiling without any issues by using the following command:
forge build
If things went as expected, you should see something like this:

-
Now we need to grab our private keys in order to deploy our token smart contract.
- Open your Metamask (or whatever wallet you installed) extension and make sure you are on the correct account (one from which you want to deploy the token smart contract).
- Click on the kebab (three dots) menu
- Click on Account Details
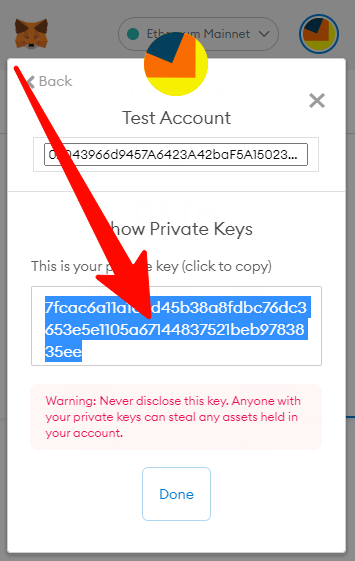
- Click on Export Private Key
- Type your Metamask password
- Now your private keys are exposed. Copy and paste them somewhere on your system.
Your exposed private key window would look something like this (This is for demonstration purposes and this is a throwaway wallet)
-
A note about private keys: Your private keys are supposed to be private and not meant to be shared with anyone under any circumstance. If anyone gets hold of your private keys, they then have unrestricted access to your wallets and all the assets inside it. So, take care and either delete your private keys from your system after this tutorial or simply create a new wallet/account and use that.
-
Once you do have your private keys, its time to use them to deploy your token smart contract to either the Chiado testnet or the Gnosis mainnet. The command to deploy that is as follows:
In our case, the first placeholder would be replaced by Token and the second placeholder will be replaced by TestToken and the <your_private_key> will be replaced by whatever we grabbed in step 1 of this section.
- For Chiado testnet
forge create --rpc-url https://rpc.chiadochain.net --private-key <your_private_key> src/<YourContract>.sol:<YourContract>
- For Gnosis mainnet
forge create --rpc-url https://rpc.gnosischain.com --private-key <your_private_key> src/<YourContract>.sol:<YourContract>
If things go as expected, you should see a screen similar to this:

-
Congratulations!! You just deployed your tokens on the Chiado testnet (or the gnosis mainnet) and the address of your tokens (or token contract) is the address written infront of the
deployed tospec in the earlier image. -
You can also see the deployment done by you (your wallet) on the Gnosis/Chiado block explorer. For this you need to visit the official Chiado explorer or Gnosis explorer depending on where you deployed and search for your wallet address. In the page that opens up, you should see a deployment done by you, something like this:

-
Remember the code that we wrote in
Token.sol? There we minted 1000TTGtokens to the msg.sender (which is our deploying wallet in this case), so we should be able to see those 1000 tokens in our wallet, right? We need to include our token in our wallets for that to happen. The steps to do that are as follows:- Click on your Metamask wallet extension
- Make sure you are on the correct account and correct network
- Click on the
Import Tokensoption - In the
Token Contract Addressfill the address where your token contract was deployed to - Other fields should get autofilled (if not, fill the name and decimals which was 18 by default)
- Click on
Add Custom Token - Now you should be able to see your token in your wallet
- Congratulations!! Now you can send and recieve your tokens to and from your friends using your Metamask wallet.
If things went as expected, you should see something like this:

-
Create a new folder separate from the one where we working till now and please update npm version to at least node 14.
-
Create a new react application using the following command: (we are naming the app
erc20-frontend)npx create-react-app erc20-frontend
If things go as expected, you should see a screen as follows:

-
Add the ethers library to your project using the following command:
npm install --save ethers
-
Navigate to the folder you created, using
cd erc20-frontend -
Use the
npm run startcommand to see if the default react app is opening in your browser. If things go as expected, you should see a screen like this:
-
Now you can exit using the
Ctrl + Ccommand.
- Navigate to src/App.js and clear all the code written there.
- Paste the following code in this file:
import { useState } from "react";
import {ethers} from 'ethers';
import Token from "./contracts/TestToken.json";

import './App.css';

const tokenAddress = "0x96273AAc53dED55e0cE26E7dd4d834662F163516"; // Change this to your recent deployed token address

function App() {
  const [userAccount, setUserAccount] = useState('');
  const [amount, setAmount] = useState(ethers.BigNumber.from(0));
  const [balance, setBalance] = useState(0);
  const [currentUser, setCurrentUser] = useState('yourAddress');
  const [transferred, setTransferred] = useState(false);
  const [balanceCall, setBalanceCall] = useState(false);


  async function requestAccount() {
    await window.ethereum.request({method: 'eth_requestAccounts'});
  }

  async function getBalance() {
    if(typeof window.ethereum !== 'undefined') {
      const [account] = await window.ethereum.request({method: 'eth_requestAccounts'});
      setCurrentUser(account);
      const provider = new ethers.providers.Web3Provider(window.ethereum);
      const contract = new ethers.Contract(tokenAddress, Token.abi, provider);
      const balance = await contract.balanceOf(account);
      setBalance((parseInt(balance))/1e18);
      setBalanceCall(true);
      console.log("Balance: ", (parseInt(balance))/1e18);
    }
  }

  async function sendCoins() {
    if(typeof window.ethereum !== 'undefined') {
      await requestAccount();
      const provider = new ethers.providers.Web3Provider(window.ethereum);
      const signer = provider.getSigner();
      const contract = new ethers.Contract(tokenAddress, Token.abi, signer);
      let stringAmount = amount.toString();
      stringAmount = stringAmount + "000000000000000000";
      console.log(stringAmount);
      const transaction = await contract.transfer(userAccount, ethers.BigNumber.from(stringAmount));
      await transaction.wait();
      getBalance();
      setTransferred(true);
      console.log(`${amount} GTT coins successfully sent to ${userAccount}`);
    }
  }

  return (
    <div className="App">
      <header className="App-header">
        <input onChange = {e => setUserAccount(e.target.value)} placeholder = "Account to transfer to" />
        <input onChange = {e => setAmount(e.target.value)} placeholder = "Enter Amount"/>
        <span>
        <button onClick = {getBalance}>Get Balance</button>
        <button onClick = {sendCoins}>Send Coins</button>
        </span>
        <br/>
        <>
          {
            balanceCall ? <h2>Balance of {currentUser}: {balance}</h2> : null
          }
        </>
        <>
          {
            transferred ? <h2>Transfer Successful</h2> : null
          }
        </>
      </header>
    </div>
  );
}

export default App;
- Don't forget to change the
const tokenAddressto your deployed address - Now, you have to go back to the ERC20 folder where you created and deployed your token contract using Forge.
- There you'll see
out/Token.sol/TestToken.json. Open that file and copy the json file. - Come back to your frontend folder, create a new folder called
contractsunder thesrcfolder. - Now under this
contractsfolder, create a new file calledTestToken.jsonand paste the json you copied in step 3. - Run the app using the command:
npm run start
- If everything went well, you should see a screen like this:

- You will either get a prompt automatically to connect your wallet, or will get once you click on the
Get Balancebutton. - Clicking on
Get Balancewill show you your balance (assuming the default 18 decimals of your tokens) - Entering the amount and reciever address and then clicking the
Send Coinsbutton will transfer the coins, after you approve the transaction using your Metamask wallet. - After both the operations, a prompt will be updated on the screen.
Note: After using the
Send Coinsbutton, wait for atleast 15-20 seconds for the transaction to go through. If it does not update even after 1+ minute, check the console (after clicking on inspect) - If both the functions work as expected, you will see a screen like this:
