We introduce 6IMPOSE, a novel framework for sim-to-real data generation and 6D pose estimation. 6IMPOSE consists of four modules: First, a data generation pipeline that employs the 3D software suite Blender to create synthetic RGBD image datasets with 6D pose annotations. Second, an annotated RGBD dataset of five household objects generated using the proposed pipeline. Third, a real-time two-stage 6D pose estimation approach that integrates the object detector YOLO-V4 and a streamlined, real-time version of the 6D pose estimation algorithm PVN3D optimized for time-sensitive robotics applications. Fourth, a codebase designed to facilitate the integration of the vision system into a robotic grasping experiment.
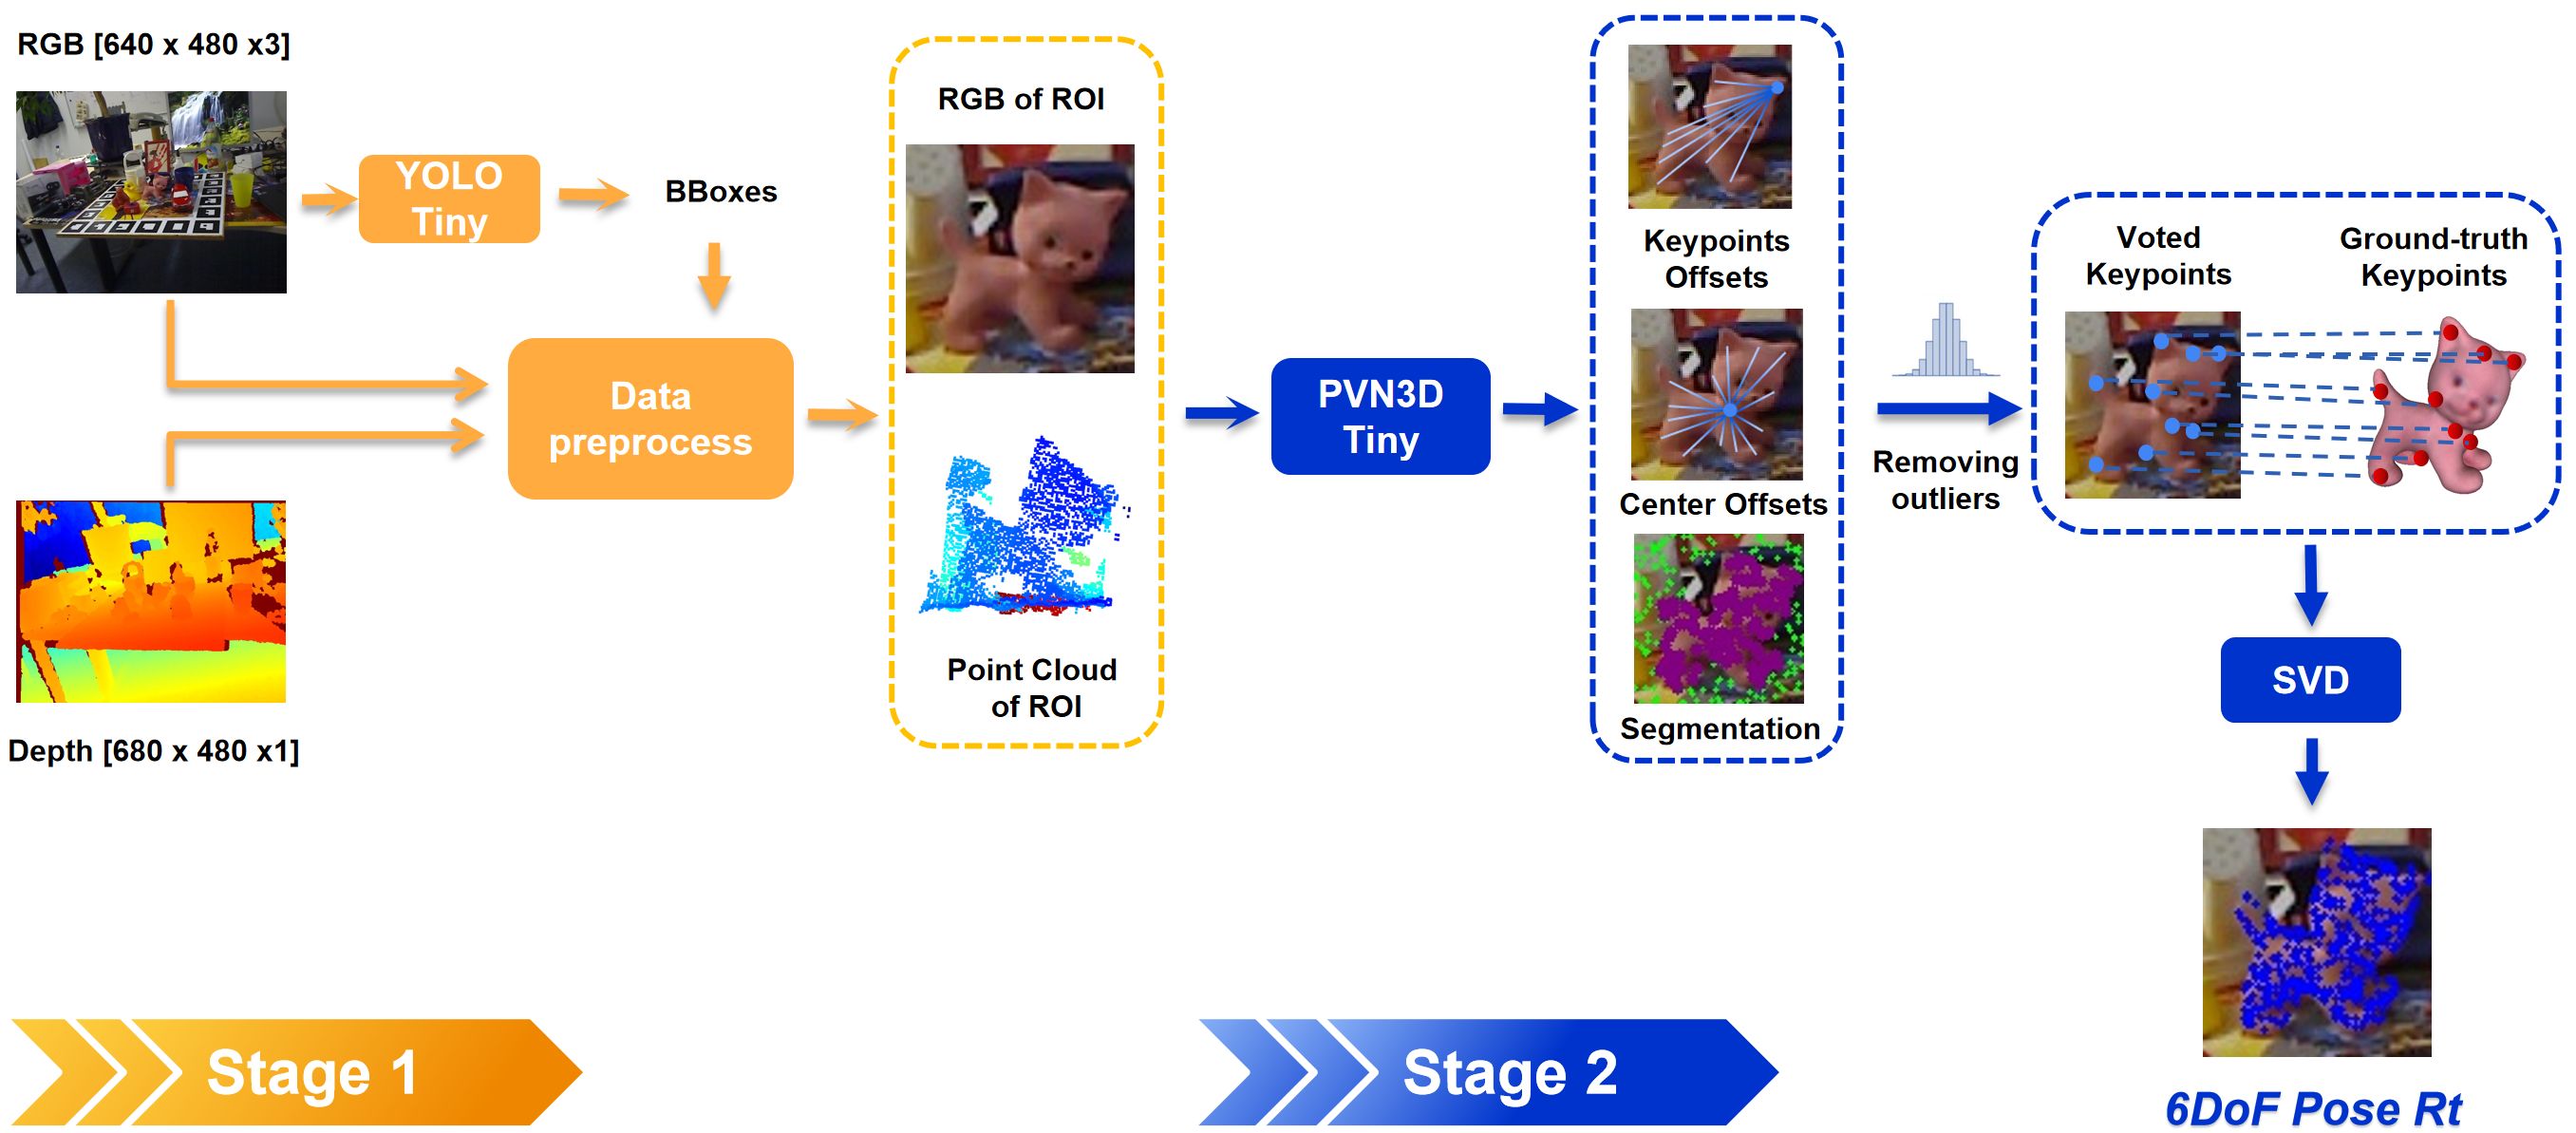 A two-stage pose estimation approach shows the object detection with YOLO-tiny to localize the object of interest at the first stage, followed by the 6D object pose estimation with PVN3D-tiny at the second stage.
This project is using the following settings:
- Ubuntu: 20.04
- CUDA: 11.2 with cudnn 8.5
- Tensorflow: 2.6.2
- python: 3.6.5
Download Pointnet++ tensorflow 2.0 layers and save it under /lib/net/. Then compile the pointnet++ layers following the introduction. Some modifications needed:
- Before compiling, ensure the CUDA_ROOT path in
./tf_ops/compile_ops.shis correct - After compiling, you might need to modify the path in
./pnet2_layers/cpp_modules.py
We take Darknet as a submodule of this repo. To use darknet for inference, you need to compile darknet as introduced here. Before compile, check if the Makefile is properly configured as
GPU=1
CUDNN=1
CUDNN_HALF=1
OPENCV=1
AVX=0
OPENMP=0
LIBSO=1
ZED_CAMERA=0
ZED_CAMERA_v2_8=0
then just do make in the darknet directory
make
We generate synthetic data using 3D software suite Blender, the developed codebase can be found from the link. The dataset developed in this project can be found from the link. To reuse the developed dataset and code for data preprocessing and training, please organize the downloaded dataset as follows:
Dataset structure:
6IMPOSE
    - dataset
      - blender
        - bl_obj_kpts
        - bl_obj_mesh
        - blender
          - blender_linemod
            - 01
              - depth
              - gt
              - mask
              - rgb
              - preprocessd
                - darknet
                - tfrecord
                - numpy
              gt.json
              params.json
             ...
          - cps
            ...

      - linemod
        - lm_obj_kpts
        - lm_obj_mesh
        - linemod
          - data
            - 01
              - rgb
              - mask
              - depth
              gt.yml
            ...
          ...
- blender: synthetically generated Dataset using Blender.
- linemod: Kinect V1 RGBD dataset with object poses. We download the LM dataset as in original pvn3d implementation
- pvn3d: Pointwise keypoint voting network for pose estimation from RGBD. The Original PyTorch implementation can be found in pvn3d repo
- yolov4: YOLO-V4 is taken from the Darknet implementation
This tool allows the inspection and validation of the datasets. Specify which dataset and what to inspect to generate an output.json file containing the relevant statistics and preview randomly sampled datapoints.
inspect_datasets.py [-h] [--mode MODE] [--num_imgs NUM_IMGS]
                           datasets [datasets ...]

positional arguments:
  datasets             format as <data_set>/<data_name>/<cls_type>.
                       Add */aug* to perform augmentation on that dataset

optional arguments:
  -h, --help           show this help message and exit
  --mode MODE          [rgb|bbox|mask|depth|normals|statistics] define what to
                       inspect. join multiple ops with /. Default is all
  --num_imgs NUM_IMGS  Number of images to inspect
Preprocess datasets to speed up training and evaluation. Set use_preprocessed=True in the config to utilize the preprocessed data. Preprocess the validation split in the numpy format and the training split in the tfrecord format. Use darknet format to generate a training dataset for YOLO (darknet implementation). Set further settings in the respective config file. To overwrite config parameters from the commandline, use e.g. --params dataset_params/clstype duck
preprocessor.py [-h] [--config CONFIG] [--num_workers NUM_WORKERS]
                       [--params [PARAMS [PARAMS ...]]] [--mode MODE]
                       [--format FORMAT]
arguments:
  --config CONFIG      Path to the configuration files in .json
  --num_workers        Number of processsors for processing dataset
  --params             To overwrite config parameters from the commandline, use e.g. --params dataset_params/clstype duck
  --mode MODE          [train|val|full] decide image split of dataset
  --format FORMAT      [tfrecord|numpy|darknet] decide save format (WIP for darknet ajust path
                        in script)
Example to preprocess training and validation data for darknet yolo.
python preprocessor.py --config config/sim2real_darknet.json --mode train --format darknet --params dataset_params/cls_type cam

python preprocessor.py --config config/sim2real_darknet.json --mode val --format darknet --params dataset_params/cls_type cam
Example to preprocess training and validation data for pvn3d.
python preprocessor.py --config config/sim2real_pvn3d.json --mode  train --format tfrecord --params dataset_params/cls_type cam

python preprocessor.py --config config/sim2real_pvn3d.json --mode  val --format numpy --params dataset_params/cls_type cam
main.py [-h] [--generate_config] [--config CONFIG] [--id ID] [--force]
               [--weights WEIGHTS] [--params [PARAMS [PARAMS ...]]]
               [--mode MODE]

arguments:
  --generate_config    Generating a template for configuration with default settings.
  --id                 ID for different run.
  --force              Overwriting the existing saved log files with same ID.
  --config CONFIG      Path to the configuration files in .json
  --weights            Path to load the saved pre-trained models.
  --params             To overwrite config parameters from the commandline, use e.g. --params dataset_params/clstype duck
  --mode MODE          [train|val|full] decide image split of dataset
  --mode:              [train|val|test|export] choose different mode for training, testing or exporting the DNNs to tensorflow model.
Download example test data and pretrained models from here. Put the folder "demo_data" under the root directory. Run
python demo.py
If everything is fine, the test result will be saved to the demo_data folder. You can also download different pretrained models and images from the annotated RGBD dataset to test different objects.
- Either use
CUDA_VISIBLE_DEVICES=<gpus>from the commandline or make sure the correct GPUS are set in the main scripts - Use to experiment in command line
CUDA_VISIBLE_DEVICES=-1 python -i main.py --config <your_config> --mode test --params monitor_params/write_log false
For the grasping experiments, we use a robotic manipulator Fanuc CRX 10iAL with a custom Python interface. As an endeffector, we use an OnRobot RG2 gripper. Attached to the end-effector is a Intel Realsense D415 which is used to obtain the RGBD images. This setup is then used to perform 50 grasp attempts per object in three different lighting conditions, which yields 750 grasps in total. The three different lighting conditions are diffused, low and spot lighting, to test the algorithm's robustness to different lighting levels, The codebase for performing the robotic gasping can be found from link
[1] Bochkovskiy, Alexey, Chien-Yao Wang, and Hong-Yuan Mark Liao. "Yolov4: Optimal speed and accuracy of object detection." arXiv preprint arXiv:2004.10934 (2020).
[2] He, Yisheng, et al. "Pvn3d: A deep point-wise 3d keypoints voting network for 6dof pose estimation." Proceedings of the IEEE/CVF conference on computer vision and pattern recognition. 2020.