👀 Need help with your Django project? HackSoft is here for you. Reach out at
consulting@hacksoft.io
![]()
Table of contents:
- How to ask a question or propose something?
- What is this?
- How to use it?
- Overview
- Why not?
- Cookie Cutter
- Models
- Services
- APIs & Serializers
- Urls
- Settings
- Errors & Exception Handling
- Testing
- Celery
- Cookbook
- DX (Developer Experience)
- Django Styleguide in the Wild
- Additional resources / Alternatives
- Inspiration
Few points to navigate yourself:
- If you've read the Django Styleguide & you have questions or suggestions, the simplest thing you can is to open an issue. We will respond.
- Even if you have a question that you are not sure if it's related to the Django Styleguide - just open an issue anyway. We will respond.
- If you want to see a code example, make sure to head to the Django Styleguide Example repository. We treat this as a "Django test project", combining best practices & also examples from our blog.
That's about it ✨
Hello 👋
This is the Django Styleguide, created by us, the folks at HackSoft.
Few important notes about it:
- It's derived from many years of experience & many Django projects, both big & small.
- It's pragmatic. All things mentioned here are things tested in production.
- It's opinionated. This is how we build applications with Django.
- It's not the only way. There are other ways of building & structuring Django projects that can do the job for you.
- We have a
Django-Styleguide-Exampleto show most of the styleguide in an actual project.
You can watch Radoslav Georgiev's Django structure for scale and longevity for the philosophy behind the styleguide:

You can also watch Radoslav Georgiev & Ivaylo Bachvarov's discussion on HackCast, around the Django Styleguide:

When it comes to the Django Styleguide, there are 3 general ways of using it:
- Strictly follow everything written here.
- Cherry-pick whatever makes sense to you, based on your specific context.
- Don't follow anything written here.
We recommend point number 2:
- Read the styleguide.
- Decide what's going to work best for you.
- Adapt for your specific case.
The core of the Django Styleguide can be summarized as follows:
In Django, business logic should live in:
- Services - functions, that mostly take care of writing things to the database.
- Selectors - functions, that mostly take care of fetching things from the database.
- Model properties (with some exceptions).
- Model
cleanmethod for additional validations (with some exceptions).
In Django, business logic should not live in:
- APIs and Views.
- Serializers and Forms.
- Form tags.
- Model
savemethod. - Custom managers or querysets.
- Signals.
Model properties vs selectors:
- If the property spans multiple relations, it should better be a selector.
- If the property is non-trivial & can easily cause
N + 1queries problem, when serialized, it should better be a selector.
The general idea is to "separate concerns" so those concerns can be maintainable / testable.
🤔 Why not put your business logic in APIs / Views / Serializers / Forms?
Relying on generic APIs / Views, with the combination of serializers & forms does 2 major things:
- Fragments the business logic in multiple places, making it really hard to trace the data flow.
- Hides things from you. In order to change something, you need to know the inner-workings of the abstraction that you are using.
Generic APIs & Views, in combination with serializers & forms, is really great for the straightforward "CRUD for a model" case.
From our experience, so far, this straightforward case rarely happens. And once you leave the happy CRUD path, things start to get messy.
And once things start to get messy, you need more "boxes", to organize your code in a better way.
This styleguide aims to:
- Give you those "boxes".
- Help you figure out your own "boxes", for your own specific context & needs.
🤔 Why not put your business logic in custom managers and/or querysets?
This is actually a good idea & you might introduce custom managers & querysets, that can expose better API, tailored to your domain.
But trying to place all of your business logic in a custom manager is not a great idea, because of the following:
- Business logic has its own domain, which is not always directly mapped to your data model (models)
- Business logic most often spans across multiple models, so it's really hard to choose where to place something.
- Let's say you have a custom piece of logic that touches models
A,B,C, andD. Where do you put it?
- Let's say you have a custom piece of logic that touches models
- There can be additional calls to 3rd party systems. You don't want those in your custom manager methods.
The idea is to let your domain live separately from your data model & API layer.
If we take the idea of having custom queryset/managers and combine that with the idea of letting the domain live separately, we'll end up with what we call a "service layer".
Services can be functions, classes, modules, or whatever makes sense for your particular case.
With all that in mind, custom managers & querysets are very powerful tools and should be used to expose better interfaces for your models.
🤔 Why not put your business logic in signals?
From all of the available options, perhaps, this one will lead you to a very bad place very quickly:
- Signals are a great tool for connecting things that should not know about each other, yet, you want them to be connected.
- Signals are also a great tool for handling cache invalidation outside your business logic layer.
- If we start using signals for things that are heavily connected, we are just making the connection more implicit and making it harder to trace the data flow.
That's why we recommend using signals for very particular use cases, but generally, we don't recommend using them for structuring the domain / business layer.
We recommend starting every new project with some kind of cookiecutter. Having the proper structure from the start pays off.
Few examples:
- You can use the
Styleguide-Exampleproject as a starting point. - You can also use
cookiecutter-djangosince it has a ton of good stuff inside. - Or you can create something that works for your case & turn it into a cookiecutter project.
Models should take care of the data model and not much else.
It's a good idea to define a BaseModel, that you can inherit.
Usually, fields like created_at and updated_at are perfect candidates to go into a BaseModel.
Here's an example BaseModel:
from django.db import models
from django.utils import timezone


class BaseModel(models.Model):
    created_at = models.DateTimeField(db_index=True, default=timezone.now)
    updated_at = models.DateTimeField(auto_now=True)

    class Meta:
        abstract = True
Then, whenever you need a new model, just inherit BaseModel:
class SomeModel(BaseModel):
passLets take a look at an example model:
class Course(BaseModel):
    name = models.CharField(unique=True, max_length=255)

    start_date = models.DateField()
    end_date = models.DateField()

    def clean(self):
        if self.start_date >= self.end_date:
            raise ValidationError("End date cannot be before start date")
We are defining the model's clean method, because we want to make sure we get good data in our database.
Now, in order for the clean method to be called, someone must call full_clean on an instance of our model, before saving.
Our recommendation is to do that in the service, right before calling save:
def course_create(*, name: str, start_date: date, end_date: date) -> Course:
    obj = Course(name=name, start_date=start_date, end_date=end_date)

    obj.full_clean()
    obj.save()

    return obj
This also plays well with Django admin, because the forms used there will trigger full_clean on the instance.
We have few general rules of thumb for when to add validation in the model's clean method:
- If we are validating based on multiple, non-relational fields, of the model.
- If the validation itself is simple enough.
Validation should be moved to the service layer if:
- The validation logic is more complex.
- Spanning relations & fetching additional data is required.
It's OK to have validation both in
cleanand in the service, but we tend to move things in the service, if that's the case.
As proposed in this issue, if you can do validation using Django's constraints, then you should aim for that.
Less code to write, less to code to maintain, the database will take care of the data even if it's being inserted from a different place.
Lets look at an example!
class Course(BaseModel):
    name = models.CharField(unique=True, max_length=255)

    start_date = models.DateField()
    end_date = models.DateField()

    class Meta:
        constraints = [
            models.CheckConstraint(
                name="start_date_before_end_date",
                check=Q(start_date__lt=F("end_date"))
            )
        ]
Now, if we try to create new object via course.save() or via Course.objects.create(...), we are going to get an IntegrityError, rather than a ValidationError.
This can actually be a downside (this is not the case, starting from Django 4.1. Check the extra section below.) to the approach, because now, we have to deal with the IntegrityError, which does not always have the best error message.
👀
⚠️ 👀 Since Django 4.1, calling.full_cleanwill also check model constraints!This actually removes the downside, mentioned above, since you'll get a nice
ValidationError, if your model constraints fail the check (if you go thruModel.objects.create(...)the downside still holds)More on this, here - https://docs.djangoproject.com/en/4.1/ref/models/instances/#validating-objects
For an example test case, check the Styleguide-Example repo - https://github.com/HackSoftware/Django-Styleguide-Example/blob/master/styleguide_example/common/tests/models/test_random_model.py#L12
The Django's documentation on constraints is quite lean, so you can check the following articles by Adam Johnson, for examples of how to use them:
- Using Django Check Constraints to Ensure Only One Field Is Set
- Django’s Field Choices Don’t Constrain Your Data
- Using Django Check Constraints to Prevent Self-Following
Model properties are great way to quickly access a derived value from a model's instance.
For example, lets look at the has_started and has_finished properties of our Course model:
from django.utils import timezone
from django.core.exceptions import ValidationError


class Course(BaseModel):
    name = models.CharField(unique=True, max_length=255)

    start_date = models.DateField()
    end_date = models.DateField()

    def clean(self):
        if self.start_date >= self.end_date:
            raise ValidationError("End date cannot be before start date")

    @property
    def has_started(self) -> bool:
        now = timezone.now()

        return self.start_date <= now.date()

    @property
    def has_finished(self) -> bool:
        now = timezone.now()

        return self.end_date <= now.date()
Those properties are handy, because we can now refer to them in serializers or use them in templates.
We have few general rules of thumb, for when to add properties to the model:
- If we need a simple derived value, based on non-relational model fields, add a
@propertyfor that. - If the calculation of the derived value is simple enough.
Properties should be something else (service, selector, utility) in the following cases:
- If we need to span multiple relations or fetch additional data.
- If the calculation is more complex.
Keep in mind that those rules are vague, because context is quite often important. Use your best judgement!
Model methods are also very powerful tool, that can build on top of properties.
Lets see an example with the is_within(self, x) method:
from django.core.exceptions import ValidationError
from django.utils import timezone


class Course(BaseModel):
    name = models.CharField(unique=True, max_length=255)

    start_date = models.DateField()
    end_date = models.DateField()

    def clean(self):
        if self.start_date >= self.end_date:
            raise ValidationError("End date cannot be before start date")

    @property
    def has_started(self) -> bool:
        now = timezone.now()

        return self.start_date <= now.date()

    @property
    def has_finished(self) -> bool:
        now = timezone.now()

        return self.end_date <= now.date()

    def is_within(self, x: date) -> bool:
        return self.start_date <= x <= self.end_date
is_within cannot be a property, because it requires an argument. So it's a method instead.
Another great way for using methods in models is using them for attribute setting, when setting one attribute must always be followed by setting another attribute with a derived value.
An example:
from django.utils.crypto import get_random_string
from django.conf import settings
from django.utils import timezone


class Token(BaseModel):
    secret = models.CharField(max_length=255, unique=True)
    expiry = models.DateTimeField(blank=True, null=True)

    def set_new_secret(self):
        now = timezone.now()

        self.secret = get_random_string(255)
        self.expiry = now + settings.TOKEN_EXPIRY_TIMEDELTA

        return self
Now, we can safely call set_new_secret, that'll produce correct values for both secret and expiry.
We have few general rules of thumb, for when to add methods to the model:
- If we need a simple derived value, that requires arguments, based on non-relational model fields, add a method for that.
- If the calculation of the derived value is simple enough.
- If setting one attribute always requires setting values to other attributes, use a method for that.
Models should be something else (service, selector, utility) in the following cases:
- If we need to span multiple relations or fetch additional data.
- If the calculation is more complex.
Keep in mind that those rules are vague, because context is quite often important. Use your best judgement!
Models need to be tested only if there's something additional to them - like validation, properties or methods.
Here's an example:
from datetime import timedelta

from django.test import TestCase
from django.core.exceptions import ValidationError
from django.utils import timezone

from project.some_app.models import Course


class CourseTests(TestCase):
    def test_course_end_date_cannot_be_before_start_date(self):
        start_date = timezone.now()
        end_date = timezone.now() - timedelta(days=1)

        course = Course(start_date=start_date, end_date=end_date)

        with self.assertRaises(ValidationError):
            course.full_clean()
A few things to note here:
- We assert that a validation error is going to be raised if we call
full_clean. - We are not hitting the database at all, since there's no need for that. This can speed up certain tests.
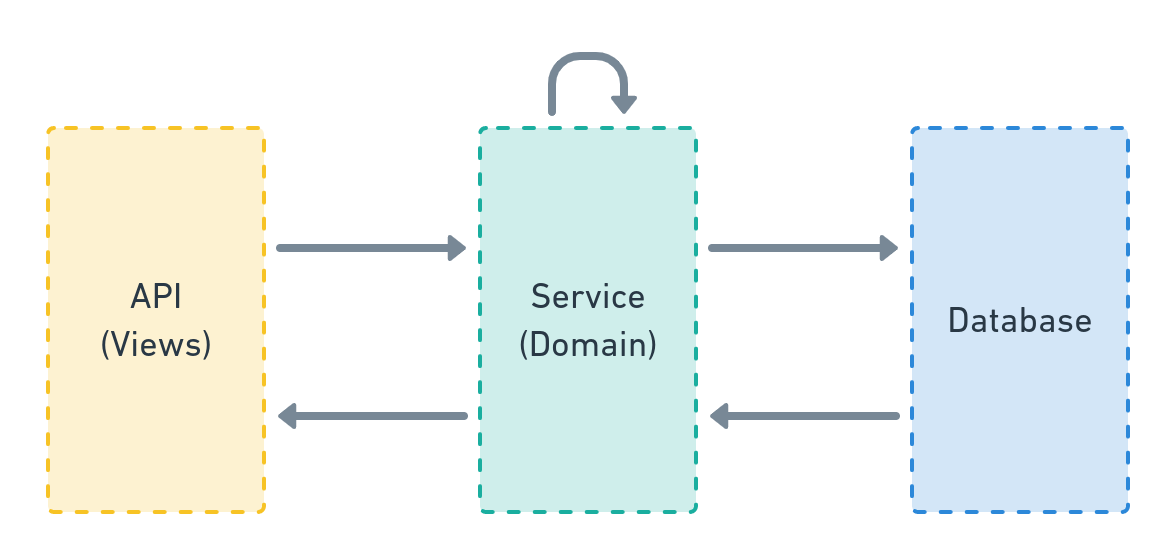
Services are where business logic lives.
The service layer speaks the specific domain language of the software, can access the database & other resources & can interact with other parts of your system.
Here's a very simple diagram, positioning the service layer in our Django apps:
A service can be:
- A simple function.
- A class.
- An entire module.
- Whatever makes sense in your case.
In most cases, a service can be simple function that:
- Lives in
<your_app>/services.pymodule. - Takes keyword-only arguments, unless it requires no or one argument.
- Is type-annotated (even if you are not using
mypyat the moment). - Interacts with the database, other resources & other parts of your system.
- Does business logic - from simple model creation to complex cross-cutting concerns, to calling external services & tasks.
An example service that creates a user:
def user_create(
    *,
    email: str,
    name: str
) -> User:
    user = User(email=email)
    user.full_clean()
    user.save()

    profile_create(user=user, name=name)
    confirmation_email_send(user=user)

    return user
As you can see, this service calls 2 other services - profile_create and confirmation_email_send.
In this example, everything related to the user creation is in one place and can be traced.
Additionally, we can have "class-based" services, which is a fancy way of saying - wrap the logic in a class.
Here's an example, taken straight from the Django Styleguide Example, related to file upload:
# https://github.com/HackSoftware/Django-Styleguide-Example/blob/master/styleguide_example/files/services.py


class FileStandardUploadService:
    """
    This also serves as an example of a service class,
    which encapsulates 2 different behaviors (create & update) under a namespace.

    Meaning, we use the class here for:

    1. The namespace
    2. The ability to reuse `_infer_file_name_and_type` (which can also be an util)
    """
    def __init__(self, user: BaseUser, file_obj):
        self.user = user
        self.file_obj = file_obj

    def _infer_file_name_and_type(self, file_name: str = "", file_type: str = "") -> Tuple[str, str]:
        if not file_name:
            file_name = self.file_obj.name

        if not file_type:
            guessed_file_type, encoding = mimetypes.guess_type(file_name)

            if guessed_file_type is None:
                file_type = ""
            else:
                file_type = guessed_file_type

        return file_name, file_type

    @transaction.atomic
    def create(self, file_name: str = "", file_type: str = "") -> File:
        _validate_file_size(self.file_obj)

        file_name, file_type = self._infer_file_name_and_type(file_name, file_type)

        obj = File(
            file=self.file_obj,
            original_file_name=file_name,
            file_name=file_generate_name(file_name),
            file_type=file_type,
            uploaded_by=self.user,
            upload_finished_at=timezone.now()
        )

        obj.full_clean()
        obj.save()

        return obj

    @transaction.atomic
    def update(self, file: File, file_name: str = "", file_type: str = "") -> File:
        _validate_file_size(self.file_obj)

        file_name, file_type = self._infer_file_name_and_type(file_name, file_type)

        file.file = self.file_obj
        file.original_file_name = file_name
        file.file_name = file_generate_name(file_name)
        file.file_type = file_type
        file.uploaded_by = self.user
        file.upload_finished_at = timezone.now()

        file.full_clean()
        file.save()

        return file
As stated in the comment, we are using this approach for 2 main reasons:
- Namespace. We have a single namespace for our create & update.
- Reuse of the
_infer_file_name_and_typelogic.
Here's how this service is used:
# https://github.com/HackSoftware/Django-Styleguide-Example/blob/master/styleguide_example/files/apis.py

class FileDirectUploadApi(ApiAuthMixin, APIView):
    def post(self, request):
        service = FileDirectUploadService(
            user=request.user,
            file_obj=request.FILES["file"]
        )
        file = service.create()

        return Response(data={"id": file.id}, status=status.HTTP_201_CREATED)
And
@admin.register(File)
class FileAdmin(admin.ModelAdmin):
    # ... other code here ...
    # https://github.com/HackSoftware/Django-Styleguide-Example/blob/master/styleguide_example/files/admin.py

    def save_model(self, request, obj, form, change):
        try:
            cleaned_data = form.cleaned_data

            service = FileDirectUploadService(
                file_obj=cleaned_data["file"],
                user=cleaned_data["uploaded_by"]
            )

            if change:
                service.update(file=obj)
            else:
                service.create()
        except ValidationError as exc:
            self.message_user(request, str(exc), messages.ERROR)
Additionally, using class-based services is a good idea for "flows" - things that go thru multiple steps.
For example, this service represents a "direct file upload flow", with a start and finish (and additionally):
# https://github.com/HackSoftware/Django-Styleguide-Example/blob/master/styleguide_example/files/services.py


class FileDirectUploadService:
    """
    This also serves as an example of a service class,
    which encapsulates a flow (start & finish) + one-off action (upload_local) into a namespace.

    Meaning, we use the class here for:

    1. The namespace
    """
    def __init__(self, user: BaseUser):
        self.user = user

    @transaction.atomic
    def start(self, *, file_name: str, file_type: str) -> Dict[str, Any]:
        file = File(
            original_file_name=file_name,
            file_name=file_generate_name(file_name),
            file_type=file_type,
            uploaded_by=self.user,
            file=None
        )
        file.full_clean()
        file.save()

        upload_path = file_generate_upload_path(file, file.file_name)

        """
        We are doing this in order to have an associated file for the field.
        """
        file.file = file.file.field.attr_class(file, file.file.field, upload_path)
        file.save()

        presigned_data: Dict[str, Any] = {}

        if settings.FILE_UPLOAD_STORAGE == FileUploadStorage.S3:
            presigned_data = s3_generate_presigned_post(
                file_path=upload_path, file_type=file.file_type
            )

        else:
            presigned_data = {
                "url": file_generate_local_upload_url(file_id=str(file.id)),
            }

        return {"id": file.id, **presigned_data}

    @transaction.atomic
    def finish(self, *, file: File) -> File:
        # Potentially, check against user
        file.upload_finished_at = timezone.now()
        file.full_clean()
        file.save()

        return file
Naming convention depends on your taste. It pays off to have something consistent throughout a project.
If we take the example above, our service is named user_create. The pattern is - <entity>_<action>.
This is what we prefer in HackSoft's projects. This seems odd at first, but it has few nice features:
- Namespacing. It's easy to spot all services starting with
user_and it's a good idea to put them in ausers.pymodule. - Greppability. Or in other words, if you want to see all actions for a specific entity, just grep for
user_.
If you have a simple-enough Django app with a bunch of services, they can all live happily in the service.py module.
But when things get big, you might want to split services.py into a folder with sub-modules, depending on the different sub-domains that you are dealing with in your app.
For example, lets say we have an authentication app, where we have 1 sub-module in our services module, that deals with jwt, and one sub-module that deals with oauth.
The structure may look like this:
services
├── __init__.py
├── jwt.py
└── oauth.py
There are lots of flavors here:
- You can do the import-export dance in
services/__init__.py, so you can import fromproject.authentication.serviceseverywhere else - You can create a folder-module,
jwt/__init__.py, and put the code there. - Basically, the structure is up to you. If you feel it's time to restructure and refactor - do so.
In most of our projects, we distinguish between "Pushing data to the database" and "Pulling data from the database":
- Services take care of the push.
- Selectors take care of the pull.
- Selectors can be viewed as a "sub-layer" to services, that's specialized in fetching data.
If this idea does not resonate well with you, you can just have services for both "kinds" of operations.
A selector follows the same rules as a service.
For example, in a module <your_app>/selectors.py, we can have the following:
def user_list(*, fetched_by: User) -> Iterable[User]:
    user_ids = user_get_visible_for(user=fetched_by)

    query = Q(id__in=user_ids)

    return User.objects.filter(query)
As you can see, user_get_visible_for is another selector.
You can return querysets, or lists or whatever makes sense to your specific case.
Since services hold our business logic, they are an ideal candidate for tests.
If you decide to cover the service layer with tests, we have few general rules of thumb to follow:
- The tests should cover the business logic in an exhaustive manner.
- The tests should hit the database - creating & reading from it.
- The tests should mock async task calls & everything that goes outside the project.
When creating the required state for a given test, one can use a combination of:
- Fakes (We recommend using
faker) - Other services, to create the required objects.
- Special test utility & helper methods.
- Factories (We recommend using
factory_boy) - Plain
Model.objects.create()calls, if factories are not yet introduced in the project. - Usually, whatever suits you better.
Let's take a look at our service from the example:
from django.contrib.auth.models import User
from django.core.exceptions import ValidationError
from django.db import transaction

from project.payments.selectors import items_get_for_user
from project.payments.models import Item, Payment
from project.payments.tasks import payment_charge


@transaction.atomic
def item_buy(
    *,
    item: Item,
    user: User,
) -> Payment:
    if item in items_get_for_user(user=user):
        raise ValidationError(f'Item {item} already in {user} items.')

    payment = Payment(
        item=item,
        user=user,
        successful=False
    )
    payment.full_clean()
    payment.save()

    # Run the task once the transaction has commited,
    # guaranteeing the object has been created.
    transaction.on_commit(
        lambda: payment_charge.delay(payment_id=payment.id)
    )

    return payment
The service:
- Calls a selector for validation.
- Creates an object.
- Delays a task.
Those are our tests:
from unittest.mock import patch

from django.test import TestCase
from django.contrib.auth.models import User
from django.core.exceptions import ValidationError

from django_styleguide.payments.services import item_buy
from django_styleguide.payments.models import Payment, Item


class ItemBuyTests(TestCase):
    @patch('project.payments.services.items_get_for_user')
    def test_buying_item_that_is_already_bought_fails(self, items_get_for_user_mock):
        """
        Since we already have tests for `items_get_for_user`,
        we can safely mock it here and give it a proper return value.
        """
        user = User(username='Test User')
        item = Item(
            name='Test Item',
            description='Test Item description',
            price=10.15
        )

        items_get_for_user_mock.return_value = [item]

        with self.assertRaises(ValidationError):
            item_buy(user=user, item=item)

    @patch('project.payments.services.payment_charge.delay')
    def test_buying_item_creates_a_payment_and_calls_charge_task(
        self,
        payment_charge_mock
    ):
        # How we prepare our tests is a topic for a different discussion
        user = given_a_user(username="Test user")
        item = given_a_item(
            name='Test Item',
            description='Test Item description',
            price=10.15
        )

        self.assertEqual(0, Payment.objects.count())

        payment = item_buy(user=user, item=item)

        self.assertEqual(1, Payment.objects.count())
        self.assertEqual(payment, Payment.objects.first())

        self.assertFalse(payment.successful)

payment_charge_mock.assert_called()When using services & selectors, all of your APIs should look simple & identical.
When we are creating new APIs, we follow those general rules:
- Have 1 API per operation. This means, for CRUD on a model, having 4 APIs.
- Inherit from the most simple
APIVieworGenericAPIView.- Avoid the more abstract classes, since they tend to manage things via serializers & we want to do that via services & selectors.
- Don't do business logic in your API.
- You can do object fetching / data manipulation in your APIs (potentially, you can extract that to somewhere else).
- If you are calling
some_servicein your API, you can extract object fetching / data manipulation tosome_service_parse.
- If you are calling
- Basically, keep the APIs as simple as possible. They are an interface towards your core business logic.
When we are talking about APIs, we need a way to deal with data serialization - both incoming & outgoing data.
Here are our rules for API serialization:
- There should be a dedicated input serializer & a dedicated output serializer.
- Input serializer takes care of the data coming in.
- Output serializer takes care of the data coming out.
- In terms of serialization, Use whatever abstraction works for you.
In case you are using DRF's serializers, here are our rules:
- Serializer should be nested in the API and be named either
InputSerializerorOutputSerializer. - Our preference is for both serializers to inherit from the simpler
Serializerand avoid usingModelSerializer- This is a matter of preference and choice. If
ModelSerializeris working fine for you, use it.
- This is a matter of preference and choice. If
- If you need a nested serializer, use the
inline_serializerutil. - Reuse serializers as little as possible.
- Reusing serializers may expose you to unexpected behavior, when something changes in the base serializers.
For our APIs we use the following naming convention: <Entity><Action>Api.
Here are few examples: UserCreateApi, UserSendResetPasswordApi, UserDeactivateApi, etc.
This is mostly up to personal preferences, since you can achieve the same results with both approaches.
We have the following preferences:
- Pick class-based APIS / views by default.
- If everyone else preferes & are comfortable with functions, use function-based APIs / views.
For us, the added benefits of using classes for APIs / views are the following:
- You can inherit a
BaseApior add mixins.- If you are using function-based APIs / views, you'll need to do the same, but with decorators.
- The class creates a namespace where you can nest things (attributes, methods, etc.).
- Additional API configuration can be done via class attributes.
- In the case of function-based APIs / views, you need to stack decorators.
Here's an example with a class, inheriting a BaseApi:
class SomeApi(BaseApi):
    def get(self, request):
        data = something()

        return Response(data)
Here's an example with a function, using a base_api decorator (implementation is based on your needs)
@base_api(["GET"])
def some_api(request):
    data = something()
return Response(data)A dead-simple list API should look like that:
from rest_framework.views import APIView
from rest_framework import serializers
from rest_framework.response import Response

from styleguide_example.users.selectors import user_list
from styleguide_example.users.models import BaseUser


class UserListApi(APIView):
    class OutputSerializer(serializers.Serializer):
        id = serializers.CharField()
        email = serializers.CharField()

    def get(self, request):
        users = user_list()

        data = self.OutputSerializer(users, many=True).data

        return Response(data)
Keep in mind this API is public by default. Authentication is up to you.
At first glance, this is tricky, since our APIs are inheriting the plain APIView from DRF, while filtering and pagination are baked into the generic ones:
That's why, we take the following approach:
- Selectors take care of the actual filtering.
- APIs take care of filter parameter serialization.
- If you need some of the generic paginations, provided by DRF, the API should take care of that.
- If you need a different pagination, or you are implementing it yourself, either add a new layer to handle pagination or let the selector do that for you.
Let's look at the example, where we rely on pagination, provided by DRF:
from rest_framework.views import APIView
from rest_framework import serializers

from styleguide_example.api.mixins import ApiErrorsMixin
from styleguide_example.api.pagination import get_paginated_response, LimitOffsetPagination

from styleguide_example.users.selectors import user_list
from styleguide_example.users.models import BaseUser


class UserListApi(ApiErrorsMixin, APIView):
    class Pagination(LimitOffsetPagination):
        default_limit = 1

    class FilterSerializer(serializers.Serializer):
        id = serializers.IntegerField(required=False)
        # Important: If we use BooleanField, it will default to False
        is_admin = serializers.NullBooleanField(required=False)
        email = serializers.EmailField(required=False)

    class OutputSerializer(serializers.Serializer):
        id = serializers.CharField()
        email = serializers.CharField()
        is_admin = serializers.BooleanField()

    def get(self, request):
        # Make sure the filters are valid, if passed
        filters_serializer = self.FilterSerializer(data=request.query_params)
        filters_serializer.is_valid(raise_exception=True)

        users = user_list(filters=filters_serializer.validated_data)

        return get_paginated_response(
            pagination_class=self.Pagination,
            serializer_class=self.OutputSerializer,
            queryset=users,
            request=request,
            view=self
        )
When we look at the API, we can identify few things:
- There's a
FilterSerializer, which will take care of the query parameters. If we don't do this here, we'll have to do it elsewhere & DRF serializers are great at this job. - We pass the filters to the
user_listselector - We use the
get_paginated_responseutility, to return a .. paginated response.
Now, let's look at the selector:
import django_filters

from styleguide_example.users.models import BaseUser


class BaseUserFilter(django_filters.FilterSet):
    class Meta:
        model = BaseUser
        fields = ('id', 'email', 'is_admin')


def user_list(*, filters=None):
    filters = filters or {}

    qs = BaseUser.objects.all()

    return BaseUserFilter(filters, qs).qs
As you can see, we are leveraging the powerful django-filter library.
👀 The key thing here is that the selector is responsible for the filtering. You can always use something else, as a filtering abstraction. For most of the cases,
django-filteris more than enough.
Finally, let's look at get_paginated_response:
from rest_framework.response import Response


def get_paginated_response(*, pagination_class, serializer_class, queryset, request, view):
    paginator = pagination_class()

    page = paginator.paginate_queryset(queryset, request, view=view)

    if page is not None:
        serializer = serializer_class(page, many=True)
        return paginator.get_paginated_response(serializer.data)

    serializer = serializer_class(queryset, many=True)

    return Response(data=serializer.data)
This is basically a code, extracted from within DRF.
Same goes for the LimitOffsetPagination:
from collections import OrderedDict

from rest_framework.pagination import LimitOffsetPagination as _LimitOffsetPagination
from rest_framework.response import Response


class LimitOffsetPagination(_LimitOffsetPagination):
    default_limit = 10
    max_limit = 50

    def get_paginated_data(self, data):
        return OrderedDict([
            ('limit', self.limit),
            ('offset', self.offset),
            ('count', self.count),
            ('next', self.get_next_link()),
            ('previous', self.get_previous_link()),
            ('results', data)
        ])

    def get_paginated_response(self, data):
        """
        We redefine this method in order to return `limit` and `offset`.
        This is used by the frontend to construct the pagination itself.
        """
        return Response(OrderedDict([
            ('limit', self.limit),
            ('offset', self.offset),
            ('count', self.count),
            ('next', self.get_next_link()),
            ('previous', self.get_previous_link()),
            ('results', data)
        ]))
What we basically did is reverse-engineered the generic APIs.
👀 Again, if you need something else for pagination, you can always implement it & use it in the same manner. There are cases, where the selector needs to take care of the pagination. We approach those cases the same way we approach filtering.
You can find the code for the example list API with filters & pagination in the Styleguide Example project.
Here's an example:
class CourseDetailApi(SomeAuthenticationMixin, APIView):
    class OutputSerializer(serializers.Serializer):
        id = serializers.CharField()
        name = serializers.CharField()
        start_date = serializers.DateField()
        end_date = serializers.DateField()

    def get(self, request, course_id):
        course = course_get(id=course_id)

        serializer = self.OutputSerializer(course)

return Response(serializer.data)Here's an example:
class CourseCreateApi(SomeAuthenticationMixin, APIView):
    class InputSerializer(serializers.Serializer):
        name = serializers.CharField()
        start_date = serializers.DateField()
        end_date = serializers.DateField()

    def post(self, request):
        serializer = self.InputSerializer(data=request.data)
        serializer.is_valid(raise_exception=True)

        course_create(**serializer.validated_data)

return Response(status=status.HTTP_201_CREATED)Here's an example:
class CourseUpdateApi(SomeAuthenticationMixin, APIView):
    class InputSerializer(serializers.Serializer):
        name = serializers.CharField(required=False)
        start_date = serializers.DateField(required=False)
        end_date = serializers.DateField(required=False)

    def post(self, request, course_id):
        serializer = self.InputSerializer(data=request.data)
        serializer.is_valid(raise_exception=True)

        course_update(course_id=course_id, **serializer.validated_data)

return Response(status=status.HTTP_200_OK)When our APIs receive an object_id, the question that arises is: Where should we fetch that object?
We have several options:
- We can pass that object to a serializer, which has a
PrimaryKeyRelatedField(or aSlugRelatedFieldfor that matter) - We can do some kind of object fetching in the API & pass the object to a service or a selector.
- We can pass the id to the service / selector and do the object fetching there.
What approach we take is a matter of project context & preference.
What we usually do is to fetch objects on the API level, using a special get_object util:
def get_object(model_or_queryset, **kwargs):
    """
    Reuse get_object_or_404 since the implementation supports both Model && queryset.
    Catch Http404 & return None
    """
    try:
        return get_object_or_404(model_or_queryset, **kwargs)
    except Http404:
        return None
This is a very basic utility, that handles the exception and returns None instead.
Whatever you do, make sure to keep it consistent.
In case you need to use a nested serializer, you can do the following thing:
class Serializer(serializers.Serializer):
    weeks = inline_serializer(many=True, fields={
        'id': serializers.IntegerField(),
        'number': serializers.IntegerField(),
    })
The implementation of inline_serializer can be found here, in the Styleguide-Example repo.
Sometimes, the end result of an API can be quite complex. Sometimes, we want to optimize the queries that we do and the optimization itself can be quite complex.
Trying to stick with just an OutputSerializer in that case might limit our options.
In those cases, we can implement our output serialization as a function, and have the optimizations we need there, instead of having all the optimizations in the selector.
Lets take this API as an example:
class SomeGenericFeedApi(BaseApi):
    def get(self, request):
        feed = some_feed_get(
            user=request.user,
        )

        data = some_feed_serialize(feed)

        return Response(data)
In this scenario, some_feed_get has the responsibility of returning a list of feed items (can be ORM objects, can be just IDs, can be whatever works for you).
And we want to push the complexity of serializing this feed, in an optimal manner, to the serializer function - some_feed_serialize.
This means we don't have to do any unnecessary prefetches & optimizations in some_feed_get.
Here's an example of some_feed_serialize:
class FeedItemSerializer(serializers.Serializer):
    ... some fields here ...
    calculated_field = serializers.IntegerField(source="_calculated_field")


def some_feed_serialize(feed: List[FeedItem]):
    feed_ids = [feed_item.id for feed_item in feed]

    # Refetch items with more optimizations
    # Based on the relations that are going in
    objects = FeedItem.objects.select_related(
      # ... as complex as you want ...
    ).prefetch_related(
      # ... as complex as you want ...
    ).filter(
      id__in=feed_ids
    ).order_by(
      "-some_timestamp"
    )

    some_cache = get_some_cache(feed_ids)

    result = []

    for feed_item in objects:
        # An example, adding additional fields for the serializer
        # That are based on values outside of our current object
        # This may be some optimization to save queries
        feed_item._calculated_field = some_cache.get(feed_item.id)

        result.append(FeedItemSerializer(feed_item).data)

    return result
As you can see, this is a pretty generic example, but the idea is simple:
- Refetch your data, with the needed joins & prefetches.
- Fetch or build in-memory caches, that will save you queries for specific computed values.
- Return a result, that's ready to be an API response.
Even though this is labeled as "advanced serialization", the pattern is really powerful and can be used for all serializations.
Such serializer functions usually live in a serializers.py module, in the corresponding Django app.
We usually organize our urls the same way we organize our APIs - 1 url per API, meaning 1 url per action.
A general rule of thumb is to split urls from different domains in their own domain_patterns list & include from urlpatterns.
Here's an example with the APIs from above:
from django.urls import path, include

from project.education.apis import (
    CourseCreateApi,
    CourseUpdateApi,
    CourseListApi,
    CourseDetailApi,
    CourseSpecificActionApi,
)


course_patterns = [
    path('', CourseListApi.as_view(), name='list'),
    path('<int:course_id>/', CourseDetailApi.as_view(), name='detail'),
    path('create/', CourseCreateApi.as_view(), name='create'),
    path('<int:course_id>/update/', CourseUpdateApi.as_view(), name='update'),
    path(
        '<int:course_id>/specific-action/',
        CourseSpecificActionApi.as_view(),
        name='specific-action'
    ),
]

urlpatterns = [
    path('courses/', include((course_patterns, 'courses'))),
]
Splitting urls like that can give you the extra flexibility to move separate domain patterns to separate modules, especially for really big projects, where you'll often have merge conflicts in urls.py.
Now, if you like to see the entire url tree structure, you can do just that, by not extracting specific variables for the urls that you include.
Here's an example from our Django Styleguide Example:
from django.urls import path, include

from styleguide_example.files.apis import (
    FileDirectUploadApi,

    FilePassThruUploadStartApi,
    FilePassThruUploadFinishApi,
    FilePassThruUploadLocalApi,
)


urlpatterns = [
    path(
        "upload/",
        include(([
            path(
                "direct/",
                FileDirectUploadApi.as_view(),
                name="direct"
            ),
            path(
                "pass-thru/",
                include(([
                    path(
                        "start/",
                        FilePassThruUploadStartApi.as_view(),
                        name="start"
                    ),
                    path(
                        "finish/",
                        FilePassThruUploadFinishApi.as_view(),
                        name="finish"
                    ),
                    path(
                        "local/<str:file_id>/",
                        FilePassThruUploadLocalApi.as_view(),
                        name="local"
                    )
                ], "pass-thru"))
            )
        ], "upload"))
    )
]
Some people prefer the first way of doing it, others prefer the visible tree-like structure. This is up to you & your team.
When it comes to Django settings, we tend to follow the folder structure from cookiecutter-django, with few adjustments:
- We separate Django specific settings from other settings.
- Everything should be included in
base.py.- There should be nothing that's only included in
production.py. - Things that need to only work in production are controlled via environment variables.
- There should be nothing that's only included in
Here's the folder structure of our Styleguide-Example project:
config
├── __init__.py
├── django
│   ├── __init__.py
│   ├── base.py
│   ├── local.py
│   ├── production.py
│   └── test.py
├── settings
│   ├── __init__.py
│   ├── celery.py
│   ├── cors.py
│   ├── sentry.py
│   └── sessions.py
├── urls.py
├── env.py
└── wsgi.py
├── asgi.py
In config/django, we put everything that's Django related:
base.pycontains most of the settings & imports everything else fromconfig/settingsproduction.pyimports frombase.pyand then overwrites some specific settings for production.test.pyimports frombase.pyand then overwrites some specific settings for running tests.- This should be used as the settings module in
pytest.ini.
- This should be used as the settings module in
local.pyimports frombase.pyand can overwrite some specific settings for local development.- If you want to use that, point to
localinmanage.py. Otherwise stick withbase.py
- If you want to use that, point to
In config/settings, we put everything else:
- Celery configuration.
- 3rd party configurations.
- etc.
This gives you a nice separation of modules.
Additionally, we usually have config/env.py with the following code:
import environ

env = environ.Env()
And then, whenever we need to read something from the environment, we import like that:
from config.env import envUsually, at the end of the base.py module, we import everything from config/settings:
from config.settings.cors import *  # noqa
from config.settings.sessions import *  # noqa
from config.settings.celery import *  # noqa
from config.settings.sentry import * # noqaIn a lot of examples, you'll see that environment variables are usually prefixed with DJANGO_. This is very helpful when there are other applications alongside your Django app that run on the same environment. In that case, prefixing the environment variables with DJANGO_ helps you to differ which are the environment variables specific to your Django app.
In HackSoft we do not ususally have several apps running on the same environment. So, we tend to prefix with DJANGO_ only the Django specific environments & anything else.
For example, we would have DJANGO_SETTINGS_MODULE, DJANGO_DEBUG, DJANGO_ALLOWED_HOSTS, DJANGO_CORS_ORIGIN_WHITELIST prefixed. We would have AWS_SECRET_KEY, CELERY_BROKER_URL, EMAILS_ENABLED not prefixed.
This is mostly up to personal preference. Just make sure you are consistent with that.
Since everything should be imported in base.py, but sometimes we don't want to configure a certain integration for local development, we derived the following approach:
- Integration-specific settings are placed in
config/settings/some_integration.py - There's always a boolean setting called
USE_SOME_INTEGRATION, which reads from the environment & defaults toFalse. - If the value is
True, then proceed reading other settings & failing if things are not present in the environment.
For example, lets take a look at config/settings/sentry.py:
from config.env import env

SENTRY_DSN = env('SENTRY_DSN', default='')

if SENTRY_DSN:
    import sentry_sdk
    from sentry_sdk.integrations.django import DjangoIntegration
    from sentry_sdk.integrations.celery import CeleryIntegration

    # ... we proceed with sentry settings here ...
# View the full file here - https://github.com/HackSoftware/Styleguide-Example/blob/master/config/settings/sentry.pyHaving a local .env is a nice way of providing values for your settings.
And the good thing is, django-environ provides you with a way to do that:
# That's in the beginning of base.py

import os

from config.env import env, environ

# Build paths inside the project like this: os.path.join(BASE_DIR, ...)
BASE_DIR = environ.Path(__file__) - 3

env.read_env(os.path.join(BASE_DIR, ".env"))
Now you can have a .env (but it's not required) file in your project root & place values for your settings there.
There are 2 things worth mentioning here:
- Don't put
.envin your source control, since this will leak credentials. - Rather put an
.env.examplewith empty values for everything, so new developers can figure out what's being used.
👀 If you want the code, hop to the
Styleguide-Exampleproject - https://github.com/HackSoftware/Styleguide-Example/blob/master/styleguide_example/api/exception_handlers.py
Errors & exception handling is a big topic & quite often - the details are specific for a given project.
That's why we'll split things into two - general guidelines, followed by some specific approaches for error handling.
Our general guidelines are:
- Know how exception handling works (we'll give context for Django Rest Framework).
- Describe how your API errors are going to look like.
- Know how to change the default exception handling behavior.
Followed by some specific approaches:
- Use DRF's default exceptions, with very little modifications.
- HackSoft's proposed approach.
If you are looking for a standard way to structure your error responses, check RFC7807 - https://datatracker.ietf.org/doc/html/rfc7807 (as proposed here - #133)
DRF has an excellent guide on how exceptions are being handled, so make sure to read it first - https://www.django-rest-framework.org/api-guide/exceptions/
Additonally, here's a neat diadgram with an overview of the process:
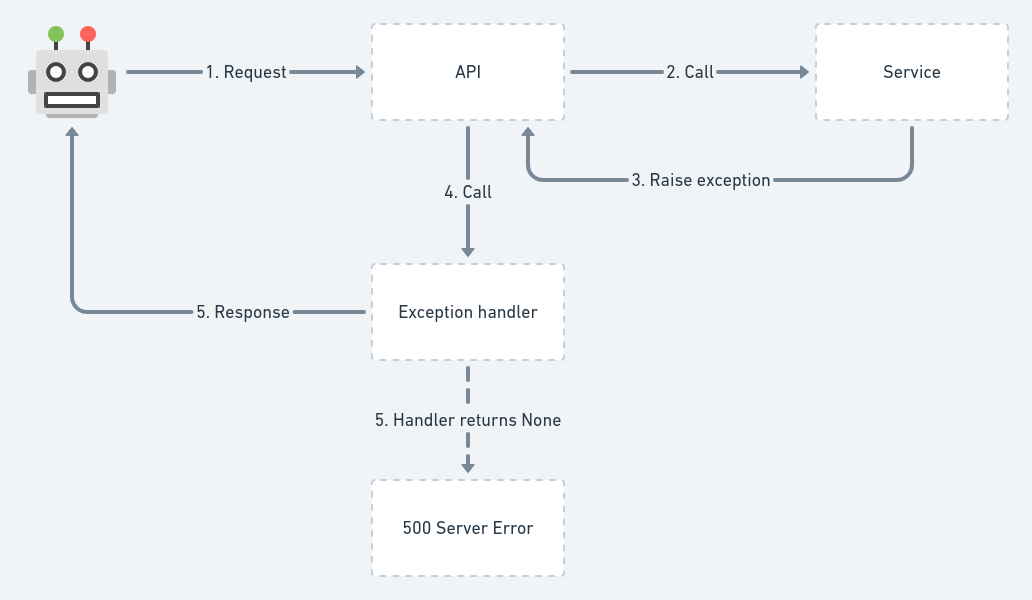
Basically, if the exception handler cannot handle the given exception & returns None, this will result in an unhandled exception & a 500 Server Error. This is often good, because you won't be silencing errors, that you need to pay attention to.
Now, there are some quirks, that we need to pay attention to.
For example, if we simply raise a rest_framework.exceptions.ValidationError like that:
from rest_framework import exceptions


def some_service():
    raise ValidationError("Error message here.")
The response payload is going to look like this:
["Some message"]This looks strange, because if we do it like this:
from rest_framework import exceptions


def some_service():
    raise exceptions.ValidationError({"error": "Some message"})
The response payload is going to look like this:
{
  "error": "Some message"
}
That's basically what we passed as the detail of the ValidationError. But it's a different data structure from the initial array.
Now, if we decide to raise another of the DRF's built-in exceptions:
from rest_framework import exceptions


def some_service():
    raise exceptions.NotFound()
The response payload is going to look like this:
{
  "detail": "Not found."
}
That's entirely different from what we saw as behavior from the ValidationError and this might cause problems.
So far, the default DRF behavior can get us:
- An array.
- A dictionary.
- A specific
{"detail": "something"}result.
So if we need to use the default DRF behavior, we need to take care of this inconsistency.
Now, DRF's default exception handling is not playing nice with Django's ValidationError.
This piece of code:
from django.core.exceptions import ValidationError as DjangoValidationError


def some_service():
    raise DjangoValidationError("Some error message")
Will result in an unhandled exception, causing 500 Server Error.
This will also happen if this ValidationError comes from model validation, for example:
def some_service():
    user = BaseUser()
    user.full_clean()  # Throws ValidationError
    user.save()
This will also result in 500 Server Error.
If we want to start handling this, as if it was rest_framework.exceptions.ValidationError, we need to roll-out our own custom exception handler:
from django.core.exceptions import ValidationError as DjangoValidationError

from rest_framework.views import exception_handler
from rest_framework.serializers import as_serializer_error
from rest_framework import exceptions


def custom_exception_handler(exc, ctx):
    if isinstance(exc, DjangoValidationError):
        exc = exceptions.ValidationError(as_serializer_error(exc))

    response = exception_handler(exc, ctx)

    # If unexpected error occurs (server error, etc.)
    if response is None:
        return response

    return response
This is basically the default implementation, with the addition of this piece of code:
if isinstance(exc, DjangoValidationError):
    exc = exceptions.ValidationError(as_serializer_error(exc))
Since we need to map between django.core.exceptions.ValidationError and rest_framework.exceptions.ValidationError, we are using DRF's as_serializer_error, which is used internally in the serializers, just for that.
With that, we can now have Django's ValidationError playing nice with DRF's exception handler.
This is very important and should be done as early as possible in any given project.
This is basically agreeing upon what the interface of your API errors - How an error is going to look like as an API response?
This is very project specific, you can use some of the popular APIs for inspiration:
- Stripe - https://stripe.com/docs/api/errors
As an example, we might decide that our errors are going to look like this:
4**and5**status codes for different types of errors.- Each error will be a dictionary with a single
messagekey, containing the error message.
{
  "message": "Some error message here"
}
That's simple enough:
400will be used for validation errors.401for auth errors.403for permission errors.404for not found errors.429for throttling errors.500for server errors (we need to be careful not to silence an exception causing 500 and always report that in services like Sentry)
Again, this is up to you & it's specific to the project. We'll propose something similiar for one of the specific approaches.
This is also important, because when you decide how your errors are going to look like, you need to implement this as custom exception handling.
We've already provided an example for that in the paragraph above, talking about Django's ValidationError.
We'll also provide additional examples in the sections below.
DRF's error handling is good. It'd be great, if the end result was always consistent. Those are the little modifications that we are going to do.
We want to end up with errors, always looking like that:
{
  "detail": "Some error"
}
or
{
  "detail": ["Some error", "Another error"]
}
or
{
  "detail": { "key": "... some arbitrary nested structure ..." }
}
Basically, make sure we always have a dictionary with a detail key.
Additonally, we want to handle Django's ValidationError as well.
In order to achieve that, this is how our custom exception handler is going to look like:
from django.core.exceptions import ValidationError as DjangoValidationError, PermissionDenied
from django.http import Http404

from rest_framework.views import exception_handler
from rest_framework import exceptions
from rest_framework.serializers import as_serializer_error


def drf_default_with_modifications_exception_handler(exc, ctx):
    if isinstance(exc, DjangoValidationError):
        exc = exceptions.ValidationError(as_serializer_error(exc))

    if isinstance(exc, Http404):
        exc = exceptions.NotFound()

    if isinstance(exc, PermissionDenied):
        exc = exceptions.PermissionDenied()

    response = exception_handler(exc, ctx)

    # If unexpected error occurs (server error, etc.)
    if response is None:
        return response

    if isinstance(exc.detail, (list, dict)):
        response.data = {
            "detail": response.data
        }

    return response
We kind-of replicate the original exception handler, so we can deal with an APIException after that (looking for detail).
Now, lets run a set of tests:
Code:
def some_service():
    raise DjangoValidationError("Some error message")
Response:
{
  "detail": {
    "non_field_errors": ["Some error message"]
  }
}
Code:
from django.core.exceptions import PermissionDenied

def some_service():
    raise PermissionDenied()
Response:
{
  "detail": "You do not have permission to perform this action."
}
Code:
from django.http import Http404

def some_service():
    raise Http404()
Response:
{
  "detail": "Not found."
}
Code:
def some_service():
    raise RestValidationError("Some error message")
Response:
{
  "detail": ["Some error message"]
}
Code:
def some_service():
    raise RestValidationError(detail={"error": "Some error message"})
Response:
{
  "detail": {
    "error": "Some error message"
  }
}
Code:
class NestedSerializer(serializers.Serializer):
    bar = serializers.CharField()


class PlainSerializer(serializers.Serializer):
    foo = serializers.CharField()
    email = serializers.EmailField(min_length=200)

    nested = NestedSerializer()


def some_service():
    serializer = PlainSerializer(data={
        "email": "foo",
        "nested": {}
    })
    serializer.is_valid(raise_exception=True)
Response:
{
  "detail": {
    "foo": ["This field is required."],
    "email": [
      "Ensure this field has at least 200 characters.",
      "Enter a valid email address."
    ],
    "nested": {
      "bar": ["This field is required."]
    }
  }
}
Code:
from rest_framework import exceptions


def some_service():
    raise exceptions.Throttled()
Response:
{
  "detail": "Request was throttled."
}
Code:
def some_service():
    user = BaseUser()
    user.full_clean()
Response:
{
  "detail": {
    "password": ["This field cannot be blank."],
    "email": ["This field cannot be blank."]
  }
}We are going to propose an approach, that can be easily extended into something that works well for you.
Here are the key ideas:
- Your application will have its own hierarchy of exceptions, that are going to be thrown by the business logic.
- Lets say, for simplicity, that we are going to have only 1 error -
ApplicationError.- This is going to be defined in a special
coreapp, withinexceptionsmodule. Basically, havingproject.core.exceptions.ApplicationError.
- This is going to be defined in a special
- We want to let DRF handle everything else, by default.
ValidationErroris now special and it's going to be handled differently.ValidationErrorshould only come from either serializer or a model validation.
We are going to define the following structure for our errors:
{
  "message": "The error message here",
  "extra": {}
}
The extra key can hold arbitrary data, for the purposes of passing information to the frontend.
For example, whenever we have a ValidationError (usually coming from a Serializer or a Model), we are going to present the error like that:
{
  "message": "Validation error.",
  "extra": {
    "fields": {
      "password": ["This field cannot be blank."],
      "email": ["This field cannot be blank."]
    }
  }
}
This can be communicated with the frontend, so they can look for extra.fields, to present those specific errors to the user.
In order to achieve that, the custom exception handler is going to look like this:
from django.core.exceptions import ValidationError as DjangoValidationError, PermissionDenied
from django.http import Http404

from rest_framework.views import exception_handler
from rest_framework import exceptions
from rest_framework.serializers import as_serializer_error
from rest_framework.response import Response

from styleguide_example.core.exceptions import ApplicationError


def hacksoft_proposed_exception_handler(exc, ctx):
    """
    {
        "message": "Error message",
        "extra": {}
    }
    """
    if isinstance(exc, DjangoValidationError):
        exc = exceptions.ValidationError(as_serializer_error(exc))

    if isinstance(exc, Http404):
        exc = exceptions.NotFound()

    if isinstance(exc, PermissionDenied):
        exc = exceptions.PermissionDenied()

    response = exception_handler(exc, ctx)

    # If unexpected error occurs (server error, etc.)
    if response is None:
        if isinstance(exc, ApplicationError):
            data = {
                "message": exc.message,
                "extra": exc.extra
            }
            return Response(data, status=400)

        return response

    if isinstance(exc.detail, (list, dict)):
        response.data = {
            "detail": response.data
        }

    if isinstance(exc, exceptions.ValidationError):
        response.data["message"] = "Validation error"
        response.data["extra"] = {
            "fields": response.data["detail"]
        }
    else:
        response.data["message"] = response.data["detail"]
        response.data["extra"] = {}

    del response.data["detail"]

    return response
Take a look at that code & try to understand what's going on. The strategy is - reuse as much as possible from DRF & then adjust.
Now, we are going to have the following behavior:
Code:
from styleguide_example.core.exceptions import ApplicationError


def trigger_application_error():
    raise ApplicationError(message="Something is not correct", extra={"type": "RANDOM"})
Response:
{
  "message": "Something is not correct",
  "extra": {
    "type": "RANDOM"
  }
}
Code:
def some_service():
    raise DjangoValidationError("Some error message")
Response:
{
  "message": "Validation error",
  "extra": {
    "fields": {
      "non_field_errors": ["Some error message"]
    }
  }
}
Code:
from django.core.exceptions import PermissionDenied

def some_service():
    raise PermissionDenied()
Response:
{
  "message": "You do not have permission to perform this action.",
  "extra": {}
}
Code:
from django.http import Http404

def some_service():
    raise Http404()
Response:
{
  "message": "Not found.",
  "extra": {}
}
Code:
def some_service():
    raise RestValidationError("Some error message")
Response:
{
  "message": "Validation error",
  "extra": {
    "fields": ["Some error message"]
  }
}
Code:
def some_service():
    raise RestValidationError(detail={"error": "Some error message"})
Response:
{
  "message": "Validation error",
  "extra": {
    "fields": {
      "error": "Some error message"
    }
  }
}
Code:
class NestedSerializer(serializers.Serializer):
    bar = serializers.CharField()


class PlainSerializer(serializers.Serializer):
    foo = serializers.CharField()
    email = serializers.EmailField(min_length=200)

    nested = NestedSerializer()


def some_service():
    serializer = PlainSerializer(data={
        "email": "foo",
        "nested": {}
    })
    serializer.is_valid(raise_exception=True)
Response:
{
  "message": "Validation error",
  "extra": {
    "fields": {
      "foo": ["This field is required."],
      "email": [
        "Ensure this field has at least 200 characters.",
        "Enter a valid email address."
      ],
      "nested": {
        "bar": ["This field is required."]
      }
    }
  }
}
Code:
from rest_framework import exceptions


def some_service():
    raise exceptions.Throttled()
Response:
{
  "message": "Request was throttled.",
  "extra": {}
}
Code:
def some_service():
    user = BaseUser()
    user.full_clean()
Response:
{
  "message": "Validation error",
  "extra": {
    "fields": {
      "password": ["This field cannot be blank."],
      "email": ["This field cannot be blank."]
    }
  }
}
Now, this can be extended & made to better suit your needs:
- You can have
ApplicationValidationErrorandApplicationPermissionError, as an additional hierarchy. - You can reimplement DRF's default exception handler, instead of reusing it (copy-paste it & adjust to your needs).
The general idea is - figure out what kind of error handling you need and then implement it accordingly.
As you can see, we can mold exception handling to our needs.
You can start handling more stuff - for example - translating django.core.exceptions.ObjectDoesNotExist to rest_framework.exceptions.NotFound.
You can even handle all exceptions, but then, you should be sure those exceptions are being logged properly, otherwise you might silence something that's important.
Testing is an interesting & vast topic.
As an overview, you can listen to Radoslav Georgiev's talk at DjangoCon Europe 2022:

In our Django projects, we split our tests depending on the type of code they represent.
Meaning, we generally have tests for models, services, selectors & APIs / views.
The file structure usually looks like this:
project_name
├── app_name
│   ├── __init__.py
│   └── tests
│       ├── __init__.py
│       ├── factories.py
│       ├── models
│       │   └── __init__.py
│       │   └── test_some_model_name.py
│       ├── selectors
│       │   └── __init__.py
│       │   └── test_some_selector_name.py
│       └── services
│           ├── __init__.py
│           └── test_some_service_name.py
└── __init__.py
We follow 2 general naming conventions:
- The test file names should be
test_the_name_of_the_thing_that_is_tested.py - The test case should be
class TheNameOfTheThingThatIsTestedTests(TestCase):
For example, if we have:
def a_very_neat_service(*args, **kwargs):
    pass
We are going to have the following for file name:
project_name/app_name/tests/services/test_a_very_neat_service.py
And the following for test case:
class AVeryNeatServiceTests(TestCase):
    pass
For tests of utility functions, we follow a similar pattern.
For example, if we have project_name/common/utils.py, then we are going to have project_name/common/tests/test_utils.py and place different test cases in that file.
If we are to split the utils.py module into submodules, the same will happen for the tests:
project_name/common/utils/files.pyproject_name/common/tests/utils/test_files.py
We try to match the structure of our modules with the structure of their respective tests.
Factories are a great tool for generating data for your tests.
When used correctly, you can improve the overall quality of your tests.
If you are new to this concept, you can refer to the following materials:
- Improve your Django tests with fakes and factories
- https://www.hacksoft.io/blog/improve-your-tests-django-fakes-and-factories-advanced-usage
- DjangoCon 2022 | factory_boy: testing like a pro
We use Celery for the following general cases:
- Communicating with 3rd party services (sending emails, notifications, etc.)
- Offloading heavier computational tasks outside the HTTP cycle.
- Periodic tasks (using Celery beat)
We try to treat Celery as if it's just another interface to our core logic - meaning - don't put business logic there.
Lets look at an example of a service that sends emails (example taken from Django-Styleguide-Example)
from django.db import transaction
from django.core.mail import EmailMultiAlternatives

from styleguide_example.core.exceptions import ApplicationError
from styleguide_example.common.services import model_update
from styleguide_example.emails.models import Email


@transaction.atomic
def email_send(email: Email) -> Email:
    if email.status != Email.Status.SENDING:
        raise ApplicationError(f"Cannot send non-ready emails. Current status is {email.status}")

    subject = email.subject
    from_email = "styleguide-example@hacksoft.io"
    to = email.to

    html = email.html
    plain_text = email.plain_text

    msg = EmailMultiAlternatives(subject, plain_text, from_email, [to])
    msg.attach_alternative(html, "text/html")

    msg.send()

    email, _ = model_update(
        instance=email,
        fields=["status", "sent_at"],
        data={
            "status": Email.Status.SENT,
            "sent_at": timezone.now()
        }
    )
    return email
Email sending has business logic around it, but we still want to trigger this particular service from a task.
Our task looks like that:
from celery import shared_task

from styleguide_example.emails.models import Email


@shared_task
def email_send(email_id):
    email = Email.objects.get(id=email_id)

    from styleguide_example.emails.services import email_send
    email_send(email)
As you can see, we treat the task as an API:
- Fetch the required data.
- Call the appropriate service.
Now, imagine we have a different service, that triggers the email sending.
It may look like that:
from django.db import transaction

# ... more imports here ...

from styleguide_example.emails.tasks import email_send as email_send_task


@transaction.atomic
def user_complete_onboarding(user: User) -> User:
    # ... some code here

    email = email_get_onboarding_template(user=user)

    transaction.on_commit(lambda: email_send_task.delay(email.id))

    return user
2 important things to point out here:
- We are importing the task (which has the same name as the service), but we are giving it a
_tasksuffix. - And when the transaction commits, we'll call the task.
So, in general, the way we use Celery can be described as:
- Tasks call services.
- We import the service in the function body of the task.
- When we want to trigger a task, we import the task, at module level, giving the
_tasksuffix. - We execute tasks, as a side effect, whenever our transaction commits.
This way of mixing tasks & services also prevents circular imports, which may occurr often enough when using Celery.
Sometimes, our service can fail and we might want to handle the error on the task level. For example - we might want to retry the task.
This error handling code needs to live in the task.
Lets expand the email_send task example from above, by adding error handling:
from celery import shared_task
from celery.utils.log import get_task_logger

from styleguide_example.emails.models import Email


logger = get_task_logger(__name__)


def _email_send_failure(self, exc, task_id, args, kwargs, einfo):
    email_id = args[0]
    email = Email.objects.get(id=email_id)

    from styleguide_example.emails.services import email_failed

    email_failed(email)


@shared_task(bind=True, on_failure=_email_send_failure)
def email_send(self, email_id):
    email = Email.objects.get(id=email_id)

    from styleguide_example.emails.services import email_send

    try:
        email_send(email)
    except Exception as exc:
        # https://docs.celeryq.dev/en/stable/userguide/tasks.html#retrying
        logger.warning(f"Exception occurred while sending email: {exc}")
        self.retry(exc=exc, countdown=5)
As you can see, we do a bunch of retries and if all of them fail, we handle this in the on_failure callback.
The callback follows the naming pattern of _{task_name}_failure and it calls the service layer, just like an ordinary task.
We pretty much follow the official guidelines of integrating Celery with Django - https://docs.celeryq.dev/en/stable/django/first-steps-with-django.html
For a full example, you can check the Celery configuration in the Django-Styleguide-Example project:
- https://github.com/HackSoftware/Django-Styleguide-Example/tree/master/styleguide_example/tasks
- https://github.com/HackSoftware/Django-Styleguide-Example/blob/master/styleguide_example/tasks/celery.py
Celery is a complex topic, so it's a good idea to invest time reading the documentation & understanding the different configuration options.
We constantly do that & find new things or find better approaches to our problems.
Tasks are located in tasks.py modules in different apps.
We follow the same rules as with everything else (APIs, services, selectors): if the tasks for a given app grow too big, split them by domain.
Meaning, you can end up with tasks/domain_a.py and tasks/domain_b.py. All you need to do is import them in tasks/__init__.py for Celery to autodiscover them.
The general rule of thumb is - split your tasks in a way that'll make sense to you.
Managing periodic tasks is quite important, especially when you have tens or hundreds of them.
We use Celery Beat + django_celery_beat.schedulers:DatabaseScheduler + django-celery-beat for our periodic tasks.
The extra thing that we do is to have a management command, called setup_periodic_tasks, which holds the definition of all periodic tasks within the system. This command is located in the tasks app, discussed above.
Here's how project.tasks.management.commands.setup_periodic_tasks.py looks like:
from django.core.management.base import BaseCommand
from django.db import transaction

from django_celery_beat.models import IntervalSchedule, CrontabSchedule, PeriodicTask

from project.app.tasks import some_periodic_task


class Command(BaseCommand):
    help = f"""
    Setup celery beat periodic tasks.

    Following tasks will be created:

    - {some_periodic_task.name}
    """

    @transaction.atomic
    def handle(self, *args, **kwargs):
        print('Deleting all periodic tasks and schedules...\n')

        IntervalSchedule.objects.all().delete()
        CrontabSchedule.objects.all().delete()
        PeriodicTask.objects.all().delete()

        periodic_tasks_data = [
            {
                'task': some_periodic_task
                'name': 'Do some peridoic stuff',
                # https://crontab.guru/#15_*_*_*_*
                'cron': {
                    'minute': '15',
                    'hour': '*',
                    'day_of_week': '*',
                    'day_of_month': '*',
                    'month_of_year': '*',
                },
                'enabled': True
            },
        ]

        for periodic_task in periodic_tasks_data:
            print(f'Setting up {periodic_task["task"].name}')

            cron = CrontabSchedule.objects.create(
                **periodic_task['cron']
            )

            PeriodicTask.objects.create(
                name=periodic_task['name'],
                task=periodic_task['task'].name,
                crontab=cron,
                enabled=periodic_task['enabled']
            )
Few key things:
- We use this task as part of a deploy procedure.
- We always put a link to
crontab.guruto explain the cron. Otherwise it's unreadable. - Everything is in one place.
⚠️ We use, almost exclusively, a cron schedule. If you plan on using the other schedule objects, provided by Celery, please read thru their documentation & the important notes - https://django-celery-beat.readthedocs.io/en/latest/#example-creating-interval-based-periodic-task - about pointing to the same schedule object.⚠️
Celery has powerful tools to implement complex workflows - https://docs.celeryq.dev/en/stable/userguide/canvas.html
If you decide to use them, the rules still apply.
You may need to reorganize things a bit, but as long as you have a well-defined interface to your application core, you'll be able to mix and match tasks & services in more complex scenarios.
More complex scenarios depend on their context. Make sure you are aware of the architecture & the decisions you are making.
Some of the implementations of generic reusable pieces of code are stored here.
As for updating, we have a generic update service that we use inside of the actual update services. Here's what a sample user_update service would look like:
def user_update(*, user: User, data) -> User:
    non_side_effect_fields = ['first_name', 'last_name']

    user, has_updated = model_update(
        instance=user,
        fields=non_side_effect_fields,
        data=data
    )

    # Side-effect fields update here (e.g. username is generated based on first & last name)

    # ... some additional tasks with the user ...

return user- We're calling the generic
model_updateservice for the fields that have no side-effects related to them (meaning that they're just set to the value that we provide). - This pattern allows us to extract the repetitive field setting in a generic service and perform only the specific tasks inside of the update service (side-effects).
- We can be smart & provide the
update_fieldskwarg, when saving the instance. This way, in theUPDATEquery, we'll only send values that are actually updated.
The full implementations of these services can be found in our example project:
If you are going to include model_update in your project, make sure to read the tests & include them too!
A section with various things that can make your Django developer life better.
When it comes to mypy, we have the following philosophy:
Use it, if it makes sense for you & helps you produce better software.
In HackSoft, we have:
- Projects where we enforce
mypyand are very strict about it. - Projects where types are more loose and
mypyis not used at all.
Context is king here.
In the Django-Styleguide-Example, we've configured mypy, using both https://github.com/typeddjango/django-stubs and https://github.com/typeddjango/djangorestframework-stubs/. You can check it as an example.
Additionally, this particular project - https://github.com/wemake-services/wemake-django-template - also has mypy configuration.
Figure out what is going to work best for you.
Here's a collection of different folks & companies, that have found the styleguide useful:
Michael Valencia, CTO at Facturedo
The source code of our core project in Facturedo started to get messy. Business logic could be found in many, incoherent places. We needed a solution to structure our Django project and we found it in the Django Styleguide.
We recommend it to anyone wanting to structure a medium to large-sized project. It's a well defined guide that's constantly evolving.
Additional resources & other alternatives that we found useful and that can add value to the styleguide.
- Dan Palmer - Scaling Django to 500 apps (DjangoCon US 2021)
- Django API Domains
- A YC News discussion around the Django Styleguide - you can potentially find additional useful things here.
The way we do Django is inspired by the following things:
- The general idea for separation of concerns
- Boundaries by Gary Bernhardt
- Rails service objects