- Create an ordered HTML list
- Create an unordered HTML list
How do we go about writing text for the web? How is that different from the text that we write in a text file? We're going to experience for ourselves how these things are different in this lab.
You don't need any prior knowledge of HTML for this lab. We're going to tell you what to type. Don't focus on specific commands or taking notes. Everything will be covered thoroughly later. Instead, the goal of this exercise is to feel the joy of editing a file and seeing the change "out there."
NOTE: We don't expect you to know markup, content, source text, or rendered text yet. We'll be defining them in this lab.
If you haven't already, fork and clone this lesson into your local environment.
Quick Review: To fork this lab:
- click the Fork icon in the upper right of this page. This will bring you to GitHub. You may be prompted to choose where to fork — choose your personal GitHub account.
- Once your fork is created, click the Code button in GitHub, choose SSH and copy the provided git URL info.
- Clone to your local machine with
git clonefollowed by the git URL you copied. This will create a folder in the location you're currently in containing your fork of this lab's repository.
cd into the repository that you just cloned down in the terminal, then run code . to
open the files in Visual Studio Code. (If you are using a different text editor,
the command will be different. For the AWS Cloud9 IDE, for example, you must
click on the file in the left navigation to open it.) Finally, run bundle to
install the lab's dependencies.
Note: This lab's test uses Ruby, so the commands we'll use are different
than what you've seen before — npm install and npm test. Here, we use
bundle and rspec to do the same things. The bundle command installs the
Ruby dependencies for this lab, and you only need to run it once. You can run
rspec any time you want to run the tests.
Think of a collection of things united by theme: Pokémon, Old-school MC's, Prime Ministers of New Zealand, Magical Beasts and Where to Find Them, etc. We're going to walk through how to create a list of things marked up with HTML.
In your terminal, while still inside of this labs directory,
create a new file called my_list.txt by running touch my_list.txt.
The file extension suggests to humans and operating systems that it
contains text. Open the file in VS Code by typing code my_list.txt; you
will do all editing for this lesson in VS Code.
Below is a collection of song titles (songs in the English post-punk genre).
Copy and paste the songs into your my_list.txt file.
"Love Will Tear Us Apart"
"Bela Lugosi's Dead"
"A Forest"
"Nine While Nine"
"Girlfriend In a Coma"
The material we typed into the file is called the content. It's the thing we're trying to communicate.
A problem with our content is that it doesn't explicitly state anywhere that it's a list. In the example, we see a list of songs. But a browser doesn't know what a "list" is.
We need to help the browser know what a list is. The secret is to add "notes" or "breadcrumbs" to the content that tell the browser that it has list items and that these items "go together" in a list. To add these "notes" we surround the content with bits of markup, with bits of HTML.
We will take the text content from our text file, paste it into a new HTML file and then we will add markup so that a browser "sees" a list. Let's write an HTML file!
Now we're going to create an HTML list together.
- Create a new file called
my_list.html. You can either do this in the terminal and then open it in VS Code, or create the file directly in VS Code. - Copy the contents of
my_list.txtand paste them intomy_list.html - Save the
my_list.htmlfile - Open the
my_list.htmlfile in the browser. For Mac users, you can do this withopen my_list.html. For Windows users, you can do this in your Ubuntu app withexplorer.exe my_list.html. Make sure you've set Chrome as your default browser. - Hit enter to run the command
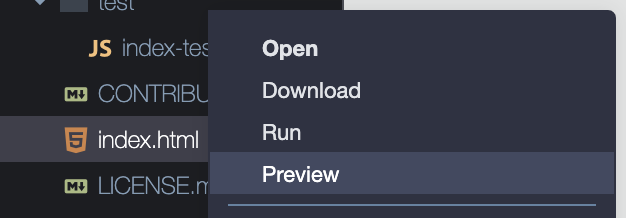
Note: If you are using the AWS Cloud9 IDE, the process for opening HTML
files is slightly different. In the lefthand file navigation, right click
my_list.html (command + click for Mac users). In the context menu that
appears, click the Preview option:
This will open the HTML page as a new tab in the IDE. You can also open this preview tab as a separate browser tab by clicking the 'pop out' button in the upper right corner of the tab

Once you've opened the file in the browser, you should see:

As noted above, the browser doesn't know that items on new lines means "items in a list." Browsers ignore when HTML is split onto new lines. We cover why a little later in this README. Since the browser doesn't know we intend this to be a list and since browsers ignore when content is split onto different lines, it displays all the content on one line. Not what we wanted.
REMEMBER: This lab will provide you what to type. Subsequent labs will deeply examine details of HTML markup. However, our goal here is to show how slight changes to markup can quickly alter the browser's display of content. If you're fuzzy on a detail that's fine.
OK, we've reached the critical moment. We're going to tell the browser that
these bits of letters represent list items. To do so we "wrap" each line
with <li> and </li>:
<li>"Love Will Tear Us Apart"</li>
<li>"Bela Lugosi's Dead"</li>
<li>"A Forest"</li>
<li>"Nine While Nine"</li>
<li>"Girlfriend In a Coma"</li>
Flip back to the viewing tab and refresh the page. You should see something like the following:

AWESOME.
In this step we added some HTML markup:
- The
<li>is an HTML list item opening tag - The
</li>is an HTML closing tag - We would call this pair of opening and closing tags a "
litag" - The whole length of text of opening markup plus "wrapped" content plus
closing markup (
<li>...content...</li>) is called "an HTML element;" or, more exactly, anli element
Again, you don't need to memorize these terms yet, but we want to help you develop an intuition for how these words are used. You will be using these terms when speaking with other developers and HTML authors.
It may not seem like we did much work, but the idea of a method for "marking up" content and linking it is the foundation of the web. It's what made Tim Berners-Lee's reputation. And you just experienced Sir Tim's great insight. AWESOME.
Let's work with additional HTML tags to see how we tweak our HTML a bit more. Let's tell the browser "Hey! These list items, they go together!"
Wrap the entire set of <li> items with an <ol> and </ol> like so:
<ol>
  <li>"Love Will Tear Us Apart"</li>
  <li>"Bela Lugosi's Dead"</li>
  <li>"A Forest"</li>
  <li>"Nine While Nine"</li>
  <li>"Girlfriend In a Coma"</li>
</ol>
Save the file and refresh the viewing tab. It should display:

We told the browser that this set of list items that we "wrapped" in the ordered list tag go together as a list. Because we told the browser that the list is ordered it decided to be helpful and put numbers next to the list items for us.
With all these angle-brackets of markup and content mixed together, HTML authors like to use indentation to make HTML easier to read. Here's how most HTML authors would expect our code from the previous section to be arranged:
<ol>
  <li>"Love Will Tear Us Apart"</li>
  <li>"Bela Lugosi's Dead"</li>
  <li>"A Forest"</li>
  <li>"Nine While Nine"</li>
  <li>"Girlfriend In a Coma"</li>
</ol>
Update your document. Save it and refresh your viewing tab.
Remember earlier when the browser ignored that content was on separate lines? Cleaning up your code requires splitting lines, adding spaces, and adding tabs. Browsers ignore those characters that humans use to make their HTML reader-friendly.
Let's change our ordered list to be unordered. If <ol> means ordered
list, you might guess that <ul> means unordered list. Make the change
and refresh your viewing tab.

Here we return to a "bulleted" unordered list.
ASIDE: If you've been following along closely, you might be wondering, if
we didn't have a <ul> tag around our <li> items earlier, how did the browser
know to treat those <li> as if they were in a <ul>? When browsers detect
problematic HTML they guess! This can lead to some very strange results when you
make an error, but if you write invalid HTML, they try to recover. HTML
validity will be discussed further soon!
Let's introduce our list by adding some background:
<p>Some of my favorite post-punk and Goth songs!</p>
<ul>
  <li>"Love Will Tear Us Apart"</li>
  <li>"Bela Lugosi's Dead"</li>
  <li>"A Forest"</li>
  <li>"Nine While Nine"</li>
  <li>"Girlfriend In a Coma"</li>
</ul>
Take a look at your "rendered page" and verify the result is to your liking.
Lastly, let's put a "heading" on the top of our document. Add a h1 element
with an appropriate title inside.
<h1>My Music List</h1>Here's the full example code:
<h1>My Music List</h1>
<p>Some of my favorite post-punk and Goth songs!</p>
<ul>
  <li>"Love Will Tear Us Apart"</li>
  <li>"Bela Lugosi's Dead"</li>
  <li>"A Forest"</li>
  <li>"Nine While Nine"</li>
  <li>"Girlfriend In a Coma"</li>
</ul>
When you're done, it is time to run this assignment's tests. Make sure
that you have your HTML content in a file called my_list.html in
order to pass the check. Type rspec and verify that your tests pass.
Currently, the work you've done on this assignment is only on your local machine. To preserve work on your GitHub fork, you will need to stage the changes you've made, commit them, and push the commit up to GitHub. Use the following commands to do this:
$ git add .
$ git commit -m "Completed assignment"
$ git push
If you visit your fork on GitHub, you should now see that you've made the most recent commit, and your solution will be present in the files.
Once you've pushed your code to GitHub, do the following steps to submit your work on Canvas:
-
Go to your repository in GitHub and copy the URL. Note, this should be copied from the browser's address bar, and should start with
https://github.com/ -
Go to the assignment in Canvas and click Submit Assignment (or Start Assignment)
-
Paste in your GitHub URL as your submission
In this lab, you have done the job of an HTML author. You receive raw content, you mark it up to create source text. You test, tweak and adjust your source text until the rendered text displayed in the browser is to your liking.
In upcoming lessons, we will learn additional tags which provide us more ways to describe our content. We might be starting with lists today, but soon we'll be using HTML in even more exciting ways!
Welcome to the community of web page creators!