- Shepard
- Table of contents
- Getting started
- Ready to Use Shepard Setups
- Joining the Shepard Dev Team
- Technical Documentation
- Overview of the Flock Architecture
- Right Sizing Jobs for Shepard
- Instantiating a Flock and Deploying Code to it
- Running a Job With Shepard
- Writing Code for Use With Shepard
- Deploy Secrets to a Flock
- Collecting Results From Jobs Run With Shepard
- Special Environment Variables
- Detailed Documentation on Configuration Options for Shepard
- Flock Configuration Options
- ** General Stack Parameters**
- Job Execution Parameters
- S3 Parameters
- DynamoDB Parameters
- Secrets Manager Parameters
- Batch Parameters
- Instance Tagging Parameters
- ECR Parameters
- File System Parameters
- EBS Volume Parameters
- SQS Parameters
- Lambda Parameters
- Extra IAM Policy Parameters
- Networking Parameters
- CLI Configuration Options
- Using GPUs For Jobs
- Flock Configuration Options
Shepard is a one-stop shop to make highly scalable easy to manage batch workflows on AWS. Shepard is a flexible platform for turning a containerized workload into a highly scalable workflow built on top of AWS Batch that can run many thousands of jobs that can each run for hours, days or even weeks. Shepard summons sheep when jobs are queued and the sheep go home when there are no more jobs left to do which saves you money on your computing costs. With a properly configured flock you should only pay for as much compute as you'll need to do complete your computing jobs.
The project is named after Alan Shepard who was the first American to travel into space. It was also named as a playful jab at Rancher which is a program that I spent a lot of time supporting. Rancher is a program that manages "herds" of "cattle" while Shepard manages "flocks" of "sheep". A "flock" is technically the term used for an instance of a Shepard architecture and a "sheep" is an instance running within that "flock". Keep in mind I will use "EC2 instance" and "sheep" interchangeably and will also use "flock" and "instance of an architecture" interchangeably going forward in the rest of the documentation.
You must have the following minimum system requirements to use Shepard.
- OS: Amazon Linux 2 (AL2) (it may work for other operating systems but this was what testing was done on)
- 2 cores; 8 GiB of RAM
- 32 GB of disk space
You must have the following tools installed and set up to use Shepard.
#install shepard
pip3 install shepard

#deploy our testing infrastructure and code
shepard deploy --cloudformation_stack_name testing --path_to_deployment_folder testing-setup

#this job will fail
shepard batch_via_api --json_payload '{"an_example_variable_name":"an_example_variable_value"}'

#this job will succeed
shepard batch_via_api --json_payload '{"test1":"test1","test2":"test2","test3":"test3","test4":"0"}'

#after the jobs complete you can tear down the infrastructure with the following command
shepard destroy --cloudformation_stack_name testing
The Hello World Example above installs Shepard, deploys the testing-setup hosted at https://github.com/Jmevorach/Shepard-Setups and then runs two jobs through that setup.
The first sample job we run has one environment variable set with the name "an_example_variable_name" and the value "an_example_variable_value".
The second sample job we run has some specific environment variable set that will allow it to pass this line in our testing_code.py without throwing an error.
The last command tears down our infrastructure.
The repository at https://github.com/Jmevorach/Shepard-Setups contains a number of ready to use Shepard setups along with documentation on what they can be used for. If you create a cool or interesting shepard setup I'd encourage you to please share it there so that others can use it to!
You're welcome to make contributions without joining the Shepard Dev Team. Having said that if you'd like to join the Shepard Dev Team send an email to the Shepard Dev Team at shepard_dev_group@googlegroups.com. Ask that you be added to the Google user group and the Github repos which are, for reference, this repo and the Shepard-Setups repo.
- Be nice to each other!
- Have fun!
- "infrastructure" - CDK code to instantiate Shepard architecture.
- "images" - A folder with images for the readme.
- "code" - The code for the worker container that runs peoples code in Shepard.
- "cli" - The code for the Shepard CLI.
Our technical deep dive is going to go over the following topics in order.
- Overview of the Flock Architecture
- Right Sizing Jobs for Shepard
- Instantiating a Flock and Deploying Code to it
- Running a Job with Shepard
- Writing Code for Use With Shepard
- Deploy Secrets to a Flock
- Collecting Results From Jobs Run With Shepard
- Detailed Documentation on Configuration Options for Shepard

I prefer to configure flocks that I use to have each job run on a single sheep. You could either configure your jobs such that multiple jobs run on an instance with more compute resources or you could size jobs to run on a single instance and use the resources on said instance.
I'd strongly recommend the latter from personal experience. I find setups that are configured that way tend to be more reliable and scalable.
When specifying RAM and CPU requirements for jobs it's important to also keep in mind that I've found that with AWS Batch you can't specify all of the RAM on an instance for compute jobs. If you do that your instances will spin up but no jobs will run.
I suspect that this is because the ECS agent that runs on Batch instance itself takes up some RAM so when running an instance not all of the RAM on that instance is available to jobs.
What'd I'd recommend is sizing all of your jobs to run on a single instance and to take up as much of the resources on that instance as possible.
A good rule of thumb I've found for doing this is to take the RAM on an instance and specify ~90% of that for a job and specify all of the CPU cores on the instance for that job.
Deploying your code to Shepard and instantiating a new flock or reconfiguring an existing flock is all accomplished with one command: shepard deploy.
You can either use Shepard deploy with a deployment folder hosted publicly in the Shepard-Setups repository or use one hosted on your local machine.
The Shepard CLI will detect this for you automatically when you go to run Shepard deploy. If your argument to path_to_deployment_folder is an absolute filepath then Shepard CLI will look locally on your machine for a deployment folder. If path_to_deployment_folder is a string then Shepard CLI will check Shepard-Setups for a folder with the same name and use that as your deployment folder.
A properly formatted Shepard deployment folder is a directory containing two sub-directories; one named "code" and another named "infrastructure".
An example of a properly formatted "infrastructure" folder can be found in this repository here. It contains the CDK code necessary to create a Shepard architecture. In general you should most often be creating "infrastructure" folders by copying the folder from this repository and editing the cdk.json (example here) to customize the attributes of your flock. However since Shepard is meant to be a flexible framework for users to use you're welcome to edit the core infrastructure stack (named "shepard.py") or the code for the scheduler lambda or the code for the job batching api endpoint as well for your own setup if you'd be so inclined.
The "code" folder contains the contents necessary to create your containerized workload. It must at a minimum contain a file called "Dockerfile" or "Dockerfile.txt" but you can include other files needed for your container as well. An example of a properly formatted "code" folder can be found here.
The typical method of running jobs through shepard involves uploading a directory on your machine to S3 to the inputs S3 bucket.
A sample call illustrating this can be seen below:
shepard batch --path_to_local_folder_to_batch /path/to/local/folder/to/batch
This will take the directory located at /path/to/local/folder/to/batch and create a zipped copy of it before uploading it to the trigger S3 bucket.
If the zipped directory is under 4,294,967,295 bytes in size and, at a minimum, has a file called "inputs.json" containing properly formatted json then the upload will result in a Shepard job being submitted to be run.
You can also batch out jobs via API call to an autoscaling HTTP endpoint. This endpoint automatically gets created and configured as part of a flock architecture. You specify the arguments that you want to become environment variables during job execution as a json blob of values when you make your call to the batch endpoint. Here's an example call:
shepard batch_via_api --json_payload '{"test":"this will become the value associated with an environment variable named 'test'"}'
The object returned by the call above can also be parsed to determine whether the call succeeded.
All you have to do is write a container, any container, where the default command is one that runs your code. Here's an example of such a container below:
FROM python:latest
MAINTAINER jmevorach

COPY your_code.py /
ENTRYPOINT ["python"]
CMD ["your_code.py"]
The container above will run a Python script called "your_code.py" and being able to write a container like this is the first step towards getting started using Shepard.
Shepard is a flexible framework. You can write a container that runs any language so long as that language allows you to use environment variables.
Example Code
#By Jacob Mevorach

import os

def main():

    #will write a 2G file of zeros named outputFile to the Lustre filesystem if one exists for this flock
    if os.getenv('USES_LUSTRE') == 'True':
        os.chdir(os.getenv('LUSTRE_OUTPUT_NAME'))
        os.system('dd if=/dev/zero of=outputFile bs=2G count=1')

    #will write a 2G file of zeros named outputFile to the EFS filesystem if one exists for this flock
    if os.getenv('USES_EFS') == 'True':
        os.chdir(os.getenv('EFS_OUTPUT_NAME'))
        os.system('dd if=/dev/zero of=outputFile bs=2G count=1')

    #will write a 2G file of zeros named outputFile to the output
    os.chdir(os.getenv('ROOT_OUTPUT_NAME'))
    os.system('dd if=/dev/zero of=outputFile bs=2G count=1')
    return 0

if __name__ == '__main__':
    main()
The above code will do the following:
- Check if I have a lustre file system for this flock and if one exists write a 2G file filled with zeros called outputFile to the temporary output directory hosted there.
- Check if I have an EFS for this flock and if one exists write a 2G file filled with zeros called outputFile to the temporary output directory hosted there.
- Write a 2G file filled with zeros called outputFile to the temporary output directory hosted on the EBS volume for the sheep running this job.
Depending on whether or not I have an EFS or a lustre file system configured for this flock I can end up with either 1, 2 or 3 output zips in my outputs bucket from running this code.
This is a very simple example with no practical purpose but it does show how you can run code and then write outputs to an output directory located either on an EFS, Lustre file system or the root file system of an instance.
You could extend this script however to do as much computation as you'd like and write whatever outputs from those computations to output directories you'd like.
Rather than just writing zeros for instance this script could instead run 10 genomics workloads or calculate pi to 10,000,000 places and so on and so on.
You can also set custom environment variables when you batch out a job allowing you to customize the behavior of specific job executions.
You could also write a script that uses these same principles to do whatever you'd like in any language that can run in a container and use environment variables.
Container images can be large and as a result they can often take a long time to deploy places. This can end up slowing down development for cases where you have to redeploy your container image each time you make an edit.
Shepard has a way to get around this; every flock comes with a "quick deploy" S3 bucket automatically attached to the architecture. This feature is intended to allow users to test and run code without having to deploy a new container image each time.
To use the feature you first upload a directory to your quick deploy bucket. Your directory at a minimum must contain a script named "run.sh".
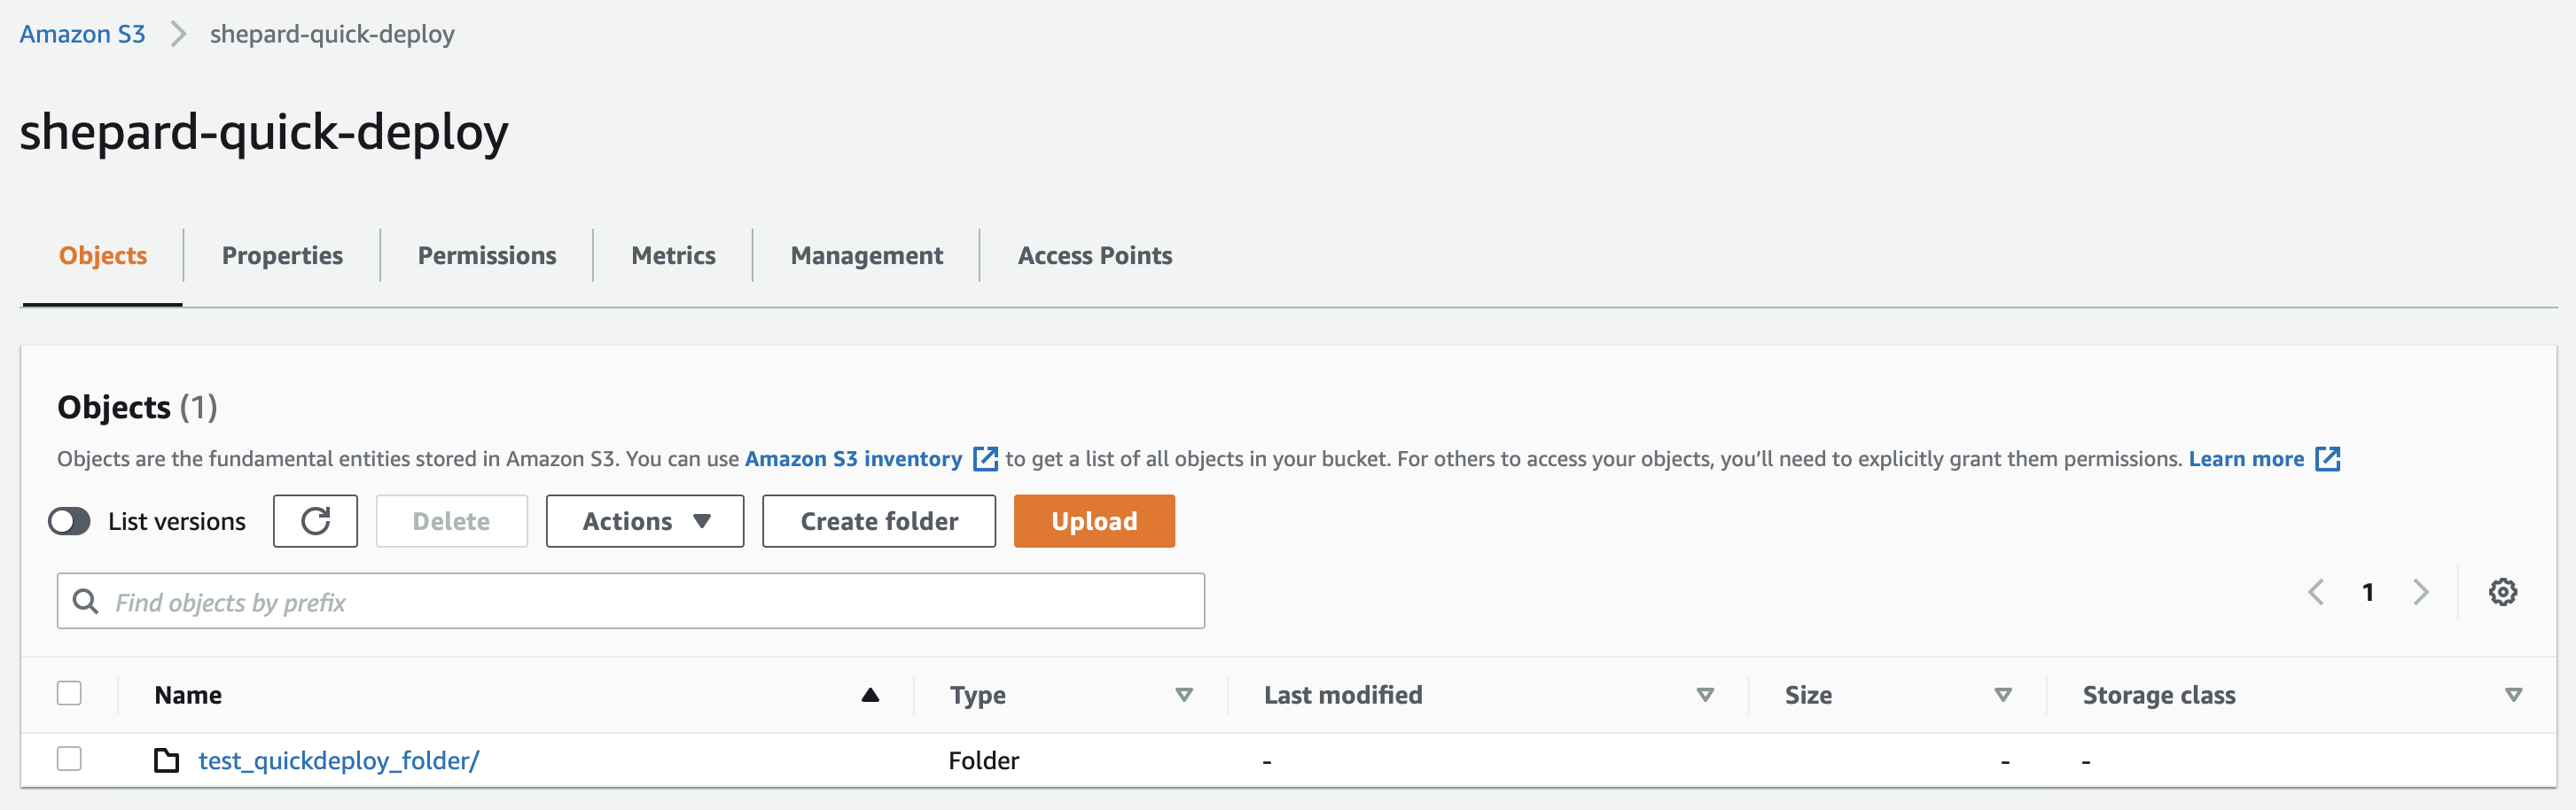

In this case my run.sh script is simple and is a text file as seen here:

All this is going to do is echo "hello world!" to stderr when it runs which is just going to show up in our Cloudwatch logs for our run as "hello world!" when we run it.
If I wanted to run this code I would provide a value for QUICK_DEPLOY_DIRECTORY in either my inputs.json file or my call to the job batching API endpoint that comes with Shepard. That QUICK_DEPLOY_DIRECTORY value would refer to a directory located in my quick-deploy-folder. An example inputs.json file in a "shepard batch" command that would be used to run the code above would be as follows:
{ "QUICK_DEPLOY_DIRECTORY": "test_quickdeploy_folder"}
What this is going to accomplish is when your job runs it's going to tell Shepard to fetch the "test_quickdeploy_folder" to your input folder (in order of preference it will attempt to fetch the folder and then it will set your container to run the "run.sh" script in the "QUICK_DEPLOY_DIRECTORY" folder from your quick deploy bucket. In my case this will result in the following output in CloudWatch logs:

If I try to have shepard deploy from a Dockerfile with the following line:
FROM docker.my-private-repo-that-requires-authorization.com/subreddit/super-amazing-image:latest
it will fail because the docker-in-docker container that Shepard is using to build your container as part of the deploy command does not have the ability to pull from a private repository that requires authorizations it doesn't have.
A way to get around this is simply to log in to the private repo on your machine and then run the following command on whatever machine you're currently running Shepard CLI:
docker pull docker.my-private-repo-that-requires-authorization.com/subreddit/super-amazing-image:latest
now when you go to run "shepard deploy" again your nested container will simply use the local copy of this image rather than trying (and failing) to pull it directly from the private repository. Also this way you don't have to pass in any authorizations to any containers you're going to deploy which allows you to keep things nice and secure and not have to worry about what happens if someone gets their hands on the image you deployed with cryptomatter baked into it and starts poking around in it for some authentications to a private repo you might not want to be sharing with others.
Deploy your secrets to your flock's secrets manager instance using the Shepard "secretify" command.
A sample call illustrating this can be seen below:
shepard secretify --path_to_local_secrets /path/to/local/folder/to/secretify
This command takes a local path on your computer and turns the files in that directory into base64 string representations and uploads those representations to secrets manager where they will be stored securely in the form of key-value pairs where the key is the name of the file and the value is the base64 representation of that file.
At runtime these files will be reconstituted back to their original forms (i.e. not as base64 strings but as the files those base64 strings represent with the original names of those files) in a directory called "secrets" located in the file path provided by the "ROOT_INPUT_NAME" environment variable. If you have not deployed any secrets than this directory will be empty.
This is a great way to grant Shepard jobs access to authorization files or credentials in a secure manner. This strategy can be used to allow sheep in your flock to communicate with 3rd party services outside of AWS.
At the end of a Shepard job file written to one of the following file paths are uploaded to the outputs S3 bucket.
-
ROOT_OUTPUT_NAME - Calling os.getenv('ROOT_OUTPUT_NAME') will return a path to folder on the root file system of the host instance that you can write to. Anything written here will be uploaded to the outputs bucket when the job finishes.
-
EFS_OUTPUT_NAME - Calling os.getenv('EFS_OUTPUT_NAME') will return a path to a folder on the EFS file system you can write to if you've requested an EFS file system for your architecture. Anything written here will be uploaded to the outputs bucket when the job finishes.
-
LUSTRE_OUTPUT_NAME - Calling os.getenv('LUSTRE_OUTPUT_NAME') will return a path to a folder on the Lustre file system you can write to if you've requested a Lustre file system for your architecture. Anything written here will be uploaded to the outputs bucket when the job finishes.
You can automatically sync your outputs S3 bucket to a folder on your computer using the Shepard CLI and retrieve all your results using a "shepard retrieve" command.
If you don't want to download results automatically using the CLI you can also do this manually via the S3 management console in AWS.
Specifying a variable named "TAG" (not case-sensitive) in your inputs.json will cause the value assigned to "TAG" to be automatically appended at the beginning of the name of any output produced for the run that uses that specific inputs.json.
{ "test1": "test1", "test2": "test2", "test3": "test3", "test4": 0, "TAG":"test_file" }
As an example the zip file(s) of results from this job will have "test_file" appended at the front.
Results uploaded to the outputs bucket at the end of a job from the path specified by the ROOT_OUTPUT_NAME environment variable will have the following format:
- if TAG is specified : tag_to_append+'result@' + UUID + '' + START_TIME + '_root' + '.zip'
- If TAG is not specified: 'result@' + UUID + '_' + START_TIME + '_root' + '.zip'
Results uploaded to the outputs bucket at the end of a job from the path specified by the EFS_OUTPUT_NAME environment variable will have the following format:
- if TAG is specified : tag_to_append+'result@' + UUID + '' + START_TIME + '_efs' + '.zip'
- If TAG is not specified: 'result@' + UUID + '_' + START_TIME + '_efs' + '.zip'
Results uploaded to the outputs bucket at the end of a job from the path specified by the LUSTRE_OUTPUT_NAME environment variable will have the following format:
- if TAG is specified : tag_to_append+'result@' + UUID + '' + START_TIME + '_lustre' + '.zip'
- If TAG is not specified: 'result@' + UUID + '_' + START_TIME + '_lustre' + '.zip'
There are special environment variables that Shepard sets or that a user can set and/or query that describe the existing configuration of an architecture or can be used to affect the behavior of an existing architecture.
The following environment variables are special but not reserved. Setting these will modify the behavior of an existing architecture but will not cause jobs to be rejected.
- TAG - Specifying this will cause the value specified by tag to be appended to the front of any output names of files uploaded to the output bucket by the architecture.
The following environment variables are reserved. Attempting to set these in a json in an inputs.json or in a json_payload file will cause a job to be rejected.
- UUID - The unique UUID given to each job run by Shepard
- START_TIME - The start time in UTC of the job
- END_TIME - The end time in UTC of the job
- JOB_STATUS - The status of your job. Possible values are: 'in_progress','calling_payload_code','job failed; pushing logs to s3','','job failed; cleaning up workspace','job_complete_cleaning_up_workspace','job_complete_pushing_to_s3' and 'not_yet_initiated'.
- EFS_INPUT_NAME - A path to a folder on the EFS file system you can write to if you've requested an EFS file system for your architecture. Will not be set if you don't request an EFS for your architecture.
- EFS_OUTPUT_NAME - A path to folder on the root file system of the host instance that you can write to. Anything written here will be uploaded to the outputs bucket when the job finishes. Will not be set if you don't request an EFS for your architecture.
- LUSTRE_INPUT_NAME - A path to a folder on the Lustre file system you can write to if you've requested a Lustre file system for your architecture. Will not be set if you don't request Lustre for your architecture.
- LUSTRE_OUTPUT_NAME - A path to a folder on the Lustre file system you can write to if you've requested a Lustre file system for your architecture. Anything written here will be uploaded to the outputs bucket when the job finishes. Will not be set if you don't request Lustre for your architecture.
- ROOT_INPUT_NAME - A path to folder on the root file system of the host instance that you can write to. By default this folder will also contain your original input zip you uploaded to the input bucket and all of the files stored in secrets manager (through the use of the "shepard_cli secretify" command) will appear here in a folder called "secrets".
- ROOT_OUTPUT_NAME - A path to folder on the root file system of the host instance that you can write to. Anything written here will be uploaded to the outputs bucket when the job finishes.
- INPUTS_BUCKET - The input or trigger s3 bucket that your architecture uses to batch out jobs. Uploading job zips here will batch out jobs.
- OUTPUTS_BUCKET - The output or results s3 bucket that your architecture uses to store results from successful jobs. All outputs will appear here as zip files.
- ERROR_BUCKET - The error s3 bucket that log files are written to in the event of a fatal error in a container. Outputs will appear here as formatted zip files.
- INPUT_ZIP_NAME - The name of the original zip file that was dropped into the trigger s3 bucket specified by INPUTS_BUCKET that triggered this job. A copy of this will be located in the path specified by ROOT_INPUT_NAME.
- PATH - A variable that is commonly used to denote the location of binaries on machines we thought it would be prudent to exclude from being overwritten.
- HOSTNAME - The hostname of the instance your job is running on.
- USES_EFS - 'True' if you have requested EFS for this architecture and 'False' if you have not.
- USES_LUSTRE - 'True' if you have requested Lustre for this architecture and 'False' if you have not.
- LUSTRE_READ_ONLY_PATH - A path to a folder you can read (but not write) all data on the Lustre file system from if you've requested Lustre file system for your architecture. Will not be set if you don't request Lustre for your architecture.
- EFS_READ_ONLY_PATH - A path to a folder you can read (but not write) all data on the EFS from if you've requested an EFS file system for your architecture. Will not be set if you don't request an EFS for your architecture.
- ULIMIT_FILENO - This is the maximum number of files you can open in your container. This number can not be made to exceed 1048576 as of 27 May 2020 as this has been found to cause Batch instances running the default AMI to not boot. This will be a string of the number equal to whatever value is given in the cloudformation template for the UlimitsNoFilesOpen parameter (which is by default set to 1048576).
- IS_INVOKED - 'True' if this job was created via the API batching endpoint and 'False' if this job was created via s3 upload.
The following environment variables describe locations where users can fetch input files from.
- ROOT_INPUT_NAME - Calling os.getenv('ROOT_INPUT_NAME') will return a path to folder on the root file system of the host instance that you can write to. By default this folder will also contain your original input zip you uploaded to the input bucket and all of the files stored in secrets manager (through the use of the "shepard_cli secretify" command) will appear here in a folder called "secrets". If you have a EFS or Lustre file system as part of your architecture the original input zip will be fetched to the temporary folders you are afforded write access to on either of those file systems (i.e. EFS_INPUT_NAME and LUSTRE_INPUT_NAME). If you have requested neither file system than the input zip will be fetched to this folder.
- EFS_INPUT_NAME - Calling os.getenv('EFS_INPUT_NAME') will return a path to a folder on the EFS file system you can write to if you've requested an EFS file system for your architecture.
- EFS_READ_ONLY_PATH - Calling os.getenv('EFS_READ_ONLY_PATH') will return a path to a folder you can read (but not write) all data on the EFS from if you've requested an EFS file system for your architecture.
- LUSTRE_INPUT_NAME - Calling os.getenv('LUSTRE_INPUT_NAME') will return a path to a folder on the Lustre file system you can write to if you've requested a Lustre file system for your architecture.
- LUSTRE_READ_ONLY_PATH - Calling os.getenv('LUSTRE_READ_ONLY_PATH') will return a path to a folder you can read (but not write) all data on the Lustre file system from if you've requested Lustre file system for your architecture.
The following environment variables describe locations where users can deposit files they want to return as outputs from the execution of a job. All other files created during a job's execution not written to an output location are deleted when a job finishes running.
- ROOT_OUTPUT_NAME - Calling os.getenv('ROOT_OUTPUT_NAME') will return a path to folder on the root file system of the host instance that you can write to. Anything written here will be uploaded to the outputs bucket when the job finishes.
- EFS_OUTPUT_NAME - Calling os.getenv('EFS_OUTPUT_NAME') will return a path to a folder on the EFS file system you can write to if you've requested an EFS file system for your architecture. Anything written here will be uploaded to the outputs bucket when the job finishes.
- LUSTRE_OUTPUT_NAME - Calling os.getenv('LUSTRE_OUTPUT_NAME') will return a path to a folder on the Lustre file system you can write to if you've requested a Lustre file system for your architecture. Anything written here will be uploaded to the outputs bucket when the job finishes.
The following environment variables can be queried during job execution to determine whether a Flock has an EFS and/or a Lustre file system available for compute jobs to use.
- USES_EFS - Calling os.getenv('USES_EFS') will return "True" if you've requested an EFS file system for your architecture and "False" if you have not requested an EFS file system for your architecture.
- USES_LUSTRE - Calling os.getenv('USES_LUSTRE') will return "True" if you've requested a Lustre file system for your architecture and "False" if you have not requested a Lustre file system for your architecture.
Infrastructure configuration options for your flock can be set in the cdk.json file (example of that file found in this repository here).
Here's a description of each of the options you can set:
- ResourceTags - Tags that will be applied to all infrastructure created for your flock.
- AllowJobsToAccessDockerDaemon - Setting this to "True" will cause containerized workloads to be run in the "privileged") mode and have access to the Docker daemon from the host sheep. Setting this to true allows for jobs to perform docker actions such as pulling another container from a private or public registry, loading a container from a tar file created by a
docker savecommand (especially useful for certain workflows), and more
- InputsBucket - This is the name of the S3 bucket with which you can trigger Shepard jobs by dropping properly formatted S3 zip files to. We will get into what constitutes a properly formatted zip file later on in the documentation but for brevity we will describe it here as a zip that, at a minimum, contains a text file named "inputs.txt" that contains json describing what you'd like to become environment variables for that specific job. This also corresponds to the "shepard_cli_s3_bucket_to_upload_to" attribute when you run the "configure" command using the Shepard CLI.
- OutputsBucket - This is the name of the S3 bucket that will store outputs from jobs from the architecture written to the output locations. This also corresponds to the "shepard_cli_s3_bucket_for_results" attribute when you run the "configure" command using the Shepard CLI.
- ErrorsBucket - This is the name of the S3 bucket to which jobs will deposit zip files containing log files in the event a container being run throws a fatal error.
- QuickDeployBucket - This is the name of the S3 bucket to be used for the "Quick Deploy" capability for this flock. For more information on how to use the "Quick Deploy" feature in Shepard please see the "Using the Quick-Deploy Feature" section of this documentation.
- TableName - The name of the DynamoDB that will get made for use with the flock for storing attributes (including real-time auto-updating attributes) for jobs. This also corresponds to the "shepard_cli_dynamo_db_to_query" attribute when you run the "configure" command using the Shepard CLI.
- SecretsManagerName - The name of the secrets manager secrets instance that will get made for use along with the rest of the architecture. Secrets stored here as key value pairs where the key is the name of a file and the value is a base64 string representation of a file will be securely reconstituted for use at runtime by containers running your jobs. You can populate this with files in a directory using the Shepard CLI "secretify" command. This also corresponds to the "shepard_cli_secret_store" attribute when you run the "configure" command using the Shepard CLI.
- BatchInstanceNames - This is the name that will be given to batch instances running as part of the flock.
- DesiredRam - This is the amount of RAM you'd like each of your jobs running in AWS Batch to use in CPU cores.
- DesiredCPU - This is the amount of CPU you'd like each of your jobs running in AWS Batch to use in MiB.
- MaxCPU - This is the maximum amount of CPU cores you'd ever want to be allowed to run in the batch environment at one time. By default this is set very high but if you'd like to limit throughput lowering it might not be a bad idea.
- InstanceTypes - The instance types you'd like to run your jobs as a comma delimited list.
- LaunchTemplateName - The name you'd like to give to the launch template associated with this flock.
- ComputeEnvironmentName - Name given to the AWS Batch compute environment associated with this flock.
- ComputeEnvironmentType - You get to choose from a dropdown between "Ec2" and "Spot". Selecting "Spot" will cause the instances running your jobs to be AWS "Spot" instances which can result in potential cost savings while "Ec2" will cause the instances running your jobs to be normal on-demand instances which are generally (but not always) more expensive than "Spot" instances.
- QueueName - The name given to the AWS Batch job queue associated with this flock.
- JobDefinitionName - The name given to the AWS Batch job definition associated wit this flock.
- Ec2KeyPair - An SSH key that exists that can be specified to SSH into sheep running on the flock. If this isn't specified you won't be able to SSH into sheep running in a flock. Can be useful for debugging purposes to have SSH access to your sheep.
- UlimitsNoFilesOpen - Changing this number allows you to modify the amount of files that can be opened by all the containers running on an instance at one time simultaneously. Right now it's set to the maximum I found I could make it of 1048576 (1024^2) but you should be able to lower it if you desire. That said making it higher this number will generally cause errors.
- SpotBidPricePercent - If set the compute environment type will be set to "SPOT" and this number will be used as the spot bid price percentage bid for sheep running on your flock.
- ProjectName - This value will be set as a value for a "Project" tag that will be affixed to all instances running in this flock.
- TeamName - This value will be set as a value for a "Team" tag that will be affixed to all instances running in this flock.
- ContactEmail - This value will be set as a value for a "Contact" tag that will be affixed to all instances running in this flock.
- WorkloadValue - This value will be set as a value for a "WorkloadType" tag that will be affixed to all instances running in this flock.
- ECRRepoName - The name given to the ECR repo associated with this flock. To deploy new code you push a new container. A Shepard compatible container can be pushed to ECR in one command using the "deploy" command in the Shepard CLI. This corresponds to the 'shepard_cli_ecr_repo_to_push_to' attribute when you run the "configure" command using the Shepard CLI. This also corresponds to the "shepard_ecr_repo_to_push_to" attribute when you run the "configure" command using the Shepard CLI.
- CreateEFS - If you set this to "True" an EFS file system will be spun up for use with your flock. If you set this to "False" an EFS file system will not be created for use with your flock.
- EFSName - The name given to an EFS filesystem associated with this flock should you decide to request one for use with the flock.
- EFSThroughput - The throughput of an EFS filesystem associated with this flock should you decide to request one for use with the flock.
- CreateLustre - If you set this to "True" a Lustre file system will be spun up for use with your flock. If you set this to "False" a Lustre file system will not be created for use with your flock.
- LustreName - The name given to a Lustre filesystem associated with this flock should you decide to request one for use with the flock.
- LustreBucketName - The name given to an S3 bucket associated with a Lustre filesystem should you decide to request a Lustre filesystem for use with the flock. To be clear this will be the name of an S3 bucket that will be created if you choose to request a Lustre filesystem for the flock unless you specify that you'd like to use a preexisting bucket.
- LustreStorageCapacity - A number in GiB you'd like for storage on your Lustre file system. Must be an integer. Valid values are 1.2 TiB, 2.4 TiB, and increments of 2.4 TiB.
- ExistingLustreBucket - If set allows for the usage of an existing S3 bucket with your Lustre file system. Can be useful for quickly populating a Lustre file system with data from an S3 bucket as when the Lustre file system is first created it will attempt to import data from the S3 bucket associated with it.
- SizeOfRootDisk - An integer specifying the number of GiB you'd like for the encrypted EBS volume that will be used to backend the root disk for the EC2 instances that will run your batch jobs. By default AWS Batch makes this 22 GiB but you can make it arbitrarily large (while not exceeding the limits for EBS volumes in launch templates general). If you choose to be able to toggle the default EBS volume sizes for Batch instances to this size by setting "ToggleVariableEBSVolumeSizes" to "True" in the Cloudforamtion this number must be at least 22 GiB.
- SizeOfContainerStorageDisk - An integer specifying the number of GiB you'd like for the encrypted EBS volume that will be used to backend the storage of containers for the EC2 instances that will run your batch jobs. By default AWS Batch makes this 8 GiB but you can make it arbitrarily large (while not exceeding the limits for EBS volumes in launch templates general). If you choose to be able to toggle the default EBS volume sizes for Batch instances to this size by setting "ToggleVariableEBSVolumeSizes" to "True" in the Cloudforamtion this number must be at least 22 GiB.
- SQSName - The name of the SQS queue that will hold events resulting from S3 uploads to the Shepard trigger bucket.
- LambdaMemorySize - This is the RAM in MiB allocated to the Lambda that's used to process s3 uploads into Batch jobs by Shepard. This is by default set to the lowest possible value of 128 MiB and to be honest it probably doesn't ever need to get raised for any reason. You might get slight speed improvements if raise this but I doubt they would be relevant event if they occurred in 99.999..% of workflows you'd be running. So if you'd like to pay more money for what probably will be no improvement to you please feel free to raise this number.
- DaysToKeepFailedLaunchIndexes - The DynamoDB that stores updating attributes for Shepard apps is self cleaning in that when jobs finish they will change the TTL (time to live) for the indexes associated with those jobs to the present time causing them to be deleted. If a job dies before it gets a chance to adjust the TTL there's a default TTL that's set by the Lambda that batches out jobs from S3 jobs and this number is an integer that determines how many days those indexes will be kept before they're deleted. The whole idea behind this parameter is to give you time to check things for error handling if necessary but also to save you money by not having you store failed job indexes in a DynamoDB forever.
- ExtraIAMPolicyForContainerRole - Extra IAM policy that will be attached to the role for your containerized workloads if set.
- CreateNewVPC - Set to "True" to create a new VPC for this flock. If set to "False" then the "ExistingVPC*" parameters must be used to specify an existing VPC to use for the flock.
- EnvironmentName - A name that will be prefixed to network resource names for this flock.
- VpcCIDR - The CIDR that will be given to the VPC that this flock will be put into.
- PublicSubnet1CIDR - A CIDR representing a subset of I.P. addresses specified in the VpcCIDR that will be accessible to the public subnet created in the first availability zone of the region you build the cloudformation in.
- PublicSubnet2CIDR - A CIDR representing a subset of I.P. addresses specified in the VpcCIDR that will be accessible to the public subnet created in the second availability zone of the region you build the cloudformation in.
- PrivateSubnet1CIDR - A CIDR representing a subset of I.P. addresses specified in the VpcCIDR that will be accessible to the private subnet created in the first availability zone of the region you build the cloudformation in.
- PrivateSubnet2CIDR - A CIDR representing a subset of I.P. addresses specified in the VpcCIDR that will be accessible to the private subnet created in the second availability zone of the region you build the cloudformation in.
- CIDRToAllowSSHAccessTo - A CIDR representing I.P. addresses you would like to allow SSH access to your instances to.
- AllowSSHAccessToCIDRToAllowSSHAccessTo - If you set this to "True" the CIDR specified in the "CIDRToAllowSSHAccessTo" parameter will be granted access to SSH into instances running your jobs on port 22.
- MakeSubnetsPublic - If you set this to "True" your instances running jobs will be spun up in the public subnets of this flock where they will get public I.P. addresses mapped to them whereas if you set this to "False" your instances will be spun up in the private subnets of this flock where they will not get public I.P. addresses mapped to them.
- VPCCidrMaskPrivate - CIDR mask set for the private subnets created if a new VPC is created for this flock. Defaults to 24.
- VPCCidrMaskPublic - CIDR mask set for the public subnets created if a new VPC is created for this flock. Defaults to 28.
- ExistingVPC - An existing VPC that can be specified for usage for this flock if you'd not like to have to create a new VPC. Leave blank to create a new VPC for this flock.
- ExistingVPCCidr - A CIDR representing a subset of I.P. addresses specified in the ExistingVPC that will be used for sheep. Can be ignored if ExistingVPC is not set and a new VPC is being created for the flock.
- ExistingSubnetID1 - An I.D. of an existing subnet in the existing VPC referenced in the ExistingVPC variable you'd like to use as part of your architecture. Can be ignored if ExistingVPC is not set and a new VPC is being created for the flock.
- ExistingSubnetID2 - An I.D. of an existing subnet in the existing VPC referenced in the ExistingVPC variable you'd like to use as part of your architecture. Can be ignored if ExistingVPC is not set and a new VPC is being created for the flock.
- ExistingSubnetID3 - An I.D. of an existing subnet in the existing VPC referenced in the ExistingVPC variable you'd like to use as part of your architecture. Can be ignored if ExistingVPC is not set and a new VPC is being created for the flock.
The CLI gets access to AWS assets by using the credentials stored in the AWScli. Specifically the Shepard CLI will use your Access Keys that are configured to your AWScli setup and also the default region specified in your AWScli setup. This means that unless you have credentials set up for the AWScli the Shepard CLI will not work. In terms of instructions on how to set up the AWScli I'd like to refer you to AWS's documentation on their website here: https://docs.AWS.amazon.com/cli/latest/userguide/cli-chap-configure.html.
For information on arguments for each command run shepard help. Below is a general description of what each command can be used for.
Command that can be run to automatically configure and generate a profile for a flock. For more information on profiles in Shepard CLI see the "Profiles in Shepard CLI" section of this documentation.
Takes a specified folder with inputs and zips this folder and gives the zip a UUID name and uploads it to the inputs bucket folder for an architecture. This will batch out a job. You can override the UUID name given to output zips but doing this would have very little use practically and would actually be detrimental if you uploaded too many job zips with the same name too quickly. This command will fail with an error if the inputs.txt file in the target directory contains improperly formatted json.
Command that allows you to batch out jobs via the API batching endpoint without the need for an S3 upload. Allows for rapid and easy batching out of jobs.
Prints out a list of profiles with the current profile being used being underlined and attributes of the current profile printed out (if you have a profile set). If you have no profile set it will tell you that you have no profile currently set.
Tells you if you have a role set or not. If you do it will tell you what account the new role is in and what the name of the role in said account is.
Running This command will tell you whether or not your version of Shepard CLI is the most up to date version possible. It will automatically update your code to the latest version with pip if it's not already the latest version. You should back up any configuration associated with your current shepard CLI setup before running this command so they can be restored after the update.
Clears your current default profile if you have one set and makes it so you have no profile currently selected as a default.
Takes a name of a profile and makes a profile with attributes provided by answers to prompts provided to the user. The variables the user provides for the profile creation become defaults unless overwritten by the user and can be used to easily batch out commands without having to specify the same variables over and over again. It's especially useful for things like the 'deploy', 'query', 'secretify' ,'describe' and 'retrieve' commands. It functions in a manner that's very similar to the "AWS configure" command so if you're familiar with the AWScli this should be no problem for you to use.
Deletes the profile name specified from your system.
Command used to deploy code and instantiate or reconfigure architecture flock infrastructure. Also automatically runs the auto_configure command for you for the relevant flock architecture.
This takes a cloudformation stack name and will print out everything having to do with that stack name. The effect of this command is that will describe all the resources and parameters associated with your shepard architecture.
Command used to destroy and delete the infrastructure for a flock setup.
Every architecture gets a DynamoDB that stores metadata regarding jobs and includes arguments for said jobs, a UUID assigned to that job and stuff regarding the stop time, start time and other metadata. Running this command will print out information regarding all running jobs and sometimes some very recently stopped jobs.
Release a role set by the set_role command.
Syncs all of the files in the results/output bucket from your architecture to a local directory on your computer. Used to retrieve outputs from your architecture.
Takes a path to a local folder and converts the files in that folder to base64 strings which are deployed to the secrets manager associated with your architecture. All the files stored as base64 strings in the secrets manager will be reconstituted at run time and will appear in a folder named 'secrets' in the path specified by the environment variable named 'ROOT_INPUT_NAME'.
Sets a profile specified by profile name as your default profile.
Generates role variables and attaches them to all additional commands. Requires the use of mfa_token and serial_number arguments. Intended for use in attaching a role when using mfa to assume for every command would be inconvenient.
Prints out the directory where you profile files are located. If you drag new profiles into this directory they will be automatically imported into the CLI and you can export profile files from this directory to other installations of the CLI.
A profile is a collection of default variables with a given name. The idea is that each profile should represent an architecture you're managing so that if you're in the profile named "project_A" and you type "shepard deploy" you will deploy the code for project_A and if you're in the profile named "project_B" and you type "shepard deploy" you will deploy the code for project_B.
The shepard where_am_i command prints out the directory where you profile files are located. If you drag new profiles into this directory they will be automatically imported into the CLI and you can export profile files from this directory to other installations of the CLI. You can study the composition of profile files created by the CLI in this directory to see how they're configured but they're basically just json blobs that specify variables provided by the user.
When running the configure command in the CLI you'll be prompted to fill out a few fields. I'd like to clearly establish exactly what each of those fields refers to to preempt people getting confused with things:
- shepard_account_number - The AWS account number of the account you'd like to act upon (i.e. the one that contains your flock).
- shepard_role_to_assume_to_target_account - If you'd like to assume role into another account specified by "shepard_account_number" this is where you'd specify the role to set as a default.
- shepard_path_to_deployment_folder - This is the path to a local folder that contains the resources necessary to construct your flock.
- shepard_ecr_repo_to_push_to - This is the name of the ECR repo associated with your flock (not an ARN).
- shepard_path_to_local_folder_to_batch - This is a path to a local folder that you'd like to upload as a job zip to the S3 bucket you specified in the "InputsBucket" parameter in the cloudformation. Unless you're editing the contents of this folder in-between "batch" calls you probably won't get too much use out of setting this as a default because you'd be running the same job over and over again.
- shepard_s3_bucket_to_upload_to - This the name of the S3 bucket you specified in the "InputsBucket" parameter in the cloudformation that you'd like to specify as a default to upload input job zips to. Uploading an input job zip to this bucket will result in a job being run by Shepard against said zip.
- shepard_dynamo_db_to_query - The name of the DynamoDB specified in the "TableName" parameter in the cloudformation.
- shepard_cloudformation_stack_name - The name you gave to the cloudformation stack you ran to create your flock.
- shepard_path_to_local_secrets - Path to a local folder containing secret/auth files you'd like to securely deploy to a secrets manager instance associated with a flock.
- shepard_secret_store - The name of a secrets manager instance specified by the "SecretsManagerName" parameter in the cloudformation.
- shepard_s3_bucket_for_results - The name of an S3 bucket specified by the "OutputsBucket" parameter in the cloudformation.
- shepard_directory_to_sync_s3_bucket_to - Path to a local folder you'd like to sync your output S3 bucket to when using the shepard "retrieve" command.
- shepard_lambda_to_invoke - This is the name of the lambda function indicated by the logical name "ShepardSchedulerFunctionBatchingEndpoint" in the cloudformation stack you ran to build your flock. This is the name of a lambda endpoint that can be used to batch jobs for your flock.
Assuming role is a concept you should be aware of when using the Shepard CLI. It's sort of a concept that underpins a lot of the operation of the tool.
Basically the way many AWS environments are set up is that you have AWS IAM accounts located in a root account and everything else you do in any other account that's part of the same organization is done via a role. This in-general is sometimes known as a "multi-account strategy" because you may have one root account that contains peoples IAM accounts and every other account is accessed via roles that the IAM accounts have permissions to assume. A role is basically a certain collection of permissions and when you "assume" a role you gain access to the permissions that role describes (they're all basically a collection of JSONs that say what you can and can't do in an AWS account).
The Shepard CLI is designed to be able to operate in all AWS environments and to do this securely it borrows the credentials stored in the official AWS CLI you should also have installed and configured on a computer where you're using the CLI.
- Why Would You Do This? If you have your AWS CLI set up to use your account credentials in the root account and you want to assume role into another account and your credentials don't require you to use MFA (multi factor authentication) to do this.
- How Would You Do This? If you specify the --mfa_token, --serial_number, and --dont_assume (by default it is set to True) flags Shepard will try to assume role into another account using the role specified by the --role_to_assume_to_target_account flag.
- Why Would You Do This? If you have your AWS CLI set up to use your account credentials in the root account and you want to assume role into another account and your credentials require you to use MFA (multi factor authentication) to do this.
- How Would You Do This? If you specify the --mfa_token flag and the --serial_number flag and specify the --dont_assume flag (by default it is set to True) Shepard will try to assume role into another account using the role specified by the --role_to_assume_to_target_account flag and will use the mfa_token specified by the --mfa_token flag and the mfa device serial number specified by the --serial_number flag to do so.
- Why Would You Do This? If you are running Shepard CLI in an EC2 instance with a role attached with the permissions you need for that account and don't need to assume into another role to access resources in that account. So in this scenario you're in the account your architecture is in and you have a role attached to your EC2 instance that allows you to use the features you need to use in the Shepard CLI.
- How Would You Do This? If you set the --dont_assume flag to True (the default) the Shepard CLI will use the credentials encoded by the AWS CLI as environment variables to perform operations without the need to assume role. If you attach a role to an EC2 instance these environment variables I mentioned are configured for you automatically.
- Why Would You Do This? The most likely reason I can think of is you have account credentials that require you to use MFA to assume role and you want to batch out a bunch of commands and don't want to have to enter in a new mfa token each time you do this (i.e. you want to batch out 30 jobs and don't want to type in 30 different mfa tokens to make that happen).
- How Would You Do This? Attach role variables to Shepard CLI using the set_role command. You can verify that the command worked correctly using the check_role command. When the role credentials expire due to time or you're done using them you can release them and detatch the role from Shepard CLI using the release_role command.
Shepard auto-detects when EC2 instances with GPUs are used and will enable workloads to make use of the GPUs on a sheep.
Your container must have nvidia-smi and the Nvidia Container Runtime installed properly to make use of GPUs on a sheep.
You must also specify a properly configured AMI that has the proper drivers. However by default AWS Batch will automatically select a properly configured AMI if you run a job on a sheep with Nvidia GPUs so you'll only need to worry about creating an AMI if you're looking to override this automatic selection.