This is the MoB controller code of A1 adapted from Improbable-AI/walk-these-ways, the performance of this controller is really amazing.
Simulated Training and Evaluation: Isaac Gym requires an NVIDIA GPU. To train in the default configuration, we recommend a GPU with at least 10GB of VRAM. The code can run on a smaller GPU if you decrease the number of parallel environments (Cfg.env.num_envs). However, training will be slower with fewer environments.
Hardware Deployment: We provide deployment code for the Unitree Go1 Edu robot. This relatively low-cost, commercially available quadruped can be purchased here: https://shop.unitree.com/. You will need the Edu version of the robot to run and customize your locomotion controller.
pip3 install torch==1.10.0+cu113 torchvision==0.11.1+cu113 torchaudio==0.10.0+cu113 -f https://download.pytorch.org/whl/cu113/torch_stable.html-
Download and install Isaac Gym Preview 4 from https://developer.nvidia.com/isaac-gym
-
unzip the file via:
tar -xf IsaacGym_Preview_4_Package.tar.gz
-
now install the python package
cd isaacgym/python && pip install -e .
-
Verify the installation by try running an example
python examples/1080_balls_of_solitude.py
-
For troubleshooting check docs
isaacgym/docs/index.html
In this repository, run pip install -e .
If everything is installed correctly, you should be able to run the test script with:
python scripts/test.pyThe script should print Simulating step {i}.
The GUI is off by default. To turn it on, set headless=False in test.py's main function call.
CODE STRUCTURE The main environment for simulating a legged robot is in legged_robot.py. The default configuration parameters including reward weightings are defined in legged_robot_config.py::Cfg.
There are three scripts in the scripts directory:
scripts
├── __init__.py
├── play.py
├── test.py
└── train.py
You can run the test.py script to verify your environment setup. If it runs then you have installed the gym
environments correctly. To train an agent, run train.py. To evaluate a pretrained agent, run play.py. We provie a
pretrained agent checkpoint in the ./runs/pretrain-v0 directory.
To train the A1 controller from Walk these Ways, run:
python scripts/train.pyAfter initializing the simulator, the script will print out a list of metrics every ten training iterations.
Training with the default configuration requires about 12GB of GPU memory. If you have less memory available, you can
still train by reducing the number of parallel environments used in simulation (the default is Cfg.env.num_envs = 4000).
To visualize training progress, first start the ml_dash frontend app:
python -m ml_dash.appthen start the ml_dash backend server by running this command in the parent directory of the runs folder:
python -m ml_dash.server .Finally, use a web browser to go to the app IP (defaults to localhost:3001)
and create a new profile with the credentials:
Username: runs
API: [server IP] (defaults to localhost:8081)
Access Token: [blank]
Now, clicking on the profile should yield a
To evaluate the most recently trained model, run:
python scripts/play.pyThe robot is commanded to run forward at 3m/s for 5 seconds. After completing the simulation, the script plots the robot's velocity and joint angles.
The GUI is on by default.
If it does not appear, and you're working in docker, make sure you haven't forgotten to run bash docker/visualize_access.bash.
Users are advised to follow Unitree's recommendations for safety while using the A1 in low-level control mode.
- This means hanging up the robot and keeping it away from people and obstacles.
- In practice, the main safety consideration we've found important has been not plug anything into the robot's back (ethernet cable, USB) during the initial calibration or when testing a new policy because it can hurt the robot in case of a fall.
- Our code implements the safety layer from Unitree's
unitree_legged_sdkwith PowerProtect level 9. This will cut off power to the motors if the joint torque is too high (could happen sometimes during fast running) - This is research code; use at your own risk; we do not take responsibility for any damage.
The first step is to connect your development machine to the robot using ethernet. You should ping the robot to verify the connection: ping 192.168.123.12 should return x packets transmitted, x received, 0% packet loss.
Once you have confirmed the robot is connected, run the following command on your computer to transfer files to the robot. The first time you run it, the script will download and transfer the zipped docker image for development on the robot (deployment_image.tar). This file is quite large (3.5GB), but it only needs to be downloaded and transferred once.
cd a1_gym_deploy/scripts && ./send_to_unitree.sh
Next, you will log onto the robot's onboard computer and install the docker environment. To enter the onboard computer, the command is:
ssh unitree@192.168.123.12
Now, run the following commands on the robot's onboard computer:
cd ~/a1_gym/a1_gym_deploy/installer
./install_deployment_code.sh
The installer will automatically unzip and install the docker image containing the deployment environment.
Place the robot into damping mode. The control sequence is: [L1+B], [L1+A], [L1+L2+START]. After this, the robot should sit on the ground and the joints should move freely.
Now, ssh to unitree@192.168.123.12 and run the following two commands to start the controller. This will operate the robot in low-level control mode. Make sure your Go1 is hung up.
First:
cd ~/a1_gym/a1_gym_deploy/autostart
./start_unitree_sdk.sh
Second:
cd ~/a1_gym/a1_gym_deploy/docker
sudo make autostart
The robot will wait for you to press [R2], then calibrate, then wait for a second press of [R2] before running the control loop.
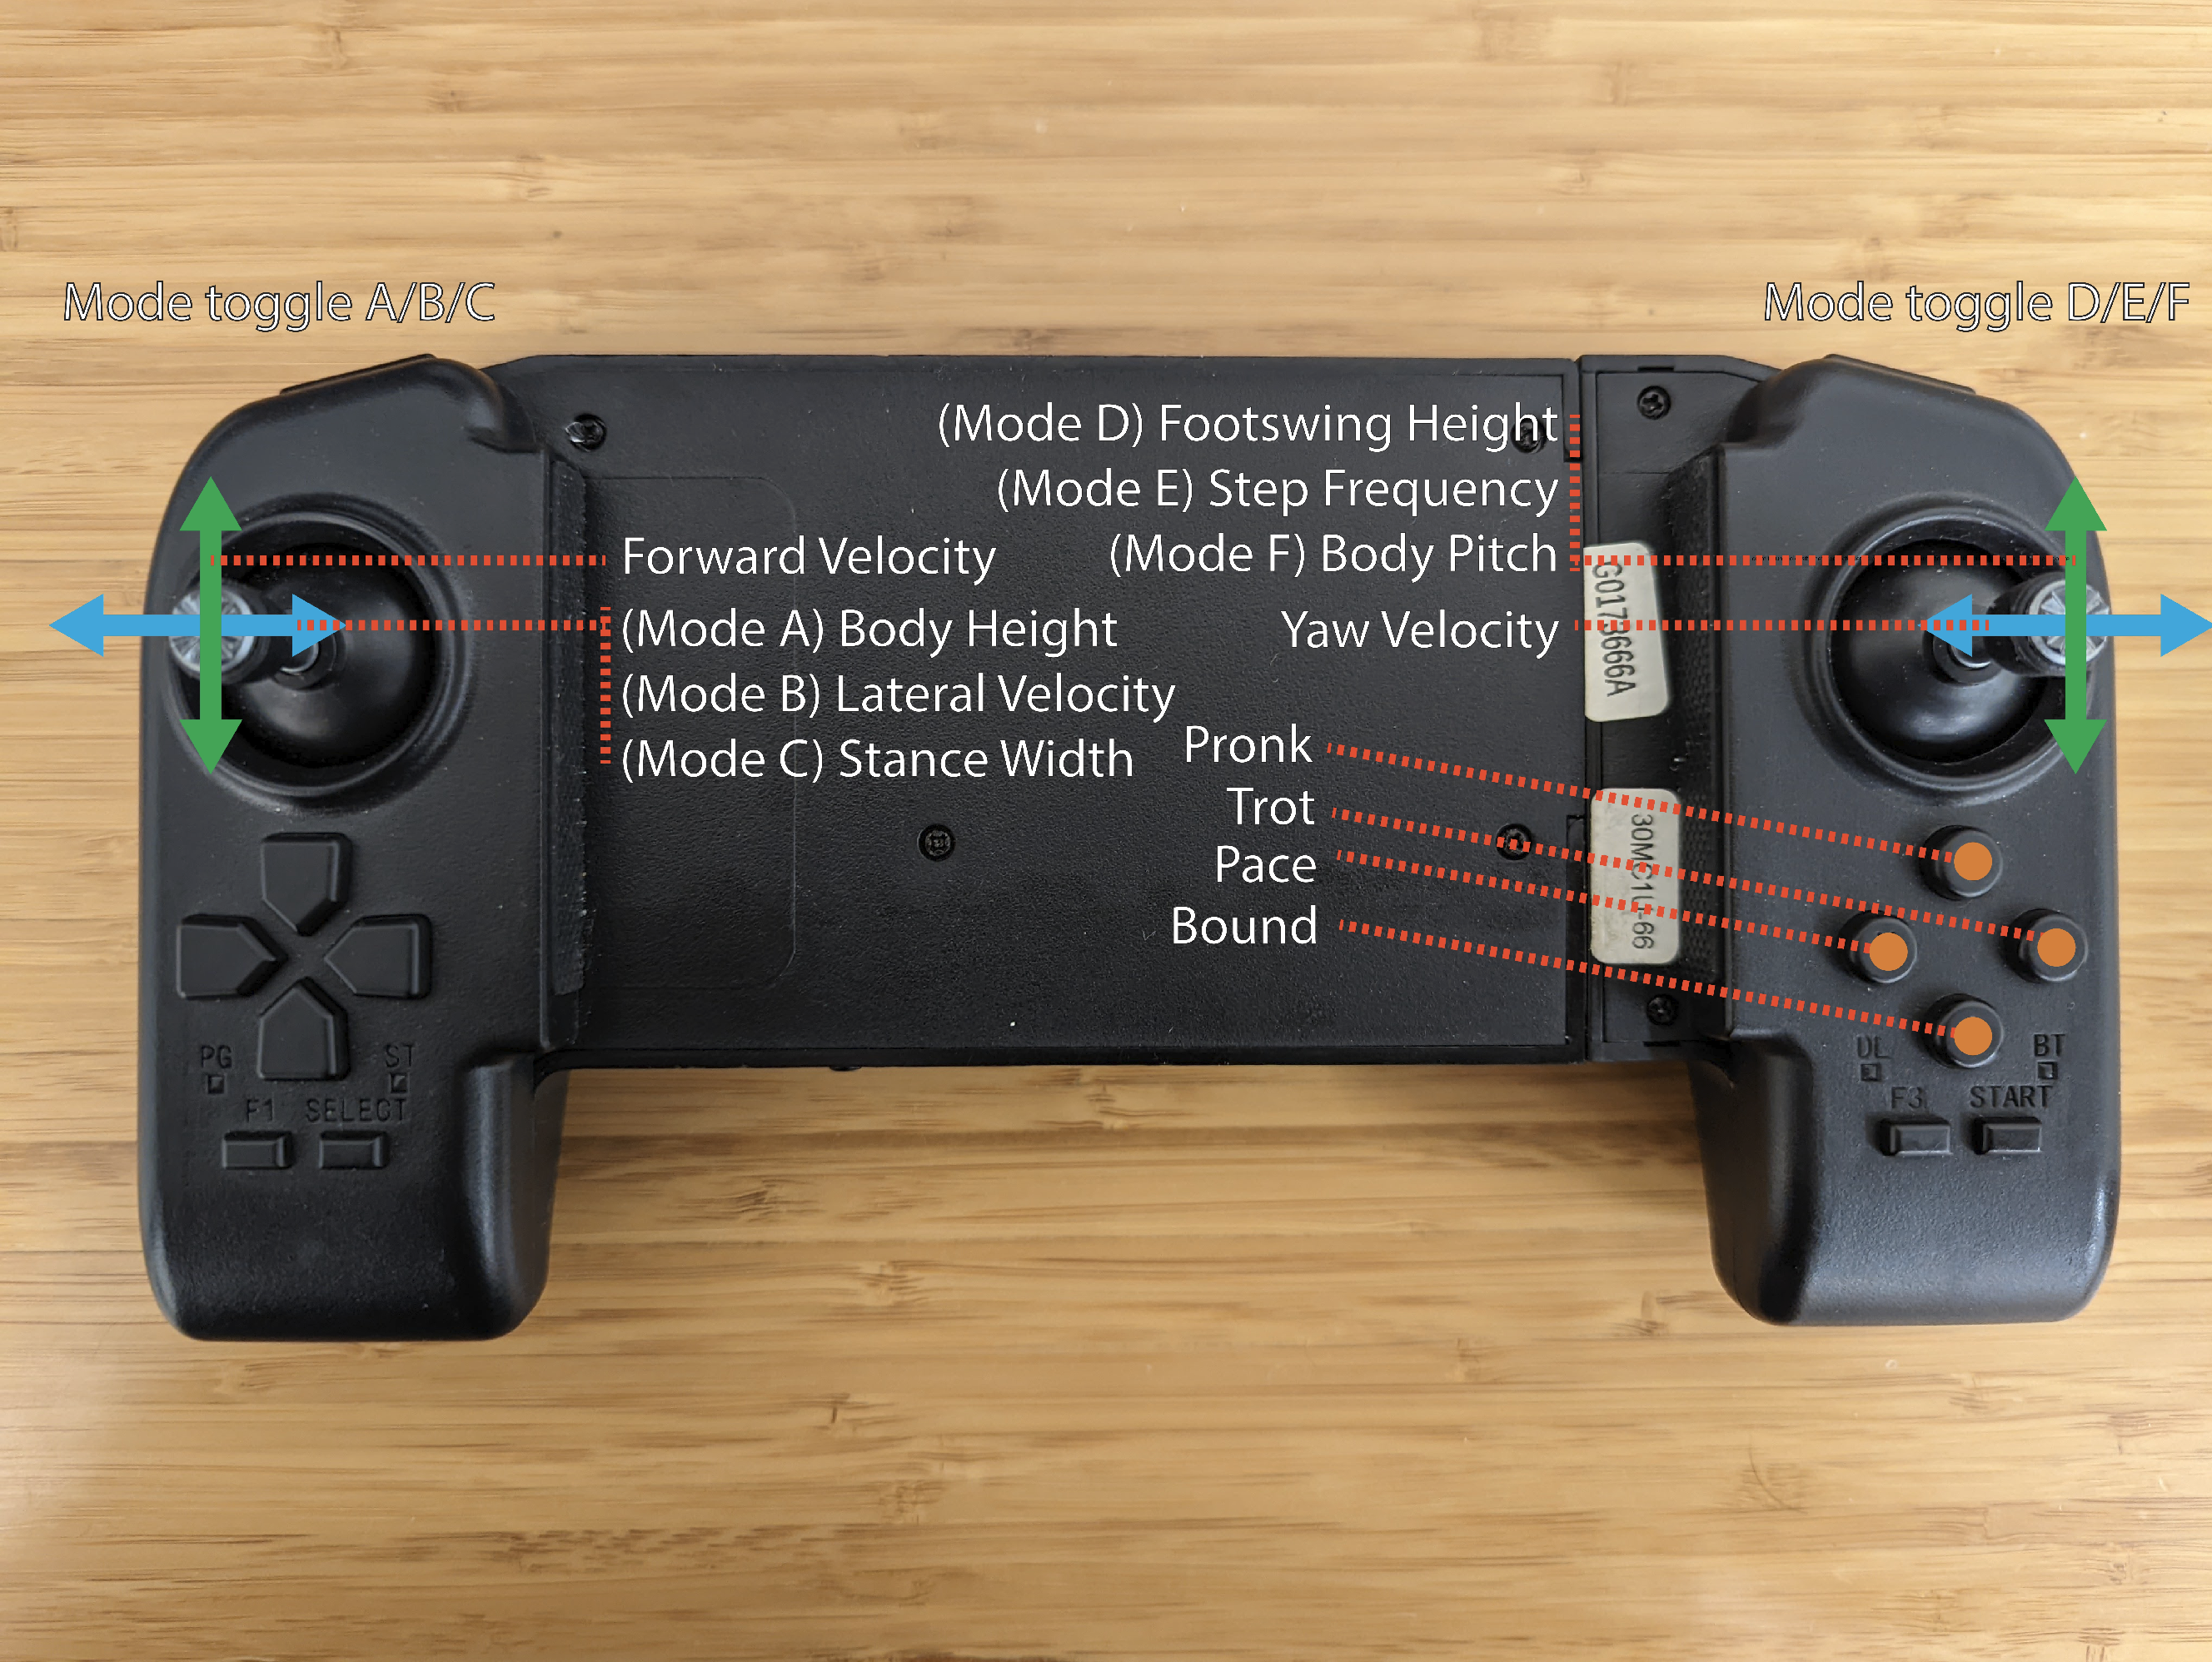 The RC mapping is depicted above.
Change the policy label according to your policy directory.
This repository provides an implementation of the paper:
Walk these Ways: Tuning Robot Control for Generalization with Multiplicity of BehaviorGabriel B. Margolis and Pulkit Agrawal
Conference on Robot Learning, 2022
paper / bibtex / project page
This environment builds on the legged gym environment by Nikita Rudin, Robotic Systems Lab, ETH Zurich (Paper: https://arxiv.org/abs/2109.11978) and the Isaac Gym simulator from NVIDIA (Paper: https://arxiv.org/abs/2108.10470). Training code builds on the rsl_rl repository, also by Nikita Rudin, Robotic Systems Lab, ETH Zurich. All redistributed code retains its original license.
Our initial release provides the following features:
- Train reinforcement learning policies for the Go1 robot using PPO, IsaacGym, Domain Randomization, and Multiplicity of Behavior (MoB).
- Evaluate a pretrained MoB policy in simulation.
- Deploy learned policies on the Go1 using the
unitree_legged_sdk.
Simulated Training and Evaluation: Isaac Gym requires an NVIDIA GPU. To train in the default configuration, we recommend a GPU with at least 10GB of VRAM. The code can run on a smaller GPU if you decrease the number of parallel environments (Cfg.env.num_envs). However, training will be slower with fewer environments.
Hardware Deployment: We provide deployment code for the Unitree Go1 Edu robot. This relatively low-cost, commercially available quadruped can be purchased here: https://shop.unitree.com/. You will need the Edu version of the robot to run and customize your locomotion controller.
pip3 install torch==1.10.0+cu113 torchvision==0.11.1+cu113 torchaudio==0.10.0+cu113 -f https://download.pytorch.org/whl/cu113/torch_stable.html-
Download and install Isaac Gym Preview 4 from https://developer.nvidia.com/isaac-gym
-
unzip the file via:
tar -xf IsaacGym_Preview_4_Package.tar.gz
-
now install the python package
cd isaacgym/python && pip install -e .
-
Verify the installation by try running an example
python examples/1080_balls_of_solitude.py
-
For troubleshooting check docs
isaacgym/docs/index.html
In this repository, run pip install -e .
If everything is installed correctly, you should be able to run the test script with:
python scripts/test.pyThe script should print Simulating step {i}.
The GUI is off by default. To turn it on, set headless=False in test.py's main function call.
CODE STRUCTURE The main environment for simulating a legged robot is in legged_robot.py. The default configuration parameters including reward weightings are defined in legged_robot_config.py::Cfg.
There are three scripts in the scripts directory:
scripts
├── __init__.py
├── play.py
├── test.py
└── train.py
You can run the test.py script to verify your environment setup. If it runs then you have installed the gym
environments correctly. To train an agent, run train.py. To evaluate a pretrained agent, run play.py. We provie a
pretrained agent checkpoint in the ./runs/pretrain-v0 directory.
To train the Go1 controller from Walk these Ways, run:
python scripts/train.pyAfter initializing the simulator, the script will print out a list of metrics every ten training iterations.
Training with the default configuration requires about 12GB of GPU memory. If you have less memory available, you can
still train by reducing the number of parallel environments used in simulation (the default is Cfg.env.num_envs = 4000).
To visualize training progress, first start the ml_dash frontend app:
python -m ml_dash.appthen start the ml_dash backend server by running this command in the parent directory of the runs folder:
python -m ml_dash.server .Finally, use a web browser to go to the app IP (defaults to localhost:3001)
and create a new profile with the credentials:
Username: runs
API: [server IP] (defaults to localhost:8081)
Access Token: [blank]
Now, clicking on the profile should yield a
To evaluate the most recently trained model, run:
python scripts/play.pyThe robot is commanded to run forward at 3m/s for 5 seconds. After completing the simulation, the script plots the robot's velocity and joint angles.
The GUI is on by default.
If it does not appear, and you're working in docker, make sure you haven't forgotten to run bash docker/visualize_access.bash.
Users are advised to follow Unitree's recommendations for safety while using the Go1 in low-level control mode.
- This means hanging up the robot and keeping it away from people and obstacles.
- In practice, the main safety consideration we've found important has been not plug anything into the robot's back (ethernet cable, USB) during the initial calibration or when testing a new policy because it can hurt the robot in case of a fall.
- Our code implements the safety layer from Unitree's
unitree_legged_sdkwith PowerProtect level 9. This will cut off power to the motors if the joint torque is too high (could happen sometimes during fast running) - This is research code; use at your own risk; we do not take responsibility for any damage.
The first step is to connect your development machine to the robot using ethernet. You should ping the robot to verify the connection: ping 192.168.123.15 should return x packets transmitted, x received, 0% packet loss.
Once you have confirmed the robot is connected, run the following command on your computer to transfer files to the robot. The first time you run it, the script will download and transfer the zipped docker image for development on the robot (deployment_image.tar). This file is quite large (3.5GB), but it only needs to be downloaded and transferred once.
cd go1_gym_deploy/scripts && ./send_to_unitree.sh
Next, you will log onto the robot's onboard computer and install the docker environment. To enter the onboard computer, the command is:
ssh unitree@192.168.123.15
Now, run the following commands on the robot's onboard computer:
cd ~/go1_gym/go1_gym_deploy/installer
./install_deployment_code.sh
The installer will automatically unzip and install the docker image containing the deployment environment.
Place the robot into damping mode. The control sequence is: [L1+B], [L1+A], [L1+L2+START]. After this, the robot should sit on the ground and the joints should move freely.
Now, ssh to unitree@192.168.123.15 and run the following two commands to start the controller. This will operate the robot in low-level control mode. Make sure your Go1 is hung up.
First:
cd ~/go1_gym/go1_gym_deploy/autostart
./start_unitree_sdk.sh
Second:
cd ~/go1_gym/go1_gym_deploy/docker
sudo make autostart
The robot will wait for you to press [R2], then calibrate, then wait for a second press of [R2] before running the control loop.
The RC mapping is depicted above.
Coming soon
Coming soon
Coming soon