Architecture and deployment
We deployed the code of this benchmark on AWS in a setup that looks as follows:
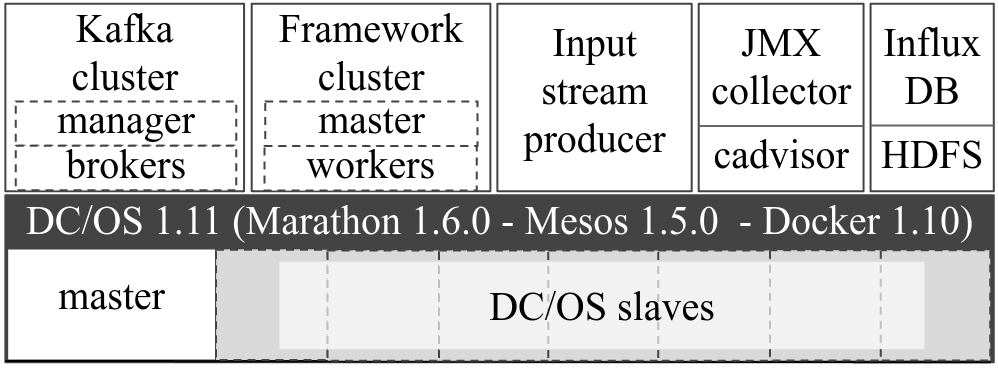
adapted from [1]
The containers can run on any environment which allows Docker containers to be deployed. We used DC/OS.
Local deployment can be used for development purposes but not for generating reliable results since there is limited parallelism and the resources will have limiting effects.
To run locally, we need the following components:
- Zookeeper
- Kafka
- Data stream generator
- Benchmark job
We run Zookeeper and Kafka in Docker containers. These can be started by using the kafka cluster tools:
cd kafka-cluster-tools
chmod +x setup-kafka.sh
./setup-kafka.sh
To read the output topic:
cd kafka-cluster-tools
chmod +x read-from-topic.sh
./read-from-topic.sh
By default this will log the messages on the metrics topic. To read from another topic, provide this as an argument:
./read-from-topic.sh topic-you-want-to-read
We run the benchmark job with SBT. The benchmark job itself requires some environment variables to be set:
MODE=constant-rate;
DEPLOYMENT_TYPE=local;
KAFKA_BOOTSTRAP_SERVERS=$(hostname -I | head -n1 | awk '{print $1\;}'):9092;
ZOOKEEPER_SERVER=$(hostname -I | head -n1 | awk '{print $1\;}'):2181
To run do:
sbt compile
sbt run
We run the data stream generator with SBT to be able to start and stop it more easily. It can be packaged in a Docker container as well, if this is preferred.
The following environment variables should be set:
S3_ACCESS_KEY=xxx # S3 access key of data input
S3_SECRET_KEY=xxx # S3 secret key of data input
KAFKA_BOOTSTRAP_SERVERS=$(hostname -I | head -n1 | awk '{print $1\;}'):9092  # list of Kafka brokers in the form of "host1:port1,host2:port2"
DATA_VOLUME=0 # inflation factor for the data
MODE=constant-rate # data characteristics of the input stream (explained further)
FLOWTOPIC=ndwflow # Kafka topic name for flow data
SPEEDTOPIC=ndwspeed # Kafka topic name for speed data
RUNS_LOCAL=true # whether we run locally or on a platform
To run do:
sbt compile
sbt run
Copied from deployment/README.md on 9/8/21 This article will run you through the steps to deploy a benchmark run.
BE AWARE THAT USING AN AWS CLUSTER IS COSTLY! MONITOR YOUR COST FREQUENTLY!
We use bash scripts for all automation. This may not be optimatl but it worked for us...
A few things need to be arranged in order to be able to deploy the infrastructure.
You will need an AWS account and have an installation of the AWS CLI.
First of all, you need to have access keys to store and retrieve data from S3. This will be used for all input and output data throughout the runs.
You will need to have S3 keys that can access the bucket where you want to store your data.
Afterwards, you need to fill in the files deployment/automation_scripts/AWS_ACCESS_KEY.template and deployment/automation_scripts/AWS_SECRET_KEY.template. After filling them in, you need to remove the .template extension and just keep them as two files named AWS_ACCESS_KEY and AWS_SECRET_KEY.
Also you need to create a bucket to put the benchmark jars which you will be running.
Once you have done this you need to put the name of the bucket in the file automation_scripts/benchmark-jars-bucket.template. Again remove the .template extension. In the file, you put just the short bucket name, no URL or anything like that.
Then put the URL to the bucket in the file named automation_scripts/benchmark-jars-path.template, e.g. https://s3.eu-central-1.amazonaws.com/bucketname. Again, remove the .template extension.
Put the path where the input data of the data stream generator is stored in automation_scripts/benchmark-input-data-path.template in the format s3a://bucket/rest/of/path. Remove the .template extension.
The data can also be found under data-stream-generator/src/main/resources/data. All the files in this folder need to be available at the path specified in automation_scripts/benchmark-input-data-path.template .
Put the path where you want to save the metrics that are saved by the output consumer in automation_scripts/benchmark-metrics-path.template in the format s3a://bucket/rest/of/path. Remove the .template extension.
Put the path where you want to save the results of the evaluation in automation_scripts/benchmark-results-path.template in the format s3a://bucket/rest/of/path. Remove the .template extension.
You will need SSH keys to access the underlying EC2 instances of the platform.
You can do this via the EC2 service page by clicking on "Key Pairs" in the menu -> create key pair.
It will automatically download and then you save the private key pem file it in your ~/.ssh folder.
We named it ~/.ssh/id_rsa_benchmark.
You will need to set your AWS profile to run some of the commands. We created a profile called benchmark. On Linux, you do this as follows:
-
create a file named
~/.aws/configand add:[profile benchmark] output = json region = eu-west-1 -
create a file named
~/.aws/credentialsand add:[benchmark] aws_secret_access_key = put-secret-access-key-here aws_access_key_id = put-access-key-id-here
To prevent having to use the --profile statement everywhere, set the profile as the environment variable.
export AWS_PROFILE=benchmark
To spin up the DC/OS cluster, we use AWS CloudFormation. In this tutorial we will deploy it via the AWS Console UI.
First of all, make sure you are in the region eu-west-1 (Ireland). Some of the provided scripts depend on this.
Our CloudFormation templates are based on templates provided by DC/OS for 1 master for EU central (Frankfurt).
We changed some things such as the instance types, volumes, instance counts, etc.
The reworked templates can be found in the deployment/automation_scripts folder. There are two templates there:
- new_cloudformation_template.json: uses normal m5n.4xlarge instances.
- new_cloudformation_template_SPOT.json: uses spot m5n.4xlarge instances to reduce cost.
In the template, you can change the number of instances by changing the count in this snippet in the template (almost at the top of the template):
"SlaveInstanceCount": {
    "Description": "Required: # of private agents",
    "Type": "Number",
    "Default": "6"
},
In the new_cloudformation_template_SPOT.json template, you can change the spot price by searching the term SpotPrice in the template and adapting the price. The SpotPrice is set in two locations in the file.
If you replace other things such as the instance type, always do a find replace with the instance name on this project. Some specifics of instances are used throughout the code, e.g. we use the instance type to request CloudWatch metrics on the instances.
Then go to CloudFormation in the AWS console and follow these steps:
- Click on launch stack .
- Choose "Upload a template file", select the CloudFormation template and click next.
- Enter a name for the benchmark stack. We call it
streaming-benchmark. Many scripts use this name so it is best to keep this. - As KeyName, select the benchmark key pair that was made earlier and click next.
- We left the other settings to the defaults. Then click next and launch
It will take around 10-15 minutes for the stack to fully launch.
You can find the the link to the DC/OS UI by clicking in CloudFormation on the streaming-benchmark stack. Then in the 'Outputs' tab, you click on the DnsAddress.
In this section, we explain how to setup the other benchmark services.
All images required to run OSPBench have been published on DockerHub and can be found here.
You can find the following images for the benchmark services:
- gisellevd/ospbench-kafka-broker: for the Kafka brokers
- gisellevd/ospbench-cadvisor: for the cAdvisor instances
- gisellevd/ospbench-metrics-exporter: for the metrics exporter
- gisellevd/ospbench-data-stream-generator: for the data stream generator
For the Spark cluster:
For the Flink cluster:
For Kafka Streams jobs:
- gisellevd/ospbench-kafka-benchmark: for the Kafka Streams job images
The images are publicly available. We recommend pulling them once and storing them in your own repository manager, e.g. ECR. You will then need to change the docker image references in the Marathon files in automation_scripts/aws_marathon_files.
When developing services on DC/OS, you may find it helpful to access your cluster from your local machine via VPN. For instance, you can work from your own development environment and immediately test against your DC/OS cluster.
DC/OS documentation about setting up a tunnel with VPN: https://docs.mesosphere.com/1.8/administration/access-node/tunnel/
In short, you need OpenVPN, the DC/OS CLI, a running DC/OS cluster and your SSH access key.
sudo apt-get install openvpn unzip
You will also need jq.
To login to the cluster with the DCOS CLI, do the following.
-
Install the DC/OS CLI: following these instructions
[ -d usr/local/bin ] || sudo mkdir -p /usr/local/bin curl https://downloads.dcos.io/binaries/cli/linux/x86-64/dcos-1.11/dcos -o dcos sudo mv dcos /usr/local/bin chmod +x /usr/local/bin/dcos dcos package install tunnel-cli --cli -
Run the script:
 cd automation_scripts
 ./connect.sh
Then you run the following script:
./initiate-dcos-tunnel.sh
This prompts an external terminal to continue the login process.
In this section, we explain how to deploy the services (e.g. Kafka, cAdvisor, etc.). All services are automatically spun up by:
cd automation_scripts
./bring-up-side-components.sh -p <NUM_PARTITIONS> -s <AMT_SLAVES> -k <KAFKA_BROKER_COUNT>
Parameters:
-p    NUM_PARTITIONS: describing the number of partitions for the topics on Kafka. This also influences the number of brokers. (REQUIRED)
-s    AMT_SLAVES: describing the number of slaves in the DC/OS cluster. Based on this it spins up enough ECR login and cAdvisor services. (REQUIRED)
-k    KAFKA_BROKER_COUNT: describing the number of Kafka brokers. (REQUIRED)
-h    Print this Help."
All scripts have a help section by running the script with the flag -h. This counts for most of the scripts in this folder!!!
When you run this script it will prompt a second terminal in which you need to log in to DC/OS. Here, it will setup the DC/OS tunnel. If you had already an open tunnel, than close that one first.
It will give you 2 minutes to login and then it will continue with the script.
When this script has finished running after approx. 15 minutes, you should have all components.
You can now login to the UIs via the following links. You will need to have an open DC/OS tunnel to see these UIs.
- Marathon UI: : <DCOS-DNS-ADDRESS>/marathon
- Zookeeper: <DCOS-DNS-ADDRESS>/exhibitor
- HDFS UI: <host-ip-name-node>:9002 for the UI and <host-ip-name-node>:9001 for the RPC endpoint.
- Kafka manager UI: <host-ip>:9000
- InfluxDB UI: <host-ip>:8083 for the UI. You can find the API endpoint under <host-ip>:8086
- cAdvisor UI: If you click in the DC/OS UI on nodes and then on one of the nodes that had cAdvisor on them, you can click further and see on which ip address and port they are running. If you go to this address you will find the cAdvisor of that node.
- Spark cluster
- Flink cluster
You are now all set up!
Now you can start running the benchmark itself.
All the scripts to do this can be found in the automation_scripts folder under the subdirectories of the frameworks.
In each of these directories, you find one script per workload. Run the script with the flag -h to get the help information.
It is possible that you first need to make the script executable before you can run it. You can do this with:
chmod +x name_of_script.sh
The scripts were used by me to automate deployment and are not very robust (I am not an automation engineer). If you have issues, feel free to contact me. You will need to run the scripts from their folder (cd all the way to the script and then run it). Running a script from another folder will probably not work. For example, to run a script of Flink:
cd benchmark/automation_scripts/flink
./run-any-flink-script-you-want.sh
All scripts for Flink can be found at:
cd benchmark/automation_scripts/flink
ls
In order to run the scripts you need to have the Flink jar on S3. First build the jar as follows with SBT:
cd benchmark
sbt
Within sbt, do:
project flink-benchmark
assembly
Now you have a jar in ./benchmark/flink-benchmark/target/scala-2.12/flink-benchmark-assembly-3.0.jar.
The JAR will need to be uploaded to the path specified in the file ./automation_scripts/benchmark-jars-path.
You can do this by uploading the JAR with the AWS CLI:
aws s3 cp ./benchmark/flink-benchmark/target/scala-2.12/flink-benchmark-assembly-3.0.jar s3://path-where-benchmark-jars-are-stored
When running one of the workload scripts, a Flink cluster will be started. If a Flink cluster is running, you can find the UI under :8089.
The code of the Flink cluster itself has been included in flink_cluster_1.11.1 and is based on what is provided by Ververica.
There is a different folder per size of the taskmanagers because many configs in the flink-conf.yaml changed. These images are also available on DockerHub as such.
More information on the different workloads can be found in the workload section of the wiki.
All scripts for Spark Streaming can be found at:
cd automation_scripts/spark
ls
Before you run a Spark Streaming job. The JAR will need to be uploaded to the path specified in the file ./automation_scripts/benchmark-jars-path.
First you will need to build the jar and remove some of the meta files:
cd benchmark
sbt
Within sbt, do:
project spark-benchmark
assembly
Now you have a jar in ./benchmark/spark-benchmark/target/scala-2.12/spark-benchmark-assembly-3.0.jar.
In order to run this jar we need to remove some metadata files and upload it to S3:
zip -d ./benchmark/spark-benchmark/target/scala-2.12/spark-benchmark-assembly-3.0.jar 'META-INF/*.SF' 'META-INF/*.RSA'
aws s3 cp  ./benchmark/spark-benchmark/target/scala-2.12/spark-benchmark-assembly-3.0.jar s3://path-where-benchmark-jars-are-stored --acl public-read
If a Spark cluster is running you can find the Spark master UI under :7777.
When a job is running you can find that under :4040.
The code of the Spark cluster itself has been included in spark_cluster_3.0.0 and is based on https://github.com/actionml/docker-spark.
More information on the different workloads can be found in the workload section of the wiki.
All scripts for Kafka Streams can be found at:
cd automation_scripts/kafka-streams
ls
Kafka Streams will run in a docker container that is avalable at gisellevd/ospbench-kafka-benchmark. To rebuild the container after changes do:
cd benchmark
sbt
Within sbt, do
docker:publishLocal
docker tag <local-image-name> <image-name-in-repository>
docker push <image-name-in-repository>
You can push the image to your own Docker registry.
More information on the different workloads can be found in the workload section of the wiki.
All scripts for Structured Streaming can be found at:
cd automation_scripts/structured-streaming
ls
First you will need to build the jar and remove some of the meta files:
cd benchmark
sbt
Within sbt, do:
project structured-streaming-benchmark
assembly
Now you have a jar in ./benchmark/spark-benchmark/target/scala-2.12/spark-benchmark-assembly-3.0.jar.
Before you run a Structured Streaming job. The JAR will need to be uploaded to the path specified in the file ./automation_scripts/benchmark-jars-path.
First you will need to remove some of the meta files:
zip -d ./benchmark/structured-streaming-benchmark/target/scala-2.12/structured-streaming-benchmark-assembly-3.0.jar 'META-INF/*.SF' 'META-INF/*.RSA'
aws s3 cp  ./benchmark/structured-streaming-benchmark/target/scala-2.12/structured-streaming-benchmark-assembly-3.0.jar s3://path-where-benchmark-jars-are-stored --acl public-read
If a Spark cluster is running you can find the Spark master UI under <host-ip-master>:7777.
When a job is running you can find that under <host-ip-spark-submit>:4040.
The code of the Spark cluster itself has been included in spark_cluster_3.0.0 and is based on https://github.com/actionml/docker-spark.
More information on the different workloads can be found in the workload section of the wiki.
The following environment variables should be set:
S3_ACCESS_KEY=xxx # S3 access key of data input
S3_SECRET_KEY=xxx # S3 secret key of data input
KAFKA_BOOTSTRAP_SERVERS=$(hostname -I | head -n1 | awk '{print $1\;}'):9092  # list of Kafka brokers in the form of "host1:port1,host2:port2"
DATA_VOLUME=0 # inflation factor for the data
MODE=constant-rate # data characteristics of the input stream (explained further)
FLOWTOPIC=ndwflow # Kafka topic name for flow data
SPEEDTOPIC=ndwspeed # Kafka topic name for speed data
RUNS_LOCAL=true # whether we run locally or on a platform
To run do:
sbt compile
sbt run
Copied from deployment/README.md on 9/8/21 This article will run you through the steps to deploy a benchmark run.
BE AWARE THAT USING AN AWS CLUSTER IS COSTLY! MONITOR YOUR COST FREQUENTLY!
We use bash scripts for all automation. This may not be optimatl but it worked for us...
A few things need to be arranged in order to be able to deploy the infrastructure.
You will need an AWS account and have an installation of the AWS CLI.
First of all, you need to have access keys to store and retrieve data from S3. This will be used for all input and output data throughout the runs.
You will need to have S3 keys that can access the bucket where you want to store your data.
Afterwards, you need to fill in the files deployment/automation_scripts/AWS_ACCESS_KEY.template and deployment/automation_scripts/AWS_SECRET_KEY.template. After filling them in, you need to remove the .template extension and just keep them as two files named AWS_ACCESS_KEY and AWS_SECRET_KEY.
Also you need to create a bucket to put the benchmark jars which you will be running.
Once you have done this you need to put the name of the bucket in a file named automation_scripts/benchmark-jars-bucket. Just the short bucket name, no URL or anything like that.
Then put the URL to the bucket in the file named automation_scripts/benchmark-jars-path, e.g. https://s3.eu-central-1.amazonaws.com/bucketname.
Put the path where the input data of the data stream generator is stored in automation_scripts/benchmark-input-data-path in the format s3a://bucket/rest/of/path.
The data can also be found under data-stream-generator/src/main/resources/data. All the files in this folder need to be available at the path specified in automation_scripts/benchmark-input-data-path.
Put the path where you want to save the metrics that are saved by the output consumer in automation_scripts/benchmark-metrics-path in the format s3a://bucket/rest/of/path.
Put the path where you want to save the results of the evaluation in automation_scripts/benchmark-results-path in the format s3a://bucket/rest/of/path.
You will need SSH keys to access the underlying EC2 instances of the platform.
You can do this via the EC2 service page by clicking on "Key Pairs" in the menu -> create key pair.
It will automatically download and then you save the private key pem file it in your ~/.ssh folder.
We named it ~/.ssh/id_rsa_benchmark.
You will need to set your AWS profile to run some of the commands. We created a profile called benchmark. On Linux, you do this as follows:
-
create a file named
~/.aws/configand add:[profile benchmark] output = json region = eu-west-1 -
create a file named
~/.aws/credentialsand add:[benchmark] aws_secret_access_key = put-secret-access-key-here aws_access_key_id = put-access-key-id-here
To prevent having to use the --profile statement everywhere, set the profile as the environment variable.
export AWS_PROFILE=benchmark
To spin up the DC/OS cluster, we use AWS CloudFormation. In this tutorial we will deploy it via the AWS Console UI.
First of all, make sure you are in the region eu-west-1 (Ireland). Some of the provided scripts depend on this.
Our CloudFormation templates are based on templates provided by DC/OS for 1 master for EU central (Frankfurt).
We changed some things such as the instance types, volumes, instance counts, etc.
The reworked templates can be found in the deployment/automation_scripts folder. There are two templates there:
-
new_cloudformation_template.json: uses normal m5n.4xlarge instances. -
new_cloudformation_template_SPOT.json: uses spot m5n.4xlarge instances to reduce cost.
In the template, you can change the number of instances by changing the count in this snippet in the template (almost at the top of the template):
"SlaveInstanceCount": {
    "Description": "Required: # of private agents",
    "Type": "Number",
    "Default": "6"
},
In the new_cloudformation_template_SPOT.json template, you can change the spot price by searching the term SpotPrice in the template and adapting the price. The SpotPrice is set in two locations in the file.
If you replace other things such as the instance type, always do a find replace with the instance name on this project. Some specifics of instances are used throughout the code, e.g. we use the instance type to request CloudWatch metrics on the instances.
Then go to CloudFormation in the AWS console and follow these steps:
- Click on launch stack .
- Choose "Upload a template file", select the CloudFormation template and click next.
- Enter a name for the benchmark stack. We call it
streaming-benchmark. Many scripts use this name so it is best to keep this. - As KeyName, select the benchmark key pair that was made earlier and click next.
- We left the other settings to the defaults. Then click next and launch
It will take around 10-15 minutes for the stack to fully launch.
You can find the the link to the DC/OS UI by clicking in CloudFormation on the streaming-benchmark stack. Then in the 'Outputs' tab, you click on the DnsAddress.
In this section, we explain how to setup the other benchmark services.
All images required to run OSPBench have been published on DockerHub and can be found here.
You can find the following images for the benchmark services:
- gisellevd/ospbench-kafka-broker: for the Kafka brokers
- gisellevd/ospbench-cadvisor: for the cAdvisor instances
- gisellevd/ospbench-metrics-exporter: for the metrics exporter
- gisellevd/ospbench-data-stream-generator: for the data stream generator
For the Spark cluster:
For the Flink cluster:
For Kafka Streams jobs:
- gisellevd/ospbench-kafka-benchmark: for the Kafka Streams job images
The images are publicly available. We recommend pulling them once and storing them in your own repository manager, e.g. ECR. You will then need to change the docker image references in the Marathon files in automation_scripts/aws_marathon_files.
When developing services on DC/OS, you may find it helpful to access your cluster from your local machine via VPN. For instance, you can work from your own development environment and immediately test against your DC/OS cluster.
DC/OS documentation about setting up a tunnel with VPN: https://docs.mesosphere.com/1.8/administration/access-node/tunnel/
In short, you need OpenVPN, the DC/OS CLI, a running DC/OS cluster and your SSH access key.
sudo apt-get install openvpn unzip
You will also need jq.
To login to the cluster with the DCOS CLI, do the following.
-
Install the DC/OS CLI: following these instructions
[ -d usr/local/bin ] || sudo mkdir -p /usr/local/bin curl https://downloads.dcos.io/binaries/cli/linux/x86-64/dcos-1.11/dcos -o dcos sudo mv dcos /usr/local/bin chmod +x /usr/local/bin/dcos dcos package install tunnel-cli --cli -
Run the script:
 cd automation_scripts
 ./connect.sh
Then you run the following script:
./initiate-dcos-tunnel.sh
This prompts an external terminal to continue the login process.
In this section, we explain how to deploy the services (e.g. Kafka, cAdvisor, etc.). All services are automatically spun up by:
cd automation_scripts
./bring-up-side-components.sh -p <NUM_PARTITIONS> -s <AMT_SLAVES> -k <KAFKA_BROKER_COUNT>
Parameters:
-p    NUM_PARTITIONS: describing the number of partitions for the topics on Kafka. This also influences the number of brokers. (REQUIRED)
-s    AMT_SLAVES: describing the number of slaves in the DC/OS cluster. Based on this it spins up enough ECR login and cAdvisor services. (REQUIRED)
-k    KAFKA_BROKER_COUNT: describing the number of Kafka brokers. (REQUIRED)
-h    Print this Help."
All scripts have a help section by running the script with the flag -h. This counts for most of the scripts in this folder!!!
When you run this script it will prompt a second terminal in which you need to log in to DC/OS. Here, it will setup the DC/OS tunnel. If you had already an open tunnel, than close that one first.
It will give you 2 minutes to login and then it will continue with the script.
When this script has finished running after approx. 15 minutes, you should have all components.
You can now login to the UIs via the following links. You will need to have an open DC/OS tunnel to see these UIs.
- Marathon UI: : <DCOS-DNS-ADDRESS>/marathon
- Zookeeper: <DCOS-DNS-ADDRESS>/exhibitor
- HDFS UI: <host-ip-name-node>:9002 for the UI and <host-ip-name-node>:9001 for the RPC endpoint.
- Kafka manager UI: <host-ip>:9000
- InfluxDB UI: <host-ip>:8083 for the UI. You can find the API endpoint under <host-ip>:8086
- cAdvisor UI: If you click in the DC/OS UI on nodes and then on one of the nodes that had cAdvisor on them, you can click further and see on which ip address and port they are running. If you go to this address you will find the cAdvisor of that node.
- Spark cluster
- Flink cluster
You are now all set up!
Now you can start running the benchmark itself.
All the scripts to do this can be found in the automation_scripts folder under the subdirectories of the frameworks.
In each of these directories, you find one script per workload. Run the script with the flag -h to get the help information.
It is possible that you first need to make the script executable before you can run it. You can do this with:
chmod +x name_of_script.sh
The scripts were used by me to automate deployment and are not very robust (I am not an automation engineer). If you have issues, feel free to contact me. You will need to run the scripts from their folder (cd all the way to the script and then run it). Running a script from another folder will probably not work. For example to run a script of Flink:
cd benchmark/automation_scripts/flink
./run-any-flink-script-you-want.sh
All scripts for Flink can be found at:
cd benchmark/automation_scripts/flink
ls
In order to run the scripts you need to have the Flink jar on S3. First build the jar as follows with SBT:
cd benchmark
sbt
Within sbt, do:
project flink-benchmark
assembly
Now you have a jar in ./benchmark/flink-benchmark/target/scala-2.12/flink-benchmark-assembly-3.0.jar.
The JAR will need to be uploaded to the path specified in the file ./automation_scripts/benchmark-jars-path.
You can do this by uploading the JAR with the AWS CLI:
aws s3 cp ./benchmark/flink-benchmark/target/scala-2.12/flink-benchmark-assembly-3.0.jar s3://path-where-benchmark-jars-are-stored
When running one of the workload scripts, a Flink cluster will be started. If a Flink cluster is running, you can find the UI under :8089.
The code of the Flink cluster itself has been included in flink_cluster_1.11.1 and is based on what is provided by Ververica.
There is a different folder per size of the taskmanagers because many configs in the flink-conf.yaml changed. These images are also available on DockerHub as such.
More information on the different workloads can be found in the workload section of the wiki.
All scripts for Spark Streaming can be found at:
cd automation_scripts/spark
ls
Before you run a Spark Streaming job. The JAR will need to be uploaded to the path specified in the file ./automation_scripts/benchmark-jars-path.
First you will need to build the jar and remove some of the meta files:
cd benchmark
sbt
Within sbt, do:
project spark-benchmark
assembly
Now you have a jar in ./benchmark/spark-benchmark/target/scala-2.12/spark-benchmark-assembly-3.0.jar.
In order to run this jar we need to remove some metadata files and upload it to S3:
zip -d ./benchmark/spark-benchmark/target/scala-2.12/spark-benchmark-assembly-3.0.jar 'META-INF/*.SF' 'META-INF/*.RSA'
aws s3 cp  ./benchmark/spark-benchmark/target/scala-2.12/spark-benchmark-assembly-3.0.jar s3://path-where-benchmark-jars-are-stored --acl public-read
If a Spark cluster is running you can find the Spark master UI under :7777.
When a job is running you can find that under :4040.
The code of the Spark cluster itself has been included in spark_cluster_3.0.0 and is based on https://github.com/actionml/docker-spark.
More information on the different workloads can be found in the workload section of the wiki.
All scripts for Kafka Streams can be found at:
cd automation_scripts/kafka-streams
ls
Kafka Streams will run in a docker container that is avalable at gisellevd/ospbench-kafka-benchmark. To rebuild the container after changes do:
cd benchmark
sbt
Within sbt, do
docker:publishLocal
docker tag <local-image-name> <image-name-in-repository>
docker push <image-name-in-repository>
You can push the image to your own Docker registry.
More information on the different workloads can be found in the workload section of the wiki.
All scripts for Structured Streaming can be found at:
cd automation_scripts/structured-streaming
ls
First you will need to build the jar and remove some of the meta files:
cd benchmark
sbt
Within sbt, do:
project structured-streaming-benchmark
assembly
Now you have a jar in ./benchmark/spark-benchmark/target/scala-2.12/spark-benchmark-assembly-3.0.jar.
Before you run a Structured Streaming job. The JAR will need to be uploaded to the path specified in the file ./automation_scripts/benchmark-jars-path.
First you will need to remove some of the meta files:
zip -d ./benchmark/structured-streaming-benchmark/target/scala-2.12/structured-streaming-benchmark-assembly-3.0.jar 'META-INF/*.SF' 'META-INF/*.RSA'
aws s3 cp  ./benchmark/structured-streaming-benchmark/target/scala-2.12/structured-streaming-benchmark-assembly-3.0.jar s3://path-where-benchmark-jars-are-stored --acl public-read
If a Spark cluster is running you can find the Spark master UI under <host-ip-master>:7777.
When a job is running you can find that under <host-ip-spark-submit>:4040.
The code of the Spark cluster itself has been included in spark_cluster_3.0.0 and is based on https://github.com/actionml/docker-spark.
More information on the different workloads can be found in the workload section of the wiki.
[1] van Dongen, G., & Van den Poel, D. (2020). Evaluation of Stream Processing Frameworks. IEEE Transactions on Parallel and Distributed Systems, 31(8), 1845-1858.