NSMG와 Hackfest를 위해서 만든 Repository 입니다.
- Visual Studio 2017
- Slack
- Git
- Github
- Event Husbs
- Stream Analysis Job
- Azure Functions
- Cosmos DB
- Azure Storage

최종 아키텍쳐가 나오기 까지 우여곡절이 많았다. 중간단계의 아키텍쳐는 아래 링크에 정리해 두었다.
https://github.com/KoreaEva/NSMG/blob/master/ArchtectureList.md
EventHub에 연결하기 위해서는 두 가지 방법 중 하나를 선택할 수 있다. 첫 번째 방법은 제공되는 패키지를 이용하는 방법이고 두 번째는 REST를 이용하는 연결 방법이다. 이번 Hackfest에서는 두 가지 방법을 모두 테스트 했다. 패키지를 이용하는 방법은 Nuget 을 사용하는 Console App으로 제작해서 테스트용 더미 클라이언트를 만드는데 사용했다.
EventHub Nuget Package https://www.nuget.org/packages/Microsoft.Azure.EventHubs/
EventHub REST https://docs.microsoft.com/en-us/rest/api/eventhub/
더미 클라이언트의 전체 소스는 아래 링크에서 볼 수 있다.
https://github.com/KoreaEva/NSMG/tree/master/Samples/EventHubDataSender
더미 클라이언트는 실제 업무에 사용되는 JSON 포멧을 발송하기 위해서 사용되었다.
REST를 사용하는 방법은 실제 Android 개발에 사용할 Library 제작에 사용 되었다.
Azure 기반의 Mobile App 을 만들면, 처음엔 Connection String 을 사용해서 프로토타이핑을 하면 쉽고 빠르지만, 상용 서비스를 위한 앱을 만들 때에는 보안을 위해서 SAS Token 을 사용해야 한다. (Cloud Service Resource 들에 대한 접근 권한 부여를 위한 다른 방법도 있다.) 이 과정에 있어, Mobile App 에서 REST API 로 Azure PaaS Service 에 접근하기 위한 SAS Token 을 서버 또는 브로커로 부터 생성해서 받아와야하는데, 이를 Azure Function 으로 구현하면 대단히 편하다. 실제로 Azure Function 에 Azure Storage 용 SAS Token 생성 템플릿이 있기도 하다. Visual Studio Community 를 사용해서 Function 의 코드를 편집할 경우 아래와 같이 하면 된다.
- 솔루션탐색기에서 local.settings.json 을 열어서 아래와 같은 형태로 세 줄을 추가한다. "eventHubResourceUri": "https://myeventhub.servicebus.windows.net/", "eventHubKeyName": "RootManageSharedAccessKey", "eventHubKey": "uqC11pox5syZy9QF7jFGwDfJO4abCaCxYyuX5Khrr0U="
- 위의 상수 값들은 로컬 테스트에서만 사용되며, Azure Function App 에 게시한 이후에는, Function App 의 Application Settings 에서 위와 동일한 이름으로 추가한 상수가 사용된다.
- eventHubResourceUri, eventHubKeyName, eventHubKey 의 값은 Azure Portal 에서 얻을 수 있다.
- Function 함수의 내용이 담겨 있는 .cs 파일의 내용은 아래와 같다.
using System;
using System.Globalization;
using System.Linq;
using System.Net;
using System.Net.Http;
using System.Security.Cryptography;
using System.Text;
using System.Threading.Tasks;
using System.Web;
using Microsoft.Azure.WebJobs;
using Microsoft.Azure.WebJobs.Extensions.Http;
using Microsoft.Azure.WebJobs.Host;
namespace SASTokenApp
{
    public static class SASTokenForEventHubs
    {
        [FunctionName("SASTokenForEventHubs")]
        public static async Task<HttpResponseMessage> Run([HttpTrigger(AuthorizationLevel.Function, "get", "post", Route = null)]HttpRequestMessage req, TraceWriter log)
        {
            log.Info("C# HTTP trigger function processed a request.");
            // 로컬 또는 Azure Function App 의 Application Settings 에서 가져오게될 환경변수 값.
            string resourceUri = System.Environment.GetEnvironmentVariable("eventHubResourceUri", EnvironmentVariableTarget.Process);
            string keyName = System.Environment.GetEnvironmentVariable("eventHubKeyName", EnvironmentVariableTarget.Process);
            string key = System.Environment.GetEnvironmentVariable("eventHubKey", EnvironmentVariableTarget.Process);

            // Token 의 유효기간을 설정하기 위한 코드.
            TimeSpan sinceEpoch = DateTime.UtcNow - new DateTime(1970, 1, 1);
            var week = 60 * 60 * 24 * 365;
            var expiry = Convert.ToString((int)sinceEpoch.TotalSeconds + week);

            // 인코딩을 거쳐서 SAS Token 생성.
            string stringToSign = HttpUtility.UrlEncode(resourceUri) + "\n" + expiry;
            HMACSHA256 hmac = new HMACSHA256(Encoding.UTF8.GetBytes(key));
            var signature = Convert.ToBase64String(hmac.ComputeHash(Encoding.UTF8.GetBytes(stringToSign)));
            var sasToken = String.Format(CultureInfo.InvariantCulture, "SharedAccessSignature sr={0}&sig={1}&se={2}&skn={3}", HttpUtility.UrlEncode(resourceUri), HttpUtility.UrlEncode(signature), expiry, keyName);
            return req.CreateResponse(HttpStatusCode.OK, sasToken);
        }
    }
}
Azure Function 은 마이크로 서비스의 대표적인 형태이며, 실행시간 100ms 기준으로 리퀘스트 1백만번에 200원 정도 밖에 안되니 걱정 없이 써도 좋다. Token 발급만을 위해서 VM 을 두는 것은 좀 낭비일 것이다.^^ 먼저, Function 을 통해서 토큰을 받으면 아래와 같은 형태일 것이다. "SharedAccessSignature sr=https%3a%2f%2fmshub.servicebus.windows.net%2f&sig=PFZVab43PMsO0q9gz4%2bFsuaQq%5ff05L4M7hKVBN8DEn0%3d&se=1553339810&skn=RootManageSharedAccessKey" 만약 Android App 에서 REST API 로 Function 을 호출해서 위의 Token 을 얻었다면 맨 앞의 " 문자와 맨 끝의 " 문자를 제거해주어야 한다. 제거 없이 바로 EventHub 에 데이터를 Post 하는 데 사용하시면 아래와 같은 오류가 발생할 것이다. MalformedToken: The credentials contained in the authorization header are not in the WRAP format. Android App 에서 Token 을 받아온 후, EventHub 로 데이터를 전송하는 코드는 아래와 같다. build.gradle 파일의 dependencies 에 아래를 추가해주면 okHttp 를 사용할 수 있다.
implementation 'com.squareup.okhttp3:okhttp:3.10.0'
Azure Function 및 EventHub 에 REST 로 접속하기 위한 HTTP Client 는 여러 사용자들의 이해를 돕기 위해 각각 다른 것을 사용해보았다. MainActivity.java
public class MainActivity extends AppCompatActivity {
    TextView textViewA;
    HttpURLConnection conn = null;
    final String TAG = "MainActivity";
    String authorizationString;
    @Override
    protected void onCreate(Bundle savedInstanceState) {
        super.onCreate(savedInstanceState);
        setContentView(R.layout.activity_main);
        textViewA = (TextView)findViewById(R.id.textView);
    }
    public void testFunctionWithPOST(View v) {
        Thread threadA = new Thread(new Runnable() {
            @Override
            public void run() {
                try {
                    String query = URLEncoder.encode("mU4kdaut8IfDR5UTRA2NMCjtpMxrhKNCIv6oLeMhhW384a021HYkOw==", "utf-8");
                    URL url = new URL("https://myfunc.azurewebsites.net/api/SASTokenForEventHubs?code="+query);
                    conn = (HttpURLConnection)url.openConnection();
                    if (conn != null) {
                        conn.setConnectTimeout(10000);
                        conn.setReadTimeout(10000);
                        conn.setRequestMethod("POST");
                        conn.setUseCaches(false);
                        conn.setDoInput(true);      // InputStream From Server
                        conn.setDoOutput(true);     // OutputStream with POST
                        // Request Header값 셋팅
                        conn.setRequestProperty("Content-Type", "application/json");    // 서버로 Request Body 전달시 json 일 때.
                        //conn.setRequestProperty("Accept", "application/json");          // 서버 Response Data를 json 으로 요청.
                        // 실제 서버로 Request 요청 하여 응답 수신.
                        final int responseCode = conn.getResponseCode();
                        if(responseCode == HttpURLConnection.HTTP_OK || responseCode == HttpURLConnection.HTTP_CREATED || responseCode == HttpURLConnection.HTTP_ACCEPTED) {
                            Log.d(TAG,"Connection OK");
                            BufferedReader br = new BufferedReader(new InputStreamReader(conn.getInputStream(), "UTF-8"));
                            StringBuilder sb = new StringBuilder();
                            String line = null;
                            while ((line = br.readLine()) != null) {
                                if(sb.length() > 0) {
                                    sb.append("\n");
                                }
                                sb.append(line);
                            }
                            final String resultA = sb.toString();
                            authorizationString = resultA.replaceAll("\"","");
                            Log.d("Res ", authorizationString);
                            runOnUiThread(new Runnable() {
                                @Override
                                public void run() {
                                    textViewA.setText(authorizationString);
                                }
                            });
                        } else {
                            Log.d(TAG,"Connection Error :" + responseCode);
                            runOnUiThread(new Runnable() {
                                @Override
                                public void run() {
                                    textViewA.setText("Connection Error :" + responseCode);
                                }
                            });
                        }
                    }
                } catch(Exception ex) {
                    Log.d(TAG, "Exception: "+ex);
                    ex.printStackTrace();
                }  finally {
                    if(conn != null) {
                        conn.disconnect();
                    }
                }
            }
        });
        threadA.start();
    }
    public void sendDataToEventHubs(View v) {
        final MediaType JSON = MediaType.parse("application/json; charset=utf-8");
        Thread threadA = new Thread(new Runnable() {
            @Override
            public void run() {
                try {
                    OkHttpClient.Builder builderA = new OkHttpClient.Builder().protocols(Arrays.asList(Protocol.HTTP_1_1));
                    OkHttpClient clientA = builderA.build();
                    HttpUrl.Builder urlBuilder = HttpUrl.parse("https://myeventhub.servicebus.windows.net/myhub/mes").newBuilder();
                    String urlA = urlBuilder.build().toString();
                    String jsonA = "{\"name\":\"mingyu\", \"age\":\"20\"}";
                    RequestBody body = RequestBody.create(JSON, jsonA);
                    Request request = new Request.Builder()
                            .header("Authorization", authorizationString)
                            .header("Content-Type", "application/json")
                            .header("ContentType","application/atom+xml;type=entry;charset=utf-8")
                            .url(urlA)
                            .post(body)
                            .build();
                    Response response = clientA.newCall(request).execute();
                    //Log.d("Code",""+response.code());
                    //Log.d("Body", response.body().string());
                    response.close();
                } catch (IOException e) {
                    e.printStackTrace();
                }
            }
        });
        threadA.start();
    }
}
activity_main.xml
<?xml version="1.0" encoding="utf-8"?>
<RelativeLayout xmlns:android="http://schemas.android.com/apk/res/android"
    xmlns:app="http://schemas.android.com/apk/res-auto"
    xmlns:tools="http://schemas.android.com/tools"
    android:layout_width="match_parent"
    android:layout_height="match_parent"
    tools:context=".MainActivity">
    <Button
        android:text="Get SAS Token"
        android:layout_width="wrap_content"
        android:layout_height="wrap_content"
        android:layout_centerVertical="true"
        android:layout_centerHorizontal="true"
        android:onClick="testFunctionWithPOST"
        android:id="@+id/button" />
    <Button
        android:text="Send Data to Event Hubs"
        android:layout_width="wrap_content"
        android:layout_height="wrap_content"
        android:layout_below="@id/button"
        android:layout_centerHorizontal="true"
        android:onClick="sendDataToEventHubs"
        android:id="@+id/buttonB" />
    <TextView
        android:text="Function Test"
        android:layout_width="wrap_content"
        android:layout_height="wrap_content"
        android:layout_marginBottom="87dp"
        android:id="@+id/textView"
        android:textSize="30sp"
        android:layout_above="@+id/button"
        android:layout_centerHorizontal="true" />
</RelativeLayout>1초에 5000개 이상의 요청을 안정적으로 처리하기 하기 위해서 IoT Hub와 EventHub 그리고 10개의 Azure Storage Queue에 분산처리 하는 방법 등 다양한 방법이 고려되었다. 이 중에서도 초기에 EventHub는 모바일 디바이스쪽으로 Callback할 수 있는 방법이 제공되지 않아서 제외되었고 IoT Hub의 경우 비용에 대한 문제로 제외되었다. Queue를 사용하는 방식으로 거의 결졍되었다가 디바이스 방향으로의 Callback을 Google이 제공하는 push notification으로 처리하게 되면서 Event Hub를 사용하기로 결정되었다.
EventHub는 Standard 버전의 경우 1개의 인스턴스가 초당 1000개의 메시지를 처리 할 수 있다. 따라서 10개를 사용하면 무난하게 요구사항을 맞출 수 있을 것으로 기대 된다.
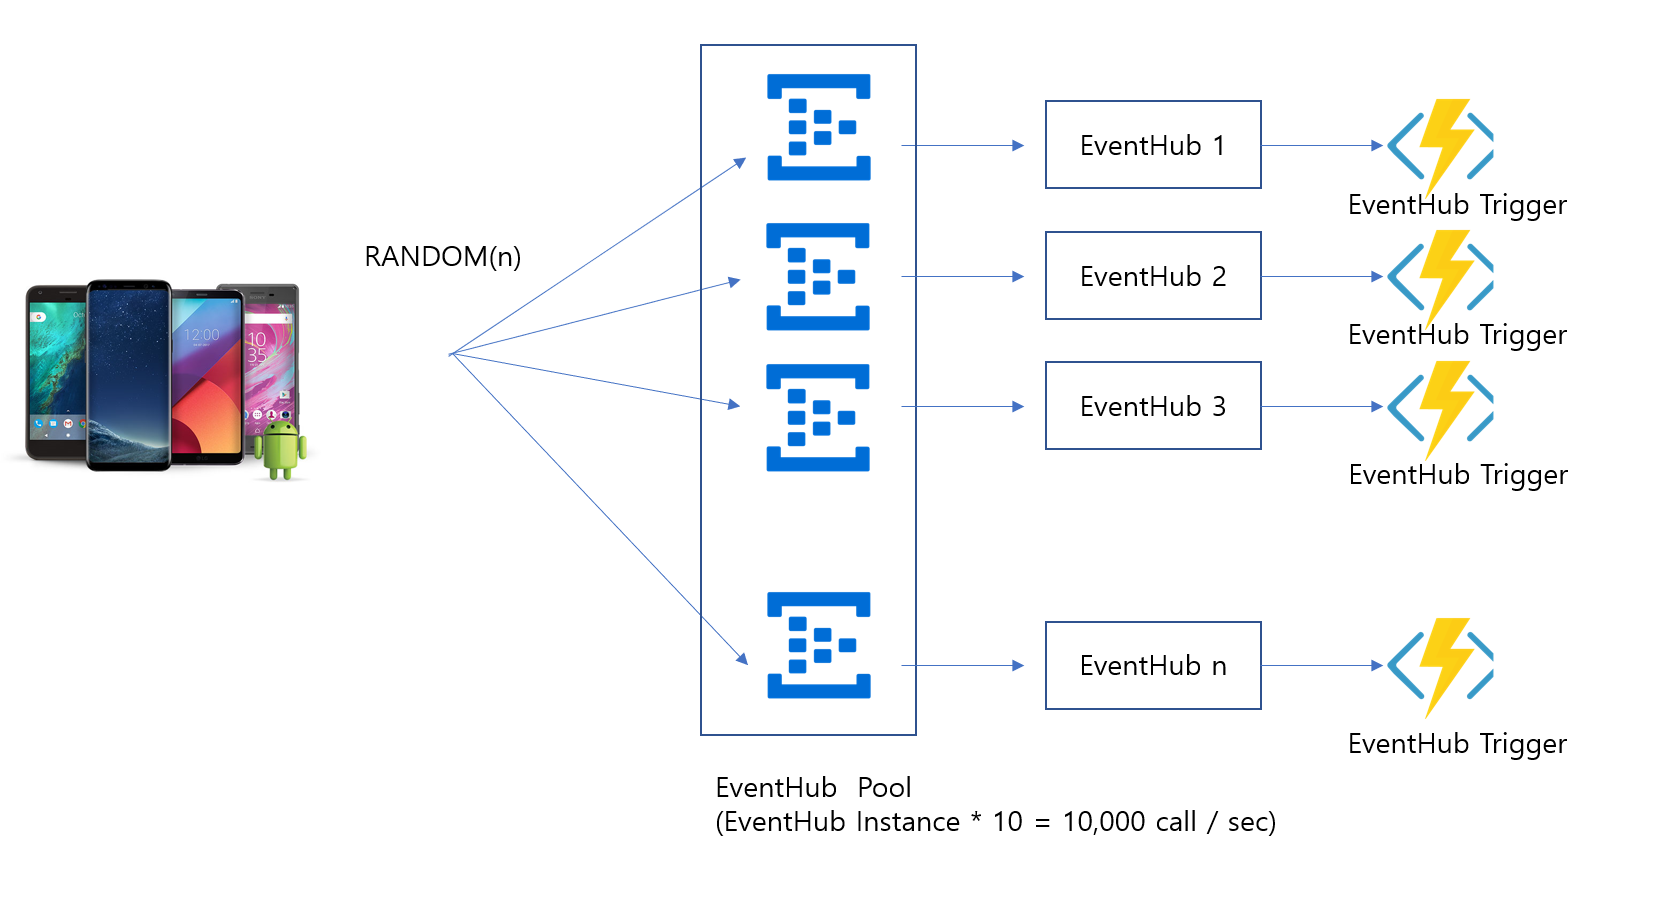
EventHub를 사용할 때 EventHub의 처리량은 충분한데 Partition에서 받아들이지 못할 수 있다. 하지만 공식웹페이지에서 제공되는 정보만으로는 1개의 Partition의 처리량을 확인 할 수 있기 때문에 일반적인 Blob Storage의 처리량을 기준으로 1개의 Partition 당 1초에 2000개 정도의 요구 사항을 처리한다고 가정해서 Partition은 4개로 설정했다.
2000 * 4개 = 8000 정도의 성능이 나올 것으로 기대 된다.
EventHub 에서 제공하는 Capture기능을 사용하면 EventHub로 들어오는 데이터를 Blob storage에 백업할 수 있다.

하지만 실제로 테스트 해보니 한글이 깨지고 Line단위로 분할하는 등의 기능이 미해서 결국 중간에 Stream Analytics Job을 사용해서 저장하기로 했다.
또 필요에 따라서 추가적인 데이터의 흐름이 필요할 수도 있어서 Stream Analytics를 사용하게 되었다.
Stream analytics job에서 들어온 데이터를 저장하기 위해서 제공되는 Blob Storage이다. 별다른 기능은 없다. 여기서 수집된 원본데이터는 추후 데이터 분석을 위해서 활용된다.
Http trigger를 사용하는 Azure Functions의 경우 단순한 입력에 활용된다. Http Trigger를 통해서 입력받은 Json 내용을 그대로 Cosmos DB에 입력하는 코드로 필요하다면 여기에 기능을 추가할 수 있는 수준의 기본적인 코드를 완성 했다.
using System.Linq;
using System.Net;
using System.Net.Http;
using System.Threading.Tasks;
using Microsoft.Azure.WebJobs;
using Microsoft.Azure.WebJobs.Extensions.Http;
using Microsoft.Azure.WebJobs.Host;

using System;
using Microsoft.Azure.Documents;
using Microsoft.Azure.Documents.Client;
using Newtonsoft.Json;
using Newtonsoft;
using Newtonsoft.Json.Serialization;
using Newtonsoft.Json.Linq;

namespace NSMGFunc
{
    public static class FuncHttp
    {
        //CosmosDB와 관련된 환경 변수들을 가져오는 코드
        static private string CosmosWifiEndpointUrl = Environment.GetEnvironmentVariable("CosmosWifiEndpoint");
        static private string CosmosPrimaryKey = Environment.GetEnvironmentVariable("CosmosWifiPrimaryKey");
        private static DocumentClient client = new DocumentClient(new Uri(CosmosWifiEndpointUrl), CosmosPrimaryKey);

        private static string DatabaseName = Environment.GetEnvironmentVariable("CosmosWifiDatabase");
        private static string DataCollectionName = Environment.GetEnvironmentVariable("CosmosHttpCollection");

        [FunctionName("FuncHttp")]
        public static async Task<HttpResponseMessage> Run([HttpTrigger(AuthorizationLevel.Anonymous, "get", "post", Route = null)]HttpRequestMessage req, TraceWriter log)
        {
            log.Info("C# HTTP trigger function processed a request.");

            //Cosmos DB Database와 Collection이 없으면 생성하는 부분 추후 서비스가 안정되면 삭제될 코드
            await client.CreateDatabaseIfNotExistsAsync(new Database { Id = DatabaseName });
            await client.CreateDocumentCollectionIfNotExistsAsync(UriFactory.CreateDatabaseUri(DatabaseName), new DocumentCollection { Id = DataCollectionName });

            // parse query parameter
            string message = req.GetQueryNameValuePairs()
                .FirstOrDefault(q => string.Compare(q.Key, "message", true) == 0)
                .Value;

            if (message == null)
            {
                // Get request body
                dynamic data = await req.Content.ReadAsAsync<object>();
                message = data?.name;
            }

            if (message != null || message != "")
            {
                //전달받은 JSON을 기반으로 HttpModel 클래스를 만들고 고유 아이디를 첨부하는 부분
                JObject jobjct = JObject.Parse(message);
                Models.HttpModel httpModel = new Models.HttpModel();
                httpModel.id = generateID();
                httpModel.jobject = jobjct;

                //CosmosDB에 입력하는 코드
                await client.CreateDocumentAsync(UriFactory.CreateDocumentCollectionUri(DatabaseName, DataCollectionName), httpModel);
            }

            return message == null
                ? req.CreateResponse(HttpStatusCode.BadRequest, "Please pass a name on the query string or in the request body")
                : req.CreateResponse(HttpStatusCode.OK, "Hello " + message);
        }

        /// 문서의 고유한 ID를 생성하는 함수
        public static string generateID()
        {
            return string.Format("{0}_{1:N}", System.DateTime.Now.Ticks, Guid.NewGuid());
        }

    }
}
위의 코드에서 사용할 데이터 구조를 위해서 Entity Class를 추가했다.
using System;
using System.Collections.Generic;
using System.Linq;
using System.Text;
using System.Threading.Tasks;

using Newtonsoft.Json.Linq;

namespace NSMGFunc.Models
{
    public class HttpModel
    {
        public string id { get; set; }
        public JObject jobject { get; set; }
    }
}CosmosDB에서 새로운 Collection을 생성할 때 추가적인 지정을 하지 않으면 기본 용량은 10GB로 Fixed되고 기본 RU는 400이 지정된다. 따라서 RU는 추가적으로 확장이 가능하지만 용량은 고정되기 때문에 지속적으로 용량의 확정이 예상되는 경우에는 코드에서 생성하기 보다는 미리 포털에서 생성해 놓는 것이 좋다.

EventHub를 사용하게 되면서 Azure Functions도 역시 EventHub Trigger를 사용하게 되었다. EventHub에서 전달되는 내용을 그냥 저장만 할 경우에는 역시 중간에 Stream Analytics Job을 추가하는 것으로 간단히 해결할 수 있겠지만 이번에는 넘어오는 데이터들을 SQL Server에서 조회하고 조회된 결과를 반영해서 CosmosDB에 저장해야 하기 때문에 EventHub Trigger로 Azure Functions을 사용하게 되었다.
using Microsoft.Azure.WebJobs;
using Microsoft.Azure.WebJobs.Host;
using Microsoft.Azure.WebJobs.ServiceBus;

using System;
using System.Net;
using Microsoft.Azure.Documents;
using Microsoft.Azure.Documents.Client;
using Newtonsoft.Json;
using Newtonsoft;
using Newtonsoft.Json.Serialization;
using Newtonsoft.Json.Linq;

using System.Data;
using System.Data.SqlClient;

namespace NSMGFunc
{
    public static class FuncWifi
    {
        //CosmosDB와 관련된 환경 변수들을 가져오는 코드
        static private string CosmosWifiEndpointUrl = Environment.GetEnvironmentVariable("CosmosWifiEndpoint");
        static private string CosmosPrimaryKey = Environment.GetEnvironmentVariable("CosmosWifiPrimaryKey");
        private static DocumentClient client =   new DocumentClient(new Uri(CosmosWifiEndpointUrl), CosmosPrimaryKey);

        private static string DatabaseName = Environment.GetEnvironmentVariable("CosmosWifiDatabase");
        private static string DataCollectionName = Environment.GetEnvironmentVariable("CosmosWifiCollection");

        [FunctionName("FuncWifi")]
        public async static void Run([EventHubTrigger("wifi", Connection = "NSMGEventHub")]string myEventHubMessage, TraceWriter log)
        {
            //Cosmos DB Database와 Collection이 없으면 생성하는 부분 추후 서비스가 안정되면 삭제될 코드
            await client.CreateDatabaseIfNotExistsAsync(new Database { Id = DatabaseName });
            await client.CreateDocumentCollectionIfNotExistsAsync(UriFactory.CreateDatabaseUri(DatabaseName), new DocumentCollection { Id = DataCollectionName });
            JArray array = JArray.Parse(myEventHubMessage);

            for(int i=0;i<array.Count;i++)
            {
                string bssid = (string)array[i]["bssid"];
                string ssid = (string)array[i]["ssid"];

                System.Data.SqlClient.SqlParameter[] para = {
                    new System.Data.SqlClient.SqlParameter("bssid", SqlDbType.NVarChar, 17),
                    new System.Data.SqlClient.SqlParameter("ssid", SqlDbType.NVarChar, 50)
                };

                para[0].Value = bssid;
                para[1].Value = ssid;

                //SQL Database에서 데이터를 조회하고 조회된 내용을 반영하는 부분
                DataSet ds = Helpers.SQLHelper.RunSQL("SELECT * FROM dbo.bssids WHERE bssid =@bssid AND ssid=@ssid", para);
                if (ds.Tables[0].Rows.Count != 0)
                {
                    DataRow row = ds.Tables[0].Rows[0];
                    array[i]["keyword"] = row[14].ToString();
                    array[i]["address"] = row[11].ToString();
                }
            }

            //WIFI Models
            Models.WifiModel wifiModel = new Models.WifiModel();
            wifiModel.id = generateID();
            wifiModel.wifies = array;

            await client.CreateDocumentAsync(UriFactory.CreateDocumentCollectionUri(DatabaseName, DataCollectionName), wifiModel);

            //성능 개선을 위해서 log를 출력하는 코드는 주석 처리 되었다.
            //log.Info($"C# Event Hub trigger function processed a message: {myEventHubMessage}");
        }

        /// 문서의 고유ID를 생성하는 코드
        public static string generateID()
        {
            return string.Format("{0}_{1:N}", System.DateTime.Now.Ticks, Guid.NewGuid());
        }

    }
}
Wifi데이터를 Seiralize하기 위해서 Entity 클래스를 별도로 추가했다.
using System;
using System.Collections.Generic;
using System.Linq;
using System.Text;
using System.Threading.Tasks;

using Newtonsoft.Json.Linq;

namespace NSMGFunc.Models
{
    public class WifiModel
    {
        public string id { get; set; }
        public JArray wifies { get; set; }
    }
}여기서 사용되는 SQL Database는 주로 낮에는 읽기 전용으로 사용하게 될 예정이기 때문에 생각보다 부하가 많이 걸리지는 않을 것으로 예상된다. 입력 혹은 업데이트 작업은 새벽시간을 이용해서 배치 작업으로 수행하게 된다. SQL Database를 다루게 될때 단순 반복적인 코드를 작성하게 되는데 이를 피하기 위해서 Helper 클래스를 생성해서 활용 했다.
using System;
using System.Collections.Generic;
using System.Linq;
using System.Web;

using System.Data;
using System.Data.SqlClient;

namespace NSMGFunc.Helpers
{
    public static class SQLHelper
    {
        private static string SQLConnectString = Environment.GetEnvironmentVariable("SQLDatabaseEndpoint");

        public static DataSet RunSQL(string query)
        {
            DataSet ds = new DataSet();

            SqlConnection con = new SqlConnection(SQLConnectString);
            SqlCommand cmd = new SqlCommand(query, con);
            SqlDataAdapter adapter = new SqlDataAdapter(cmd);

            adapter.Fill(ds);

            return ds;
        }

        public static DataSet RunSQL(string query, SqlParameter[] para)
        {
            DataSet ds = new DataSet();

            SqlConnection con = new SqlConnection(SQLConnectString);
            SqlCommand cmd = new SqlCommand(query, con);
            SqlDataAdapter adapter = new SqlDataAdapter(cmd);

            //파라메터의 반영
            cmd.Parameters.Clear();
            foreach (SqlParameter p in para)
            {
                cmd.Parameters.Add(p);
            }

            adapter.Fill(ds);

            return ds;
        }

        public static void ExecuteNonQuery(string query)
        {
            DataSet ds = new DataSet();

            SqlConnection con = new SqlConnection(SQLConnectString);
            SqlCommand cmd = new SqlCommand(query, con);

            con.Open();
            cmd.ExecuteNonQuery();
            con.Close();
        }

        public static void ExecuteNonQuery(string query, SqlParameter[] para)
        {
            DataSet ds = new DataSet();

            SqlConnection con = new SqlConnection(SQLConnectString);
            SqlCommand cmd = new SqlCommand(query, con);

            //파라메터의 반영
            cmd.Parameters.Clear();
            foreach (SqlParameter p in para)
            {
                cmd.Parameters.Add(p);
            }

            con.Open();
            cmd.ExecuteNonQuery();
            con.Close();
        }

    }
}Cosmos DB에 저장하기 위해서는 Database를 먼저 생성하고 JSON Document를 저장할 수 있는 Collection을 생성해야 한다. 실제 저장은 Collection에 이루어지는데 Collection도 10Gbyte 한계가 있는 버전과 Unlimited 버전이 존재한다. Unlimited을 사용할 때에는 사실상 RU의 제약이 없이 사용할 수 있으며 또 RU의 제한을 넘어서 사용하는 것도 별도의 요청을 통해서 가능하게 되어 있다. 반대로 10Gbyte의 한계가 있는 버전의 경우에는 10,000 RU가 한계다. 그래서 NSMG의 요구사항을 수용하기 위해서는 Unlimited Collection을 사용하게 되었다.
using Microsoft.Azure.WebJobs;
using Microsoft.Azure.WebJobs.Host;
using Microsoft.Azure.WebJobs.ServiceBus;

using System;
using System.Net;
using Microsoft.Azure.Documents;
using Microsoft.Azure.Documents.Client;
using Newtonsoft.Json;
using Newtonsoft.Json.Linq;

namespace NSMGFunctions
{
    public static class EventHubWifi
    {
        private const string EndpointUrl = "<EndPoint URL>";
        private const string PrimaryKey = "<Primary Key>";
        private static DocumentClient client = null;
        private static string DatabaseName = "<Database Name>";
        private static string DataCollectionName = "<Collection Name>";

        [FunctionName("EventHubWifi")]
        public async static void Run([EventHubTrigger("wifi", Connection = "WIFI")]string myEventHubMessage, TraceWriter log)
        {
            try
            {
                client = new DocumentClient(new Uri(EndpointUrl), PrimaryKey);

                // Azure Function의 효율을 위해서 Database와 Collection을 체크하고 생성하는 코드는 모두 주석처리 했다.

                //await client.CreateDatabaseIfNotExistsAsync(new Database { Id = DatabaseName });
                //await client.CreateDocumentCollectionIfNotExistsAsync(
                //    UriFactory.CreateDatabaseUri(DatabaseName),
                //    new DocumentCollection { Id = DataCollectionName },
                //    new RequestOptions { OfferThroughput = 5000}
                //);

                string documentID = generateID();
                JObject json = JObject.Parse(myEventHubMessage);

                log.Info($"C# Event Hub trigger function processed a message: {myEventHubMessage}");
                await client.CreateDocumentAsync(UriFactory.CreateDocumentCollectionUri(DatabaseName, DataCollectionName), json);

            }
            catch(DocumentClientException de)
            {
                Exception baseException = de.GetBaseException();
                string errorMessage = string.Format("error occurred : {0}. Message: {1},", de.StatusCode, de.Message);
                log.Info(errorMessage);
            }
            catch(Exception e)
            {
                string errorMessage = string.Format("Message: {0},", e.Message);
                log.Info(errorMessage);
            }
            finally
            {

            }
        }

        /// 문서의 고유이름 생성하기 위한 메소드
        public static string generateID()
        {
            return string.Format("{0}_{1:N}", System.DateTime.Now.Ticks, Guid.NewGuid());
        }
    }
}
Cosmos DB에 필요한 RU를 계산해 볼 수 있는 사이트 https://www.documentdb.com/capacityplanner#<br
Cosmos DB개발 참조링크
https://docs.microsoft.com/ko-kr/azure/cosmos-db/sql-api-get-started
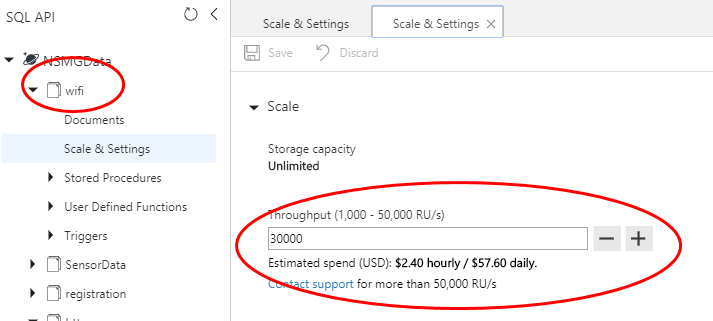
Wifi쪽은 트래픽이나 데이터의 양이 모두 많기 때문에 포털에서 직접 생성했다. RU는 30000으로 설정해 두었고 용량은 Unlimited로 설정했다. 하지만 최장 3개월 데이터만 저장될 예정이기 때문에 큰 문제는 없을 것으로 예상된다.