This is a project built off Authenticate Me that integrates the Google Maps API to render maps in React with an API key from Google Cloud Services.
This walkthrough will take you through:
- Getting an API key from Google Cloud Services to use Google Maps
- Building in your API into the backend of your application
- Bringing your API key into the frontend via an API route
- Utilizing your API with the
@react-google-maps/apipackage to render a map on the page
First, let's generate an API key.
To generate a working key, we need to do the following:
- Create a Google developers project.
- Enable Maps JavaScript API in that project.
- Go to credentials to generate an API key.
- Add the API key to our app.
- Add billing info to unlock the full set of Maps functionality.
To get started, first navigate to the Google Cloud console.
You will need a Google account to be able to log in to the Google Cloud console.
Once you are logged in, click on the Select a Project button in the nav bar.
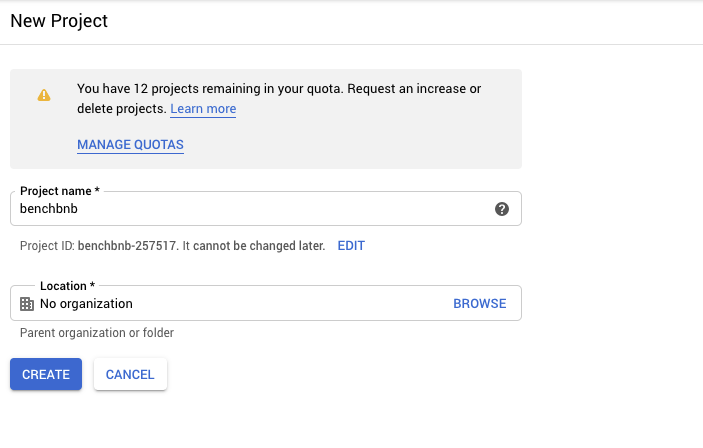
In the newly opened modal, select New Project.

Choose a name for your project. You can name it something like benchbnb. Leave
the Location set to No organization. Then, click Create.
Once you've created your project, make sure you have selected your newly created
project. Then, open the side menu, select APIs & Services > Library.
Search for and select Maps JavaScript API. Now, Enable this API for your
project. (Again, be sure you have selected your newly created project when
enabling this API.)
You can also take this opportunity to sign up for other Google Cloud Services to use in your app.

Open the side menu navigation again, and this time, select APIs & Services >
Credentials.
Then, click Create credentials and select the API key option.
Once you've generated a new API key, click Restrict key. This will take you to
a new page where you can now rename the API key to something more specific (ie.
'BenchBnB Maps Api Key'). You should also restrict your API key so that it can
only call on the Maps JavaScript API.
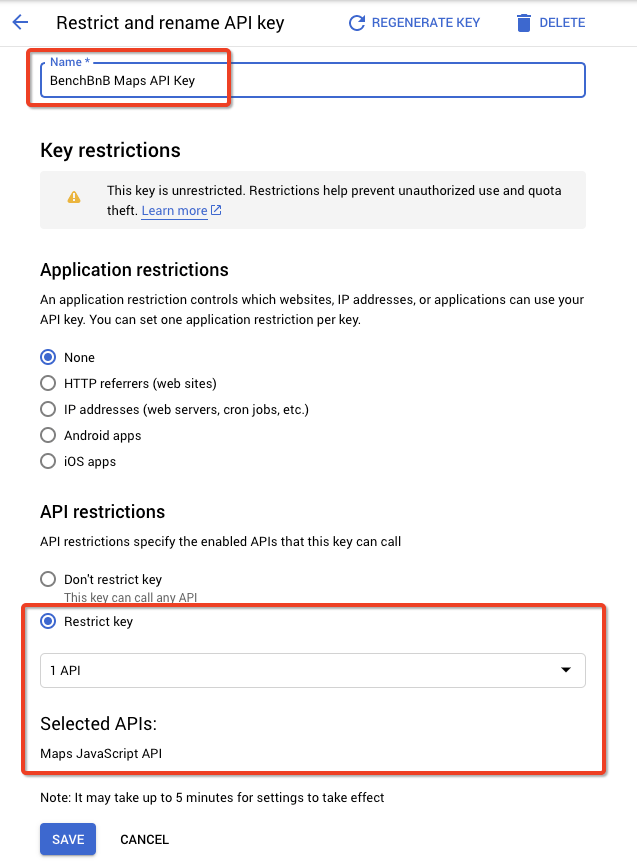
In general, we want to follow the Principle of Least Privilege when it comes to managing our API keys and what it has access to.
Quick Note: It's important to take this upcoming section very seriously! There have been multiple anecdotes from students who accidentally pushed API keys to a public GitHub repo. Those keys were then scraped by bad actors who racked up tens of thousands of dollars in charges using those keys.
With that in mind, let's add our API key to our project!
Any time we add an API key to our project, we want to take precautions to prevent bad actors from stealing and misusing our keys. In the case of our Maps API key, because billing is calculated per map load, bad actors might want to steal your key so that they can load up maps on their own projects.
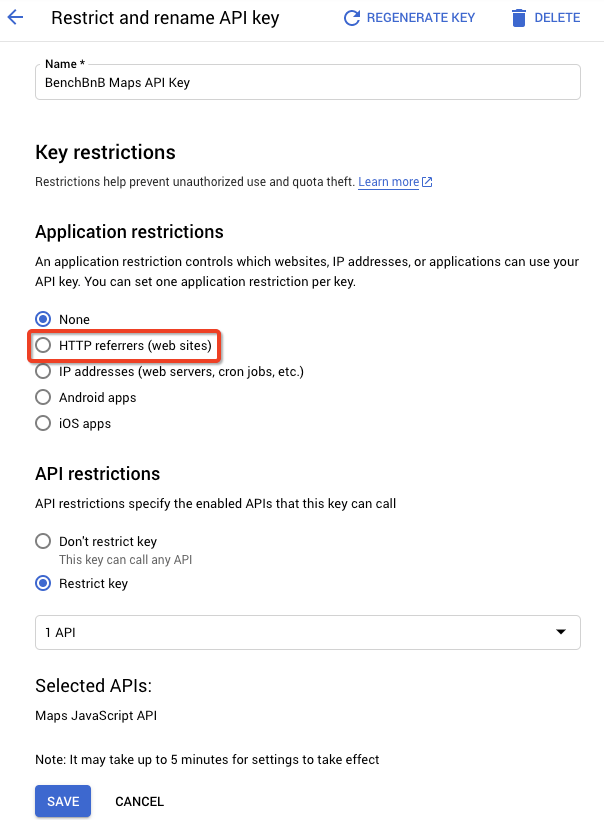
Because the Maps API key is loaded in the frontend in our HTML, there's actually not much we can do to prevent the key from being publicly accessible if our web app is deployed to production. Since you'll most likely be deploying your app (for example, using Heroku), then it's highly recommended that you protect your publicly accessible API key by restricting the websites that can use your key.
To prevent our API key from being pushed to GitHub while still being able to conveniently use the key locally, we have a couple of options.
The first option is to use React's built-in system to build in environment variables on build. This does expose the environment variable to bad actors, so it's best that you restrict where your API key can be used from once you push you app to production.
The next option, which we'll be using for this walkthrough is to make the API key an environment variable available in your backend, and to fetch a custom API route to get that key to the frontend. This way, you can use Google's system to restrict where your API key can be used from and have backend validations to make sure the people who are trying to fetch for your API key are actually using your application.
In the root of your backend, add your Google Maps API key to your .env file.
It should now look something like
PORT=5000
DB_USERNAME=«db_username»
DB_PASSWORD=«db_password»
DB_DATABASE=«db_database»
DB_HOST=localhost
JWT_SECRET=«secret»
JWT_EXPIRES_IN=604800
MAPS_API_KEY=«maps_api_key»
Next, let's configure our config/index.js file to match what we've been doing
with our environment variables throughout the Authenticate Me walkthrough. We'll
add a key of googleMapsAPIKey to the exported object with a value of the
environment variable we just added.
It should look something like this:
// backend/config/index.js
module.exports = {
  // All other keys from Authenticate Me set up
  googleMapsAPIKey: process.env.MAPS_API_KEY,
};
Now, we'll create a backend API route to send our API key to the frontend where it will actually be used. The whole point of putting our key in the backend just to send it through a route to the frontend is so that we can add middleware to prevent bad actors from using our key.
In your backend/routes/api folder, make a new file maps.js, and in your
backend/routes/api/index.js file, connect what will be the maps router to the
rest of your backend application.
// backend/routes/api/index.js
// Other imports
const mapsRouter = require('./maps');

router.use('/maps', mapsRouter);

// Other router.use statements and
// Export statement
In your backend/routes/api/maps.js file, instantiate a new router, export it
at the bottom of the file, and start the framework of a new route for POST /api/maps/key. We're using a POST route because this gives you the option to
send a public key to the backend to encrypt the API key so that it doesn't get
taken in transit from the backend to the frontend. For our example, we won't go
through all of that. We can also make use of the CSRF protection we have enabled
in our app, and even add some middleware to protect against bad actors. Also,
the actual endpoint doesn't have to be exactly like the one in this example,
this was just chosen to be specific about what the endpoint should return. Your
code should look something like:
// backend/routes/api/maps.js
const router = require('express').Router();
const { googleMapsAPIKey } = require('../../config');

router.post('/key', (req, res) => {
  res.json({ googleMapsAPIKey });
});

module.exports = router;In your frontend, install @react-google-maps/api. We'll be using this package
to utilize Google Maps in our app. In this example, we'll be using Redux to make
our API key available across our app.
Start by creating a new slice of state. In your frontend/src/store folder,
create a new file maps.js to store our maps slice of state. In that file, make
a new reducer with a default case and export it as the default export. In your
frontend/src/store/index.js file, import that new mapsReducer and insert it
into the rootReducer as a new slice of state. Upon refreshing your browser,
you should be able to see the maps slice of state in your Redux DevTools.
Going back to the frontend/src/store/maps.js file, create an action creator
and its corresponding type and case in the reducer. Then, create a thunk creator
that will access our POST /api/maps/key route to get the API key from the
backend.
Your code will end up looking something like this:
// frontend/src/store/maps.js
import { csrfFetch } from './csrf';

const LOAD_API_KEY = 'maps/LOAD_API_KEY';

const loadApiKey = (key) => ({
  type: LOAD_API_KEY,
  payload: key,
});

export const getKey = () => async (dispatch) => {
  const res = await csrfFetch('/api/maps/key', {
    method: 'POST',
  });
  const data = await res.json();
  dispatch(loadApiKey(data.googleMapsAPIKey));
};

const initialState = { key: null };

const mapsReducer = (state = initialState, action) => {
  switch (action.type) {
    case LOAD_API_KEY:
      return { key: action.payload };
    default:
      return state;
  }
};

export default mapsReducer;
Now, we can move our focus to creating a component that will house our maps.
For this walkthrough, we're going to create a Maps component. You'll find that
component in frontend/src/components/Maps/Maps.js. It'll end up looking
something like
// frontend/src/components/Maps/Maps.js
import React from 'react';
import { GoogleMap, useJsApiLoader } from '@react-google-maps/api';

const containerStyle = {
  width: '400px',
  height: '400px',
};

const center = {
  lat: 38.9072,
  lng: 77.0369,
};

const Maps = ({ apiKey }) => {
  const { isLoaded } = useJsApiLoader({
    id: 'google-map-script',
    googleMapsApiKey: apiKey,
  });

  return (
    <>
      {isLoaded && (
        <GoogleMap
          mapContainerStyle={containerStyle}
          center={center}
          zoom={10}
        />
      )}
    </>
  );
};

export default React.memo(Maps);
You'll notice that we didn't dispatch our thunk in this component, and that's to
avoid an extra render when we haven't received the API key from the backend yet.
We'll be dispatching our thunk in frontend/src/components/Maps/index.js.
// frontend/src/components/Maps/index.js
import { useEffect } from 'react';
import { useDispatch, useSelector } from 'react-redux';

import { getKey } from '../../store/maps';
import Maps from './Maps';

const MapContainer = () => {
  const key = useSelector((state) => state.maps.key);
  const dispatch = useDispatch();

  useEffect(() => {
    if (!key) {
      dispatch(getKey());
    }
  }, [dispatch, key]);

  if (!key) {
    return null;
  }

  return (
    <Maps apiKey={key} />
  );
};

export default MapContainer;Finally, in order for our Maps API to work without restrictions, we'll need to
add billing info to our Google account. To do this, open the side navigation
menu again and go to Billing to add your credit card info.
You can access Google's official docs of the Maps JavaScript API for more info.
You can also find out more about the React Google Maps API to find out more ways to use Google Maps in your React app.